はじめに
学習でのアプリ開発で、1 Storyboard — 1 ViewControllerで設計しているのですが、画面遷移についての方法をいつもネットで検索していると気づきましたので、備忘録として投稿します。
上記の方法で設計している理由としまして、1つのViewControllerにつき1つのStoryBoardを用意する作り方は共同開発におけるコンフリクトが少なくなるとのことです。
動作環境
【Xcode】Version 12.0.1
【Swift】Version 5.3
実装方法 ( navigationController を使う)
// 遷移先のView(NextViewController)を取得
let storyboard = UIStoryboard(name: "Next", bundle: nil)
let nextVC = storyboard.instantiateViewController(withIdentifier: "NextVC") as! NextViewController
// NextViewControllerへ画面遷移
self.navigationController?.pushViewController(nextVC, animated: true)
実装方法 ( navigationController を使わない)
// 遷移先のView(NextViewController)を取得
let storyboard = UIStoryboard(name: "Next", bundle: nil)
let nextVC = storyboard.instantiateViewController(withIdentifier: "NextVC") as! NextViewController
// NextViewControllerへ画面遷移
self.present(nextVC, animated: true, completion: nil)
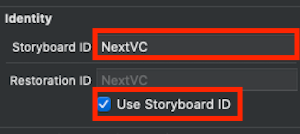
実装方法 ( storyboard の設定)
-
Storyboardの画面をインスタンス化するので、Storyboard IDをつけておく必要があります。Use Storyboard IDにチェックをつけるのを忘れないように注意してください。
まとめ
画面遷移の方法はまだまだありますので、随時更新できればなと思います。