はじめに
先日DevNetAssociateを取得しましたが、これまで実際にDevNetらしい活動はできていなかったので何か実用的な物を作ってみようということで、今回CML上に物理環境を自動で複製するというスクリプト作成にチャレンジしてみました。
このアイディアは以前Cisco社で行われた「Cisco DevNet アイデアソン&ハッカソン 2020 東京」での優勝チーム「THE KING OF SAND」のCisco DNA CenterのAPI利用してNW情報を収集し、「Cisco VIRL」にその物理環境の複製を自動展開という部分を参考に、DNACを使用しない簡易版で実装してみました。
環境
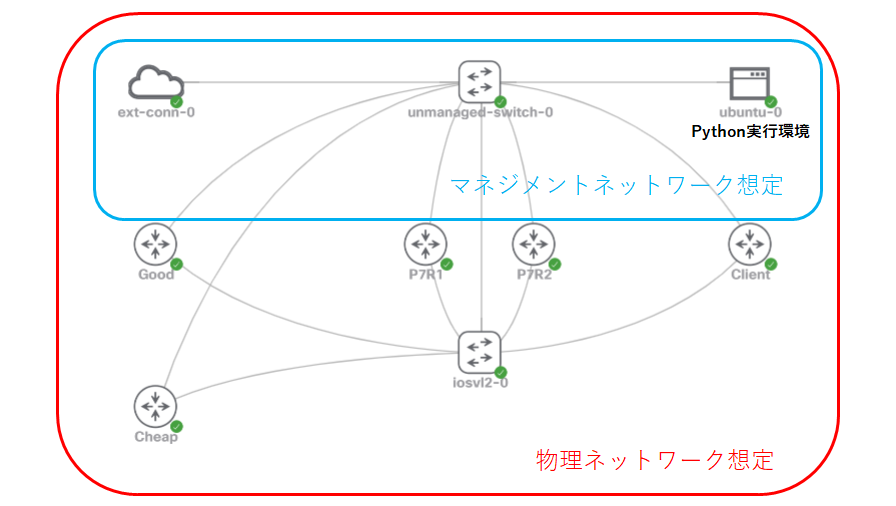
今回はCML上の環境を物理環境と想定して別のCMLラボ上に複製してみます。
CML1 Lab:BGP (複製元:物理環境想定)
今回はマネジメントネットワーク部分は複製しません。
CML2 (複製先)
CMLを2つ使用しているのはCML1のLab:BGP上のUbuntuからCML1に対してAPI接続ができなかったため。
環境準備
Ubuntu
今回Genieと、virl2_client使用するのでこの2つをインストールしている。
後はtestbedファイル、PythonスクリプトもこのUbuntuに格納している。
testbedファイル
このtestbedファイルで定義したノードが複製対象になる。
デバイスへの接続はSSHでも可。
必要な要素としては以下、device部分を複製対象の数に合わせて増やす。
testbed:
  name: XXX
devices:
  XXXX:
    os: ios
    type: router
    series: iosv
    connections:
      cli:
        protocol: telnet
        ip: xxx.xxx.xxx.xxx
        port: 23
    credentials:
      default:
        password: xxxx
        username: xxxx
      enable:
        password: xxxx
実際のtestbedファイルは以下
testbed:
  name: BGP
devices:
  P7R1:
    os: ios
    type: router
    series: iosv
    connections:
      cli:
        protocol: telnet
        ip: xxx.xxx.xxx.xxx
        port: 23
    credentials:
      default:
        password: xxxxx
        username: xxxxx
      enable:
        password: xxxxx
  P7R2:
    os: ios
    type: router
    series: iosv
    connections:
      cli:
        protocol: telnet
        ip: xxx.xxx.xxx.xxx
        port: 23
    credentials:
      default:
        password: xxxxx
        username: xxxxx
      enable:
        password: xxxxx
  Good:
    os: ios
    type: router
    series: iosv
    connections:
      cli:
        protocol: telnet
        ip: xxx.xxx.xxx.xxx
        port: 23
    credentials:
      default:
        password: xxxxx
        username: xxxxx
      enable:
        password: xxxxx
  Cheap:
    os: ios
    type: router
    series: iosv
    connections:
      cli:
        protocol: telnet
        ip: xxx.xxx.xxx.xxx
        port: 23
    credentials:
      default:
        password: xxxxx
        username: xxxxx
      enable:
        password: xxxxx
  Client:
    os: ios
    type: router
    series: iosv
    connections:
      cli:
        protocol: telnet
        ip: xxx.xxx.xxx.xxx
        port: 23
    credentials:
      default:
        password: xxxxx
        username: xxxxx
      enable:
        password: xxxxx
  iosvl2-0:
    os: ios
    type: switch
    series: iosvl2
    connections:
      cli:
        protocol: telnet
        ip: xxx.xxx.xxx.xxx
        port: 23
    credentials:
      default:
        password: xxxxx
        username: xxxxx
      enable:
        password: xxxxx
Pythonスクリプト解説
概要
Genieで対象となる物理装置に接続しCML上への複製を行うために必要なConfig、リンク情報(CDP)を取得、
virl2_clientで複製先にCMLに接続しGenieで取得した情報をもとにノードを作成、Config投入、リンク作成を行う。
フローチャート

Pythonスクリプト
# !/usr/bin/env python3
import yaml
from genie.conf import Genie
from virl2_client import ClientLibrary

# 装置情報取得のためtestbedファイルからHostnameを取得
with open('yaml/BGP-testbed.yaml', 'r') as yml:
    tb = yaml.load(yml, Loader=yaml.SafeLoader)

a = 0
l = 0
address = 'xxx.xxx.xxx.xxx'
username = 'xxxxx'
password = 'xxxxx'
# リンク情報格納用Dict
link = {}
# IF作成用Dict
IF_list = {}
# CMLのデバイス上でIF作成のためのスロット番号対応付け
iosv={
'GigabitEthernet0/0':'0',
'GigabitEthernet0/1':'1',
'GigabitEthernet0/2':'2',
'GigabitEthernet0/3':'3',
'GigabitEthernet0/4':'4',
'GigabitEthernet0/5':'5',
'GigabitEthernet0/6':'6',
'GigabitEthernet0/7':'7',
'GigabitEthernet0/8':'8',
'GigabitEthernet0/9':'9'
}
iosvl2={
'GigabitEthernet0/0':'0',
'GigabitEthernet0/1':'1',
'GigabitEthernet0/2':'2',
'GigabitEthernet0/3':'3',
'GigabitEthernet1/0':'4',
'GigabitEthernet1/1':'5',
'GigabitEthernet1/2':'6',
'GigabitEthernet1/3':'7',
'GigabitEthernet2/0':'8',
'GigabitEthernet2/1':'9',
'GigabitEthernet2/2':'10',
'GigabitEthernet2/3':'11'
}

# 作成済みリンクチェック
def get_link_by_interfaces_custom(iface1, iface2):
    """
    Returns the link identified by two interfaces.
    :param iface1: node id of first node
    :type iface1: str
    :param iface2: node id of second node
    :type iface2: str
    :returns: A Link object
    :rtype: models.Link
    :raises LinkNotFound: if link not found
    """
    lab.sync_topology_if_outdated()
    for link in lab.links():
        link_iface_pair = (link.interface_a, link.interface_b)

        if (iface1, iface2) == link_iface_pair:
            return link
        elif (iface2, iface1) == link_iface_pair:
            return link
    else:
        return 'LinkNotFound'

# testbedを指定
testbed = Genie.init(yml.name)
# CML接続情報
client = ClientLibrary(address, username, password, ssl_verify=False)
# CML LAB作成
lab = client.create_lab(testbed.name)

for i in testbed.devices:
    #デバイスに接続
    device = testbed.devices[i]
    print('#####{0}:接続中#####'.format(i))
    device.connect()
    #Hostnameごとにconfig取得
    print('#####{0}:config取得中#####'.format(i))
    config = device.execute('show running-config')
    #HostnameごとにCDP取得
    print('#####{0}:cdp取得中#####'.format(i))
    cdp = device.parse('show cdp neighbors')
    print('#####{0}:をCML上に作成中#####'.format(i))
    #CML デバイス作成
    k = lab.create_node(i, device.series, a, a)
    a = a + 100
    #CML Config投入
    k.config = config
    #CDPで取得したIFを作成する
    print('#####{0}:IF作成中#####'.format(i))
    for c in cdp['cdp']['index']:
        IF = k.create_interface(slot=int(eval(device.series)[cdp['cdp']['index'][c]['local_interface']]), wait=False)
        #取得したCDPの情報が不足していたら付け足す
        if 'GigabitEthernet' in cdp['cdp']['index'][c]['port_id']:
            v = cdp['cdp']['index'][c]['port_id']
        else:
            v = 'GigabitEthernet'+cdp['cdp']['index'][c]['port_id']
        #リンク情報格納用Dict作成
        link.update({l:{'src':{'devicename':i,'IF_name':cdp['cdp']['index'][c]['local_interface']},'dst':{'devicename':cdp['cdp']['index'][c]['device_id'].rstrip('.sollab.com'),'IF_name':v}}})
        #CDPの情報とCML上でのリンク作成に必要な情報のマッピング
        IF_list.update({l:{'src':{'devicename':i,'IF_name':cdp['cdp']['index'][c]['local_interface']},'IF':IF}})
        l = l + 1
    device.disconnect()
    print('#####{0}:から切断#####'.format(i))

# CMLノード間リンク作成
print('#####リンク作成中#####')
for pp in link:
    ss = ''
    dd = ''
    xx = link[pp]['src']['devicename']+link[pp]['src']['IF_name']
    yy = link[pp]['dst']['devicename']+link[pp]['dst']['IF_name']
    #print('xx:{0}'.format(xx))
    #print('yy:{0}'.format(yy))
    for b in IF_list:
        zz = IF_list[b]['src']['devicename']+IF_list[b]['src']['IF_name']
        #print('zz:{0}'.format(zz))
        if xx == zz:
            ss = IF_list[b]['IF']
        if yy == zz:
            dd = IF_list[b]['IF']
    link_check = get_link_by_interfaces_custom(ss, dd)
    if ss == '' or dd == '':
        print('#####一致IF無しリンク作成PASS#####')
        pass
    elif link_check != 'LinkNotFound':
        print('#####リンク作成済み#####')
        print(link_check)
        pass
    else:
        print('#####リンク作成#####')
        CL_result = lab.create_link(ss, dd)
        print(CL_result)
        print('{0} {1}\n{2} {3}\n\n'.format(ss.node, ss, dd.node, dd))
print('#####end#####')
ポイント、苦労した点
リンク作成について
物理環境から装置同士のリンク情報をどのように収集するか考えたときに利用できると考えたのがCDPだった。
そこまではよかったが、CDPの情報をGenieで分析してvirl2_clientでCML上にリンクを作成するための形式に置き換える案がなかなか思い浮かばなかった。
virl2_clientでノード間のリンクを作成する場合、create_link(i1, i2, wait=None)という関数を使用できるが、i1,i2の形式はvirl2_client独自の形式で中の情報も自ら作成するのは難しいのでCDPの情報のリスト化とCDPのIF情報とvirl2_clientのリンク作成で使用する値の対応付けを行うことで対処した。
CML上のノードに必要なIFを作成
IF = k.create_interface(slot=int(eval(device.series)[cdp['cdp']['index'][c]['local_interface']]), wait=False)
CML上のノードに必要なIFを作成する際、create_interface(node, slot=None, wait=None)という関数を使用した。
この関数のslotで指定した番号のIFが作成されるが、0,1,2,3といった数値で指定する必要がある。そのためlabmak.pyの26行以降の部分(iosv={…}、iosvl2={…}の部分)で事前にCDPで取得できるIFの形式との対応付けを行っている。
ネスト構造を持ったdictの作成
link.update({l:{'src':{'devicename':i,'IF_name':cdp['cdp']['index'][c]['local_interface']},'dst':{'devicename':cdp['cdp']['index'][c]['device_id'].rstrip('.sollab.com'),'IF_name':v}}})
単純にネスト構造を持ったdictを作成する方法自体は見つかったが、作成したdictを効率的に更新・追加する方法がわからず、決まった形のdictをどんどん追加する形で対処した。
作成済みリンクのチェック
def get_link_by_interfaces_custom(iface1, iface2):
create_link(i1, i2, wait=None)でリンク作成できることは先ほど記載したが、この関数は作成しようとしたリンクがすでに存在しているとエラーをはいてスクリプトが強制終了した。これに対処するために作成済みリンクの場合は、リンク作成処理をスキップするようにした。
get_link_by_interfaces(iface1, iface2):という関数が用意されていて、初めはこれを利用しようとしたが、この関数ではリンクがなかった場合の処理がraiseとなっていてスクリプトが終了する。そのため関数を変更しリンクが存在しない場合、'LinkNotFound'を返すようにしている。
課題と留意点
- CDPが有効になっている環境でしか使用できない。
- testbedファイルにノード識別値seriesをCML上の対応するノードに書き換える必要あり。例)series: iosvl2、series: iosvなど
- CML上に作成したデバイスは斜め1列に配置されるので手動で任意の形にする必要あり。
- IF作成のためのスロット番号対応付けは機種ごとに必要なIF分追加する必要あり。labmak.pyの26行以降の部分(iosv={…}、iosvl2={…}の部分)
- 現状GigabitEthernetのみ対応。
- CML上で実装されていない装置が存在する場合手動で差分を吸収する必要あり。例)IF名をCMLで使用できる形に直す1/0/1⇒0/1、CML上のノードに定義できない設定の削除
動かしてみた!

おわりに
こういうことが出来たら便利ではないか?といったアイディアを、試行錯誤して実装して想定通りに動くようになる、という体験は素晴らしいものだと思いました。
今回は何か実用的なものをと思って作成してみましたが、多くの課題があり、まだまだ改善余地がたくさんあります。
この部分の処理はこう書けばもっとスマートになる等もあると思うので引き続き勉強していきたいと思います。
Reference
https://developer.cisco.com/docs/genie-docs/
https://pubhub.devnetcloud.com/media/genie-docs/docs/index.html
https://github.com/CiscoDevNet/virl2-client/blob/master/virl2_client/models/lab.py#L581
https://qiita.com/tech_kitara/items/f5c4ae6cbab8e7240f40
https://qiita.com/snamon/items/6f5f67a0162d4dd6fb5e
https://sig9.hatenablog.com/entry/2020/05/20/000000
https://ccieojisan.net/post-1697