この記事は、AIスピーカーとFlashAirで鉄道模型を動かしてみたの参照記事です。
Azure Functionsとは
Azure Functionsについては、こちらのドキュメント「Azure Portal で初めての関数を作成する」をお読みください。
今回作りたいもの
今回はAzure IoT Hubで管理されたデバイスに、クラウド側からメッセージを送信することを目的としています。Logic AppsにAzure IoT Hubのコネクターがあれば良いのですが、現時点で存在しないため、Azure FunctionsでAzure IoT HubのAPIを呼び出すWebAPIを作成することにします。
こちらのドキュメント「デバイスに IoT Hub でクラウドからメッセージを送信する (.NET)」を参考にします。
Azure Functionsの関数の作成
関数の作成
さきのドキュメントにある「HTTP によってトリガーされる関数の作成」の通りに、HTTPトリガーの関数を作成します。
Azure IoT device SDKの追加
Azure IoT device SDKを利用するために、まずAzure Functionsで先に追加した関数の「ファイルの表示」から「project.json」というファイルを追加します。
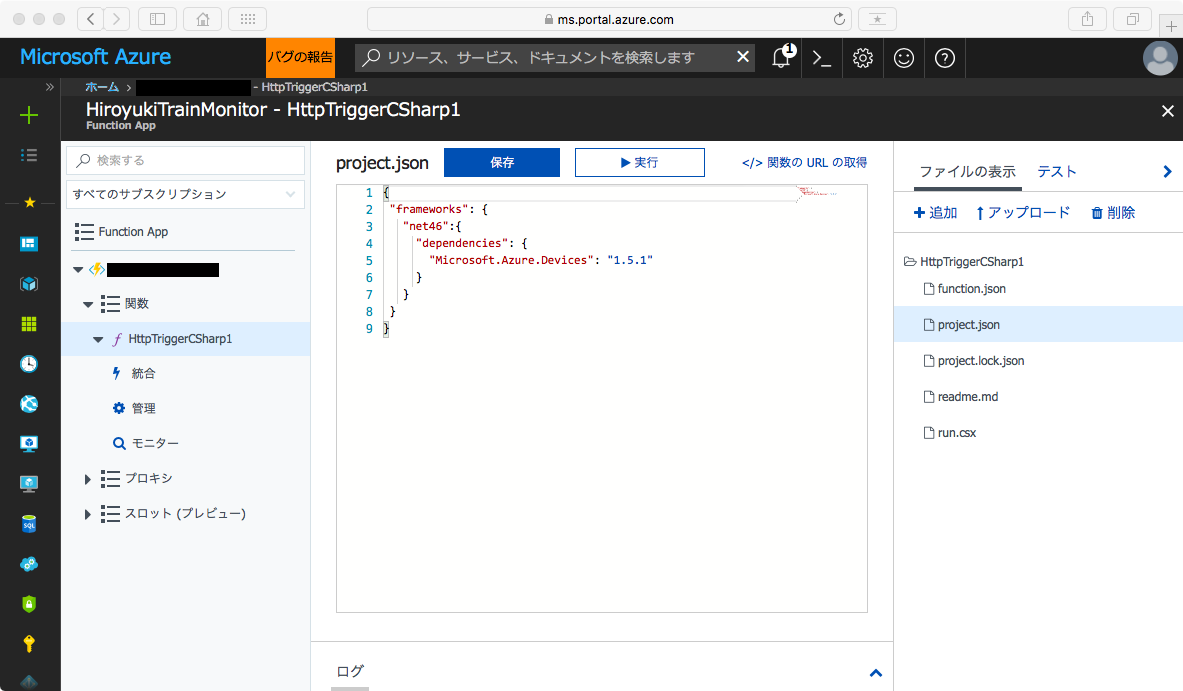
「project.json」には、以下のように記載します。
{
  "frameworks":{
    "net46":{
     "dependencies":{
      "Microsoft.Azure.Devices": "1.5.1"
    }
  }
}
関数の本体
関数本体はrun.csxになります。
さきに追加したAzure IoT device SDKを使うため「using Microsoft.Azure.Devices;」を追加しています。このとき「#r」による宣言は不要です。
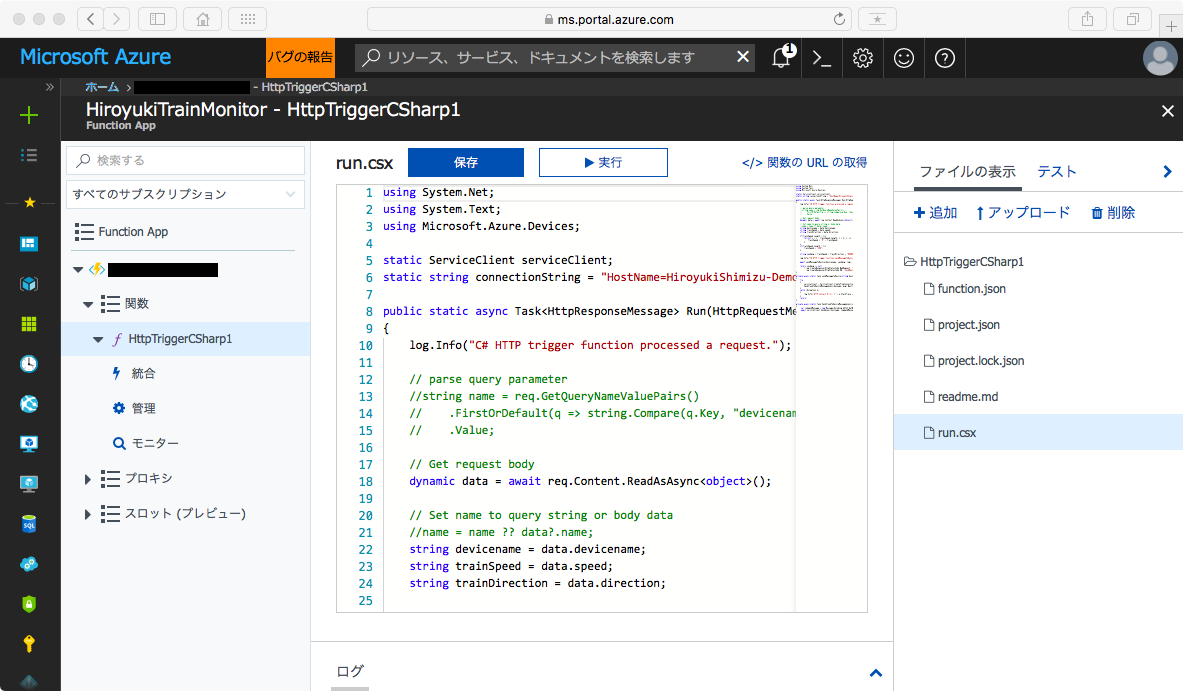
using System.Net;
using System.Text;
using Microsoft.Azure.Devices;
static ServiceClient serviceClient;
static string connectionString = "ここにAzure IoT hubの接続文字列を記載する";
public static async Task<HttpResponseMessage> Run(HttpRequestMessage req, TraceWriter log)
{
    log.Info("C# HTTP trigger function processed a request.");
    // Get request body
    dynamic data = await req.Content.ReadAsAsync<object>();
    string devicename = data.devicename;
    string trainSpeed = data.speed;
    string trainDirection = data.direction;

    if(trainSpeed.Length < 3){
        for(int i = 3 - trainSpeed.Length; i > 0; i--){
            trainSpeed = "0" + trainSpeed;
        }
    }
    if(trainSpeed.Length > 3){
        trainSpeed = "200";
    }

    string sendmsg = trainSpeed + trainDirection + "000000000";
    await sendMessageToDevice(devicename, sendmsg, log);
    return sendmsg == null
        ? req.CreateResponse(HttpStatusCode.BadRequest, "Please pass a name on the query string or in the request body")
        : req.CreateResponse(HttpStatusCode.OK, "SendMessage[" + sendmsg + "]");
}

private async static Task sendMessageToDevice(string devname, string msg, TraceWriter log)
{
    try
    {
        serviceClient = ServiceClient.CreateFromConnectionString(connectionString);
        SendCloudToDeviceMessageAsync(devname, msg).Wait();
    }
    catch (Exception e)
    {
        log.Info("HTTP Connect Error!![" + e.StackTrace + "]\n");
    }
    return;
}

private async static Task SendCloudToDeviceMessageAsync(string hostname, string msg)
{
     var commandMessage = new Message(Encoding.ASCII.GetBytes(msg));
     await serviceClient.SendAsync(hostname, commandMessage);
}
関数のURLの取得
Logic Appsから今回作成した関数を呼び出すには、関数run.csx編集画面の右上にある「関数のURLの取得」をクリックすると、以下の画面が開かれて、取得することができます。

動作確認
関数作成画面で、模擬的な入力値(JSONデータ)を指定して動作確認することができます。