この記事はFusic Advent Calenderの4日目の記事です。
昨日は@ryu022304さんのGo+serverlessでSQS→Lambda→SESの記事でした。
Serverless Framework便利ですよね。Goはまだあまりやったことないので、ちゃんと時間作ってやってみたいですね。
さて、この記事は、「PHP8+ Laravel8 + laravel-generatorで簡単CRUD作成からユニットテストまで書く」という記事です。
PHP8とLaravel8を触ってみたかったのと、Laravel-Generatorを案件で使ってみた知見の共有で、記事を書きます。
Laravel-Generatorはこちらですね。
InfyOmLabsというところが作っているみたいです。
一度案件で使ってみて、驚くほど一瞬でCRUD機能が作成できるので、早く動くものを作りたい時にはとても便利です。
最初の状態
Laravel8のプロジェクトをたてたところから始めます。ディレクトリ構成はこんな感じ。
├── README.md
├── app
├── artisan
├── bootstrap
├── composer.json
├── composer.lock
├── config
├── coverage
├── database
├── docker-compose.yml
├── package.json
├── phpunit.xml
├── public
├── resources
├── routes
├── server
├── server.php
├── storage
├── tests
├── vendor
└── webpack.mix.js
Laravel8の最初の画面、初めてみました。
ちょっと暗い感じになりましたね。
PHPはphp:8.0-rc-fpmのDockerイメージを使いました。
$ php -v
PHP 8.0.0RC5 (cli) (built: Nov 25 2020 01:10:25) ( NTS )
Copyright (c) The PHP Group
Zend Engine v4.0.0-dev, Copyright (c) Zend Technologies
Laravelのバージョンは
$ php artisan --version
Laravel Framework 8.17.0
8.17.0です。
Laravel-Generatorをインストールする
早速はじめていきます。
ドキュメント通りにインストール。
    "require": {
        "php": "^7.3|^8.0",
        "fideloper/proxy": "^4.4",
        "fruitcake/laravel-cors": "^2.0",
        "guzzlehttp/guzzle": "^7.0.1",
        "laravel/framework": "^8.12",
        "laravel/tinker": "^2.5",
        ↓以下の三つを追加↓
        "infyomlabs/laravel-generator": "8.0.x-dev",
        "laravelcollective/html": "^6.2",
        "infyomlabs/coreui-templates": "8.0.x-dev"
    },
今回はAdminLTEではなく、CoreUIを使ってみます。
$ composer update
インストールに失敗。
  Problem 1
    - Root composer.json requires infyomlabs/laravel-generator 8.0.x-dev -> satisfiable by infyomlabs/laravel-generator[8.0.x-dev].
    - infyomlabs/laravel-generator 8.0.x-dev requires php ^7.3 -> your php version (8.0.0RC5) does not satisfy that requirement.
  Problem 2
    - Root composer.json requires infyomlabs/coreui-templates 8.0.x-dev -> satisfiable by infyomlabs/coreui-templates[8.0.x-dev].
    - infyomlabs/coreui-templates 8.0.x-dev requires php ^7.3 -> your php version (8.0.0RC5) does not satisfy that requirement.
Laravel-GeneratorがまたPHP8に対応していないみたいですねー。
きっと動作すると信じて、強引に入れてみますw
$ composer update --ignore-platform-reqs
インストール完了しました。
Laravel-Generatorの初期設定
app.phpにaliasを追記
こちらもドキュメント通り、app.phpにaliasを追加します。
        'Str' => Illuminate\Support\Str::class,
        'URL' => Illuminate\Support\Facades\URL::class,
        'Validator' => Illuminate\Support\Facades\Validator::class,
        'View' => Illuminate\Support\Facades\View::class,
        // 追加
        'Form'      => Collective\Html\FormFacade::class,
        'Html'      => Collective\Html\HtmlFacade::class,
        'Flash'     => Laracasts\Flash\Flash::class,
vendor:publishコマンドを実行
$ php artisan vendor:publish --provider="InfyOm\Generator\InfyOmGeneratorServiceProvider"
config/infyom/laravel_generator.php に設定ファイルが生成されます。
デフォルト設定だと、テンプレートがAdminLTEになってしまっているので、CoreUIに修正します。
   /*
    |--------------------------------------------------------------------------
    | Templates
    |--------------------------------------------------------------------------
    |
    */

    'templates'         => 'coreui-templates',
Laravel-GeneratorのPublishコマンドを実行
$ php artisan infyom:publish
Laravel UIで認証を作成する
CRUD作成の前に、Laravel6から使われているLaravelUIを用いて、簡単に認証機能を作成します。
ドキュメント通りコマンド実行。
$ composer require laravel/ui:^3.0 --ignore-platform-reqs
$ php artisan ui bootstrap --auth
この状態で、npm install && npm run devを実行すれば、ログイン画面が確認できますが、
今回は、Laravel-Genaratorのコマンドで上書きしてしまいます。
$ php artisan infyom.publish:layout --localized
上書きしますか?というメッセージが表示されますが、全て「y」を押して大丈夫です。
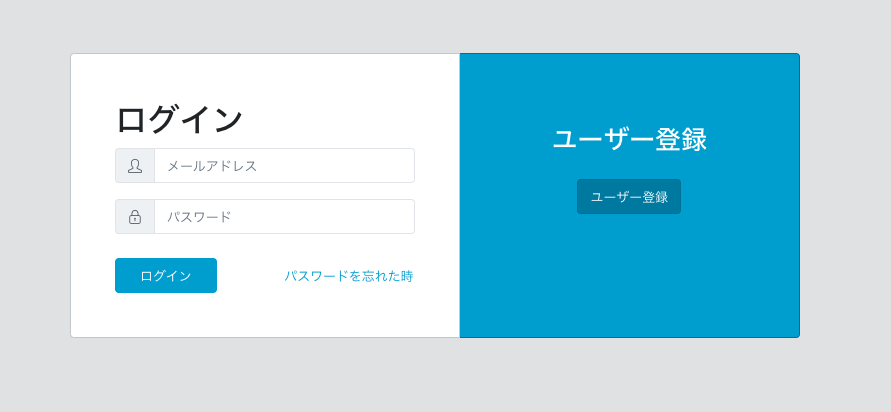
Login画面に行くと、CoreUIのログイン画面が表示されます。
多言語対応ができていないので、日本語ファイルを追加してあげましょう。
多言語対応
app.phpのlocaleの設定を日本語に変更。(ついでにTimezoneも変えときましょう)
    'timezone' => 'Asia/Tokyo',
    'locale' => 'ja',
resources/lang/ja配下に日本語ファイルを設置します。
<?php

return [
    'failed' => 'メールアドレス、もしくはパスワードが違います',
    'throttle' => 'ログイン試行回数がしきい値を超えました。 時間をおいてログインしてください。',
    'login' => 'ログインしました',
    'logout' => 'ログアウトしました',
    'notVerified' => 'メールが認証されていません',
    'verified' => 'メールの認証に成功しました',
    'alreadyVerified' => '既に認証済みのメールアドレスです',
    'sendVerifyMail' => '認証メールを再送しました',
    'noUser' => '入力されたメールアドレスのユーザーが存在しません',

    'email'            => 'メールアドレス',
    'password'         => 'パスワード',
    'confirm_password' => 'パスワードを確認',
    'sign_in'          => 'ログイン',
    'admin_sign_in'    => '管理者ログイン',
    'sign_out'         => 'ログアウト',
    'register'         => 'ユーザー登録',
    'full_name'        => '氏名',

    'login' => [
        'forgot_password'     => 'パスワードを忘れた時',
    ],

    'forgot_password' => [
        'send_pwd_reset' => 'パスワード変更リンクを送る',
    ],

    'reset_password' => [
        'title'         => 'パスワードを変更',
        'enter_email' => 'メールアドレスを入力してください'
    ],

    'registration' => [
        'have_membership' => '既にアカウントを持っている方はこちら'
    ]

];
必要なさそうな文言はresources/views/auth/login.blade.phpやresources/views/auth/register.blade.phpを削って対応。
以下のように表示されました。
ユーザー登録・ログイン
マイグレーションを走らせれば、ユーザー登録、ログインができます。
$ php artisan migrate
Migration table created successfully.
Migrating: 2014_10_12_000000_create_users_table
Migrated:  2014_10_12_000000_create_users_table (117.26ms)
Migrating: 2014_10_12_100000_create_password_resets_table
Migrated:  2014_10_12_100000_create_password_resets_table (84.44ms)
Migrating: 2019_08_19_000000_create_failed_jobs_table
Migrated:  2019_08_19_000000_create_failed_jobs_table (205.19ms)
ログインした後はこんな感じの画面に。
まっさら何もないですね。
ここから本題のCRUDを作成していきます。
Laravel-GeneratorでCRUDを作成する
今回は簡単な投稿をつくるためのCRUDを作ってみます。
Laravel-Generatorのコマンドを実行。
Model名ArticleのCRUDを作成します。
$ php artisan infyom:scaffold Article
Specify fields for the model (skip id & timestamp fields, we will add it automatically)
Read docs carefully to specify field inputs)
Enter "exit" to finish

 Field: (name db_type html_type options) []:
 >
カラムのDBタイプとHTMLタイプを聞かれるので、答えます。その後Validationも聞かれます。
HTMLタイプの候補に関しては、Laravel-Generatorのサイトに書いてあります。
http://infyom.com/open-source/laravelgenerator/docs/8.0/fields-input-guide
Validationの書き方についてはこちらに。
http://infyom.com/open-source/laravelgenerator/docs/8.0/getting-started#validations
今回は以下のような感じでやってみました。
 Field: (name db_type html_type options) []:
 > title string text

 Enter validations:  []:
 > required|max:20

 Field: (name db_type html_type options) []:
 > body text text

 Enter validations:  []:
 > required

 Field: (name db_type html_type options) []:
 > user_id integer:unsigned:foreign,users,id select

 Enter validations:  []:
 > required|numeric

 Field: (name db_type html_type options) []:
 > exit
自動でMigrationファイルやRepository、Model、Controller、Viewなどが作成されます。
Migration created:
2020_12_03_180423_create_articles_table.php

Model created:
Article.php

Repository created:
ArticleRepository.php

Factory created:
ArticleFactory.php

Create Request created:
CreateArticleRequest.php

Update Request created:
UpdateArticleRequest.php

Controller created:
ArticleController.php

Generating Views...
table.blade.php created
index.blade.php created
field.blade.php created
create.blade.php created
edit.blade.php created
show_fields.blade.php created
show.blade.php created
Migrationの実行を聞かれて、実行してみましたが、失敗。。
UsersのMigrationファイルの問題みたいだったので、修正します。
<?php

use Illuminate\Database\Migrations\Migration;
use Illuminate\Database\Schema\Blueprint;
use Illuminate\Support\Facades\Schema;

class CreateUsersTable extends Migration
{
    /**
     * Run the migrations.
     *
     * @return void
     */
    public function up()
    {
        Schema::create('users', function (Blueprint $table) {
            $table->increments('id');
            $table->string('name');
            $table->string('email')->unique();
            $table->timestamp('email_verified_at')->nullable();
            $table->string('password');
            $table->rememberToken();
            $table->timestamps();
        });
    }

    /**
     * Reverse the migrations.
     *
     * @return void
     */
    public function down()
    {
        Schema::dropIfExists('users');
    }
}
マイグレーションを再度実行
$ php artisan migrate:refresh
Rolling back: 2020_12_03_180423_create_articles_table
Rolled back:  2020_12_03_180423_create_articles_table (125.45ms)
Rolling back: 2019_08_19_000000_create_failed_jobs_table
Rolled back:  2019_08_19_000000_create_failed_jobs_table (34.11ms)
Rolling back: 2014_10_12_100000_create_password_resets_table
Rolled back:  2014_10_12_100000_create_password_resets_table (33.85ms)
Rolling back: 2014_10_12_000000_create_users_table
Rolled back:  2014_10_12_000000_create_users_table (33.50ms)
Migrating: 2014_10_12_000000_create_users_table
Migrated:  2014_10_12_000000_create_users_table (85.98ms)
Migrating: 2014_10_12_100000_create_password_resets_table
Migrated:  2014_10_12_100000_create_password_resets_table (93.14ms)
Migrating: 2019_08_19_000000_create_failed_jobs_table
Migrated:  2019_08_19_000000_create_failed_jobs_table (126.64ms)
Migrating: 2020_12_03_180423_create_articles_table
Migrated:  2020_12_03_180423_create_articles_table (198.16ms)
うまくいきました。
ログインユーザーのみが記事確認、作成できるようにする
生成されたRouteのままだと、ArticleのResourceがAuth Middlewareの外にあるので、Routeをいじってあげます。
Route::middleware('auth')->group(function () {
    Route::resource('articles', App\Http\Controllers\ArticleController::class);
});
画面を確認
Article一覧画面ができてます。
記事の作成、編集、削除もできますね。
コマンド一つでCRUDが作成できました。
ユニットテストを書く
最後にユニットテストを書いていきます。
まずは何もしない状態でテストを実行してみます。Laravelのデフォルトのテストが実行されます。
$ ./vendor/bin/phpunit
PHPUnit 9.4.4 by Sebastian Bergmann and contributors.

..                                                                  2 / 2 (100%)

Time: 00:01.291, Memory: 20.00 MB

OK (2 tests, 2 assertions)
ArticleRepositoryのテストを書く
記事のCRUDが動いていることを確認するテストを書きます。
せっかくPHP8を使っているので、Repositoryのメソッドの引数には、無駄に名前付き引数を使ってみました。
<?php

namespace Tests\Unit\Repositories;

use App\Models\Article;
use App\Models\User;
use App\Repositories\ArticleRepository;
use Illuminate\Database\Eloquent\Collection;
use Illuminate\Foundation\Testing\RefreshDatabase;
use Tests\TestCase;

class ArticleRepositoryTest extends TestCase
{
    use RefreshDatabase;

    private $articleRepository;

    public function setUp(): void
    {
        parent::setUp();
        $this->articleRepository = app(ArticleRepository::class);
    }

    /**
     * 記事全取得のテスト
     * @return void
     */
    public function testPaginate(): void
    {
        // Laravel8以降、Globalなfactory関数は廃止され、Modelから呼び出す形となりました
        Article::factory(10)->create();
        $articles = $this->articleRepository->paginate(perPage: 10);;
        $this->assertInstanceOf(Collection::class, $articles->getCollection());
        $this->assertCount(10, $articles);
    }

    /**
     * 記事一件取得のテスト
     * @return void
     */
    public function testGetById(): void
    {
        $articleId = 1;
        Article::factory()->create([
            'id' => $articleId
        ]);
        $article = $this->articleRepository->find(id: $articleId);
        $this->assertInstanceOf(Article::class, $article);
    }

    /**
     * 記事作成編集削除のテスト
     * @return void
     */
    public function testCreateAndUpdateAndDelete(): void
    {
        // Create
        $data = [
            'title'   => 'タイトル',
            'body'    => '内容',
            'user_id' => User::factory()->create()->id,
        ];
        $createdArticle = $this->articleRepository->create(input: $data);
        $this->assertInstanceOf(Article::class, $createdArticle);
        $this->assertEquals($data['title'], $createdArticle->title);

        // Update
        $updated = [
            'title'   => '更新されたタイトル',
        ];
        $updatedArticle = $this->articleRepository->update(input: $updated, id: $createdArticle->id);
        $this->assertInstanceOf(Article::class, $updatedArticle);
        $this->assertEquals($updatedArticle['title'], $updatedArticle->title);

        // Delete
        $this->articleRepository->delete(id: $updatedArticle->id);
        $this->assertNull($this->articleRepository->find($updatedArticle->id));
    }
}
factoryをModelから呼び出すところはLaravel8で変わった点ですね。
テスト実行
test/Repositories配下を実行するように、phpunit.xmlを修正してあげます。
        </testsuite>
        <testsuite name="Feature">
            <directory suffix="Test.php">./tests/Feature</directory>
        </testsuite>
        ↓追加
        <testsuite name="Repositories">
            <directory suffix="Test.php">./tests/Repositories</directory>
        </testsuite>
テストを実行します。
$ ./vendor/bin/phpunit
PHPUnit 9.4.4 by Sebastian Bergmann and contributors.

.....                                                               5 / 5 (100%)

Time: 00:02.388, Memory: 30.00 MB

OK (5 tests, 10 assertions)
通りましたね。
権限のテストを書く
ログインしたユーザーだけが記事一覧や、記事作成ができる形になっているかをテストします。
<?php

namespace Tests\Unit;

use App\Models\Article;
use App\Models\User;
use Auth;
use Illuminate\Foundation\Testing\RefreshDatabase;
use Tests\TestCase;

class AuthTest extends TestCase
{
    use RefreshDatabase;

    private Article $article;

    public function setUp(): void
    {
        parent::setUp();
        $this->article = Article::factory()->create();
    }

    /**
     * 記事へのアクセステスト
     *
     * @return void
     */
    public function testArticleAccess(): void
    {
        // ログイン前はログイン画面にリダイレクトされる
        $this->get(route('articles.index'))->assertRedirect(route('login'));
        $this->get(route('articles.create'))->assertRedirect(route('login'));
        $this->get(route('articles.show', $this->article))->assertRedirect(route('login'));
        $this->get(route('articles.edit', $this->article))->assertRedirect(route('login'));

        $user = $this->actingAs(
            User::factory()->create()
        );

        // ログイン後は正常にアクセス可能
        $user->get(route('articles.index'))->assertStatus(200);
        $user->get(route('articles.create'))->assertStatus(200);
        $user->get(route('articles.show', $this->article))->assertStatus(200);
        $user->get(route('articles.edit', $this->article))->assertStatus(200);

        Auth::logout();

        // ログアウト後はログイン画面にリダイレクトされる
        $this->get(route('articles.index'))->assertRedirect(route('login'));
        $this->get(route('articles.create'))->assertRedirect(route('login'));
        $this->get(route('articles.show', $this->article))->assertRedirect(route('login'));
        $this->get(route('articles.edit', $this->article))->assertRedirect(route('login'));
    }
}
実行してみます。
$ ./vendor/bin/phpunit
PHPUnit 9.4.4 by Sebastian Bergmann and contributors.

......                                                              6 / 6 (100%)

Time: 00:02.842, Memory: 30.00 MB

OK (6 tests, 30 assertions)
無事通りましたね!
実行対象のテストを絞りたい際は
$ ./vendor/bin/phpunit --filter='AuthTest'
のような形で絞ることも可能です。
長くなりましたが、これでLaravel-Generatorを使って簡単にCRUDを作成し、ユニットテストまで書くことができました。
PHP8やLaravel8は今回初めて使いましたが、もっといろんな機能があるので、早く色々試してみたいですね。
最後まで読んでいただき、ありがとうございました!!
明日は @gorogoroyasu の記事ですね。機械学習系の記事かな?楽しみです!


