Googleに登録してある連絡先を使ったアプリケーションを作成する際、Google People APIを利用すると、連絡先の取得、追加、削除などが可能です。
Nodeを使った日本語の記事が少なく(というかググったけど全然ない...)実装に時間がかかったので、記事にします。
People APIを有効化する
まずはAPIを利用できるように有効化します。
ドキュメントにしたがってGoogleアカウントにログインした状態で、コンソール画面にアクセスします。
プロジェクト作成画面から、プロジェクトを作成します。
初めてのプロジェクトの作成の場合、以下のような画面が表示されます。

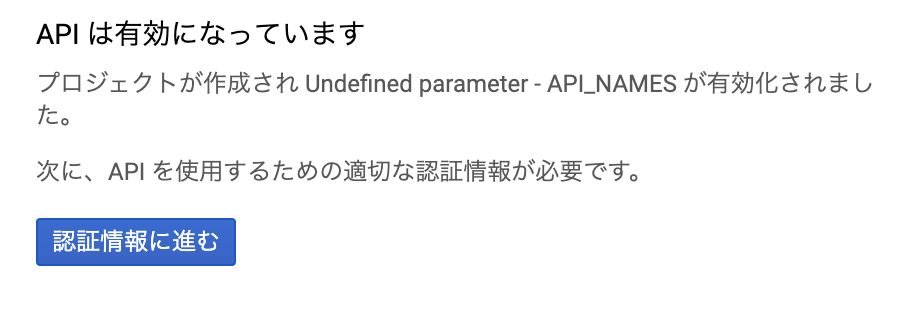
「同意して続行」をクリックすると、プロジェクトが作成されます。
プロジェクトを作成すると以下の画面になります。
Client IDを作成する
認証情報の作成に進みます。

使用するAPI: People API
APIを呼び出す場所: ウェブサーバー
アクセスするデータの種類: ユーザーデータ
を指定します。
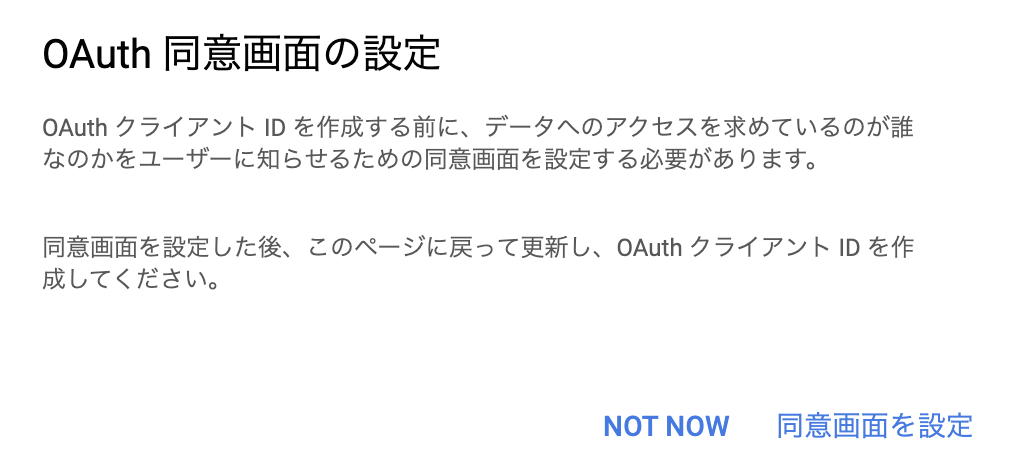
以下のモーダルが表示されるので、「同意画面を設定」をクリックします。
アプリケーション名を入力して、「保存」をクリックします。

この際、「Google API のスコープ」に「profile」が入ってることを確認してください。
OAuth同意画面の設定が完了したら、先ほどの「認証情報」から「OAuth 2.0 クライアント ID」を作成します。

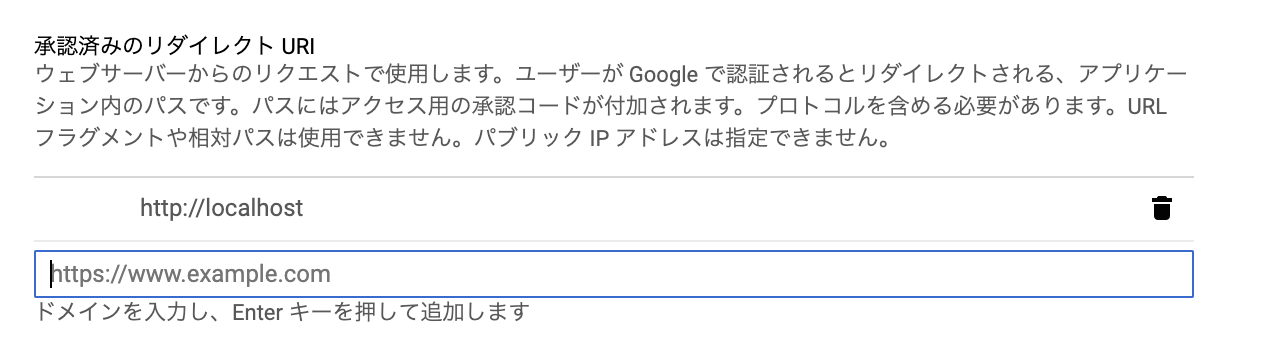
リダイレクトURIには、ここでは一旦「 http://localhost 」を入力しておきます。
「OAuthクライアントIDを作成」をクリックすると、認証情報のダウンロードができます。
Nodeから、APIにアクセスする
いよいよ、NodeからAPIにアクセスします。
必要なパッケージのインストール
まず、今回はreadlineとgoogleapisを使用するので、yarnを用いてインストールします。
$ yarn add readline googleapis
jsファイルを作成
APIにアクセスするためのjsファイルを作成します。
ソースコードはこちらになります。
const readline = require('readline')
const { google } = require('googleapis')

const auth = new google.auth.OAuth2(
    "**************************.apps.googleusercontent.com", // client_id
    "************************", // client_secret
    "http://localhost" // redirect_uris[0]
)
getToken(auth)

function getToken(oAuth2Client) {
  const authUrl = oAuth2Client.generateAuthUrl({
    access_type: 'offline',
    scope: [
        'https://www.googleapis.com/auth/contacts',
        'https://www.googleapis.com/auth/userinfo.profile'
    ]
  })
  console.log('以下のURLにアクセスして認証コードを取得してください:', authUrl)
  const rl = readline.createInterface({
    input: process.stdin,
    output: process.stdout
  })
  rl.question('認証コードを入力してください ', (code) => {
    rl.close()
    oAuth2Client.getToken(code, (err, token) => {
      if (err) return console.error('コードが不正です', err)
      oAuth2Client.setCredentials(token)
      listConnectionNames(oAuth2Client)
    })
  })
}

async function listConnectionNames(auth) {
  const service = google.people({ version: 'v1', auth })
  const { data: people } = await service.people.connections.list({
    resourceName: 'people/me',
    personFields: 'names,addresses,genders',
    pageSize: 100
  })
  console.log(people)
}
上からコードを解説します。
Client_idの読み込み
const auth = new google.auth.OAuth2(
    "**************************.apps.googleusercontent.com", // client_id
    "************************", // client_secret
    "http://localhost" // redirect_uris[0]
)
まずは先ほど作成したClient_idを読み込みます。
ダウンロードしたjsonファイルの「client_id」と「client_secret」「redirect_uris」を入力してください。
getTokenメソッド
次にgetTokenメソッドを実行します。
function getToken(oAuth2Client) {
  const authUrl = oAuth2Client.generateAuthUrl({
    access_type: 'offline',
    scope: [
        'https://www.googleapis.com/auth/contacts',
        'https://www.googleapis.com/auth/userinfo.profile'
    ]
  })
  console.log('以下のURLにアクセスして認証コードを取得してください:', authUrl)
  const rl = readline.createInterface({
    input: process.stdin,
    output: process.stdout
  })
  rl.question('認証コードを入力してください ', (code) => {
    rl.close()
    oAuth2Client.getToken(code, (err, token) => {
      if (err) return console.error('コードが不正です', err)
      oAuth2Client.setCredentials(token)
      listConnectionNames(oAuth2Client)
    })
  })
}
getTokenメソッドでは、まずPeople APIにアクセスするためのトークンを取得するURLを生成しています。
scopeでは、そのトークンでアクセスできる範囲を指定することができます。
scopeについての詳細はこちらを参照してください。
const authUrl = oAuth2Client.generateAuthUrl({
    access_type: 'offline',
    scope: [
        'https://www.googleapis.com/auth/contacts',
        'https://www.googleapis.com/auth/userinfo.profile'
    ]
  })
console.log('以下のURLにアクセスして認証コードを取得してください:', authUrl)
そのURLにアクセスし、生成された認証コードを入力。
コードが正しければ、トークンをセットし、listConnectionNamesメソッドを実行する。
const rl = readline.createInterface({
    input: process.stdin,
    output: process.stdout
  })
  rl.question('認証コードを入力してください ', (code) => {
    rl.close()
    oAuth2Client.getToken(code, (err, token) => {
      if (err) return console.error('コードが不正です', err)
      oAuth2Client.setCredentials(token)
      listConnectionNames(oAuth2Client)
    })
  })
というメソッドになっています。
listConnectionNameメソッド
次にlistConnectionNameメソッドを解説します。
async function listConnectionNames(auth) {
  const service = google.people({ version: 'v1', auth })
  const { data: people } = await service.people.connections.list({
    resourceName: 'people/me',
    personFields: 'names,addresses,genders',
    pageSize: 100
  })
  console.log(people)
}
ここでは、People APIの連絡先一覧を取得するメソッドを実行しています。
各パラメータの意味やAPIの使い方については、
を読むとわかりやすかったです。
今回は「 personFields: 'names,addresses,genders',」を指定しているので、名前、住所、性別を取得しています。
実際に実行してみる
ここまでできたら、実行してみましょう。
$ node index.js
以下のURLにアクセスして認証コードを取得してください: https://accounts.google.com/o/oauth2/v2/auth?access_type=offline&scope=....
上記のようにURLが表示されるので、そのURLにアクセスします。
アクセスすると、アプリケーションの確認をしていないため、以下のような画面がでます。
今回は「詳細」から「アプリケーション名(安全ではないページ)に移動」して、そのまま進みます。

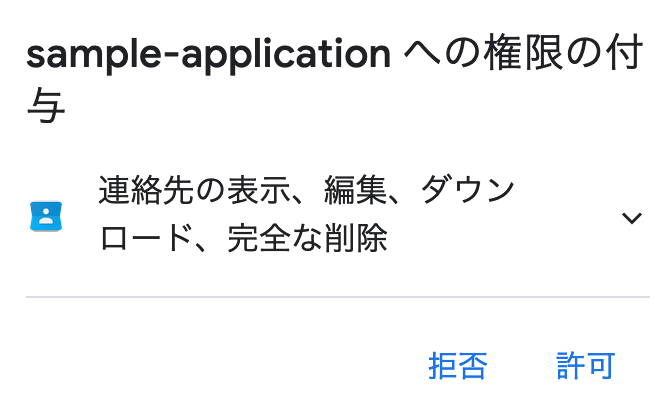
権限の付与の確認が表示されるので、「許可」をクリックします。
するとリダイレクト先に指定していた「http://localhost」に遷移します。
今回必要なのは、「http://localhost」の後ろについている、「?code=」以下の認証コードですので、
認証コードのみをコピーします。
以下のようなURLになるので、「code=」と「&scope」の間の文字列をコピーします。
http://localhost/?code=4/s***************************************************&scope=profile%20https://www.googleapis.com/auth/userinfo.profile%20https://www.googleapis.com/auth/contacts
コピーしたコードをターミナルに貼り付けます。
すると、以下のように連絡先が取得できます。
認証コードを入力してください: 4/s***************************************************
{ connections:
   [ { resourceName: 'people/c4672439454110636142',
       etag: '%EggBAj0IEEA3LhoEAQIFByIMTDR0TTh5TVd2aGc9',
       names: [Array],
       addresses: [Array] },
     { resourceName: 'people/c2333143876687154660',
       etag: '%EggBAj0IEEA3LhoEAQIFByIMQTN2WDBKWlg3clE9',
       names: [Array],
       addresses: [Array] },
以下略
これで、連絡先の取得ができました。
今回の例ではTokenを毎回取得してますが、実際にアプリケーション上で作成する際は、Tokenの情報をセッションなどにもたせることで、毎回認証をする必要がなくなります。
これでGoogle People APIでの連絡先を使ったアプリケーションの開発が可能になります。
以上です。最後まで読んでいただきありがとうございました!