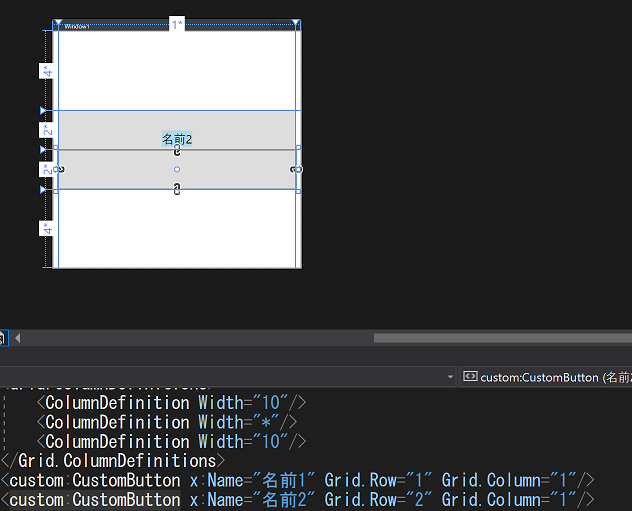
XAMLデザイナ上でのデザインをもっとやりやすくしたいという要望が社内で来てる(育休中でよくわかんないけど)ので実現方法を調べてみた。公式ドキュメントの更新日が10年以上前だったりしててこずったので、記録しておく。
環境
Visual Studio Community 2017
.NET Framework 4.7.1
実装イメージ
下の画像のように、VSのXAMLデザイナで対象コントロールをクリックすると、そのNameプロパティが表示されるようにする。

1. カスタムコントロール(名前を表示させたいコントロール)のクラスライブラリを作る
クラスライブラリを作成し、適当なコントロールを作ってください。
サンプル
namespace CustomControl
{
    public class CustomButton : Button{}
}
2.デザイン時メタデータアセンブリを作る
メタデータを探すのに名前を利用しているらしいので、規則に沿った名前のクラスライブラリを作成します。
カスタム コントロールとデザイン時アセンブリの配置(MSDN)
今回は、上を参考にアセンブリ名をCustomControl.VisualStudio.Design.4.3.1.0としました。
後は、プロジェクトの出力パスを変更してdllが1.で作ったdllと同じところにできるようにしてください。
リンク先だとMicrosoft.Windows.Design.dllのバージョンを入れるように書いてあるのですが、肝心のdllが見つからず。
悩んだ末、Microsoft.Windows.Design名前空間に定義されているクラス(EditingContext)がどのdlに定義されているか調べたらMicrosoft.Windows.Design.Extensibility.dllだったので、そのバージョンを持ってきました。
これでいいのか全然わからん。なおバージョンを5とかでたらめを入れたり、そもそも入れなくても動きました。
3.必要なアセンブリを参照する
2.のプロジェクトで、以下のアセンブリを参照します。
- PresentationCore
- PresentationFramework
- System.Xaml
- WindowsBase
- Microsoft.Windows.Design.Extensibility
- Microsoft.Windows.Design.Interaction
後、1.で作ったプロジェクトも参照します。
4.IProvideAttributeTable継承クラスを作る
3.のプロジェクトに、IProvideAttributeTableを継承したクラスを用意します。
デザイナはこのクラスのAttributeTableを参照して拡張を行います。
今回は、以下のような実装にしました。
サンプル
[assembly: ProvideMetadata(typeof(CustomControl.VisualStudio.Design.Metadata))]
namespace CustomControl.VisualStudio.Design
{
    internal class Metadata : IProvideAttributeTable
    {
        public AttributeTable AttributeTable
        {
            get
            {
                AttributeTableBuilder builder = new AttributeTableBuilder();
                builder.AddCustomAttributes(typeof(CustomButton), new FeatureAttribute(typeof(SampleAdornerProvider)));
                return builder.CreateTable();
            }
        }
    }
}
サンプル
namespace CustomControl.VisualStudio.Design
{
    public class SampleAdornerProvider: PrimarySelectionAdornerProvider
    {
        private TextBlock textBlock;
        private ModelItem modelItem;

        public SampleAdornerProvider()
        {
            // TextBoxの設定
            textBlock = new TextBlock();
            textBlock.Background = Brushes.LightBlue;
            textBlock.TextAlignment = TextAlignment.Center;
            textBlock.HorizontalAlignment = HorizontalAlignment.Center;

            // TextBoxの位置、サイズを設定
            // AdornerPlacementCollectionは下位互換のためのメソッドらしいので使用しない
            AdornerPanel.SetAdornerHorizontalAlignment(textBlock, AdornerHorizontalAlignment.Center);
            AdornerPanel.SetAdornerVerticalAlignment(textBlock, AdornerVerticalAlignment.OutsideTop);
            AdornerPanel.SetAdornerMargin(textBlock, new Thickness(0, 2, 0, 0));

            // AdornerPanelに追加して、Adornersに追加
            AdornerPanel adornerPanel = new AdornerPanel();
            adornerPanel.Children.Add(textBlock);
            Adorners.Add(adornerPanel);
        }

        protected override void Activate(ModelItem item)
        {
            modelItem = item;
            modelItem.PropertyChanged += new PropertyChangedEventHandler(ModelItem_PropertyChanged);

            textBlock.Text = (String)item.Properties["Name"].ComputedValue;
            base.Activate(item);
        }

        protected override void Deactivate()
        {
            modelItem.PropertyChanged -= new PropertyChangedEventHandler(ModelItem_PropertyChanged);
            base.Deactivate();
        }

        private void ModelItem_PropertyChanged(object sender, PropertyChangedEventArgs e)
        {
            if (e.PropertyName == "Name")
                textBlock.SetValue(TextBlock.TextProperty, (string)modelItem.Properties["Name"].ComputedValue);
        }
    }
}
おわりに
とりあえずVSIX作らなくても拡張できるのがわかってよかった。
見た目を拡張する系以外にも、ContextMenuとかの拡張も書くかも。エディタ作っちゃうようなのはめんどいからやんないかも。
参考
WPF デザイナの機能拡張
方法 : デザイン時装飾を作成する
今回のサンプルの元ネタ。古いのでコピペだと動かないです。
[WPF デザイナーの機能拡張リファレンス] (https://docs.microsoft.com/ja-jp/previous-versions/bb628665%28v%3dvs.110%29)
現行と内容が違うところがあったりします。