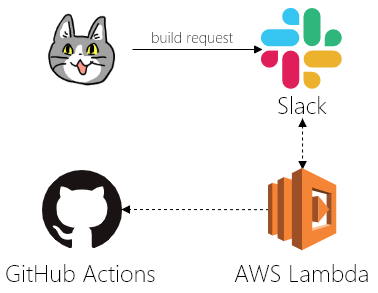
以下のサービスを組み合わせて、ポチポチCIツールを作成します。
- Slack
- GitHub Actions、REST API v3
- AWS Lambda ( Node.js 12.x (@slack/bolt 1.5.0) )
外観図
Slackに対してリクエストすると、SlackとLambdaがやりとりをしてGitHubに命令を出してくれます。
素材
猫の顔: https://kumamine.blogspot.com/2019/12/blog-post_27.html
Slack: Cacoo内の素材
AWS Lambda: Cacoo内の素材
GitHub: Cacoo内の素材
GitHub ActionsのJobを外部から実行する
GitHub Actionsはプルリク作成やコミットプッシュなどの何らかの「トリガー」で走るCIツールです。
GitHubのAPIを利用し、「トリガー」を発生させることで、外部からActionsのJobを実行することができます。
準備
GitHub ActionsをWebAPIから実行するための準備を行います。
- Github Actions用のリポジトリを作成して、ローカルにcloneしておきます。
https://help.github.com/ja/github/getting-started-with-github/create-a-repo - GitHub REST API v3を利用するためにアクセストークンを作成します。権限には
repoを付加しておきましょう。
https://help.github.com/ja/github/authenticating-to-github/creating-a-personal-access-token-for-the-command-line - GitHubからcloneしてきたプロジェクト上に、Github Actionsのワークフロー構文ファイルを作成します。作成したファイルはデフォルトブランチ(いわゆるmasterブランチ)に置きましょう。
# Actionの名前
name: Sample

# Jobが実行されるトリガー
# pushされた場合、もしくはイベント種別が「hoge」のリポジトリディスパッチイベントが作成された場合に実行する
on:
  push:
  repository_dispatch:
    types: [hoge]

jobs:
  sample_job:
    runs-on: ubuntu-latest
    name: sample_job
    steps:
      - uses: actions/checkout@v1

      # ブランチが指定されていた場合は、指定されているブランチを利用する
      - if: github.event.client_payload
        uses: actions/checkout@v1
        with:
          ref: ${{ github.event.client_payload.ref }}

      # 「echo_string」要素が指定されていた場合は、その要素の内容を表示する
      - if: github.event.client_payload.echo_string
        name: echo string
        run: echo ${{ toJSON(github.event.client_payload.echo_string) }}
Github ActionsのJobを端末から実行する
準備ができたら、端末からGitHub Actionsに文字列を渡して、Jobのログ上に表示させてみましょう。
# 扱いやすいように変数にアクセストークンを代入する
GITHUB_TOKEN={アクセストークン}

# 実行ブランチ
BRANCH={ブランチ名}

# Actionの実行
curl -X POST https://api.github.com/repos/:owner/:repo/dispatches \
     -H "Authorization: token $GITHUB_TOKEN" \
     -H "Accept: application/vnd.github.everest-preview+json" \
     --data "{\"event_type\": \"hoge\", \"client_payload\": {\"ref\": \"$BRANCH\", \"echo_string\": \"hugahuga\"}}"
curlコマンドの--dataの、
event_typeには、ワークフロー構文ファイルのon.repository_dispatch.typesの文字列を指定します。
client_payload.refには、実行するブランチ名称を指定します。
client_payload.echo_stringには、表示する文字列を指定します。
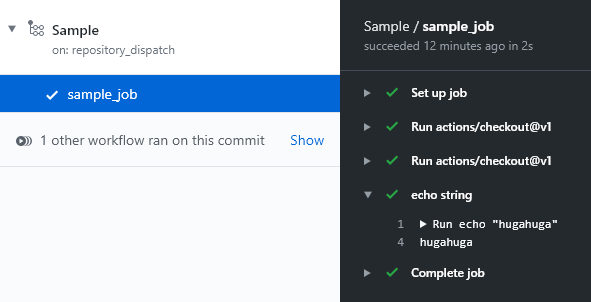
curlで実行した場合の結果
下図はGithub Actions上の実行結果です。
curlコマンドの--dataで指定したclient_payload.echo_stringの文字列が表示されます。
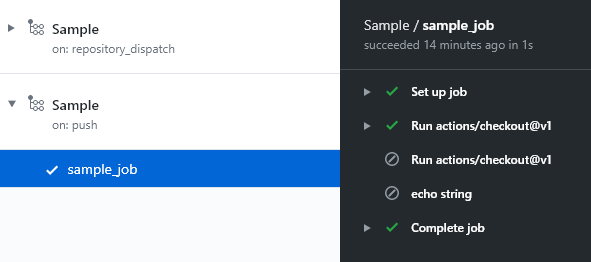
pushした場合の結果
ブランチの切り替えも文字列の表示も行いません。
pushされたブランチで処理が行われます。
ここまでの作業で察した方もいらっしゃると思いますが、デフォルトブランチ上にワークフロー構文ファイルが存在しないと、Jobが実行されません。理由は、APIがデフォルトブランチに対してイベントを発生させているためです。ではどこでブランチが切り替わっているのかというと、Github ActionsのJob中で切り替わっています。
ブランチに対してイベントを発生させるAPIも存在するのですが、本来の使い方ではない上に、意味のないログがプルリクなどに残ってしまうため、今回はdispatchesイベントを採用しました。
※ GitHub Actions用のAPIも用意されているようですが、まだパブリックベータ版のようですし、ジョブが実行できるわけではないみたいです。内容が頻繁に変更される可能性があるため、マスターがリリースされ次第、都合がよさそうであれば記事内容を書き換えようかなと思っています。(2020.02.02)
参考
https://developer.github.com/v3/repos/#create-a-repository-dispatch-event
https://help.github.com/ja/actions/automating-your-workflow-with-github-actions/events-that-trigger-workflows
https://swfz.hatenablog.com/entry/2020/01/23/080000
https://qiita.com/proudust/items/51599abd2b107b708e1e
Slackにモーダルウィンドウを表示して、入力値を取得する
Slackから提供されているWebAPIを組み合わせることで、モーダルウィンドウなどのインターフェースを実装することができます。
今回はそのラッパーであるBoltフレームワークを利用して実装していきます。
準備
- Slackのワークスペースを作成します。
https://slack.com/intl/ja-jp/help/articles/206845317 - SlackのAppsを作成します。https://api.slack.com/apps から
Create New Appを押して、App NameとDevelopment Slack Workspaceの項目を入力してCreate Appを押せばOKです。(2020.02.02現在)
https://api.slack.com/start/overview - Features > OAuth & Permissions > Scopes > Bot Token Scopes に
app_mentioned:read、chat:write、commandsを追加します。
https://api.slack.com/apps/{APP_ID}/oauth - Settings > Install App からアプリをワークスペースにインストールします。
https://api.slack.com/apps/{APP_ID}/install-on-team
アプリをハンドリングするサーバの作成
今回はServerless FrameworkとAWS Lambdaを利用してサーバを作成します。
まずは、端末で以下のコマンドを実行し、プロジェクトを作成します。
# プロジェクトの作成
npm init

# ライブラリのインストール
npm install serverless \
            aws-serverless-express \
            dotenv \
            @slack/bolt \
            axios

# サーバーレスフレームワークプロジェクトの作成
npx serverless create --template aws-nodejs
サーバーレスの設定を追加します。
service: sample

provider:
  name: aws
  runtime: nodejs12.x
  region: ap-northeast-1

functions:
  events:
    handler: handler.app
    timeout: 30
    events:
      # Bolt App
      - http:
          method: post
          path: /slack/events
      # OAuth Flow
      - http:
          method: get
          path: /slack/installation
      - http:
          method: get
          path: /slack/oauth
内部のロジックを作成します。
/repos/:owner/:repo/dispatchesの部分は「Github ActionsのJobを外部から実行する」で利用したリポジトリを指定してください。
'use strict';

// ------------------------------
// AWS Lambda handler
// ------------------------------
require('dotenv').config();
const { App, LogLevel, ExpressReceiver } = require('@slack/bolt');

const expressReceiver = new ExpressReceiver({
  signingSecret: process.env.SLACK_SIGNING_SECRET
});

const app = new App({
  token: process.env.SLACK_BOT_TOKEN,
  receiver: expressReceiver,
  logLevel: LogLevel.DEBUG
});

const awsServerlessExpress = require('aws-serverless-express');
const server = awsServerlessExpress.createServer(expressReceiver.app);

module.exports.app = (event, context) => {
  console.log('⚡️ Bolt app is running');
  console.log(event);
  awsServerlessExpress.proxy(server, event, context)
}

app.error(printCompleteJSON);

// ------------------------------
// Application Logic
// ------------------------------

// slash commandでモーダルウィンドウを表示するためのロジック
app.command('/build', async ({ ack, body, context }) => {
  ack();
  const result = app.client.views.open({
    "token": context.botToken,
    "trigger_id": body.trigger_id,
    "view": {
      "type": "modal",
      "callback_id": "task-modal",
      "private_metadata": JSON.stringify(body),
      "title": {
        "type": "plain_text",
        "text": "Github Actions",
        "emoji": true
      },
      "submit": {
        "type": "plain_text",
        "text": "Submit",
        "emoji": true
      },
      "close": {
        "type": "plain_text",
        "text": "Cancel",
        "emoji": true
      },
      "blocks": [
        {
          "type": "input",
          "block_id": "input-title",
          "element": {
            "type": "plain_text_input",
            "action_id": "input",
            "initial_value": body.text
          },
          "label": {
            "type": "plain_text",
            "text": "branch",
            "emoji": true
          },
          "optional": false
        },
        {
          "type": "input",
          "block_id": "input-description",
          "element": {
            "type": "plain_text_input",
            "action_id": "input",
            "multiline": true
          },
          "label": {
            "type": "plain_text",
            "text": "echo string",
            "emoji": true
          },
          "optional": true
        }
      ]
    }
  });

  console.log( await result);
});

// モーダルウィンドウから送信された値を受け取って、処理を行うロジック
app.view('task-modal', async ({ body, ack, context }) => {
  // モーダルウィンドウでのデータ送信イベントを確認
  ack();

  // ユーザーにメッセージを送信
  try {
    app.client.chat.postMessage({
      token: context.botToken,
      channel: body['user']['id'],
      text: 'Build request received!'
    });
  }
  catch (error) {
    console.error(error);
  }


  // ------------------------------
  // axios flow
  // ------------------------------
  const axiosBase = require('axios');
  const axios = axiosBase.create({
    baseURL: 'https://api.github.com',
    headers: {
      "Authorization": `token ${process.env.GITHUB_TOKEN}`,
      "Accept": "application/vnd.github.everest-preview+json"
    }
  });

  const requestBody = JSON.stringify({
    event_type: "hoge",
    client_payload: {
      ref: body.view.state.values['input-title'].input.value,
      echo_string: body.view.state.values['input-description'].input.value
    }
  });

  // GitHubへのリクエスト処理
  axios.post('/repos/:owner/:repo/dispatches', requestBody)
    .then(response => (this.info = response))
    .catch(function(e) {
      console.log(e);
  });
});

function printCompleteJSON(error) {
  console.log(JSON.stringify(error));
}
環境変数ファイルを作成して、センシティブな情報を入力します。
SLACK_SIGNING_SECRET : Features > OAuth & Permissions > OAuth Tokens & Redirect URLs > Tokens for Your Workspace > Bot User OAuth Access Token ( https://api.slack.com/apps/{APP_ID}/oauth )
SLACK_BOT_TOKEN : Basic Information > App Credentials > Signing Secret
GITHUB_TOKEN : GitHub REST API v3を利用するためにアクセストークン
# .envファイルの作成
touch .env
SLACK_SIGNING_SECRET=xxxxxxxxxx
SLACK_BOT_TOKEN=xoxb-xxxxxxxxxx
GITHUB_TOKEN=xxxxxxxxxx
作成し終わったらデプロイします。
$ serverless deploy
 :
endpoints:
  POST - https://xxx.execute-api.ap-northeast-1.amazonaws.com/dev/slack/events
  GET - https://xxx.execute-api.ap-northeast-1.amazonaws.com/dev/slack/installation
  GET - https://xxx.execute-api.ap-northeast-1.amazonaws.com/dev/slack/oauth
# => デプロイ後のURLをメモしておく
中身はこれで完成です。
Slackのコマンドの設定を行う
- Features > Interactive Components > Interactivity を有効化します。また、Request URL にデプロイ後のPOST
URL(https://xxx.execute-api.ap-northeast-1.amazonaws.com/dev/slack/events)を貼り付けて保存します。
https://api.slack.com/apps/{APP_ID}/interactive-messages - Features > Slash Commands で
/buildというスラッシュコマンドを作成します。URLにはhttps://xxx.execute-api.ap-northeast-1.amazonaws.com/dev/slack/eventsを設定します。
https://api.slack.com/apps/{APP_ID}/slash-commands - Features > Event Subscriptions へアクセスし、有効化します。Enable Events > Request URL には
https://xxx.execute-api.ap-northeast-1.amazonaws.com/dev/slack/eventsを設定します。Subscribe to bot events にはapp_mentionを追加します。
https://api.slack.com/apps/{APP_ID}/event-subscriptions - アプリを再インストールします。
https://api.slack.com/apps/{APP_ID}/install-on-team
ここまでの設定は「参考」の1つ目のseratchさんの手順書と、2つ目のチュートリアルがとても参考になります。
また、開発のノウハウも書かれていますので一読をオススメします。
SlackからGitHub Actionsにパラメータを渡して実行する
- ワークスペースの適当なチャンネルにアプリを追加します。
- テキストボックスに
/buildと打ち込み、送信します。 - モーダルウィンドウが現れるので、項目を入力し、Submitボタンを押します。
- うまく設定できていれば、GitHub ActionsのJobが実行されます。
以上です。おつかれさまでした。
参考
https://github.com/seratch/bolt-starter
https://slack.dev/bolt/ja-jp/tutorial/getting-started
https://github.com/okimurak/slack-bolt-sample-app-aws
https://api.slack.com/dialogs
https://api.slack.com/surfaces/modals/using
https://dev.classmethod.jp/tool/slack-multistep-modal-example/
おわりに
うまく組み込めば、スマホから手軽に緊急対応できるようになっていいかもしれませんね。
それと、GitHub ActionsのJob終了時に、Slackに通知を送るようにすると色々と捗るかも。
また、時間がある時に少しいじってみようと思います。


