はじめに
shuさんがPlaMo2 1BをGoogle Colabでファインチューニングする記事を書いてくださいました。
これを参考に、自分でもファインチューニングを行ってみた結果を紹介します。
データセットの作成
今回ファインチューニングのお題として、自分のQiita記事の中からおすすめの文書を提案するモデルを作成しようと思います。
まずはQiita Cliを使って、Qiita記事をローカルにpullします。
npm install @qiita/qiita-cli --save-dev
npx qiita init
npx qiita pull
Qiita Cliの詳しい使い方は以下の記事を参考にしました。
こうするとpublic以下に公開済みの記事がダウンロードされるので、それをベースに以下のようなスクリプトでデータセットを作成しました。
基本的な考え方としては記事の本文から、その記事のタイトルとそれが含まれる見出しを推論するようなデータセットにしています。
"""
SFT用のデータセットを作成する。

手順:
- public以下のmdファイルを読み込む
- 各ファイルごとに以下の処理を行う
  - yaml形式のメタデータを読み込み、titleを取得
  - メタデータ以降の本文を取得し、Markdown形式でパース
  - 各セクションごとに、学習データを作成する。
- 学習データはjsonl形式で保存する

セクションから学習データを作成する際のルール:
学習データは以下のようなフォーマット
```
## システムプロンプト
あなたは文書検索botです。
入力された文からそれが含まれる文書タイトルとセクションの見出しを返します。

## 検索する文書
{paragraph}

Answer:
## 文書タイトル
{title}

## 見出し
{heading}<|plamo:eos|>
```

記事のパラグラフごとに、上記のフォーマットで学習データを作成すること

使用するライブラリ
- marko
"""

import os
import re
import json
import marko
import marko.md_renderer
import yaml

# New implementation for dataset creation


def create_training_dataset():
    public_dir = os.path.join(os.path.dirname(__file__), "public")
    output_file = os.path.join(os.path.dirname(__file__), "dataset.train.jsonl")
    validate_file = os.path.join(os.path.dirname(__file__), "dataset.validate.jsonl")
    training_examples = []

    renderer = marko.md_renderer.MarkdownRenderer()

    for filename in os.listdir(public_dir):
        if not filename.endswith(".md"):
            continue
        file_path = os.path.join(public_dir, filename)
        with open(file_path, encoding="utf-8") as f:
            content = f.read()

        # Extract YAML front-matter
        m = re.match(r"^---\n(.*?)\n---\n(.*)", content, re.DOTALL)
        if m:
            yaml_text, body = m.groups()
            meta = yaml.safe_load(yaml_text)
            title = meta.get("title", filename)
        else:
            body = content
            title = filename

        # Parse the Markdown body using marko
        parsed = marko.parse(body)
        current_heading = ""  # holds the most recent heading text
        for element in parsed.children:
            if element.__class__.__name__ == "Heading":
                current_heading = renderer.render(element).strip()
                # Remove Markdown heading markers (e.g., ##)
                current_heading = re.sub(r"^#+\s*", "", current_heading)
            elif element.__class__.__name__ == "Paragraph":
                paragraph = renderer.render(element).strip()[:100]
                if not paragraph:
                    continue
                # Use the last seen heading for the dataset's "見出し"
                training_text = f"""## システムプロンプト
あなたは文書検索botです。
入力された文からそれが含まれる文書タイトルとセクションの見出しを返します。

## 検索する文書
{paragraph}

## Answer:
#### 文書タイトル
{title}

#### 見出し
{current_heading}<|plamo:eos|>"""
                training_examples.append({"text": training_text})

    # split the training examples into training and validation sets
    # ランダムにシャッフルして、9:1で分割
    training_examples = sorted(training_examples, key=lambda x: hash(x["text"]))
    split_index = int(len(training_examples) * 0.9)
    training_examples, validation_examples = (
        training_examples[:split_index],
        training_examples[split_index:],
    )

    with open(output_file, "w", encoding="utf-8") as out:
        for example in training_examples:
            out.write(json.dumps(example, ensure_ascii=False) + "\n")

    with open(validate_file, "w", encoding="utf-8") as out:
        for example in validation_examples:
            out.write(json.dumps(example, ensure_ascii=False) + "\n")


if __name__ == "__main__":
    create_training_dataset()
    # ...existing code...
trainが1266件、validateが141件のデータセットになりました。
このデータセットでは二つの能力を持つことを期待しています。
- 記事タイトルを記憶する
- データセットが1266件に対して記事は36個しかありませんので、記事タイトルは分類タスクとして学習できると期待されます
- 文章から見出しを推論する
- 見出し一件に対して学習データは一つしかありません。そのため、記憶するというよりも文章の中から見出しを推測する能力を獲得すると期待されます。
Google Colabでの学習
以下のようなコードで学習を行いました。
shuさんのブログのsft.pyを参考にしています。
"""
train.py.sampleを参考に、create_dataset.pyで作成したデータセットの学習と検証のコードを書いて
"""

from transformers import AutoModelForCausalLM
from transformers import AutoTokenizer
import datasets
import json
import os
from trl import DataCollatorForCompletionOnlyLM
from trl import SFTConfig, SFTTrainer


def main():

    # Load model and tokenizer
    model_name = "pfnet/plamo-2-1b"
    model = AutoModelForCausalLM.from_pretrained(model_name, trust_remote_code=True).to(
        "cuda"
    )
    tokenizer = AutoTokenizer.from_pretrained(model_name, trust_remote_code=True)

    # Load datasets
    train_data_path = os.path.join(os.path.dirname(__file__), "dataset.train.jsonl")
    val_data_path = os.path.join(os.path.dirname(__file__), "dataset.validate.jsonl")

    def load_jsonl(path):
        data = []
        with open(path, encoding="utf-8") as f:
            for line in f:
                json_data = json.loads(line.strip())
                data.append(json_data)
        return data

    train_data = load_jsonl(train_data_path)
    val_data = load_jsonl(val_data_path)

    train_dataset = datasets.Dataset.from_list(train_data)
    val_dataset = datasets.Dataset.from_list(val_data)

    # Setup data collator
    data_collator = DataCollatorForCompletionOnlyLM(
        response_template=tokenizer.encode(" Answer:\n", add_special_tokens=False),
        tokenizer=tokenizer,
    )

    # Training configuration
    sft_args = SFTConfig(
        output_dir="./outputs",
        evaluation_strategy="steps",
        per_device_train_batch_size=1,
        per_device_eval_batch_size=1,
        gradient_accumulation_steps=4,
        learning_rate=5e-5,
        num_train_epochs=3.0,
        lr_scheduler_type="cosine",
        warmup_ratio=0.3,
        logging_steps=10,
        eval_steps=100,
        save_strategy="steps",
        save_steps=100,
        report_to="wandb",  # Change to wandb
        bf16=True,
        max_seq_length=1024,
        gradient_checkpointing=True,
        deepspeed="./deepspeed_config.json",
    )

    # Initialize trainer
    trainer = SFTTrainer(
        model=model,
        args=sft_args,
        data_collator=data_collator,
        train_dataset=train_dataset,
        eval_dataset=val_dataset,
        tokenizer=tokenizer,
    )

    # Start training
    trainer.train()
    trainer.save_model()


if __name__ == "__main__":
    main()
Google Colabにtrain.py, deepspeed_config.json, dataset.train.jsonl, dataset.validate.jsonlを配置し、学習を行いました。
最初はepochを0.1にして動作確認を行い、その後epoch=3.0で本番のファインチューニングを行いました。
学習にはL4インスタンスを用いておよそ1時間半かかりました。
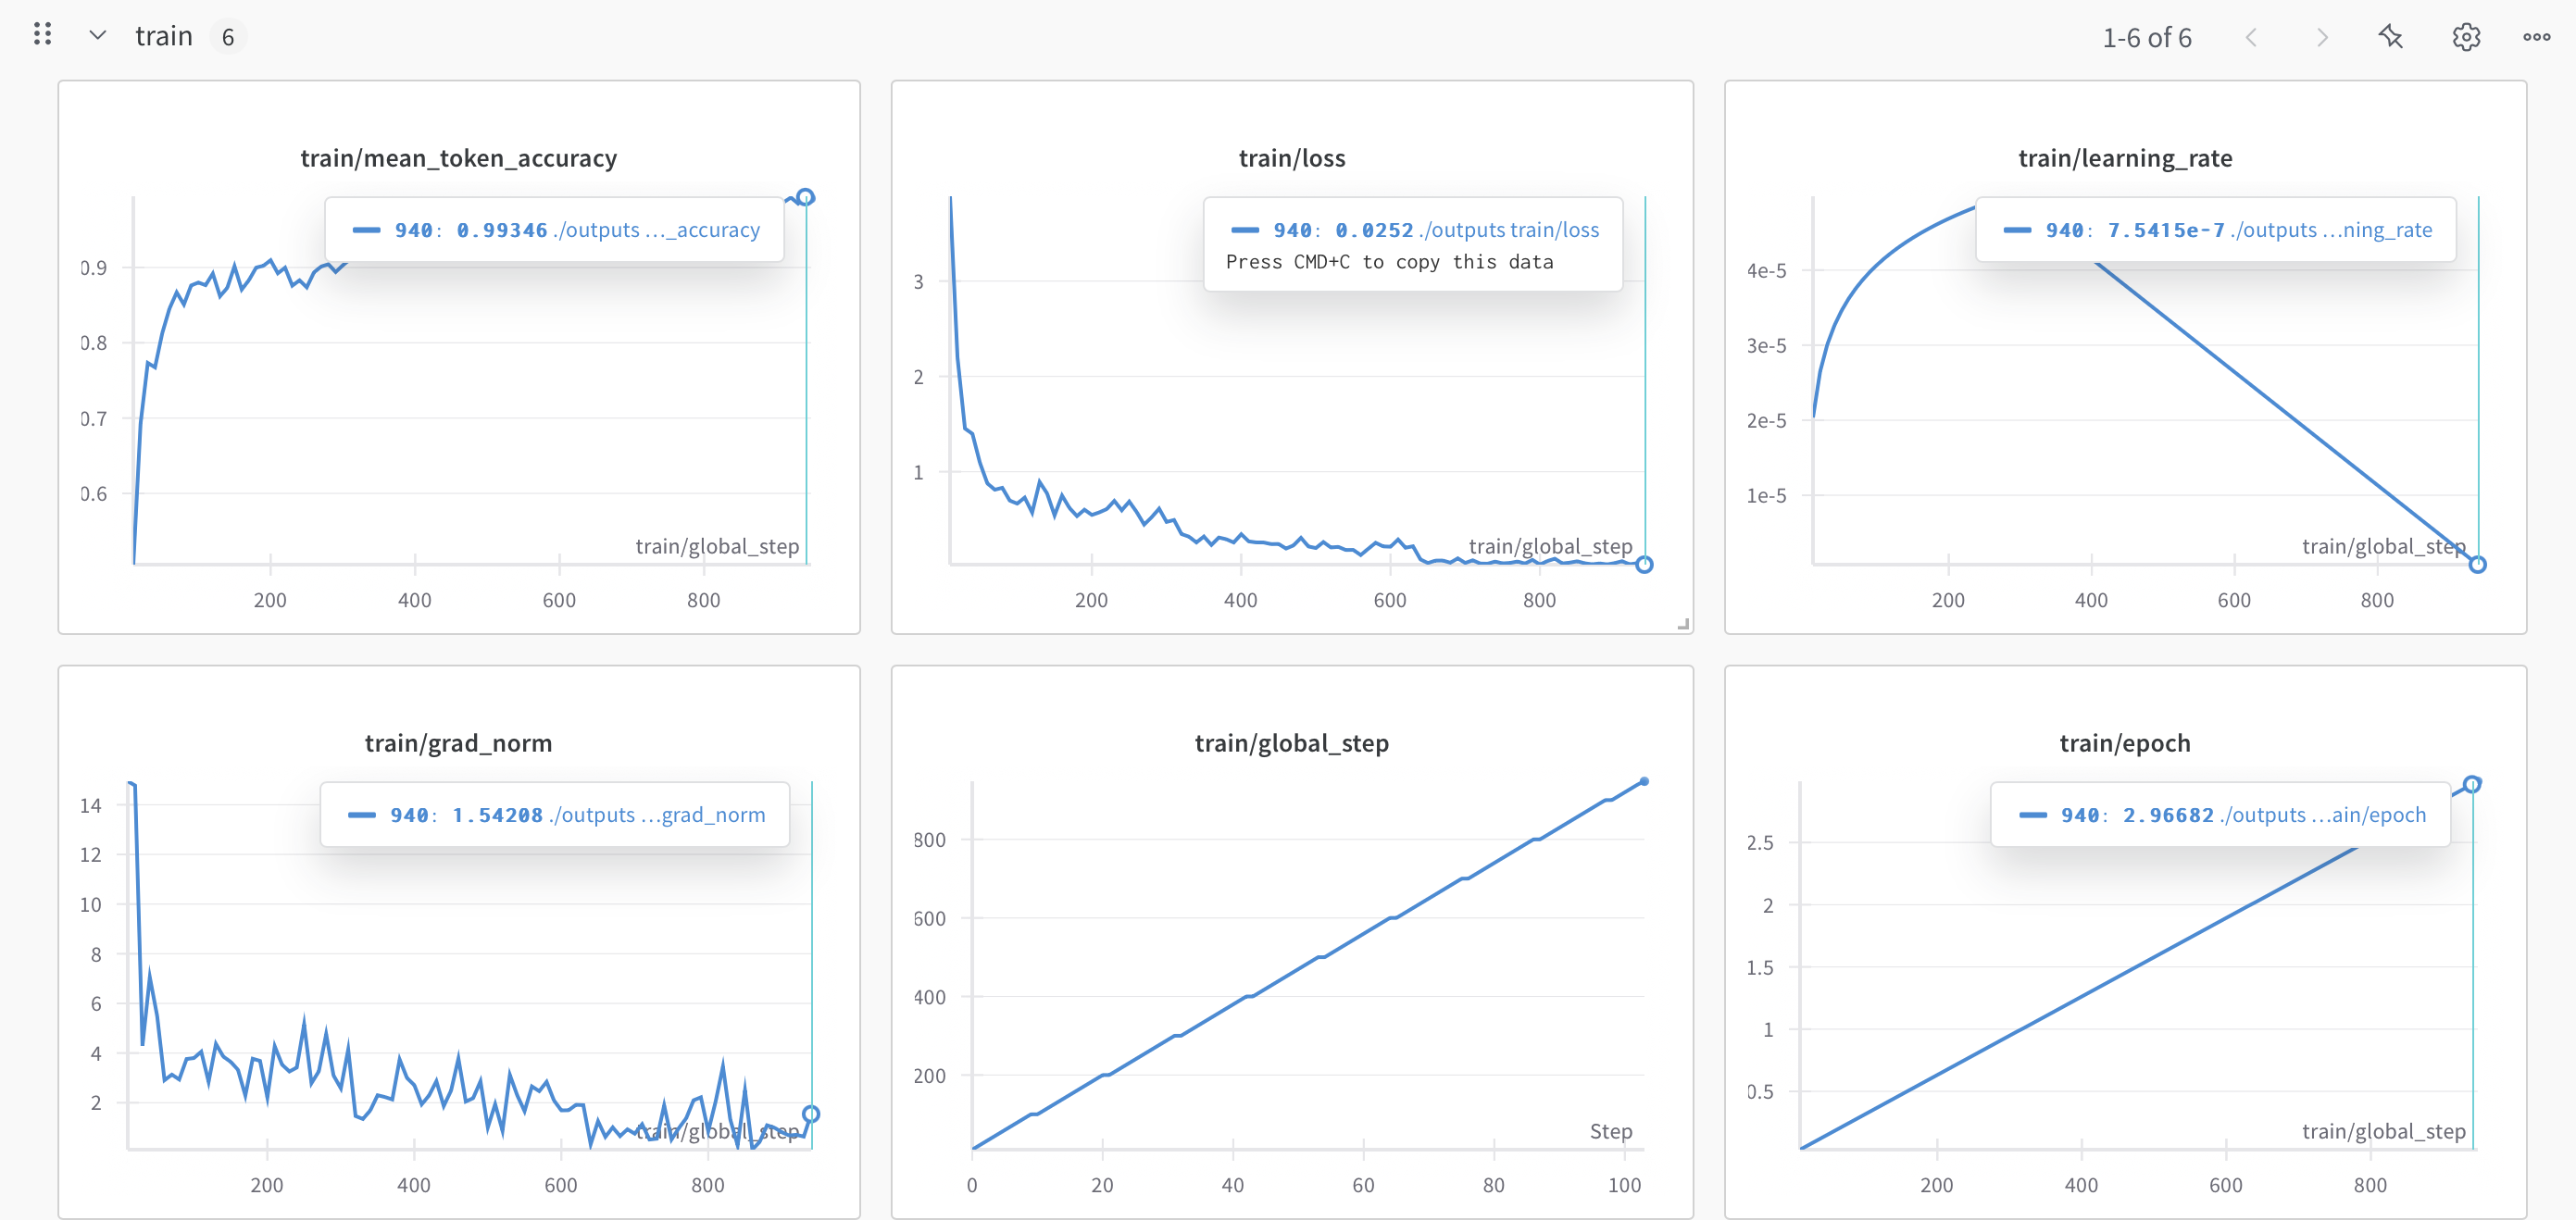
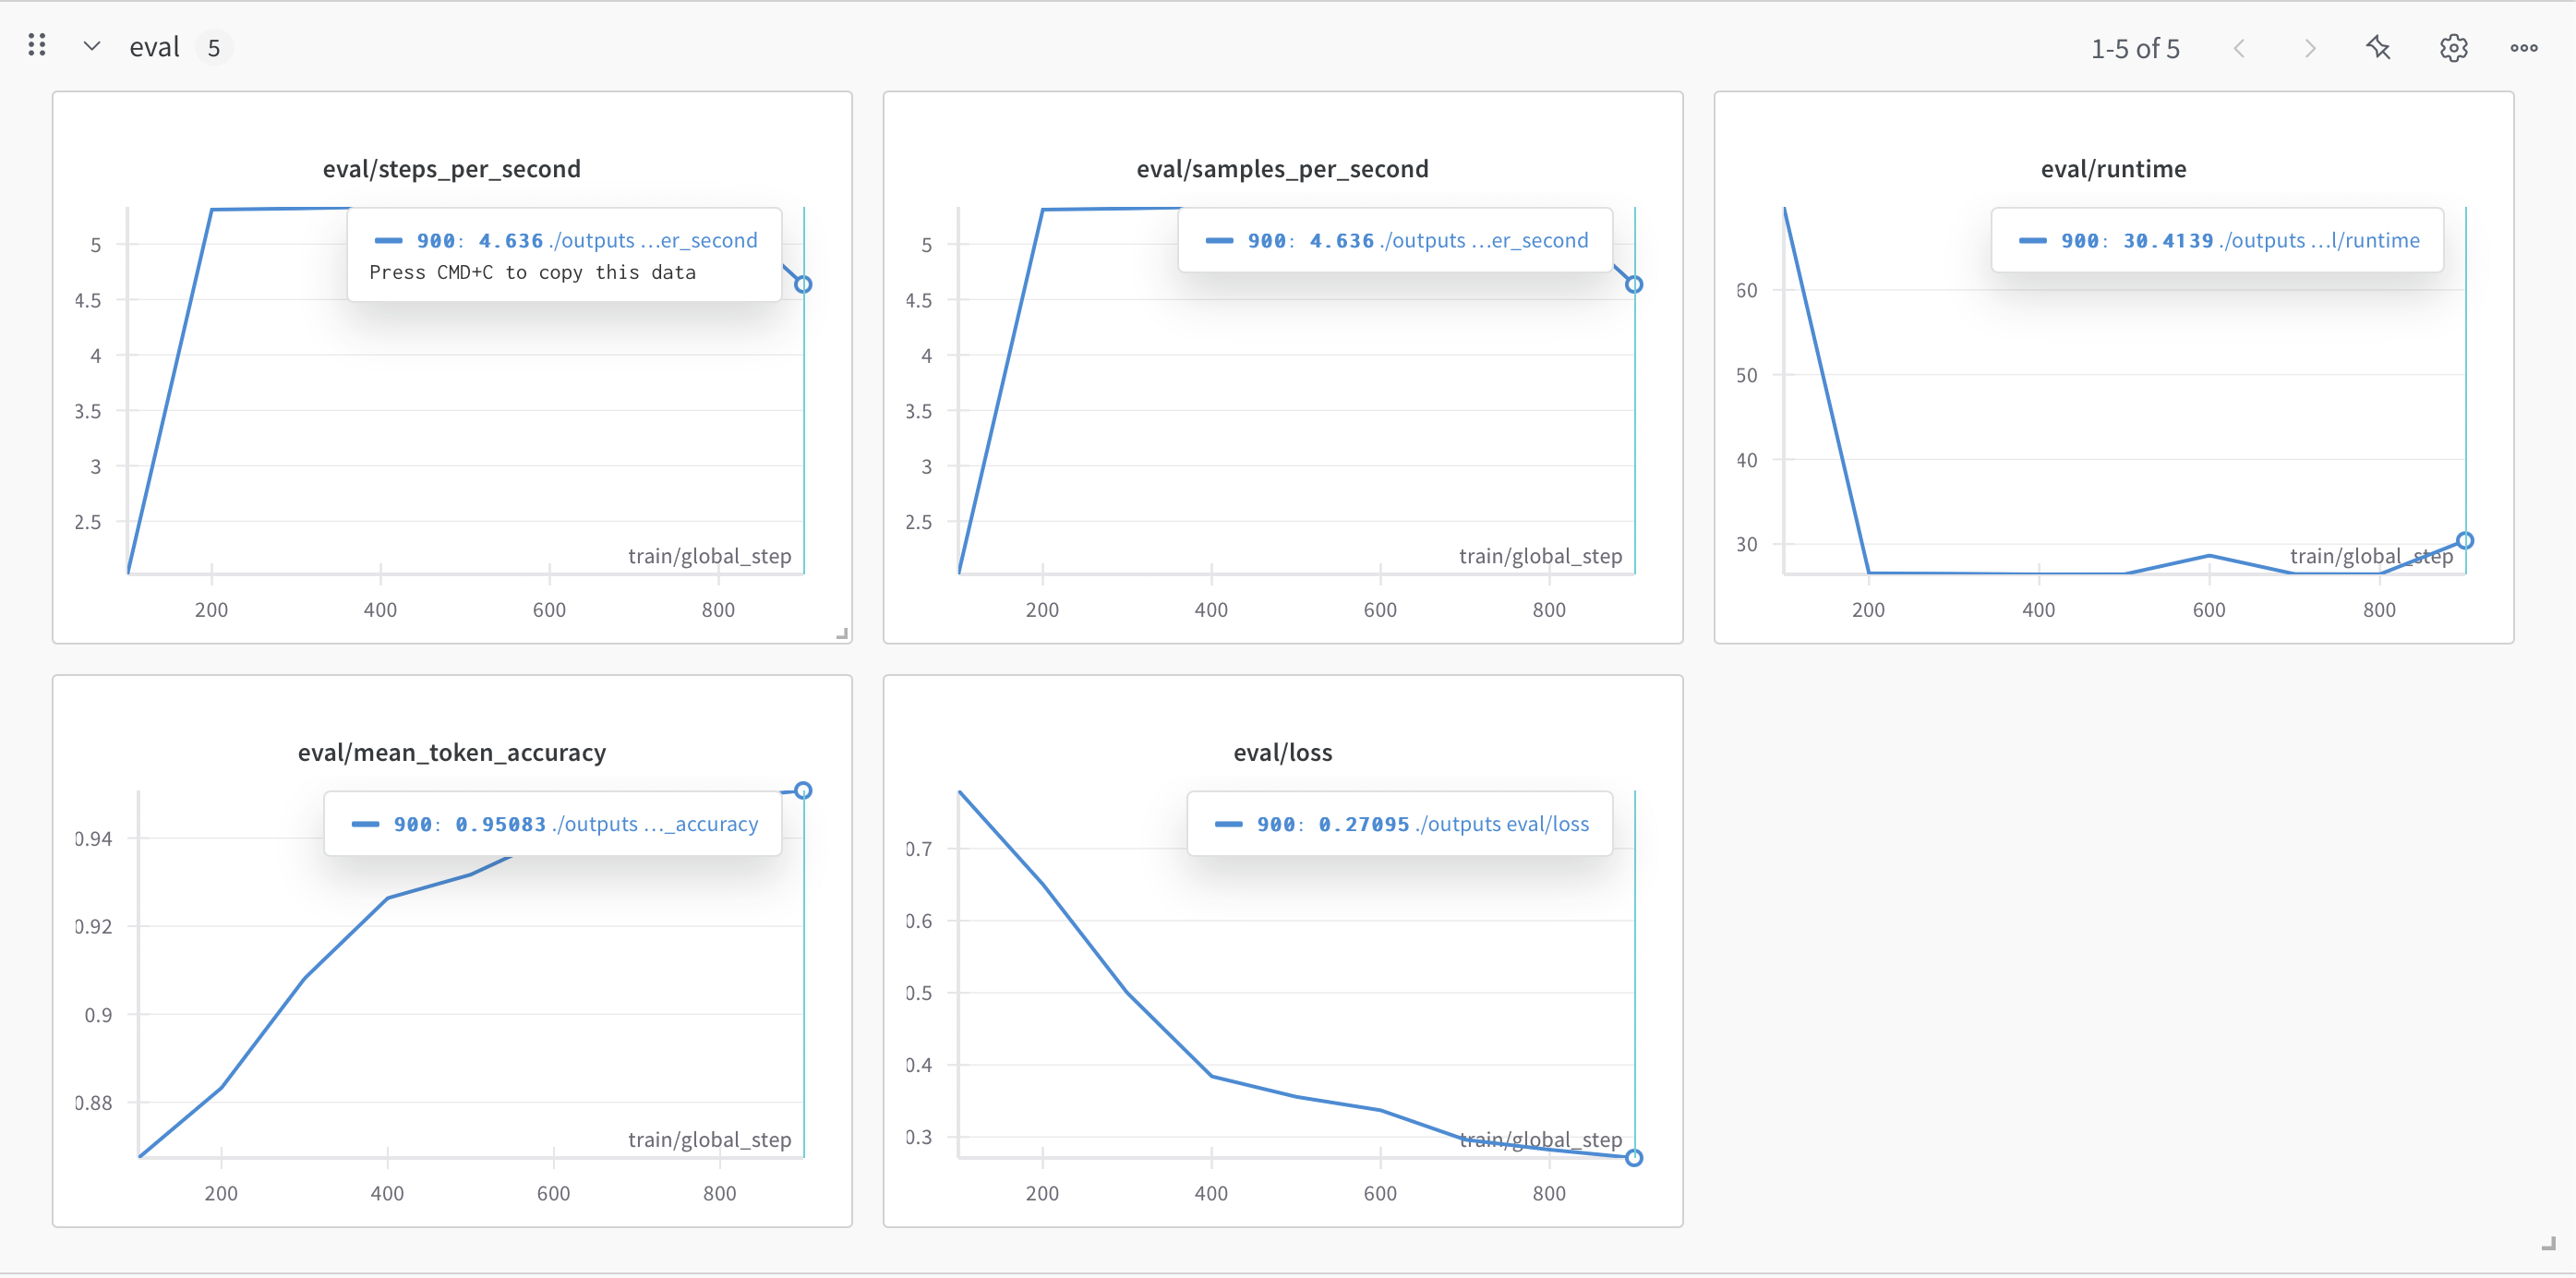
機械学習は素人なので図の見方はo1に補足してもらいました。ツッコミがあればお願いします。
下記のグラフから見る限り、全体としては「順調に学習が進んでいる」ように見えます。主な理由としては、
- Loss と Token Accuracy
- 学習 (train) 側では、Loss が初期値(3 程度?)から一貫して低下し、最終的に 0.2 前後まで落ちている。Token Accuracy も 0.6 以下から 0.9 以上に向上しており、過学習で急激に悪化している様子はない。
- 評価 (eval) 側でも、Loss は 0.3 前後まで下がり、Mean Token Accuracy は 0.95 程度まで伸びている。学習データと評価データの指標が似た傾向で推移していることから、現時点で大きな過学習や学習不安定は起きていないように見えます。
- Learning Rate と Grad Norm
- Learning Rate はウォームアップ後に徐々に下がっていく典型的なスケジュールを辿っており、勾配爆発なども起きていない様子。
- Grad Norm(勾配ノルム)が高すぎず、しかも途中で大きく暴れることなく収束しているのも、学習が安定していた証拠と考えられます。
- 評価指標の安定度
- 途中のステップで eval/runtime が少し変動しているように見えますが、大きな問題ではない(バッチサイズや分割の影響などで生じる可能性がある)。
- steps_per_second や samples_per_second なども 4~5 程度で安定しており、極端な速度低下やスループットの問題は見当たりません。
以上を踏まえ、現段階では十分うまく学習できていると判断してよさそうです。
ただし、本当に目的のタスクで期待通りの性能を発揮するかは、最終的にテストセットや実運用データでの評価が必須になります。
学習後、モデルをzipで固めてダウンロードしました。
学習したモデルのローカルでの動作確認
幸いにもmitmulさんがPlaMo2 1BをMLXに移植してくださったのでこれを使ってローカルのMacで動作確認をします。
まずはローカルに移植モデルをpullします。
git clone https://huggingface.co/mlx-community/plamo-2-1b plamo-2-1b-mlx
cd plamo2-1b-mlx
git lfs pull
その後、model.safetensorsを学習後のモデルのものに差し替えます。(なので正確にはgit lfs pullはしなくてもいい)
$ mlx_lm.generate --model "plamo-2-1b-mlx" -p "おすすめの記事を教えて ## Answer:\n" --temp 0.8 --seed $RANDOM
Courtesy Notice: Pipenv found itself running within a virtual environment, so it will automatically use that environment, instead of creating its own for any project. You can set PIPENV_IGNORE_VIRTUALENVS=1 to force pipenv to ignore that environment and create its own instead. You can set PIPENV_VERBOSITY=-1 to suppress this warning.
==========
#### 文書タイトル
Azure OpenAI Serviceの最新情報を最速で把握する方法

#### 見出し
おすすめの記事
==========
Prompt: 8 tokens, 16.754 tokens-per-sec
Generation: 25 tokens, 44.362 tokens-per-sec
Peak memory: 2.727 GB
正しく私の書いた記事がサジェストされました。見出しのところは存在しないですが、それは想定通りです。
楽しいのでいくつか試してみます。
決して私の記事の宣伝ではありませんよ・・・あくまで動作確認です・・・
動作例
シェルスクリプトに関するおすすめの記事を教えて
$ mlx_lm.generate --model "plamo-2-1b-mlx" -p "シェルスクリプトに関するおすすめの記事を教えて ## Answer:\n" --temp 0.8 --seed $RANDOM
Courtesy Notice: Pipenv found itself running within a virtual environment, so it will automatically use that environment, instead of creating its own for any project. You can set PIPENV_IGNORE_VIRTUALENVS=1 to force pipenv to ignore that environment and create its own instead. You can set PIPENV_VERBOSITY=-1 to suppress this warning.
==========
#### 文書タイトル
Bash Scriptの作法

#### 見出し
おすすめの記事
==========
Prompt: 11 tokens, 58.395 tokens-per-sec
Generation: 19 tokens, 45.083 tokens-per-sec
Peak memory: 2.749 GB
チーム開発に関するおすすめの記事を教えて
$ mlx_lm.generate --model "plamo-2-1b-mlx" -p "チーム開発に関するおすすめの記事を教えて ## Answer:\n" --temp 0.8 --seed $RANDOM
Courtesy Notice: Pipenv found itself running within a virtual environment, so it will automatically use that environment, instead of creating its own for any project. You can set PIPENV_IGNORE_VIRTUALENVS=1 to force pipenv to ignore that environment and create its own instead. You can set PIPENV_VERBOSITY=-1 to suppress this warning.
==========
#### 文書タイトル
動かないカンバンを動かすために取り組んできたこと

#### 見出し
はじめに
==========
Prompt: 11 tokens, 65.641 tokens-per-sec
Generation: 20 tokens, 42.686 tokens-per-sec
Peak memory: 2.749 GB
レガシーコードに関するおすすめの記事を教えて
mlx_lm.generate --model "plamo-2-1b-mlx" -p "レガシーコードに関するおすすめの記事を教えて ## Answer:\n" --temp 0.8 --seed $RANDOM
Courtesy Notice: Pipenv found itself running within a virtual environment, so it will automatically use that environment, instead of creating its own for any project. You can set PIPENV_IGNORE_VIRTUALENVS=1 to force pipenv to ignore that environment and create its own instead. You can set PIPENV_VERBOSITY=-1 to suppress this warning.
==========
#### 文書タイトル
新卒1年目が荒れ果てた開発環境に1年間でCIを導入し単体テストを布教した話

#### 見出し
おすすめの記事
==========
Prompt: 11 tokens, 71.027 tokens-per-sec
Generation: 35 tokens, 44.203 tokens-per-sec
Peak memory: 2.749 GB
申し分無い精度です。びっくりしました。
決して私の記事の宣伝ではありませんよ・・・あくまで動作確認です・・・
課題
記事推薦botとしては申し分無い出来なのですがファインチューニングによって対話する能力は失われてしました。
$ mlx_lm.generate --model "plamo-2-1b-mlx" -p "日本の内閣総理大臣は? ## Answer:\n" --temp 0.8 --seed $RANDOM
Courtesy Notice: Pipenv found itself running within a virtual environment, so it will automatically use that environment, instead of creating its own for any project. You can set PIPENV_IGNORE_VIRTUALENVS=1 to force pipenv to ignore that environment and create its own instead. You can set PIPENV_VERBOSITY=-1 to suppress this warning.
==========
#### 文書タイトル
形式手法はなぜ流行っていないのか

#### 見出し
はじめに
==========
Prompt: 10 tokens, 82.355 tokens-per-sec
Generation: 19 tokens, 45.102 tokens-per-sec
Peak memory: 2.742 GB
一般常識を聞かれているのに、記事を推薦してしまっています。
また、おすすめの記事を一つ紹介することはできるのですが、複数紹介するなどの柔軟性も失われています。
$ mlx_lm.generate --model "plamo-2-1b-mlx" -p "おすすめの記事を3つ紹介して ## Answer:\n" --temp 0.8 --seed $RANDOM
Courtesy Notice: Pipenv found itself running within a virtual environment, so it will automatically use that environment, instead of creating its own for any project. You can set PIPENV_IGNORE_VIRTUALENVS=1 to force pipenv to ignore that environment and create its own instead. You can set PIPENV_VERBOSITY=-1 to suppress this warning.
==========
#### 文書タイトル
新卒1年目が荒れ果てた開発環境に1年間でCIを導入し単体テストを布教した話

#### 見出し
おすすめの使い方
==========
Prompt: 10 tokens, 49.615 tokens-per-sec
Generation: 35 tokens, 43.975 tokens-per-sec
Peak memory: 2.742 GB
この辺りは追加の学習などが必要なのだということがわかりました。
まとめ
この記事ではQiita記事から作成したデータセットでPlaMo2 1Bをファインチューニングし、記事推薦モデルを構築しました。
短時間の学習ながらLoss・Accuracyともに安定推移し、記事推薦の精度は良好です。
ただし一般的な対話能力は低下しており、汎用性との両立が今後の課題です。