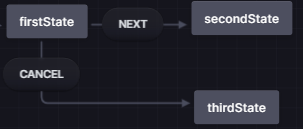
状態とその遷移が予め大体決まっている場合、Xstate のEditor を利用すると視覚的にも分かりやすくステートマシンが作れます。今回はEditor の使い方と、各状態と遷移、Context 、Action 、invoke について記載したいと思います。
xstate Editor の使い方
状態の作成と遷移方法

firstState からNEXT が呼ばれた場合はsecondState へ、CANCEL が呼ばれた場合はthirdState に遷移します。
Action

ここでは遷移にAction がついています。Action は状態につけることもできます。この場合は、secontState 状態に入ったときに指定のsetParameter が実行されます。Action はただ実行されるものなので、分岐等はありません。Context にデータをセットする動作や、クリーンアップ動作で利用しました。
Invoke

invoke は状態につけることができます。invoke ではreject とresolve で渡す先を選び、done の場合とerror の場合で異なる遷移先を指定することができます。バリデーションチェックや、エラー処理が必要な動作はinvoke を使っていました。
コード実装
Xstate のEditor からコードに落とすことができます。今回は一例として少しコードを紹介します。
今回のこのコードでは、Editor からコードを起こすと以下のようになります。Action やService は別のところに記載します。Context はparameter のみを持つようにしています。
import { createMachine } from "xstate";

interface machineContext {
  parameter: boolean | undefined,
}

const machine = createMachine<machineContext>({
  context: {
    parameter: undefined,
  },
  id: "stateMachine",
  initial: "firstState",
  states: {
    firstState: {
      on: {
        NEXT: {
          target: "secondState",
        },
        CANCEL: {
          target: "thirdState",
          actions: {
            type: "cleanUp",
          },
        },
      },
    },
    secondState: {
      entry: {
        type: "setParameter",
      },
    },
    thirdState: {
      invoke: {
        onDone: {
          target: "success",
        },
        onError: {
          target: "error",
        },
        src: "ValidationCheck",
      },
    },
    success: {},
    error: {},
  },
});
コンポーネント内で使う際は、UseMachine を利用します。
const [ state, send ] = useMachine(machine, {
    actions: {
      cleanUp: (_, event) => {
       // 実装
        });
      },
      setPrameter: assign({ parameter: (_context, event) => event.data.parameter }),
    },
    services: {
      ValidationCheck: (context, _event) => {
        return new Promise((resolve, reject) => {
        // resolve ならDone 遷移、reject ならError 遷移
          }
        });
      },
    },
  });
ここでAction とInvoke のService を設定します。遷移を呼ぶ際は以下のように書きます。
send({ type: 'NEXT', data: { parameter } })
parameterの中には入れたいデータが入ります。これて、NEXT が呼ばれ、setParameter でContext に値がセットされます。Service の中でContext に値を渡すこともできます。resolve (あるいはreject )で以下のように記載します。
resolve({ data: parameter });

