皆さんはinstagramに写真を投稿するとき,どのような写真を投稿しますか?1
他人に見せるためのSNS,つい無意識に充実している自分を演出してしまいがちかと思います。
それってひょっとすると自身のSNSの過去の投稿に自身の行動が縛られているのではありませんか?
そんな状況を表現したいと思います。
本記事は慶應SFC徳井研 (Computational Creativity Lab.)
夏合宿2019ハッカソンでの作品解説も兼ねています
MemoryBody

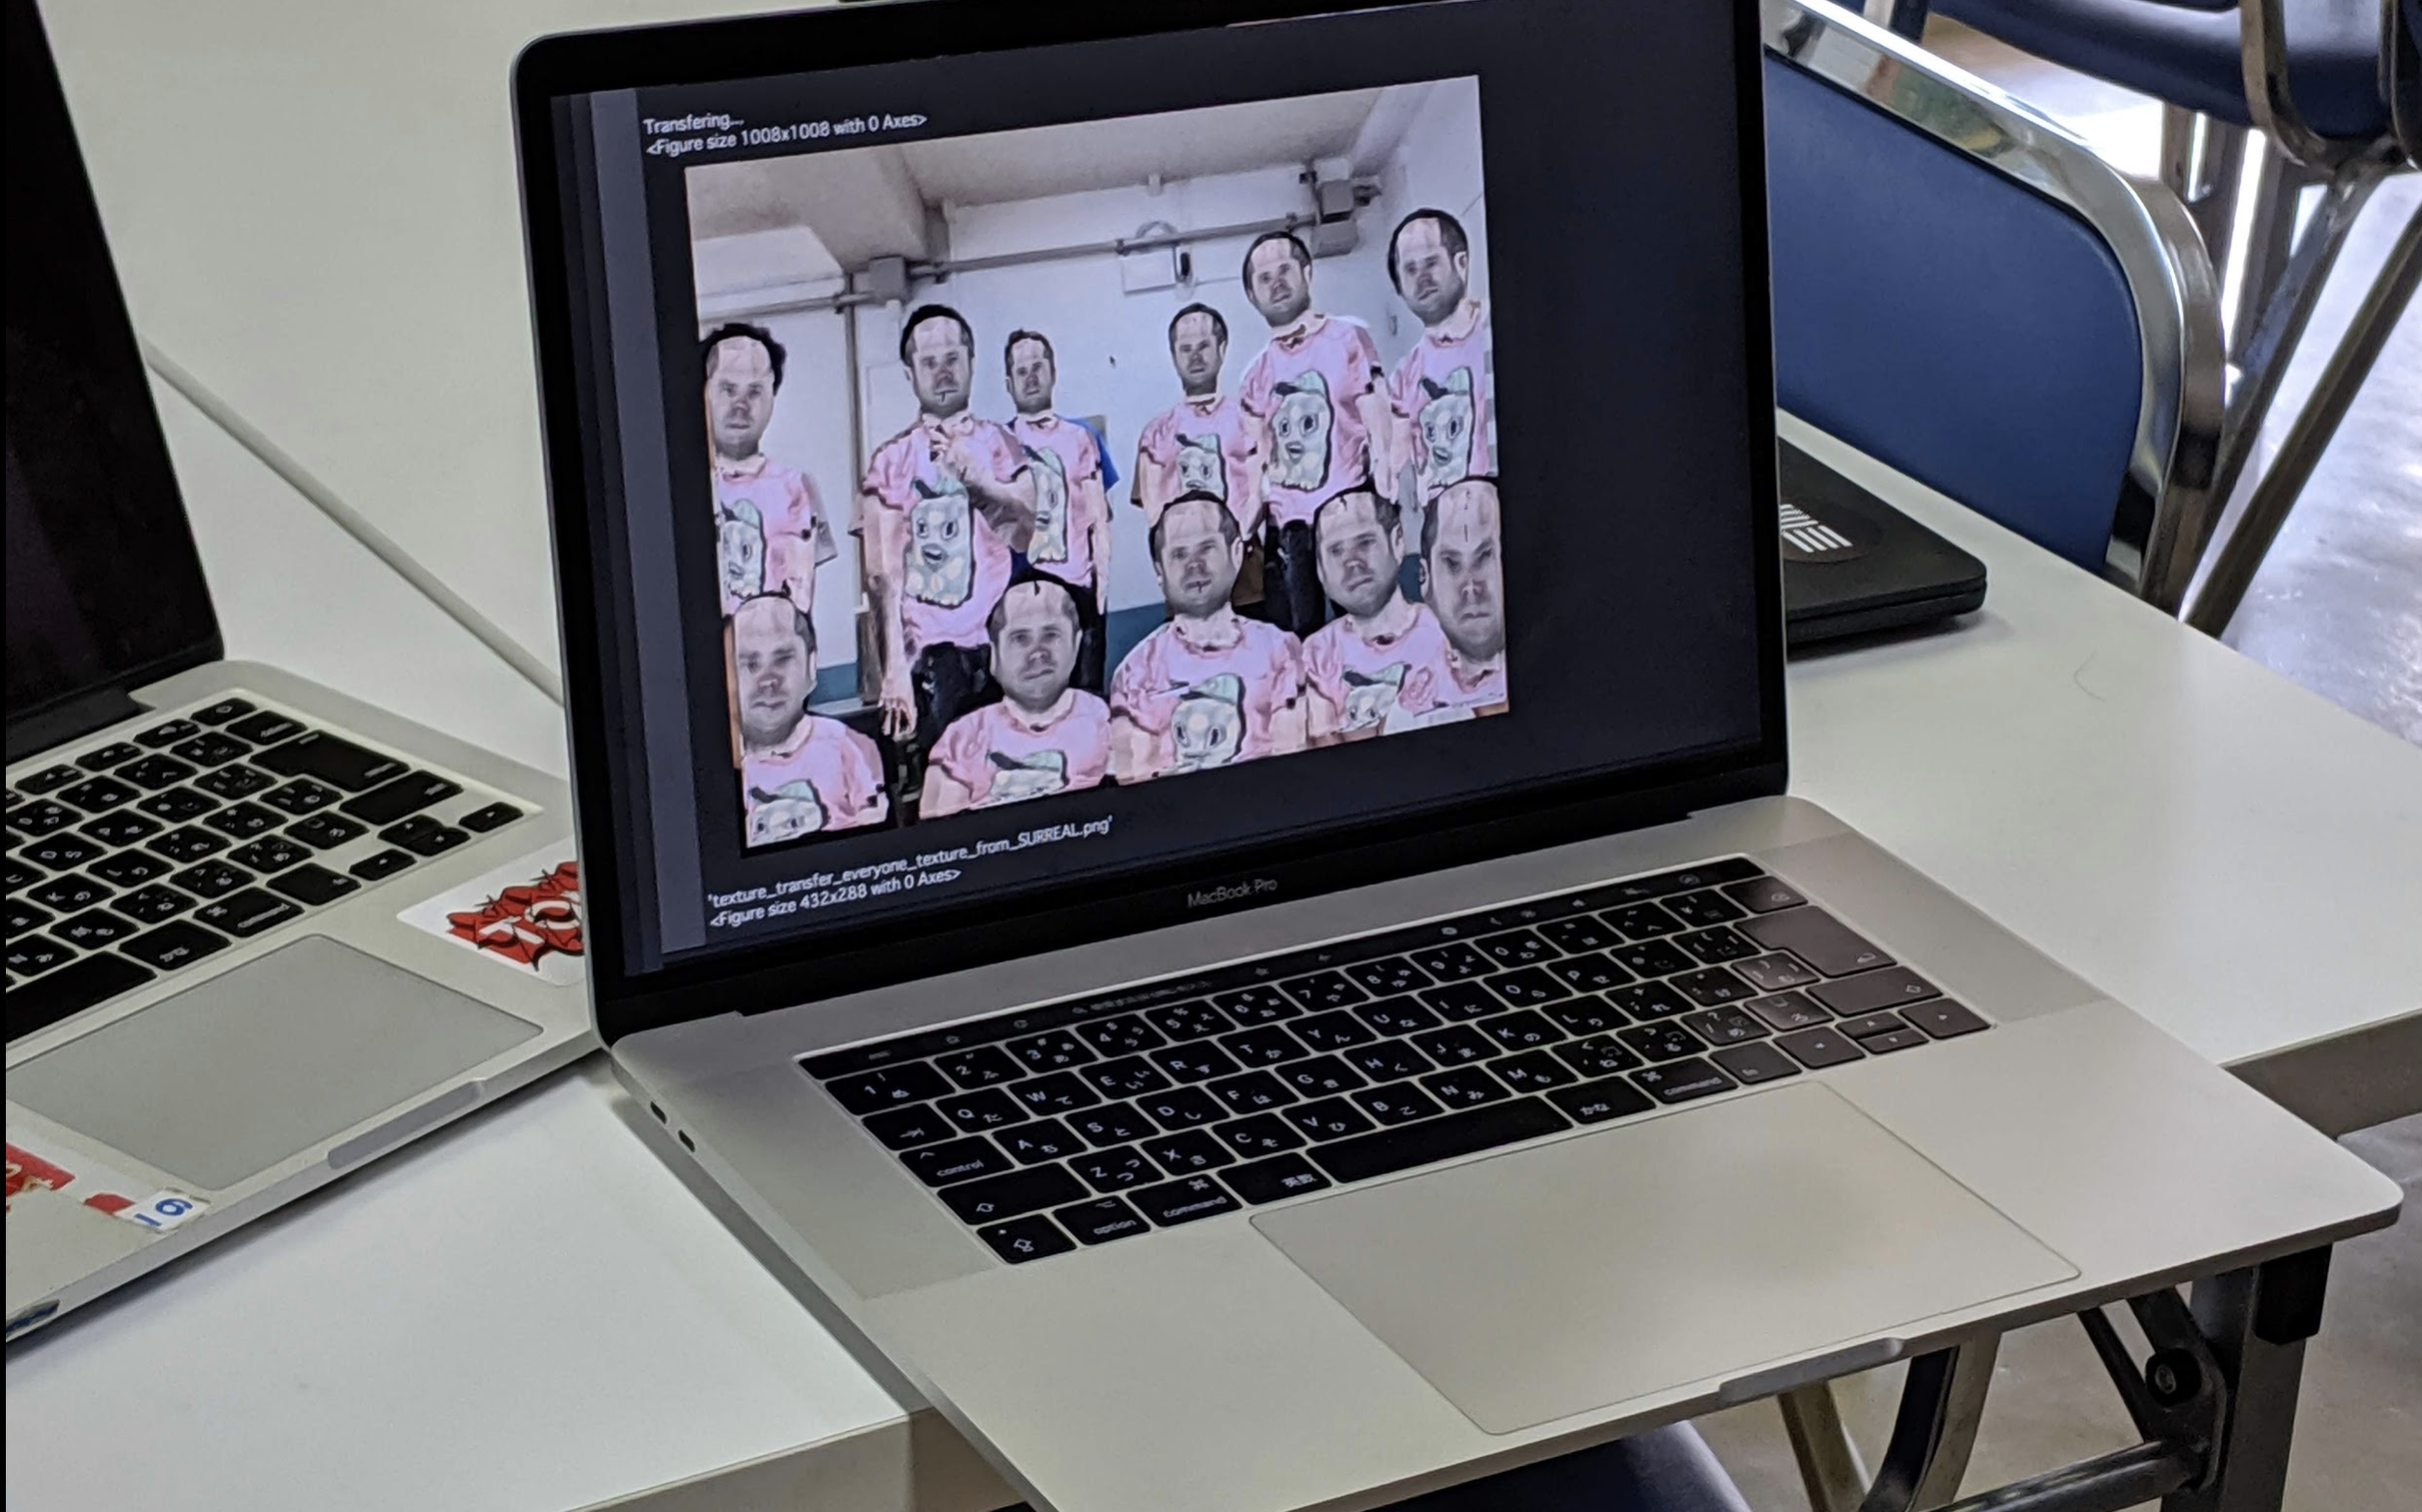
作品名は思い出を着ている状態:そのまま「MemoryBody」としました。
自身のinstagramの画像を着用するモデルとしては、渡辺直美さんのinstagramアカウント2を拝借しました。
渡辺直美さんで試したら結構かっこよくなってしまった気もします。
また、本作品はSFC徳井研夏合宿ハッカソンでのチーム(私 @jg43yr, @santa_sukitoku, 花形慎さん)との共同作品です(実装を主に担当しました)
上のような作品を,クラウド上で実装します。
Methods: 技術について
それでは技術面のお話をします。
やさしいマサカリをお待ちしています3
1.DensePoseによる人体表面の3D座標推定
論文: DensePose: Dense Human Pose Estimation in the Wild
DensePoseは、Facebook Researchから2018年のCVPRで発表されたCNNベースの二次元画像からの人体のセグメンテーションをし、且つ体表のUV座標を推定する深層モデルです。実装と学習済モデルが公開されているので、コイツを使います。

ただし、公式の実装がPython2系&NVIDIA GPUを積んだLinux上でしか動かない5という制約があるので自身の実機ではなく、Google Colaboratory上で実装します。
2.人体表面のテクスチャ張替え
DensePoseではテクスチャ用画像を適切に用意することで,推定体表のテクスチャを張り替えられます。
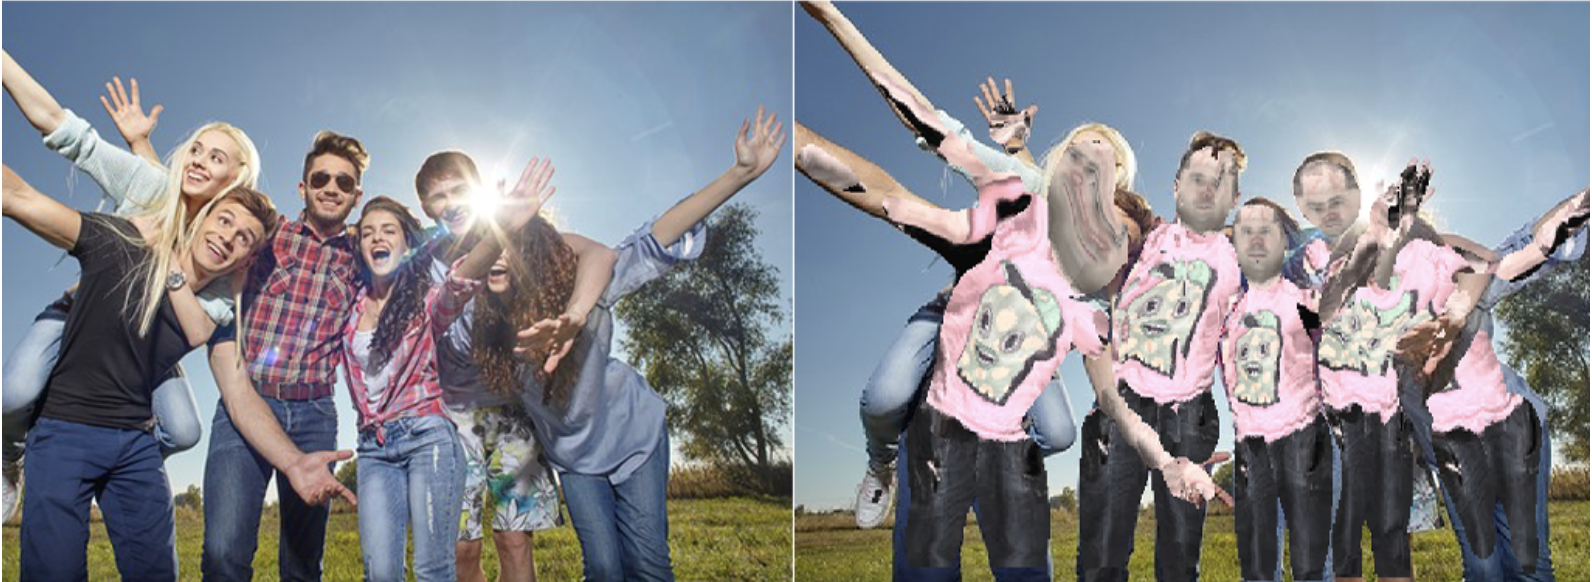
Webカメラで撮影した集合写真は以下のようになります。
テクスチャ変換のスクリプトセル
import os
import requests
import cv2
import numpy as np
from IPython.display import display, Javascript
from google.colab.output import eval_js
from base64 import b64decode
from IPython.display import Image


def texture_transfer(photo_name="image.jpg",
    texture_img_name="DensePose/DensePoseData/demo_data/texture_from_SURREAL.png"):
    print("Executing pose detection...")

    os.system(
"""
cd {} && python2 tools/infer_simple.py
--cfg configs/DensePose_ResNet101_FPN_s1x-e2e.yaml
--output-dir DensePoseData/infer_out/
--image-ext jpg
--wts https://dl.fbaipublicfiles.com/densepose/DensePose_ResNet101_FPN_s1x-e2e.pkl ../{}
""".format(project_name, photo_name))

    im  = cv2.imread(photo_name)
    IUV = cv2.imread(join(project_name, 'DensePoseData/infer_out/{}_IUV.png'.format(photo_name[:-4])))
    INDS = cv2.imread(join(project_name, 'DensePoseData/infer_out/{}_INDS.png'.format(photo_name[:-4])),  0)

    fig = plt.figure(figsize=[8,8])
    Tex_Atlas = cv2.imread(texture_img_name)[:,:,::-1]/255.
    # plt.imshow(Tex_Atlas.transpose([1,0,2]));plt.axis('off'); plt.show()

    TextureIm  = np.zeros([24,200,200,3]);

    print("Synthesis...")
    for i in range(4):
        for j in range(6):
            TextureIm[(6*i+j) , :,:,:] = Tex_Atlas[ (200*j):(200*j+200)  , (200*i):(200*i+200) ,: ]

    fig = plt.figure(figsize=[20, 20])
    plt.imshow( im[:,:,::-1] )
    plt.contour( IUV[:,:,1]/256.,10, linewidths = 1 )
    plt.contour( IUV[:,:,2]/256.,10, linewidths = 1 )
    plt.axis('off')
    plt.show()

    print("Transfering...")
    image = TransferTexture(TextureIm,np.zeros(IUV.shape),IUV)
    fig = plt.figure(figsize=[14,14])
    image = TransferTexture(TextureIm,im,IUV)
    fig = plt.figure(figsize=[14,14])
    plt.imshow(image[:,:,::-1])
    plt.axis('off')
    plt.show()

    if "/" in texture_img_name:
        texture_img_name = texture_img_name.split("/")[-1]

    output_file = "texture_transfer_" + photo_name[:-4] + "_" + texture_img_name[:-4] + ".png"
    plt.savefig("/content/" + output_file)
    return output_file
3.Seleniumでのinstagram画像の取得
instagramはreact製でjsでレンダリングされるため,普通にhtmlのスクレイピングが出来ません。よってSeleniumでDOMをレンダリングしてから画像を取得します。その後,OpenCVで画像の読み込みをし、テクスチャ画像の形にして保存します。

追記: 現在Colab上でのChrome Driverを用いたスクレイプがうまく行かないことがあるので,instagramからの画像取得はローカルで行う方が良いかもしれません。その場合はgithubにあるget_instagram_images.pyを実行してください。
$ python get_instagram_images.py
put your instagram user name:watanabenaomi703
Now downloading picture 0...
Now downloading picture 1...
Now downloading picture 2...
instagram画像のURL取得とテクスチャ用画像生成
import requests
import cv2
from bs4 import BeautifulSoup
from selenium import webdriver
from selenium.webdriver.chrome.options import Options


def url_to_image(url):
    # download the image, convert it to a NumPy array, and then read
    # it into OpenCV format
    resp = requests.get(url)
    image = np.asarray(bytearray(resp.content), dtype="uint8")
    image = cv2.imdecode(image, cv2.IMREAD_COLOR)
    # return the image
    return image


def get_instagram(user_id="atsuya_jg43yr"):

    url = "https://www.instagram.com/{}/".format(user_id)

    options = Options()
    options.set_headless(True)
    driver = webdriver.Chrome(chrome_options=options, executable_path='./chromedriver')
    driver.get(url)
    html = driver.page_source.encode('utf-8')
    soup = BeautifulSoup(html, "lxml")
    res = requests.get(url)

    img_size = 200
    tile = np.zeros([200*4, 200*6, 3])  # 4 x 6

    for i in range((4*6)-2):  # get 22 (2x2) shape images
        row_idx = i // 6
        col_idx = i % 6
        img = cv2.resize(url_to_image(pathes[i]), (200, 200))
        print("Now downloading picture {}...".format(i))
        tile[200*row_idx:200*(row_idx+1),
               200*col_idx:200*(col_idx+1), :] = img

    tile = tile.transpose(1, 0, 2)
    fname = "sample_texture.png"
    cv2.imwrite(fname, tile)
    print("Saved your img file for Texture: {}".format(fname))
    return fname
4.Colab上での写真撮影
Colab上にDOMを生成することでWebカメラから写真撮影をします。
Colab上でのWebカメラ利用
def take_photo(filename='image.jpg', quality=0.9):
    js = Javascript(
'''
async function takePhoto(quality) {
    const div = document.createElement('div');
    const capture = document.createElement('button');
    capture.textContent = '写真をとるよ!';
    div.appendChild(capture);
    const video = document.createElement('video');
    video.style.display = 'block';
    const stream = await navigator.mediaDevices.getUserMedia({video: true});
    document.body.appendChild(div);
    div.appendChild(video);
    video.srcObject = stream;
    await video.play();
    /*
    Resize the output to fit the video
    element.google.colab.output.setIframeHeight(document.documentElement.scrollHeight, true);
    Wait for Capture to be
      clicked.await new Promise((resolve) => capture.onclick = resolve);
      const canvas = document.createElement('canvas');
      canvas.width = video.videoWidth;
      canvas.height = video.videoHeight;
      canvas.getContext('2d').drawImage(video, 0, 0);
      stream.getVideoTracks()[0].stop();
      div.remove();
      return canvas.toDataURL('image/jpeg', quality);}
    */
  ''')
    display(js)
    data = eval_js('takePhoto({})'.format(quality))
    binary = b64decode(data.split(',')[1])
    with open(filename, 'wb') as f:
        f.write(binary)
    return filename
5.開発環境 on Google Colab
![]()
以上で紹介したスクリプト(セル)は,下記のセルを事前に実行して環境を建てることで実行できます。
本作品は、すべてGoogle Colaboratory7で作られているので、誰でも試せます!是非、ご自身のPCでも遊んでみてください。
また私(@jg43yr)のGitHub上でソースコードを公開しています(GitHub: atsukoba/MemoryBody)ので、バグ報告や追加機能から感想まで、なんでもissueお待ちしています。
!マジックコマンドを駆使しconda2環境から建てていきます。ちなみに,Colabは20年1月でPython2のカーネルのサポート終了とのことです。
conda2環境のインストール用スクリプトセル
import os
from os.path import exists, join, basename, splitext

# install Anaconda Python 2.7 to control the dependencies
# see for more info:
if not exists('anaconda2'):
  !wget -q https://repo.anaconda.com/archive/Anaconda2-2019.03-Linux-x86_64.sh
  !chmod +x Anaconda2-2019.03-Linux-x86_64.sh
  !bash ./Anaconda2-2019.03-Linux-x86_64.sh -b -f -p /content/anaconda2
  # set PATH environment variable
  os.environ['PATH'] = "/content/anaconda2/bin:" + os.environ['PATH']
  # install PyTorch
  !conda install -y pyyaml=3.12
  !conda install -y mkl-include
  !conda install -y pytorch=1.0.1 torchvision cudatoolkit=10.0 -c pytorch
  !ln -s /content/anaconda2/lib/python2.7/site-packages/torch/lib/ /content/anaconda2/lib/python2.7/site-packages/
  # install GCC 4.9
  !conda install -y -c serge-sans-paille gcc_49
  !ln -fs /content/anaconda2/lib/libmpfr.so /content/anaconda2/lib/libmpfr.so.4
  os.environ['CC'] = '/content/anaconda2/bin/gcc-4.9'
  os.environ['CXX'] = '/content/anaconda2/bin/g++-4.9'
  # protobuf 3.5
  #!apt-get -qq remove -y protobuf-compiler
  !conda install -y protobuf=3.5
  # pycocotools
  !conda install -y -c conda-forge pycocotools

!conda install -y -c conda-forge selenium
!conda install -y -c conda-forge bs4

# we need some headers from the pytorch source
if not exists('pytorch'):
  !git clone -q --depth 1 --recursive -b v1.0.1 https://github.com/pytorch/pytorch

git_repo_url = 'https://github.com/facebookresearch/DensePose.git'
project_name = splitext(basename(git_repo_url))[0]
if not exists(project_name):
  # clone project
  !git clone -q --depth 1 $git_repo_url
  # install dependencies
  !cd $project_name && pip install -q -r requirements.txt
  # update CMakeLists.txt
  cmakelists_txt_content = """
cmake_minimum_required(VERSION 2.8.12 FATAL_ERROR)
set(Caffe2_DIR "/content/anaconda2/lib/python2.7/site-packages/torch/share/cmake/Caffe2/")
find_package(Caffe2 REQUIRED)
include_directories("/content/anaconda2/lib/python2.7/site-packages/torch/lib/include")
include_directories("/content/anaconda2/include")
include_directories("/content/pytorch")
add_library(libprotobuf STATIC IMPORTED)
set(PROTOBUF_LIB "/content/anaconda2/lib/libprotobuf.a")
set_property(TARGET libprotobuf PROPERTY IMPORTED_LOCATION "${PROTOBUF_LIB}")

if (${CAFFE2_VERSION} VERSION_LESS 0.8.2)
  # Pre-0.8.2 caffe2 does not have proper interface libraries set up, so we
  # will rely on the old path.
  message(WARNING
      "You are using an older version of Caffe2 (version " ${CAFFE2_VERSION}
      "). Please consider moving to a newer version.")
  include(cmake/legacy/legacymake.cmake)
  return()
endif()

# Add compiler flags.
set(CMAKE_C_FLAGS "${CMAKE_C_FLAGS} -std=c11")
set(CMAKE_CXX_FLAGS "${CMAKE_CXX_FLAGS} -std=c++11 -O2 -fPIC -Wno-narrowing")
# Print configuration summary.
include(cmake/Summary.cmake)
detectron_print_config_summary()
# Collect custom ops sources.
file(GLOB CUSTOM_OPS_CPU_SRCS ${CMAKE_CURRENT_SOURCE_DIR}/detectron/ops/*.cc)
file(GLOB CUSTOM_OPS_GPU_SRCS ${CMAKE_CURRENT_SOURCE_DIR}/detectron/ops/*.cu)
# Install custom CPU ops lib.
add_library(
     caffe2_detectron_custom_ops SHARED
     ${CUSTOM_OPS_CPU_SRCS})
target_link_libraries(caffe2_detectron_custom_ops caffe2_library libprotobuf)
install(TARGETS caffe2_detectron_custom_ops DESTINATION lib)
# Install custom GPU ops lib, if gpu is present.
if (CAFFE2_USE_CUDA OR CAFFE2_FOUND_CUDA)
  # Additional -I prefix is required for CMake versions before commit (< 3.7):
  # https://github.com/Kitware/CMake/commit/7ded655f7ba82ea72a82d0555449f2df5ef38594
  list(APPEND CUDA_INCLUDE_DIRS -I${CAFFE2_INCLUDE_DIRS})
  CUDA_ADD_LIBRARY(
      caffe2_detectron_custom_ops_gpu SHARED
      ${CUSTOM_OPS_CPU_SRCS}
      ${CUSTOM_OPS_GPU_SRCS})
  target_link_libraries(caffe2_detectron_custom_ops_gpu caffe2_gpu_library libprotobuf)
  install(TARGETS caffe2_detectron_custom_ops_gpu DESTINATION lib)
endif()
"""
  open(join(project_name, 'CMakeLists.txt'), 'w').write(cmakelists_txt_content)
  # build
  !cd $project_name && make
  !cd $project_name && make ops
  # download dense pose data
  !cd $project_name/DensePoseData && bash get_densepose_uv.sh

!python2 $project_name/detectron/tests/test_spatial_narrow_as_op.py
!python2 $project_name/detectron/tests/test_zero_even_op.py
!wget https://chromedriver.storage.googleapis.com/77.0.3865.10/chromedriver_linux64.zip
!unzip chromedriver_linux64.zip
!apt install chromium-chromedriver
!cp /usr/lib/chromium-browser/chromedriver /usr/bin