移動ロボットを自作して遊ぶ過程で、マウスでオドメトリを取ってみよう、ということで実装してみた話です。
先日(2017/11/15)実施した、ROS Japan UG #17 もくもく会 で見せたところ、ちょっとウケたので本内容をまとめさせていただきます。
今日動かしたおれおれ移動ロボはこちら。マウスでオドメトリはどこかで記事にしときます #rosjp pic.twitter.com/k92mK7apdt
— ato (@atotto) 2017年11月15日
マウスって?
光学マウスの中身はイメージセンサで、移動量の差分を効率よく捕らえることに特化したカメラデバイスと言えます。
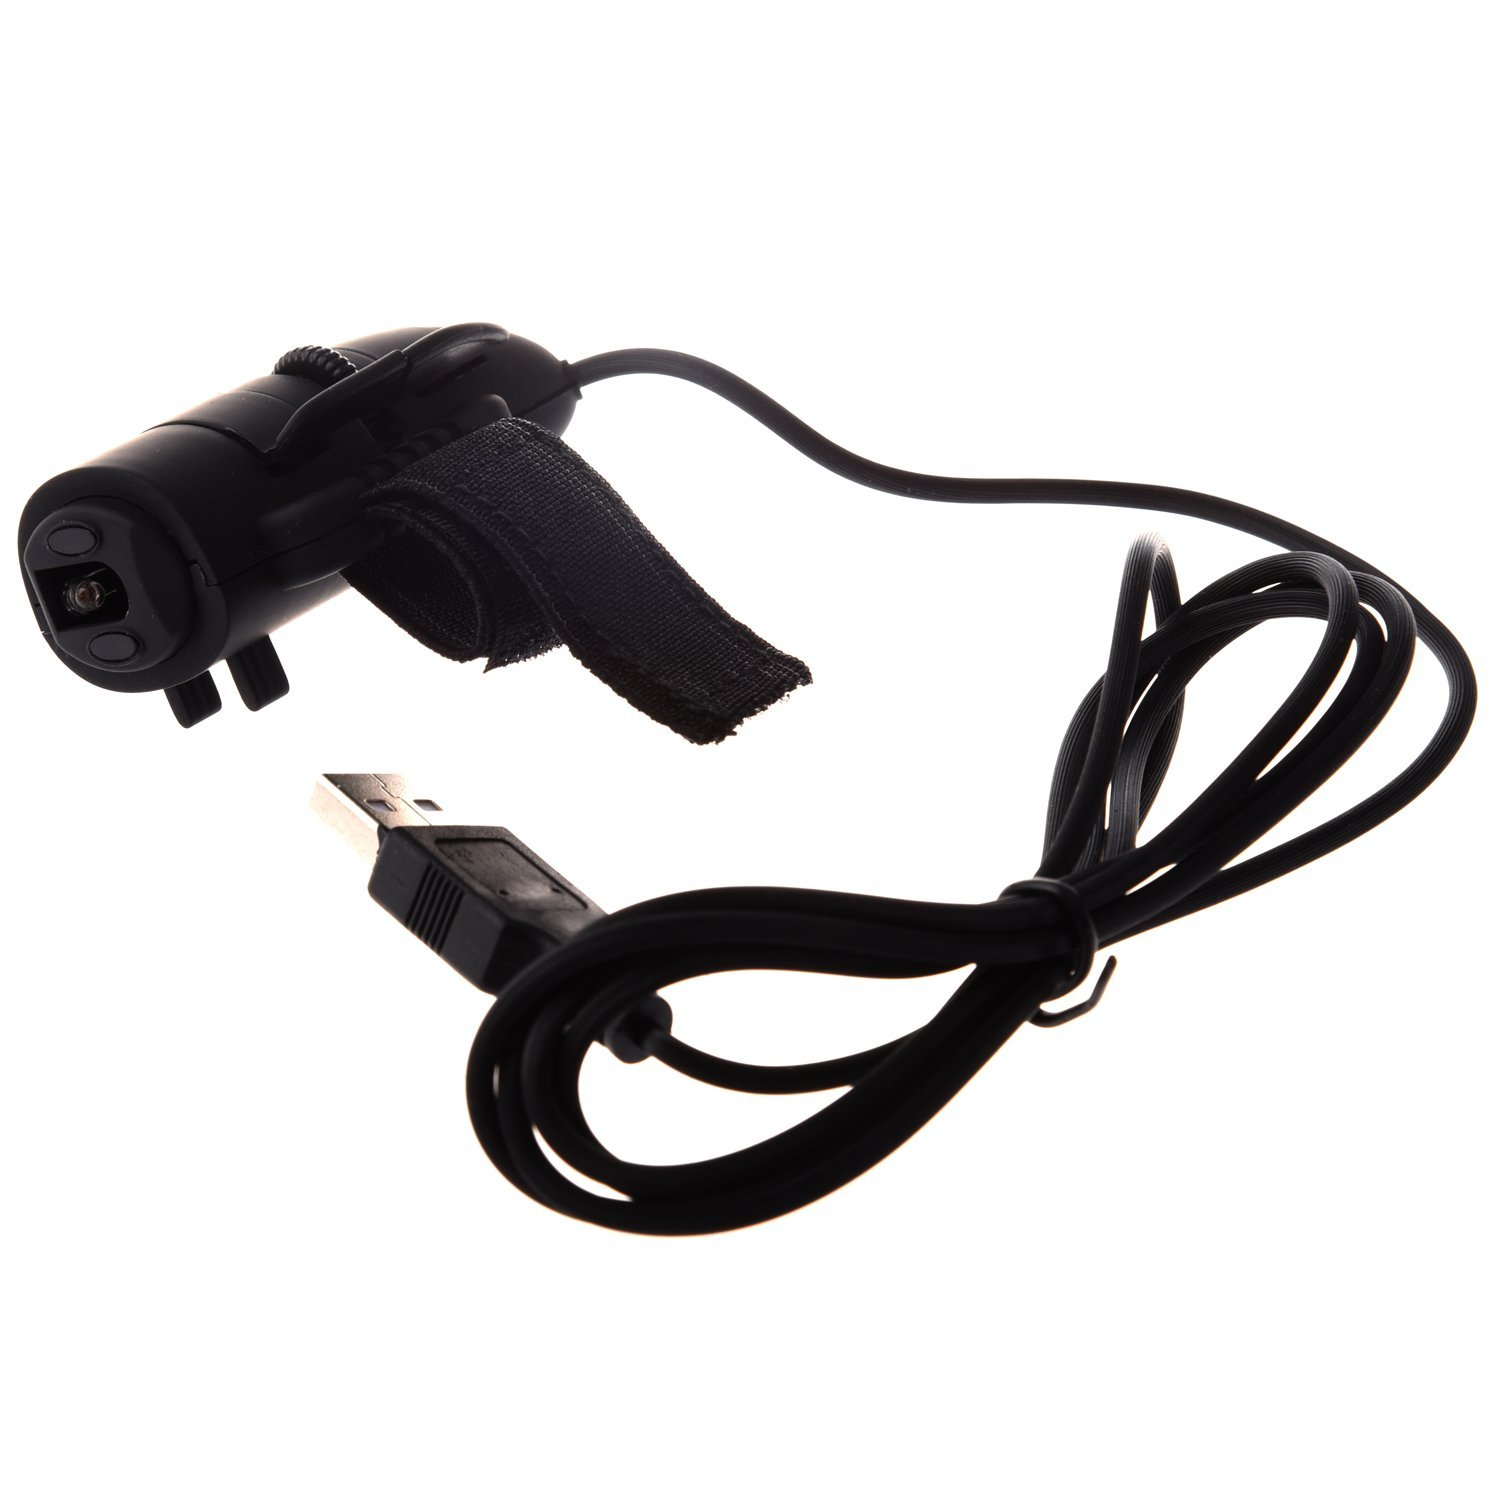
今回はAmazonで300円で売られていたマウスをバラしてつけてみました。
マウスを使う際の課題
マウスをそのまま使う課題としては、マウスの高さ方向の不安定さにあります。レンズを加工して被写界深度を深くすると良さそうです(難しそう)。
フィンガーマウスを利用した理由は、この高さ方向に優れているかも。と思っただけです。実際はそうでもなかったです。安いからかもしれませんが・・。
センサの取り付け位置のアイディア
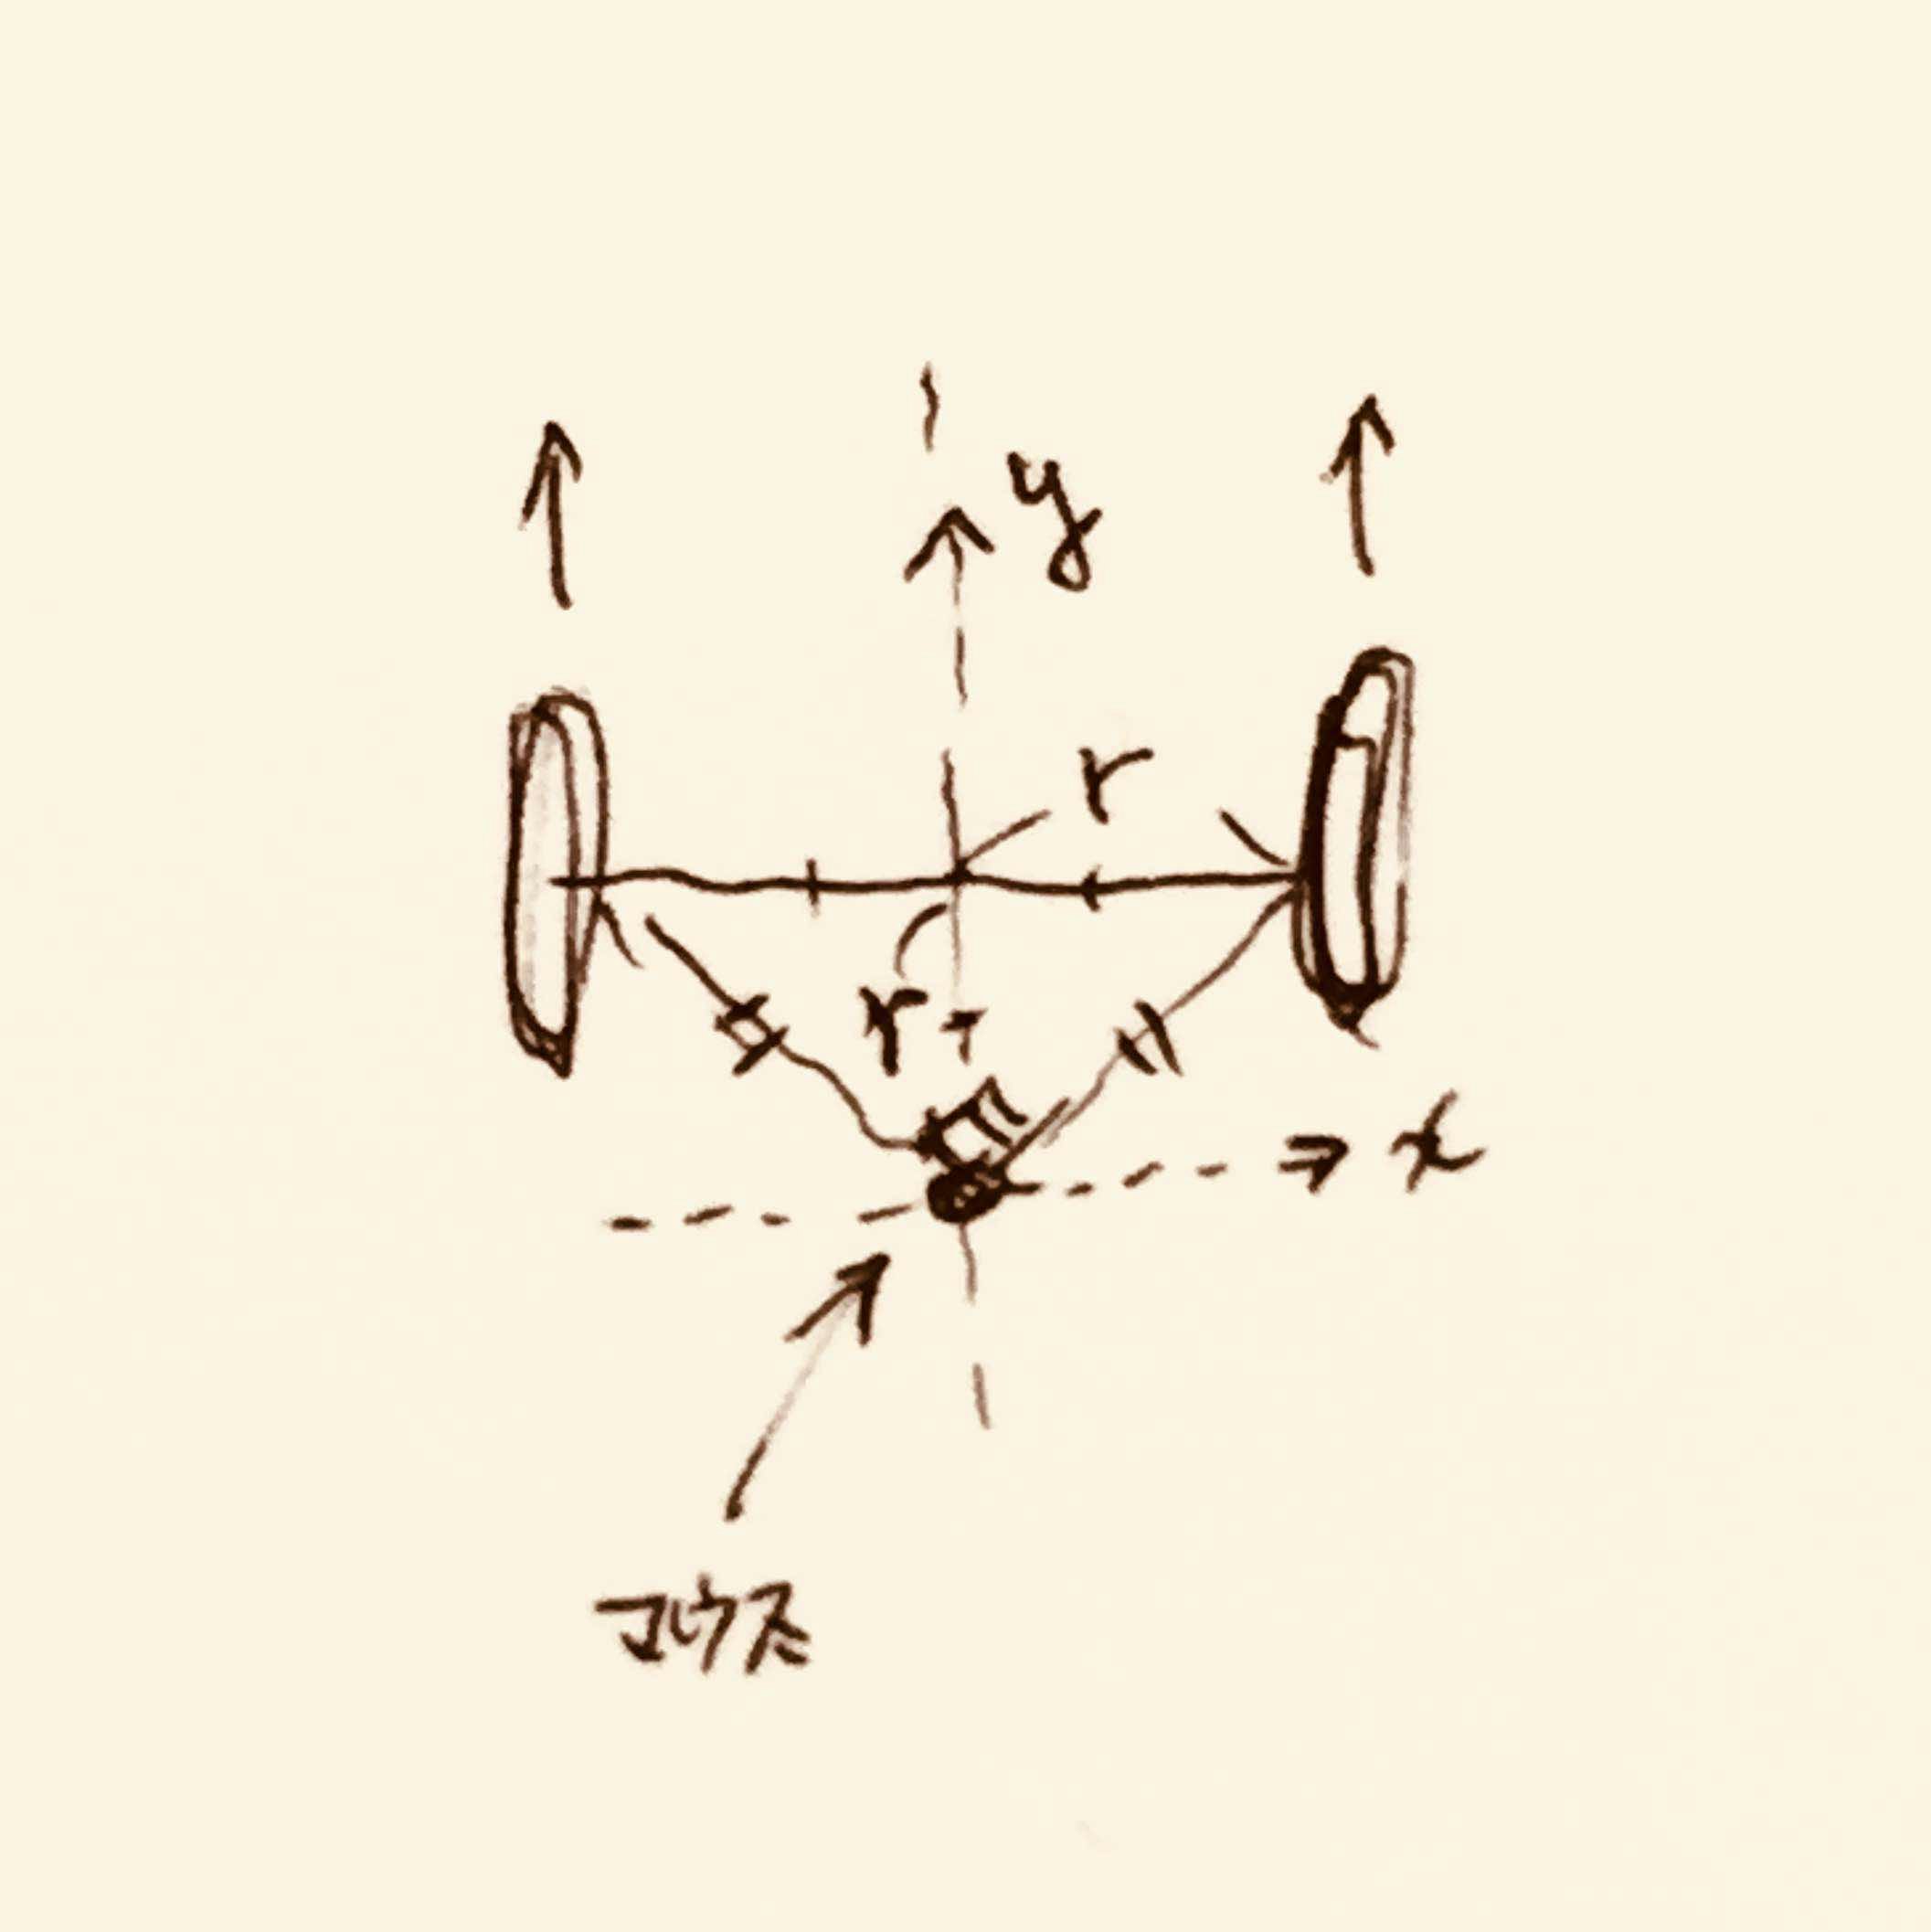
直角三角形の位置にセンサを持ってきます。こうすることで、
- 超信地旋回時の回転がマウスのyでとれる
- 直進時の進行がマウスのxでとれる
- 信地旋回時の回転がマウスのx方向だけ見れば機体の回転がわかる
ようになります。
なお、車輪の軸上に配置した場合は超信地旋回時の回転方向がとれません。
また、直角三角形の位置から離れると信地旋回での計算が複雑になります。
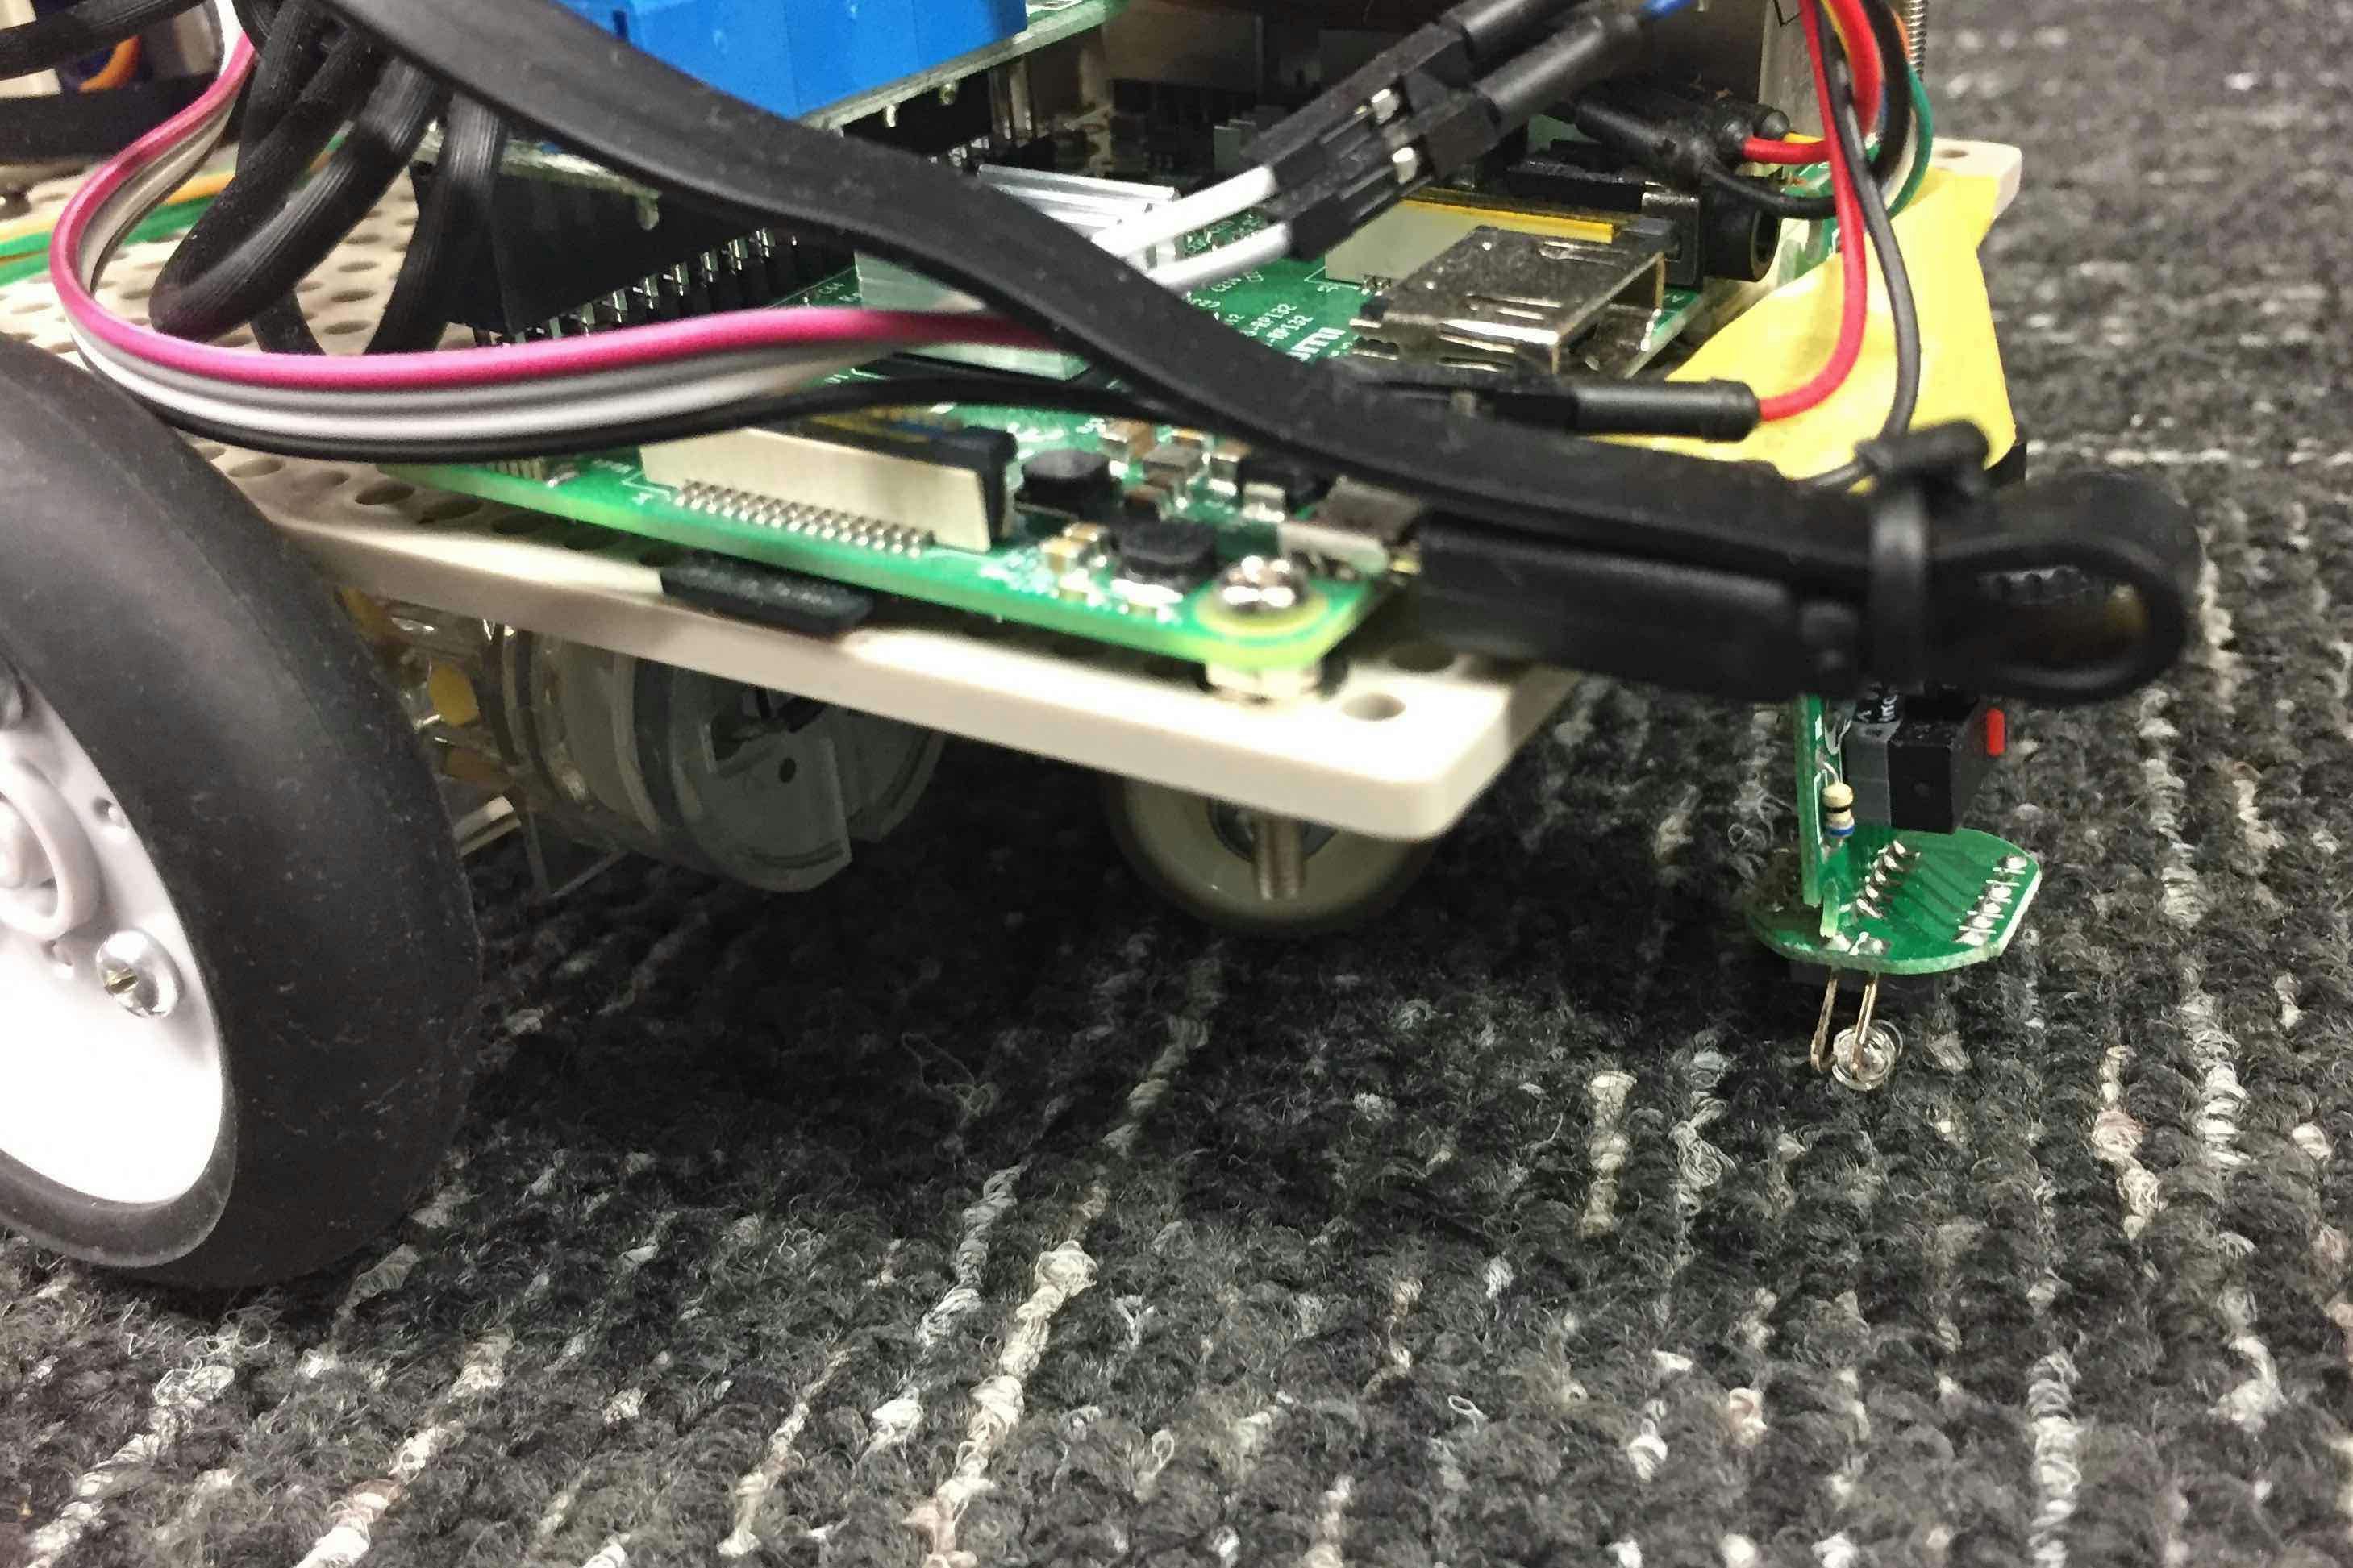
とりあえず設置する
地面スレスレ(というか擦ってる?)に設置
マウスから移動量を取得する
マウスデバイスの出力を見てみます。
マウスの出力のデータ構造は以下の通りです。
struct input_event {
    struct timeval time;
    unsigned short type;
    unsigned short code;
    unsigned int value;
};
これをさくっとデシリアライズしてみるとマウスのイベントや移動量が取れます。
例)
# !/usr/bin/env python

import struct


# * Event types
EV_REL = 0x02

# * Relative axes
REL_X = 0x00
REL_Y = 0x01

EVENT_FORMAT = "llHHi"  # long, long, unsigned short, unsigned short, signed int
EVENT_SIZE = struct.calcsize(EVENT_FORMAT)


def mouse_example(mouse_path):
    with open(mouse_path, "rb") as file:
        event = file.read(EVENT_SIZE)
        while event:
            (tv_sec, tv_usec, type_, code, value) = struct.unpack(EVENT_FORMAT, event)
            if type_ == EV_REL:
                if code == REL_X:
                    print(value)
                elif code == REL_Y:
                    print(value)
            event = file.read(EVENT_SIZE)

if __name__ == '__main__':
    import sys
    if len(sys.argv) != 2:
        print 'Usage %s /dev/input/<path-to-event-mouse>' % sys.argv[0]
        quit()
    mouse_example(sys.argv[1])
これを
$ python mouse.py /dev/input/by-id/usb-Logitech_USB_Receiver-event-mouse
などとして実行するとマウスの移動量が出てきます。
あとはROSのオドメトリとして使えるようにすれば完成ですね。
ROSでオドメトリを出力する
ROSでのオドメトリの配信はここが参考になります。
http://wiki.ros.org/navigation/Tutorials/RobotSetup/Odom
これをpythonで実装したものをここにおいておきます。
https://gist.github.com/atotto/f2754f75bedb6ea56e3e0264ec405dcf
一部抜粋:
    current_time = rospy.Time.now()

    # compute odometry in a typical way given the velocities of the robot
    dt = (current_time - last_time).to_sec()
    delta_x = (vx * cos(th) - vy * sin(th)) * dt
    delta_y = (vx * sin(th) + vy * cos(th)) * dt
    delta_th = vth * dt

    x += delta_x
    y += delta_y
    th += delta_th

    # since all odometry is 6DOF we'll need a quaternion created from yaw
    odom_quat = tf.transformations.quaternion_from_euler(0, 0, th)

    # first, we'll publish the transform over tf
    odom_broadcaster.sendTransform(
        (x, y, 0.),
        odom_quat,
        current_time,
        "base_link",
        "odom"
    )

    # next, we'll publish the odometry message over ROS
    odom = Odometry()
    odom.header.stamp = current_time
    odom.header.frame_id = "odom"

    # set the position
    odom.pose.pose = Pose(Point(x, y, 0.), Quaternion(*odom_quat))

    # set the velocity
    odom.child_frame_id = "base_link"
    odom.twist.twist = Twist(Vector3(vx, vy, 0), Vector3(0, 0, vth))

    # publish the message
    odom_pub.publish(odom)

    last_time = current_time
これを参考にするとー
↓
↓
はい、こちらが出来上がりです
https://github.com/atotto/kamesan/blob/master/scripts/odom.py
アイディアの節で述べたように、移動時の場合分け(Twistを見て判断する)をするとさらに精度が向上しそうです。ですが、マウスを使う際の課題で述べたように上下のブレによる精度低下があるので今回はこのままにします。オドメトリは大体とれれば良いです。たぶん。
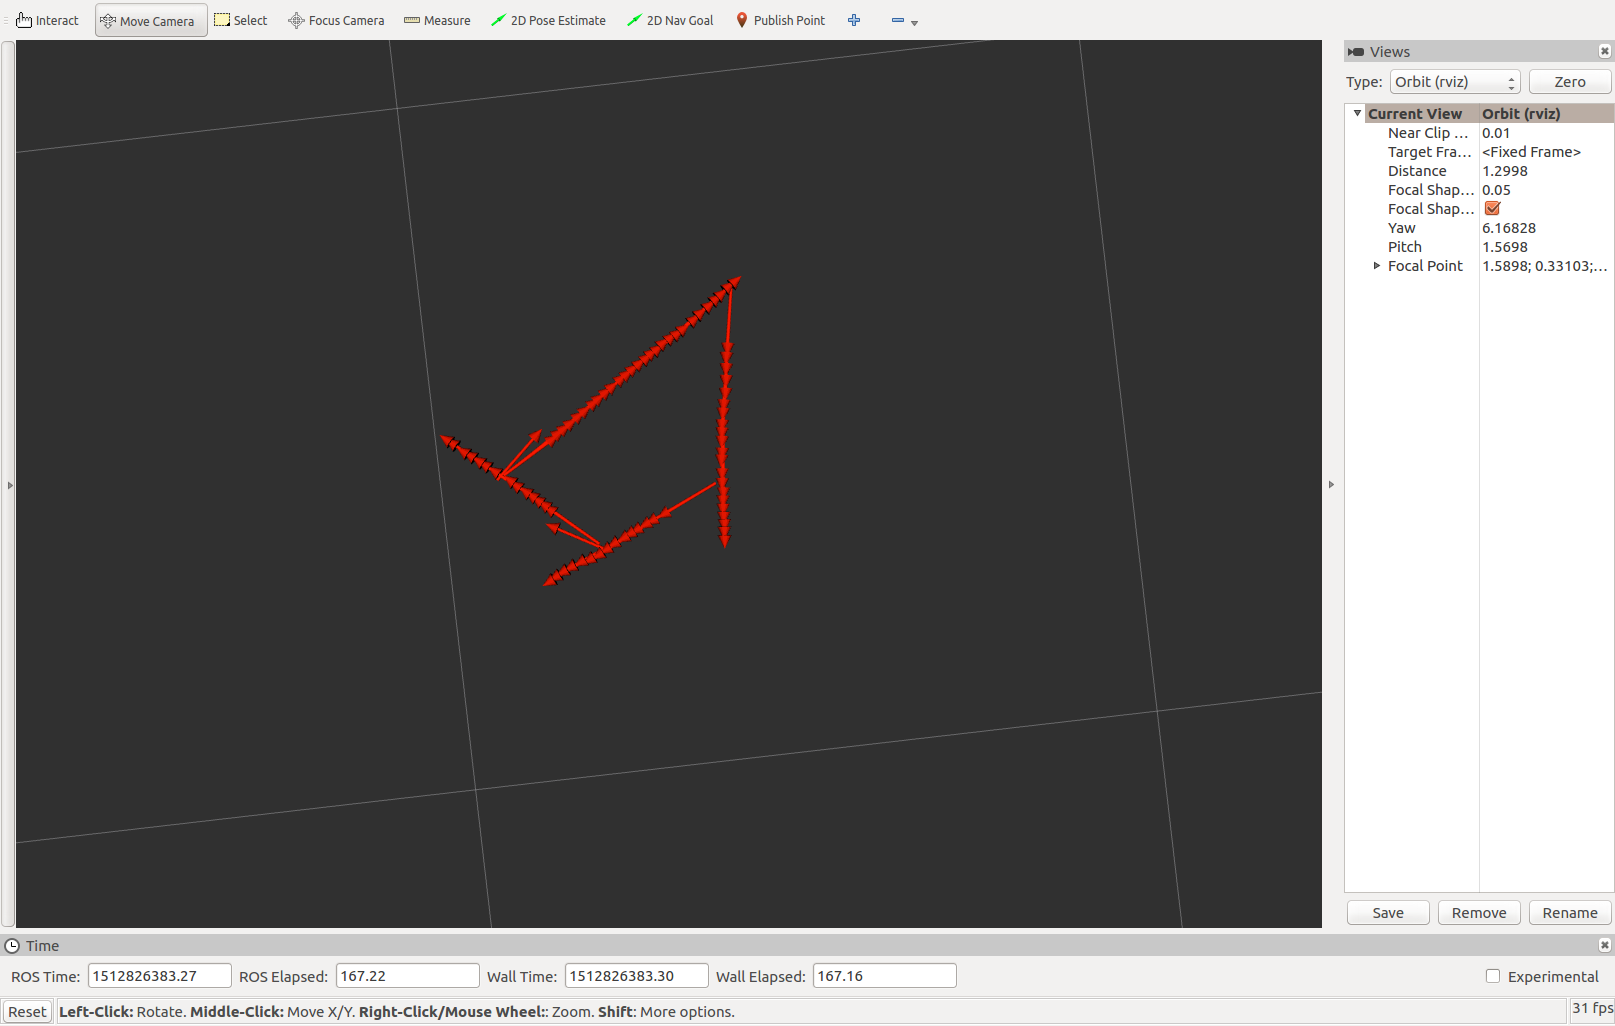
動かしてみる
それっぽい
まとめ
光学マウスをひとつ用いてROSのオドメトリを配信する仕組みを作りました。
精度はよくありませんが、センサ値の読み取りからオドメトリのトピックを配信するまでのサンプルとして、何かの役に立てば幸いです。
数百円で作れるので、よければ皆様も作ってみてください!