HoloLenSでのNavMesh
HoloToolKitでのNavMeshの記事は見かけたことがあるのですが、MRTKv2になってから
ネームスペースなどが大幅に変更されたことに伴って設定箇所が異なる様になっていたので
その備忘録を含めて投稿します。
また本記事はUnityのNavMesh公式リファレンスを参考に進めさせていただきます。
以下のリンクをお読みの上進めていただけると作業が捗ると思われます。
https://docs.unity3d.com/ja/2019.3/Manual/class-NavMeshAgent.html
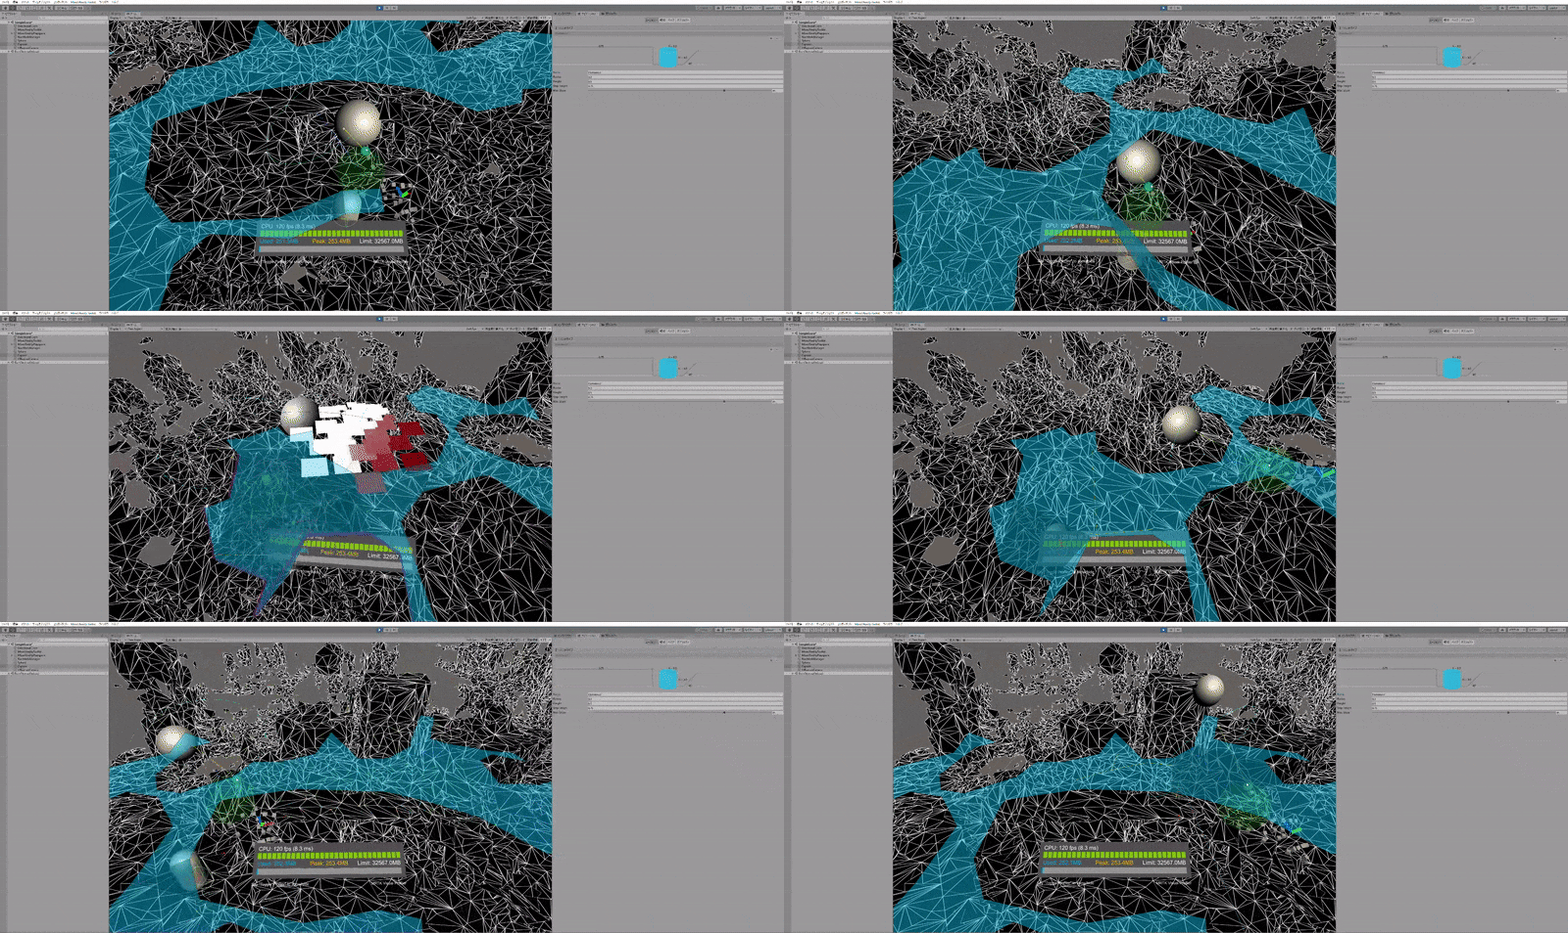
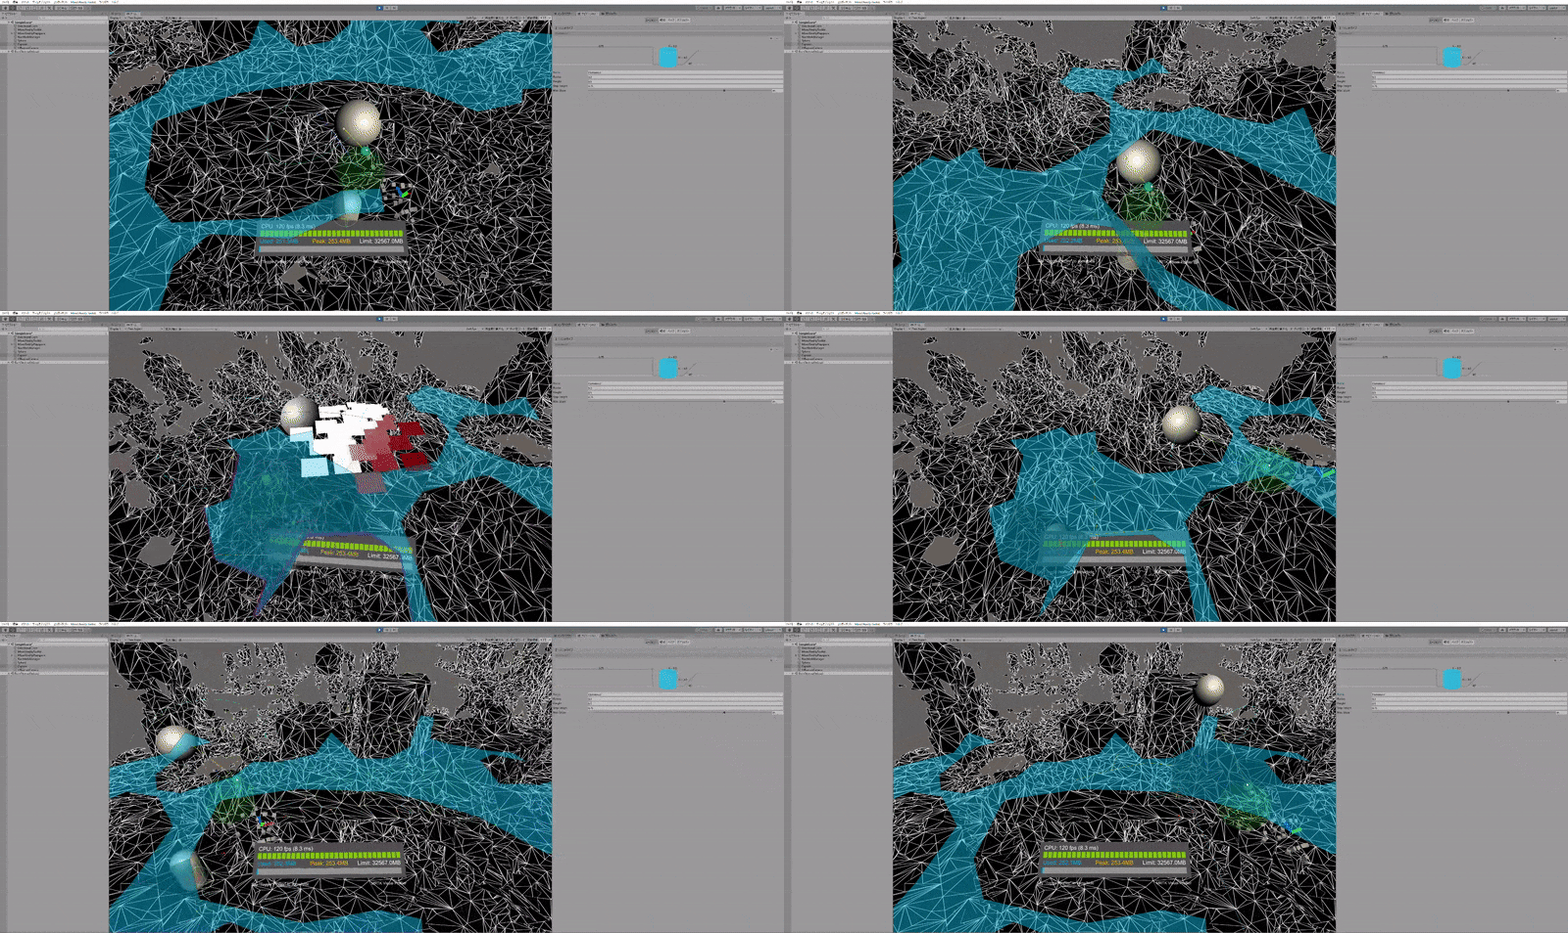
完成例
今回作成した環境はGitHubにて公開しています。
https://github.com/TakuyaKinoshita/NavMesh
作業環境
- windows10 pro
- Unity2019.4.4f1
- VisualStudio2019 version 16.6.0
- windows10 SDK 10.0.18362.0
導入手順
予めHoloLensの開発環境がととのっているかの確認をお願いします。
https://hololabinc.github.io/MixedRealityToolkit-Unity/Documentation.ja/GettingStartedWithTheMRTK.html
- プロジェクトの作成
- MRTKのインストール(UPM経由)
- SpatialAwareness(Editor)
- NavMeshの作成
- デプロイ(準備中)
プロジェクトの作成
公式のリファレンスを参考にシンプルなUnityProjectを作成します。
> -- 公式のリファレンス --
ビルド設定から、TargetPlatformをUWPに変更しておきます。

MRTKのインストール(UPM経由)
今回は、せっかくUPM経由でMRTKのインポートが利用できるので早速利用意したいと思います。
まずは、Visual StudioやVSCodeなどで、以下のファイルを開いてください。


上記のmanifest.jsonを以下のように変更してください。
{
    "scopedRegistries": [
        {
            "name": "Microsoft Mixed Reality",
            "url": "https://pkgs.dev.azure.com/aipmr/MixedReality-Unity-Packages/_packaging/Unity-packages/npm/registry/",
            "scopes": ["com.microsoft.mixedreality", "com.microsoft.spatialaudio"]
        }
    ],
    "dependencies": {
        "com.microsoft.mixedreality.toolkit.foundation": "2.5.0",
        "com.microsoft.mixedreality.toolkit.tools": "2.5.0",
        "com.microsoft.mixedreality.toolkit.examples": "2.5.0",
        "com.microsoft.mixedreality.toolkit.extensions": "2.5.0",
        "com.microsoft.mixedreality.toolkit.testutilities": "2.5.0",
        "com.unity.collab-proxy": "1.2.16",
        "com.unity.ide.rider": "1.1.4",
        "com.unity.ide.vscode": "1.2.2",
        "com.unity.render-pipelines.lightweight": "7.4.1",
        "com.unity.test-framework": "1.1.14",
        "com.unity.textmeshpro": "2.0.1",
        "com.unity.timeline": "1.2.15",
        "com.unity.ugui": "1.0.0",
        "com.unity.xr.windowsmr.metro": "4.2.3",
        "com.unity.modules.ai": "1.0.0",
        "com.unity.modules.androidjni": "1.0.0",
        "com.unity.modules.animation": "1.0.0",
        "com.unity.modules.assetbundle": "1.0.0",
        "com.unity.modules.audio": "1.0.0",
        "com.unity.modules.cloth": "1.0.0",
        "com.unity.modules.director": "1.0.0",
        "com.unity.modules.imageconversion": "1.0.0",
        "com.unity.modules.imgui": "1.0.0",
        "com.unity.modules.jsonserialize": "1.0.0",
        "com.unity.modules.particlesystem": "1.0.0",
        "com.unity.modules.physics": "1.0.0",
        "com.unity.modules.physics2d": "1.0.0",
        "com.unity.modules.screencapture": "1.0.0",
        "com.unity.modules.terrain": "1.0.0",
        "com.unity.modules.terrainphysics": "1.0.0",
        "com.unity.modules.tilemap": "1.0.0",
        "com.unity.modules.ui": "1.0.0",
        "com.unity.modules.uielements": "1.0.0",
        "com.unity.modules.umbra": "1.0.0",
        "com.unity.modules.unityanalytics": "1.0.0",
        "com.unity.modules.unitywebrequest": "1.0.0",
        "com.unity.modules.unitywebrequestassetbundle": "1.0.0",
        "com.unity.modules.unitywebrequestaudio": "1.0.0",
        "com.unity.modules.unitywebrequesttexture": "1.0.0",
        "com.unity.modules.unitywebrequestwww": "1.0.0",
        "com.unity.modules.vehicles": "1.0.0",
        "com.unity.modules.video": "1.0.0",
        "com.unity.modules.vr": "1.0.0",
        "com.unity.modules.wind": "1.0.0",
        "com.unity.modules.xr": "1.0.0"
    }
}
再度Unityの画面に移ると、勝手にインポートしてきてくれます。

インポート完了後、以下のような画面が開きますので、「Apply」を押してください。

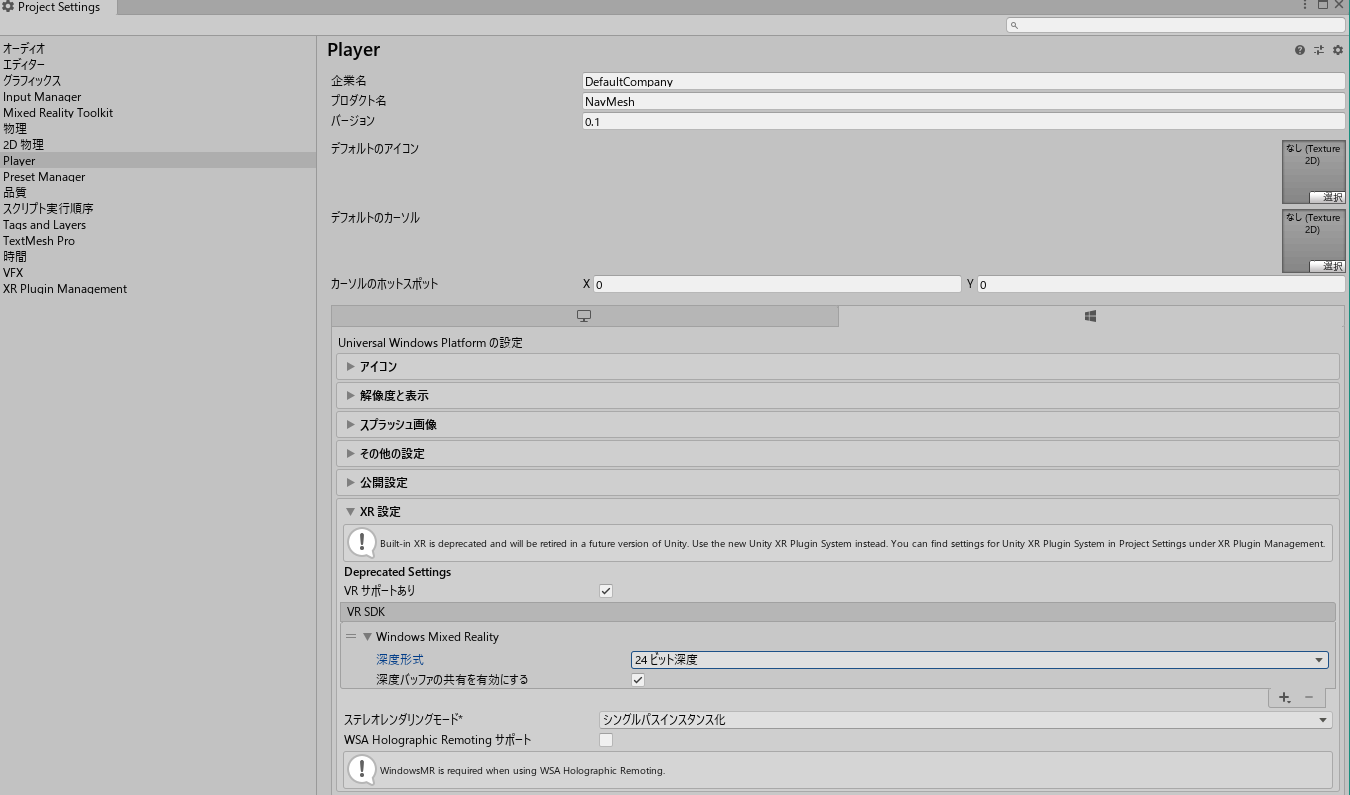
ここで、XRの設定を変更しておきます。
Project SettingsからPlayer Settingを開き、XR Settingsの項目を開き、「Windows Mixed Reality」を設定します。
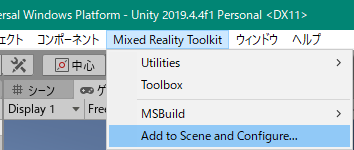
次に、シーンにMixedRealityToolkitを設定します。
Spatial Awareness (Editor)
今回は、Editor上でもNavMeshの動作を確認したいので、少しProfileを変更します。
まずは、MixedRealityToolkitオブジェクトにアタッチされている、MixedRealityToolkitコンポーネントを開きます。

最初にProfileを変更可能にするために、「DefaultMixedRealityToolkitConfigurationProfile」をCloneします。

すると、下記のように編集が可能な状態になります。
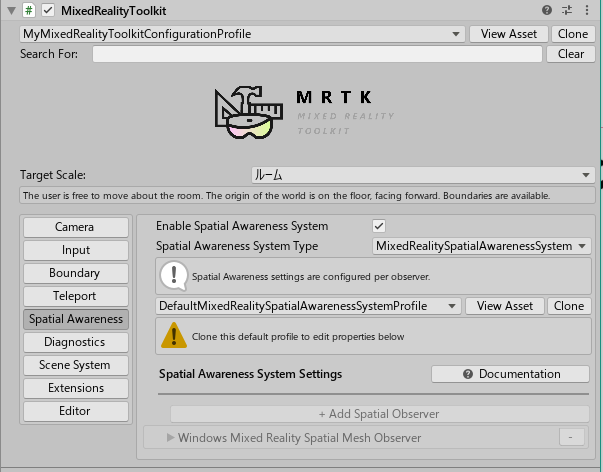
次にお目当てのSpatial Awarenessの項目を開いきます。
そして、新しくEditor上でも疑似的に空間マッピングの機能を試すためのオブザーバーと呼ばれるものを追加します。
またここでも、SpatialAwarenessのProfileを変更可能な状態にするために、ProfileをCloneします。
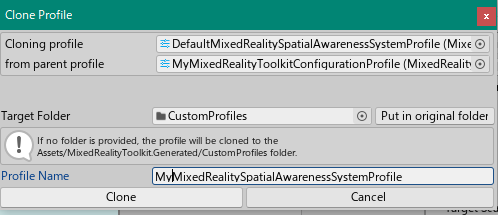
次に、新しくオブザーバーを追加します。

Typeの項目で、「SpatialObjectMeshObserve」を選択します。

この状態でシーンを実行すると、シーン上にサンプルのメッシュデータが置かれた状態でスタートします。

NavMeshの設定
下記のサイトから必要なスクリプトを入手します。
上記のスクリプトを自分のUnityProjectに入れます。
※ 右クリック -> 「名前を付けてリンク先を保存」で簡単にインストール可能です。
つぎにインストールした「NavMeshSourceTag」を先ほどのSpatialAwarenessで生成されるメッシュデータにアタッチする処理を記載します。
以下のファイルを作成して下さい。
using UnityEngine;
using UnityEngine.EventSystems;
using System.Collections.Generic;

// MRTK namespace
using Microsoft.MixedReality.Toolkit;
using Microsoft.MixedReality.Toolkit.SpatialAwareness;

public class CustomSpatialMappinngNavMesh : MonoBehaviour, IMixedRealitySpatialAwarenessObservationHandler<SpatialAwarenessMeshObject>
{
    /// <summary>
    /// Collection that tracks the IDs and count of updates for each active spatial awareness mesh.
    /// </summary>
    private Dictionary<int, uint> meshUpdateData = new Dictionary<int, uint>();

    /// <summary>
    /// Value indicating whether or not this script has registered for spatial awareness events.
    /// </summary>

    private void OnEnable()
    {
        // Register component to listen for Mesh Observation events, typically done in OnEnable()
        CoreServices.SpatialAwarenessSystem.RegisterHandler<IMixedRealitySpatialAwarenessObservationHandler<SpatialAwarenessMeshObject>>(this);
    }

    private void OnDisable()
    {
        // Unregister component from Mesh Observation events, typically done in OnDisable()
        CoreServices.SpatialAwarenessSystem.UnregisterHandler<IMixedRealitySpatialAwarenessObservationHandler<SpatialAwarenessMeshObject>>(this);
    }

    public virtual void OnObservationAdded(MixedRealitySpatialAwarenessEventData<SpatialAwarenessMeshObject> eventData)
    {
        // A new mesh has been added.
        if (!meshUpdateData.ContainsKey(eventData.Id))
        {
            meshUpdateData.Add(eventData.Id, 0);
            eventData.SpatialObject.GameObject.AddComponent<NavMeshSourceTag>();
        }
    }

    public virtual void OnObservationUpdated(MixedRealitySpatialAwarenessEventData<SpatialAwarenessMeshObject> eventData)
    {
        uint updateCount = 0;

        // A mesh has been updated. Find it and increment the update count.
        if (meshUpdateData.TryGetValue(eventData.Id, out updateCount))
        {
            // Set the new update count.
            meshUpdateData[eventData.Id] = ++updateCount;

            // Debug.Log($"Mesh {eventData.Id} has been updated {updateCount} times.");
            eventData.SpatialObject.GameObject.AddComponent<NavMeshSourceTag>();
        }
    }

    public virtual void OnObservationRemoved(MixedRealitySpatialAwarenessEventData<SpatialAwarenessMeshObject> eventData)
    {
        // A mesh has been removed. We no longer need to track the count of updates.
        if (meshUpdateData.ContainsKey(eventData.Id))
        {
            // Debug.Log($"No longer tracking mesh {eventData.Id}.");
            meshUpdateData.Remove(eventData.Id);
        }
    }
}
上記のコードで、MixedRealityToolkitが保持するオブザーバーからメッシュ生成時などのInterfaceにイベントを追加し「navMeshSourceTag」を追加しています。
次にインスペクターに、「NavMeshManager」を追加して「LocalNavMeshBuilder」、「CustomSpatialMappinngNavMesh」コンポーネントをアタッチしてください。
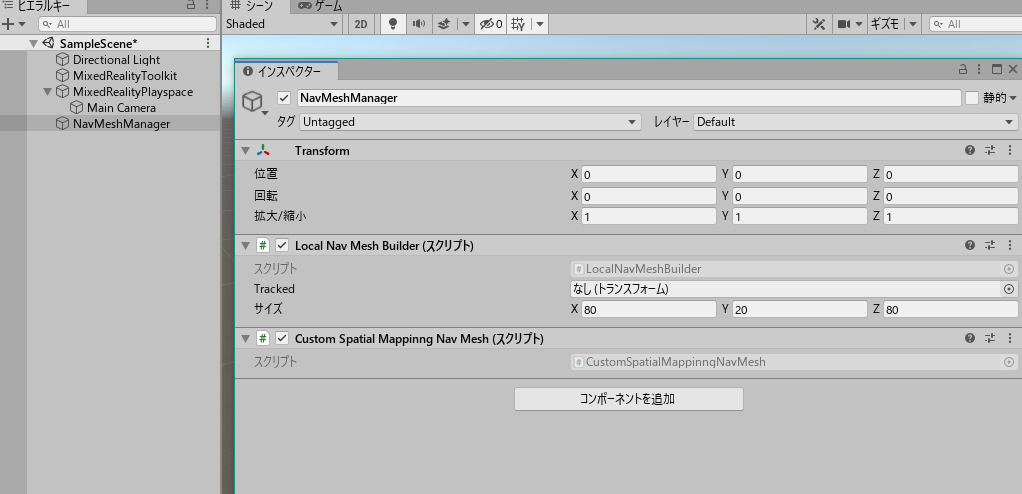
ここで一度Unity側で実行してみると、PlaySpaceオブジェクト以下にある、Meshデータに「NavmeshSourceTag」コンポーネントがアタッチされていることがわかります。

ここまでくれば後は、NavMeshの設定をするだけです。
今回は、「Sphere」と「Capsule」を使って、「sphere」を追従する「Capsule」を作りたいと思います。
まずはシーンにCapsuleとSphereを作成します。
- Sphere設定(追跡される側)
自由に移動位置を指定したいので、今回は「ObjectManipulator」コンポーネントを使って自由に移動できるようにさせます。

On Manipulation Endedイベント時に、NavMeshAgent側に目的地を伝えるスクリプトを後に用意します。
- Capsule設定(追跡する側)
sizeの設定

※ yの値に「-0.5」を適用しているのは、NavMeshの生成エリアから離れすぎているとNavMeshがうまく起動しないので、できるだけ床に近いところで待機させる必要があるからです。
NavMeshAgentの設定

NavMeshの半径はできるだけ小さくしないとエリアが狭くなるのでお気を付けください。生成されないなどの時はここが原因の場合があります。
window -> AI -> Navgationからエリアの設定を行います。

下記のスクリプトを作成しアタッチしてください。
using System.Collections;
using System.Collections.Generic;
using UnityEngine;
using UnityEngine.AI;

public class TargetTracking : MonoBehaviour
{
    public NavMeshAgent agent;
    public GameObject target;
    // Start is called before the first frame update
    void Start()
    {
        agent = transform.GetComponent<NavMeshAgent>();
    }

    public void SetDestination()
    {
        var endPoint = new Vector3(target.transform.position.x, transform.position.y, target.transform.position.z);
        agent.destination = endPoint;
    }
}
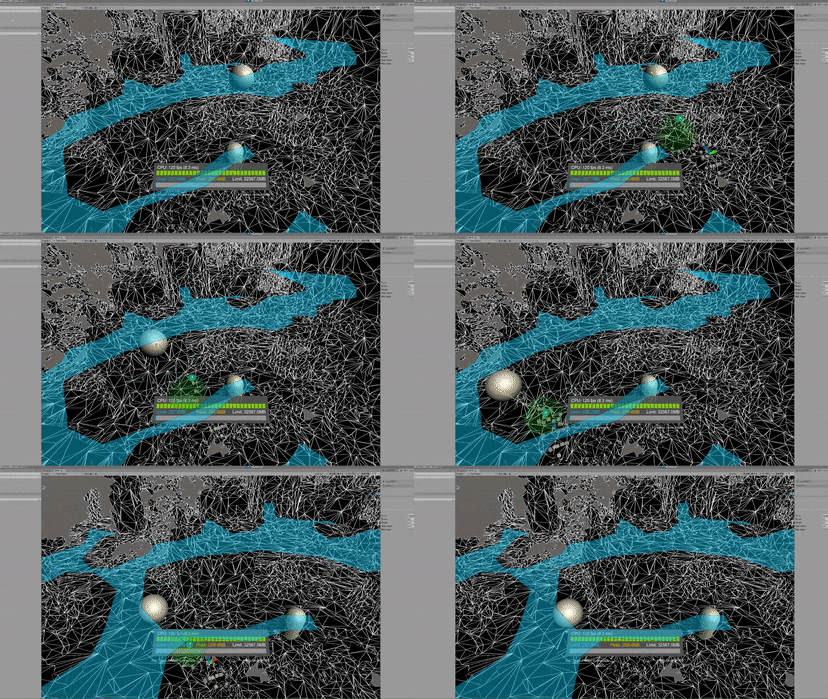
ここで注意していただきたいのが、新しくDestinationを設定するときに、y座標に自身の座標を適用するということです。先ほども伝えた通り、NavMeshはあまりにも離れた位置には移動することができません。ですのでなるべく移動オブジェクトの近くを設定させないとうまく動いてくれないです。
「Sphere」オブジェクトに追加したManipulationのイベントに先ほど作成したTargetTracking.csの「SetDestination」メソッドを登録してください。

試しにy座標を0で指定したデータで行った場合以下のようにまったく動いてくれません。
デプロイ
準備中です
最後に
HoloLens2でももちろんNavMeshは使えますので、これを使ってさらにより良いコンテンツが生まれてくれることを切に願います。
また、この記事が同じHoloLens開発者の方のために少しでも役に立てればと思っております。
文中にお菓子な個所などございましたら、コメントいただけるとすぐに修正・加筆させていただきます。
今回はここまでとさせていただきます。ありがとうございました。
参考URL
https://docs.unity3d.com/ja/2019.3/Manual/class-OffMeshLink.html
