rails6でYahoo認証機能を作る。
DeviseとOmniauthをインストール
Gemfileに記載します。
gem 'devise'
gem 'omniauth'
gem 'omniauth-yahoojp'
⇃
$ bundle install
これでdevise omniauth omniauth-yahoojpがbundle installされました!
Devise設定など
 $ rails g devise:install

 $ rails g devise user

 $ rails g devise:views

 $ rails g devise:controllers users
これらを実行します。
そして、app/models/user.rbに
  devise :database_authenticatable, :registerable,
         :recoverable, :rememberable, :validatable
とあるとおもいますが これに
:omniauthable, omniauth_providers: [:yahoojp]
これを追加してください。
ちなみにこれは omniauthableをこのモデルで使用するよ 的な感じです。
つぎにuserモデルに
name provider uid を追加して、yahooのデーターを保存するカラムを追加してあげます。
$ rails g migration AddOminiauthToUsers
と実行して、migrationファイルができるはずなので
できたmigrationファイルに
  def change
    add_column :users, :uid, :string
    add_column :users, :provider, :string
    add_column :users, :token, :text
  end
を記述してあげてください。
そして
$ rails db:migrate
そしたらカラム追加されてるはずです!
YahooのKeyとかを取得する。
https://e.developer.yahoo.co.jp/dashboard/
このURLにアクセスして、
新しいアプリケーションを開発を 押してください。

⇃するとこのような画面になりますが

このサイトURLを localhost:3000 にしてあげてください。 サイト名とかアプリケーションの説明はご自由に。 そして登録してあげます。
登録してから、もう一回アプリケーションの管理に戻って、次はコールバックURLを設定してあげます。
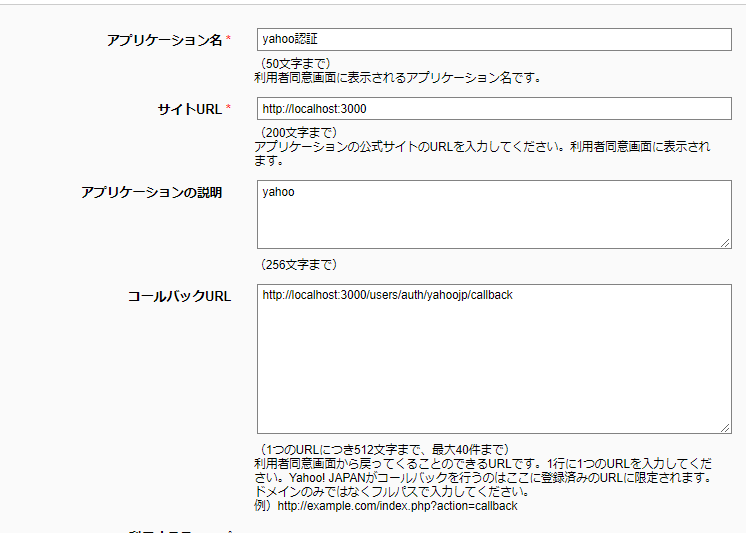
このように localhost:3000/users/auth/yahoojp/callback
としてあげます。
環境変数設定
Gemfileにgem 'dotenv-rails'
を追加して
$ bundle install
そして、 .envファイルを追加してあげて
.envファイルに
YAHOOJP_KEY="YAHOOのClientIDを記述"
YAHOOJP_SECRET="YAHOOのシークレットキーを記述"
そして、.gitinoreファイルに
/.env
と書いてあげます。 これでシークレットキーとClientIDを環境変数として使うことができます!
ちなみにシークレットキーとClientIDはばれてはまずいので気を付けて。
Yahoo認証を実装していく
routes.rb
devise_for :users
となってるとおもいますが
devise_for :users, controllers: {
    omniauth_callbacks: "users/omniauth_callbacks"
}

  get '/auth/:provider/callback' => 'users/omniauth_callbacks#yahoojp', as: "helloyahoo"  # ←これ居るかわからないけど一応。。
と追加してあげてください。
config/devise.rbに
config.omniauth :yahoo_jp, ENV['YAHOOJP_KEY'], ENV['YAHOOJP_SECRET'] #必要なのかわからないけど一応..
config/initializers/omniauth.rbファイル追加
omniauth.rbに
Rails.application.config.middleware.use OmniAuth::Builder do
        provider :yahoojp, ENV['YAHOOJP_KEY'], ENV['YAHOOJP_SECRET'],
        {
                :scope => 'openid profile email address'
                # :provider_ignores_state => true  これを追加するのはおすすめしません。
        }
end
そして、user.rbに
  def self.find_for_yahoo_jp(auth)
    user = User.where(email: auth.info.email, provider: auth.provider).first
    unless user
      user = User.create!(name: auth.info.name,
                          provider: auth.provider,
                          email: auth.info.email,
                          uid: auth.uid,
                          token: auth.credentials.token,
                          password: Devise.friendly_token[0, 20])
    end
    user
  end
を追加。
そしてapp/controllers/users/omniauth_callbacks_controller.rb
に
  def failure
    @user = Sns.find_for_yahoo_jp(request.env['omniauth.auth'])
    if @user.persisted?
           flash[:notice] = I18n.t 'devise.omniauth_callbacks.success',
                       :kind => "Yahoo"
      sign_in_and_redirect @user, :event => :authentication
    else
      session['devise.yahoo_data'] = request.env['omniauth.auth'].except("extra")
      redirect_to new_user_registration_url
    end
  end
を追加。
app/views/devise/registrations/new.html.erbに
<h2><%= link_to "Yahoo! JAPAN で登録",user_yahoojp_omniauth_authorize_path %>
これでできたとおもいます。
参考
終わりに
エンジニアの方がコメントさせていただけました。
アドバイスコメントを読んでみてください。
ということで、RailsでYahooログイン認証を作ってる記事があまりにも少なくて かなり苦戦しました。
なにか間違いなどあったらコメントください。
おねがいします。