はじめに
最近、低温調理をすることが多いのですが、温度計と見ながらIHコンロの火力調整を自力でやるのが面倒になってきました。
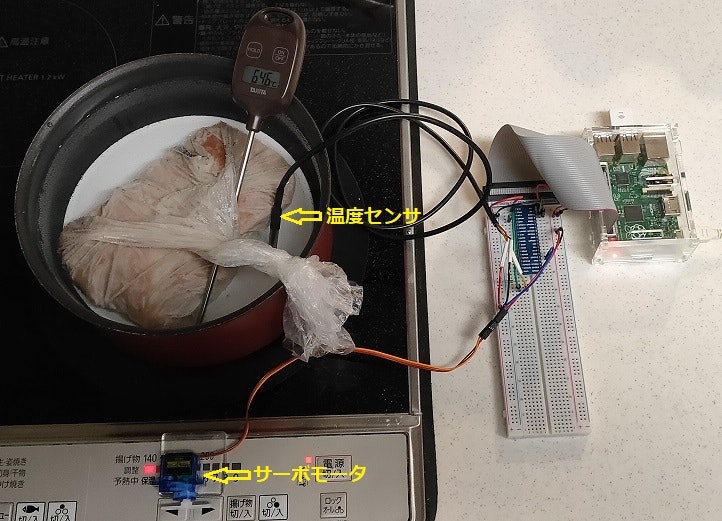
そこで、RaspberryPiに「温度センサ」と「サーボモータ」をつないでIHコンロの火力調整を自動化できるのではないかと思い、簡易的な低温調理器を実際に作ってみました。
低温調理器の概要
低温調理の方法としては水を張った鍋を使用し、その鍋の中に低温調理する食材を入れておく。鍋の水温が調理温度を維持し続けられるようIHコンロの火力を調整する。
この制御をRaspberryPiに「温度センサ」と「サーボモータ」を接続することで実現する。
「温度センサ」と「サーボモータ」のそれぞれの役割は以下の通り。
- 温度センサの役割 → 温度センサで水温を監視するために使用する。
- サーボモータの役割 → サーボモータでIHコンロの火力を調整するために使用する。水温が低ければ火力を上げて、逆に水温が高ければ火力を下げる。

必要機材
必要機材については以下の通り。機材はインターネット通販や100均で機材は購入した。
- IHコンロ
- RaspberryPi2B
- 温度センサ(型番:DS18B20 防水タイプ)→ インターネット通販で購入
- サーボモータ(型番:SG90)→ インターネット通販で購入)
- ブレッドボード → インターネット通販で購入
- 抵抗(4.7kΩ)→ インターネット通販で購入
- ジャンパーワイヤー(5本)→ インターネット通販で購入
- 耐震マット → 100均で購入
ソフトウェア
使用するソフトウェアは以下の通り。
RaspberryPi
- RaspberryPi OS
- Python
開発PC
- Teraterm(RaspberryPiとのSSH接続で使用)
機器の接続方法
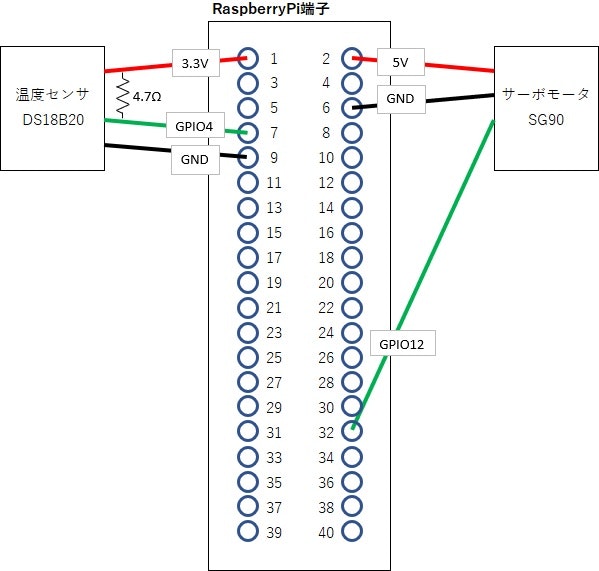
RaspberryPiの端子と、それぞれの機器の接続イメージは以下の通り。

※抵抗は10kΩだと温度センサが正常動作しなかった。そのため4.7kΩを使用した
※温度センサは3.3Vに接続すること。自分は誤って5Vに接続して温度センサが壊れた
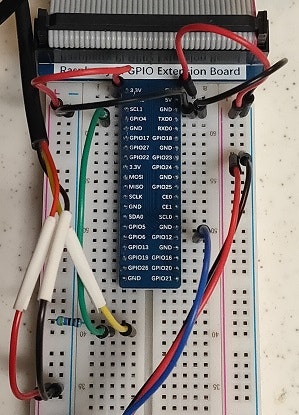
参考までに実際に機器を接続したときのブレッドボードの写真は以下の通り。

実装内容
RaspberryPi上で実行するプログラム(低温調理プログラム)について説明する。
プログラミング言語は、温度センサ、サーボモータのどちらも手軽に制御できるPythonを使用する。
温度センサの制御
温度センサ(DS18B20)との通信で1-wireを使用するため、事前にRaspberryPi OSの1-wire設定を有効化する必要がある。
/boot/config.txtをエディタで開き、下記の内容を追記する。
dtoverlay=w1-gpio
サーボモータの制御
サーボモータはPWMで制御する。パルス波のデューティー比を変化させることでサーボモータの回転角を制御する。なお、PWMは特に前準備をする必要なく使用することが可能である。
参考までにサーボモータの回転角をデューティー比に変換する式は以下の通り。
dutyCycle = 2.5 + (12.0 - 2.5) / 180 * (degree + 90)
※dutyCycleはデューティー比として設定する値、degreeは回転角
低温調理プログラムの概要
低温調理プログラムの処理の流れを簡単に説明する。
1.サーボモータ、温度センサの初期化
2.調理時間の取得(Teratermからの入力待ち)
3.調理温度の取得(Teratermからの入力待ち)
4.調理温度になるまで水温監視
5.調理温度になったらサーボモータでIHコンロの火力を最小にする
6.水温を監視し、調理温度の±3℃の範囲を超えたらサーボモータで火力を調整する
ソースコード
低温調理プログラムのソースコードは以下の通り。
import os
import glob
import time
import subprocess

GPIO_PORT_SERVO = 12
PWM_FREQ_SERVO = 50
PUSH_LEFT_BUTTON = 45
PUSH_RIGHT_BUTTON = -45
RELEASE_BUTTON = 0
DEFAULT_IH_FIREPOWER = 5
TEMPERATURE_MARGIN = 2

def initServomotor():
    import RPi.GPIO as GPIO
    GPIO.setmode(GPIO.BCM)
    GPIO.setup(GPIO_PORT_SERVO, GPIO.OUT)
    pwmInstance = GPIO.PWM(GPIO_PORT_SERVO, PWM_FREQ_SERVO)
    pwmInstance.start(0.0)
    return pwmInstance

def rotateServomotor(pwmInstance, degree):
    dutyCycle = 2.5 + (12.0 - 2.5) / 180 * (degree + 90)
    print(dutyCycle)
    pwmInstance.ChangeDutyCycle(dutyCycle)
    time.sleep(0.5)
    pwmInstance.ChangeDutyCycle(0.0)

def initOneWare():
    os.system('modprobe w1-gpio')
    os.system('modprobe w1-therm')

def getOneWareFilePath():
    baseDir = '/sys/bus/w1/devices/'
    deviceFolder = glob.glob(baseDir + '28*')[0]
    deviceFile = deviceFolder + '/w1_slave'
    return deviceFile

def readTempRaw(filePath):
    catData = subprocess.Popen(['cat',filePath], stdout = subprocess.PIPE, stderr = subprocess.PIPE)
    out,err = catData.communicate()
    outDecode = out.decode('utf-8')
    lines = outDecode.split('\n')
    return lines

def readTemp(filePath):
    lines = readTempRaw(filePath)
    while lines[0].strip()[-3:] != 'YES':
        time.sleep(0.2)
        lines = readTempRaw(filePath)
    equalsPos = lines[1].find('t=')
    if equalsPos != -1:
        tempString = lines[1][equalsPos + 2:]
        temp = float(tempString) / 1000.0
        return temp


# Main
# Initialize servomotor
pwmInstance = initServomotor()

# Initialize thermometer
initOneWare()
oneWareFilePath = getOneWareFilePath()

# Get the temperature
print("input Temperature (e.g. 60 - 80)")
targetTemperature = float(input())

# Get the Minutes
print("input Minutes (e.g. 30 - 120)")
endingTime = float(input()) * 60

# Get the Temperature
currentTemp = readTemp(oneWareFilePath)
print("currentTemp = %f, targetTemp = %f" % (currentTemp, targetTemperature))

# Heating phase
print("Heating phase")
while currentTemp < targetTemperature:
    currentTemp = readTemp(oneWareFilePath)
    print("currentTemp = %f" % (currentTemp))
    time.sleep(1.0)

for i in range(DEFAULT_IH_FIREPOWER - 1):
    rotateServomotor(pwmInstance, PUSH_LEFT_BUTTON)
    rotateServomotor(pwmInstance, RELEASE_BUTTON)

# Calculate low temperature cooking time
currentTime = time.time()
endingTime = endingTime + currentTime

# Insulation phase
print("Insulation phase")
while endingTime > currentTime:
    currentTemp = readTemp(oneWareFilePath)
    print("Temp = %f, Time = %f" % (currentTemp, (endingTime - currentTime)))
    if currentTemp < (targetTemperature - TEMPERATURE_MARGIN):
        rotateServomotor(pwmInstance, PUSH_RIGHT_BUTTON)
        rotateServomotor(pwmInstance, RELEASE_BUTTON)
        print("Push right button")
        time.sleep(30.0)
    elif currentTemp > (targetTemperature + TEMPERATURE_MARGIN):
        rotateServomotor(pwmInstance, PUSH_LEFT_BUTTON)
        rotateServomotor(pwmInstance, RELEASE_BUTTON)
        print("Push left button")
        time.sleep(30.0)
    time.sleep(1.0)
    currentTime = time.time()

print("Finished cooking")
動作確認
以下の手順で動作確認を実施。
- Teratermから
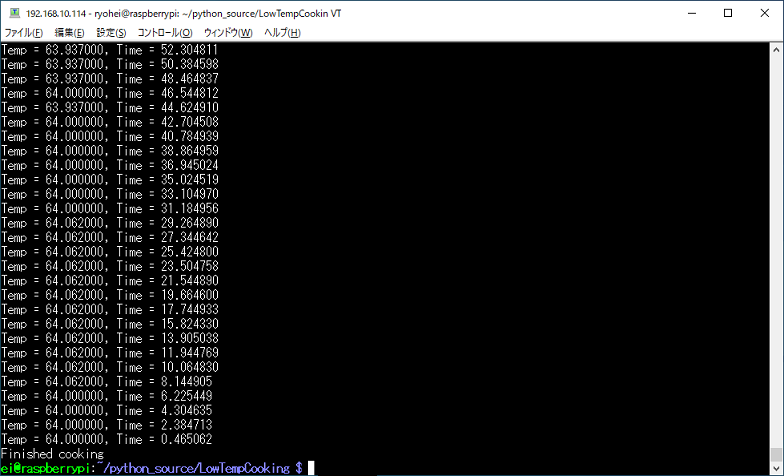
$ sudo python low_temp_cooking.pyを入力して低温調理プログラムを実行する。 - 温度や時間を聞かれるのでTeratermから値を入力する。今回は、調理温度64度、調理時間60分で動作確認を行う。
- IHコンロの電源を入れて調理開始(残念ながらここは手動。。。)
- 調理温度まで達するとサーボモータが動作し、IHコンロの温度調整が行われる。
- 低温調理開始から60分経過すると調理終了を示すログ
Finished cookingがTeratermに出力される。このタイミングでIHコンロの電源を切る。(残念ながらここも手動。。。)

まとめ
とりあえず、RaspberryPiで簡易的な低温調理器を作成することはできた。
サーボモータの固定方法には100均の耐震マットを使用した。しかし、耐震マットだとサーボモータを固定する力が弱く、IHコンロのスイッチを押せない場合があった。
サーボモータの固定方法は、もう少し考えたほうがよさそう。