高専本科での研究活動についての環境構築関連を書き残しておきます.
装着型アイトラッカーを使って視界の映像と視線情報を取得し,英文読解中に視線が滞留した地点の単語をリアルタイムで翻訳するアプリの開発を試みました.
実行環境
- Python3.11
- windows10
- GTX1660ti laptop
- Pupil Capture/Player
機械学習を用いてフレーム画像に対してリアルタイムで推論を行う場合,CUDAを利用するのでグラフィックボードが必要です.
視線情報の受信
Pythonにて以下のパッケージをインストールします.
pip install zmq msgpack==0.5.6
Pupil Captureを起動して,ネットワークでの情報送信をオンにします.
(デフォルトでオン)
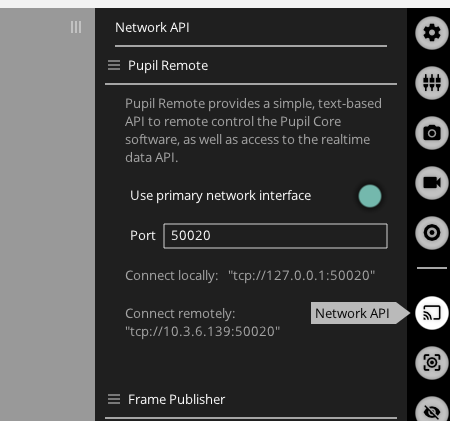
Pupil Captureを起動したまま,以下のコードを実行します.
import zmq
import msgpack

ctx = zmq.Context()
pupil_remote = ctx.socket(zmq.REQ)

ip = 'localhost'
port = 50020

pupil_remote.connect(f'tcp://{ip}:{port}')
pupil_remote.send_string('SUB_PORT')
sub_port = pupil_remote.recv_string()

subscriber = ctx.socket(zmq.SUB)
subscriber.connect(f'tcp://{ip}:{sub_port}')
subscriber.subscribe('gaze.')

while True:
    topic, payload = subscriber.recv_multipart()
    message = msgpack.loads(payload)

    # 視線の座標データのみを抽出
    if 'norm_pos' in message:
        x, y = message['norm_pos']
        print(f"視線座標: x={x:.3f}, y={y:.3f}")
このコードでは受信データから視線座標のみを抽出しているので,他に必要なデータがある場合は以下を参照してください.
Worldカメラから映像を受信
以下の追加ライブラリが必要です.
pip install pupil-core-network-client
ドキュメントは以下を参照
https://pupil-core-network-client.readthedocs.io/en/latest/examples.html
映像を受信して,OpenCVで描画するコードです.多分動くはず・・・(みかくn)
import argparse
import contextlib
import time
import cv2
import numpy as np
import pupil_labs.pupil_core_network_client as pcnc

def main(address: str, port: int, max_frame_rate_hz: int):
    kWinName = "Frame Viewer"
    cv2.namedWindow(kWinName, cv2.WINDOW_NORMAL)

    # Pupil Coreデバイスの設定
    device = pcnc.Device(address, port)
    device.send_notification(
        {"subject": "frame_publishing.set_format", "format": "bgr"}
    )

    with contextlib.suppress(KeyboardInterrupt):
        with device.subscribe_in_background("frame.world", buffer_size=10) as sub:
            while True:
                # フレームの受信
                message = sub.recv_new_message()
                frame = (
                    np.frombuffer(message.payload["__raw_data__"][0], dtype=np.uint8)
                    .reshape(message.payload["height"], message.payload["width"], 3)
                    .copy()
                )

                # フレームの表示
                cv2.imshow(kWinName, frame)

                if cv2.waitKey(1) == 27:  # ESCキーで終了
                    break
                time.sleep(1 / max_frame_rate_hz)

    cv2.destroyAllWindows()

if __name__ == "__main__":
    parser = argparse.ArgumentParser()
    parser.add_argument("-a", "--address", type=str, default="127.0.0.1")
    parser.add_argument("-p", "--port", type=int, default=50020)
    parser.add_argument("-fps", "--max-frame-rate", type=int, default=30)
    args = parser.parse_args()

    main(args.address, args.port, args.max_frame_rate)
視線座標とフレーム画像を受信して,OpenCVで重ねて描画する
オンボードでも動作しますが,かなり重いのでGPUでの利用を推奨
https://qiita.com/asasakkk/items/34c720b24e4cb51f8003
import argparse
import contextlib
import time
import zmq
import msgpack
import cv2
import numpy as np
import pupil_labs.pupil_core_network_client as pcnc


def check_cuda_availability():
    """CUDAが利用可能かチェックする"""
    try:
        count = cv2.cuda.getCudaEnabledDeviceCount()
        if count == 0:
            return False
        # テストGPUMatの作成を試みる
        test_mat = cv2.cuda_GpuMat()
        return True
    except Exception as e:
        print(f"CUDA初期化エラー: {e}")
        return False


def main(address: str, port: int, max_frame_rate_hz: int):
    # CUDAが利用可能か
    use_gpu = check_cuda_availability()
    kWinName = (
        "Frame and Gaze Overlay (GPU)" if use_gpu else "Frame and Gaze Overlay (CPU)"
    )
    print(f"GPU使用: {'有効' if use_gpu else '無効'}")

    cv2.namedWindow(kWinName, cv2.WINDOW_NORMAL)

    # Pupil Coreデバイスの設定
    device = pcnc.Device(address, port)
    device.send_notification(
        {"subject": "frame_publishing.set_format", "format": "bgr"}
    )

    # ZMQコンテキストとソケット設定
    ctx = zmq.Context()
    pupil_remote = ctx.socket(zmq.REQ)
    pupil_remote.connect(f"tcp://{address}:{port}")
    pupil_remote.send_string("SUB_PORT")
    sub_port = pupil_remote.recv_string()
    subscriber = ctx.socket(zmq.SUB)
    subscriber.connect(f"tcp://{address}:{sub_port}")
    subscriber.subscribe("gaze.")

    # GPU用ストリームの作成(GPU使用時のみ)
    if use_gpu:
        stream = cv2.cuda.Stream()

    # 描画タイミング制御用のタイマー
    last_draw_time = 0  # 最後に赤丸を描画した時刻
    draw_interval = 1 / 30  # 30fpsの間隔(秒)

    with contextlib.suppress(KeyboardInterrupt):
        with device.subscribe_in_background("frame.world", buffer_size=10) as sub:
            while True:
                # フレームの受信
                message = sub.recv_new_message()
                frame = (
                    np.frombuffer(message.payload["__raw_data__"][0], dtype=np.uint8)
                    .reshape(message.payload["height"], message.payload["width"], 3)
                    .copy()
                )

                if use_gpu:
                    try:
                        # フレームをGPUにアップロード
                        gpu_frame = cv2.cuda_GpuMat()
                        gpu_frame.upload(frame, stream)

                        # 視線データの受信と描画
                        while subscriber.poll(timeout=0, flags=zmq.POLLIN):
                            topic, payload = subscriber.recv_multipart()
                            gaze_message = msgpack.loads(payload)
                            if "norm_pos" in gaze_message:
                                gaze_x, gaze_y = gaze_message["norm_pos"]
                                print(f"視線座標: x={gaze_x}, y={gaze_y}")

                                # 描画用にスケーリング
                                scaled_x = int(gaze_x * message.payload["width"])
                                scaled_y = int((1 - gaze_y) * message.payload["height"])

                                # 現在の時刻を取得
                                current_time = time.time()

                                # 30fpsの間隔で描画
                                if current_time - last_draw_time >= draw_interval:
                                    last_draw_time = current_time  # 描画時刻を更新
                                    # GPUフレームをダウンロードして描画
                                    frame = gpu_frame.download(stream=stream)
                                    cv2.circle(
                                        frame, (scaled_x, scaled_y), 10, (0, 0, 255), -1
                                    )
                                    # 描画後、再度GPUにアップロード
                                    gpu_frame.upload(frame, stream)

                        # 最終的な処理結果をCPUにダウンロード
                        processed_frame = gpu_frame.download(stream=stream)
                        stream.waitForCompletion()

                    except cv2.error as e:
                        print(f"GPU処理エラー: {e}")
                        processed_frame = frame
                        use_gpu = False  # GPUエラーが発生した場合、CPU処理に切り替え

                else:
                    # CPU処理
                    processed_frame = frame
                    while subscriber.poll(timeout=0, flags=zmq.POLLIN):
                        topic, payload = subscriber.recv_multipart()
                        gaze_message = msgpack.loads(payload)
                        if "norm_pos" in gaze_message:
                            gaze_x, gaze_y = gaze_message["norm_pos"]
                            print(f"視線座標: x={gaze_x}, y={gaze_y}")

                            # 描画用にスケーリング
                            scaled_x = int(gaze_x * message.payload["width"])
                            scaled_y = int((1 - gaze_y) * message.payload["height"])

                            # 現在の時刻を取得
                            current_time = time.time()

                            # 30fpsの間隔で描画
                            if current_time - last_draw_time >= draw_interval:
                                last_draw_time = current_time  # 描画時刻を更新
                                cv2.circle(
                                    processed_frame,
                                    (scaled_x, scaled_y),
                                    10,
                                    (0, 0, 255),
                                    -1,
                                )

                # 処理結果の表示
                cv2.imshow(kWinName, processed_frame)

                if cv2.waitKey(1) == 27:  # ESCキーで終了
                    break
                time.sleep(1 / max_frame_rate_hz)

    cv2.destroyAllWindows()


if __name__ == "__main__":
    parser = argparse.ArgumentParser()
    parser.add_argument("-a", "--address", type=str, default="127.0.0.1")
    parser.add_argument("-p", "--port", type=int, default=50020)
    parser.add_argument("-fps", "--max-frame-rate", type=int, default=30)
    args = parser.parse_args()

    main(args.address, args.port, args.max_frame_rate)
環境構築後,以下のリポジトリを参考にEAST+CRNNでのリアルタイム推論を実行した.
https://github.com/themechanicalcoder/REAL-Time-Scene-Text-Recognition