この記事では,Diffusersについて紹介します.
前に投稿した記事の続編になります.
参考文献
この記事は以下の情報を参考にして執筆しました.
Diffusersを使って拡散モデルを訓練
この記事では,Hugging Faceが開発したDiffusersライブラリを使って,拡散モデルを訓練します.
以下のコードは,Google Colab(GPU: T4)で実行しました.
Installing the dependencies
本コードでは,以下のライブラリを活用するので,Diffusersとともにインストールします.
- Datasetsライブラリ: 画像データセットのロードと前処理
- Accelerateライブラリ: 任意の数のGPUでの処理を簡単化
training_example.ipynbに書かれているインストール方法:
!pip install diffusers[training]==0.11.1
では,訓練中に下記のエラーが出ました.
TypeError: Accelerator.__init__() got an unexpected keyword argument 'logging_dir'
エラー回避のため,(もっとスマートな方法があるかも知れませんが,とりあえず)下記の方法でインストールしました(Diffusersのバージョンは,"0.25.0").
!pip install diffusers[training]
その後,Accelerateを再インストール(単純にAcceleratorをダウングレードする方法では,別のエラーが発生しました).
!git clone https://github.com/huggingface/accelerate -b v0.25.0-release
%cd accelerate
!wget -O src/accelerate/accelerator.py https://raw.githubusercontent.com/huggingface/accelerate/v0.18-release/src/accelerate/accelerator.py
!pip install -e .
%cd ..
その後,Google Colabを再起動(忘れずに!).
Hugging Faceにログイン.
from huggingface_hub import notebook_login
notebook_login()
モデルのチェックポイントをアップロードするためにGit-LFSをインストール.
!sudo apt -qq install git-lfs
!git config --global credential.helper store
Config
訓練のためのハイパーパラメータをグループ化したコンフィギュレーションを定義します.
from dataclasses import dataclass

@dataclass
class TrainingConfig:
    image_size = 128  # the generated image resolution
    train_batch_size = 16
    eval_batch_size = 16  # how many images to sample during evaluation
    num_epochs = 50
    gradient_accumulation_steps = 1
    learning_rate = 1e-4
    lr_warmup_steps = 500
    save_image_epochs = 10
    save_model_epochs = 30
    mixed_precision = 'fp16'  # `no` for float32, `fp16` for automatic mixed precision
    output_dir = 'ddpm-butterflies-128'  # the model namy locally and on the HF Hub

    push_to_hub = True  # whether to upload the saved model to the HF Hub
    hub_private_repo = False
    overwrite_output_dir = True  # overwrite the old model when re-running the notebook
    seed = 0

config = TrainingConfig()
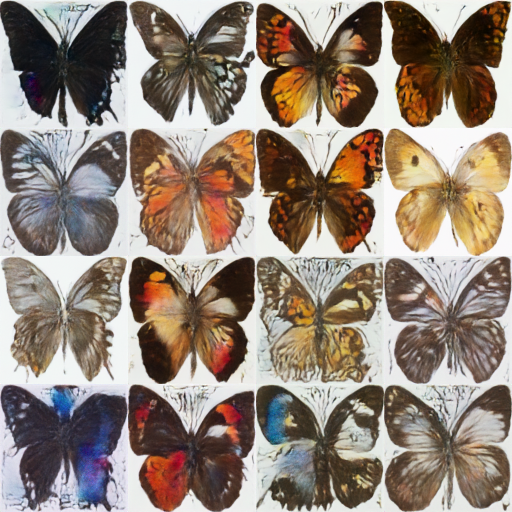
Loading the dataset
Butterfliesデータセットをロードします.
from datasets import load_dataset

config.dataset = "huggan/smithsonian_butterflies_subset"
dataset = load_dataset(config.dataset, split="train")

# Feel free to try other datasets from https://hf.co/huggan/ too!
# Here's is a dataset of flower photos:
# config.dataset = "huggan/flowers-102-categories"
# dataset = load_dataset(config.dataset, split="train")

# Or just load images from a local folder!
# config.dataset = "imagefolder"
# dataset = load_dataset(config.dataset, data_dir="path/to/folder")
データセットのサンプル画像は以下の通りです.

transformsを定義します.
from torchvision import transforms

preprocess = transforms.Compose(
    [
        transforms.Resize((config.image_size, config.image_size)),
        transforms.RandomHorizontalFlip(),
        transforms.ToTensor(),
        transforms.Normalize([0.5], [0.5]),
    ]
)
def transform(examples):
    images = [preprocess(image.convert("RGB")) for image in examples["image"]]
    return {"images": images}

dataset.set_transform(transform)
dataloaderを定義します.
import torch

train_dataloader = torch.utils.data.DataLoader(dataset, batch_size=config.train_batch_size, shuffle=True)
Defining the diffusion model
拡散モデルを設定します.
拡散モデルは,ノイズの多い画像からノイズの少ない画像を予測するように訓練されたニューラルネットワークです.

出典:DDPM paper
ここでは,U-Netの一種であるアーキテクチャを用いた拡散モデルを定義します.

from diffusers import UNet2DModel

model = UNet2DModel(
    sample_size=config.image_size,  # the target image resolution
    in_channels=3,  # the number of input channels, 3 for RGB images
    out_channels=3,  # the number of output channels
    layers_per_block=2,  # how many ResNet layers to use per UNet block
    block_out_channels=(128, 128, 256, 256, 512, 512),  # the number of output channes for each UNet block
    down_block_types=(
        "DownBlock2D",  # a regular ResNet downsampling block
        "DownBlock2D",
        "DownBlock2D",
        "DownBlock2D",
        "AttnDownBlock2D",  # a ResNet downsampling block with spatial self-attention
        "DownBlock2D",
    ),
    up_block_types=(
        "UpBlock2D",  # a regular ResNet upsampling block
        "AttnUpBlock2D",  # a ResNet upsampling block with spatial self-attention
        "UpBlock2D",
        "UpBlock2D",
        "UpBlock2D",
        "UpBlock2D"
      ),
)
Defining the noise scheduler
画像にノイズを加える操作を定義します.この操作は,DiffusersのSchedulerによって行われます.
拡散アルゴリズムによって画像にノイズを加える方法が異なります.ここでは,Denoising Diffusion Probabilistic Modelsに対応するDDPMSchedulerを使用します.
from diffusers import DDPMScheduler

noise_scheduler = DDPMScheduler(num_train_timesteps=1000, tensor_format="pt")
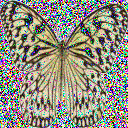
下記のようにして,ノイズを加えられた画像を生成することができます.
import torch
from PIL import Image

noise = torch.randn(sample_image.shape)
timesteps = torch.LongTensor([50])
noisy_image = noise_scheduler.add_noise(sample_image, noise, timesteps)

Image.fromarray(((noisy_image.permute(0, 2, 3, 1) + 1.0) * 127.5).type(torch.uint8).numpy()[0])
ノイズが加えられた画像サンプルは以下のようになります.
Setting up training
loss関数を定義します.
DDPMの目的関数は,noise_scheduler.add_noiseで使用したノイズを予測できるようにすることです.
import torch.nn.functional as F

noise_pred = model(noisy_image, timesteps)["sample"]
loss = F.mse_loss(noise_pred, noise)
ここでは,AdamWオプティマイザとコサイン学習率スケジュールを使用します.
optimizer = torch.optim.AdamW(model.parameters(), lr=config.learning_rate)
from diffusers.optimization import get_cosine_schedule_with_warmup

lr_scheduler = get_cosine_schedule_with_warmup(
    optimizer=optimizer,
    num_warmup_steps=config.lr_warmup_steps,
    num_training_steps=(len(train_dataloader) * config.num_epochs),
)
モデルを評価するために,DDPMPipelineを使用します.
from diffusers import DDPMPipeline
import math

def make_grid(images, rows, cols):
    w, h = images[0].size
    grid = Image.new('RGB', size=(cols*w, rows*h))
    for i, image in enumerate(images):
        grid.paste(image, box=(i%cols*w, i//cols*h))
    return grid

def evaluate(config, epoch, pipeline):
    # Sample some images from random noise (this is the backward diffusion process).
    # The default pipeline output type is `List[PIL.Image]`
    images = pipeline(
        batch_size = config.eval_batch_size,
        generator=torch.manual_seed(config.seed),
    )["images"]

    # Make a grid out of the images
    image_grid = make_grid(images, rows=4, cols=4)

    # Save the images
    test_dir = os.path.join(config.output_dir, "samples")
    os.makedirs(test_dir, exist_ok=True)
    image_grid.save(f"{test_dir}/{epoch:04d}.png")
トレーニング関数を定義します.
from accelerate import Accelerator
from huggingface_hub import HfFolder, Repository, whoami

from tqdm.auto import tqdm
from pathlib import Path
import os

def get_full_repo_name(model_id: str, organization: str = None, token: str = None):
    if token is None:
        token = HfFolder.get_token()
    if organization is None:
        username = whoami(token)["name"]
        return f"{username}/{model_id}"
    else:
        return f"{organization}/{model_id}"

def train_loop(config, model, noise_scheduler, optimizer, train_dataloader, lr_scheduler):
    # Initialize accelerator and tensorboard logging
    accelerator = Accelerator(
        mixed_precision=config.mixed_precision,
        gradient_accumulation_steps=config.gradient_accumulation_steps,
        log_with="tensorboard",
        logging_dir=os.path.join(config.output_dir, "logs")
    )
    if accelerator.is_main_process:
        if config.push_to_hub:
            repo_name = get_full_repo_name(Path(config.output_dir).name)
            repo = Repository(config.output_dir, clone_from=repo_name)
        elif config.output_dir is not None:
            os.makedirs(config.output_dir, exist_ok=True)
        accelerator.init_trackers("train_example")

    # Prepare everything
    # There is no specific order to remember, you just need to unpack the
    # objects in the same order you gave them to the prepare method.
    model, optimizer, train_dataloader, lr_scheduler = accelerator.prepare(
        model, optimizer, train_dataloader, lr_scheduler
    )

    global_step = 0

    # Now you train the model
    for epoch in range(config.num_epochs):
        progress_bar = tqdm(total=len(train_dataloader), disable=not accelerator.is_local_main_process)
        progress_bar.set_description(f"Epoch {epoch}")

        for step, batch in enumerate(train_dataloader):
            clean_images = batch['images']
            # Sample noise to add to the images
            noise = torch.randn(clean_images.shape).to(clean_images.device)
            bs = clean_images.shape[0]

            # Sample a random timestep for each image
            timesteps = torch.randint(0, noise_scheduler.num_train_timesteps, (bs,), device=clean_images.device).long()

            # Add noise to the clean images according to the noise magnitude at each timestep
            # (this is the forward diffusion process)
            noisy_images = noise_scheduler.add_noise(clean_images, noise, timesteps)

            with accelerator.accumulate(model):
                # Predict the noise residual
                noise_pred = model(noisy_images, timesteps, return_dict=False)[0]
                loss = F.mse_loss(noise_pred, noise)
                accelerator.backward(loss)

                accelerator.clip_grad_norm_(model.parameters(), 1.0)
                optimizer.step()
                lr_scheduler.step()
                optimizer.zero_grad()

            progress_bar.update(1)
            logs = {"loss": loss.detach().item(), "lr": lr_scheduler.get_last_lr()[0], "step": global_step}
            progress_bar.set_postfix(**logs)
            accelerator.log(logs, step=global_step)
            global_step += 1

        # After each epoch you optionally sample some demo images with evaluate() and save the model
        if accelerator.is_main_process:
            pipeline = DDPMPipeline(unet=accelerator.unwrap_model(model), scheduler=noise_scheduler)

            if (epoch + 1) % config.save_image_epochs == 0 or epoch == config.num_epochs - 1:
                evaluate(config, epoch, pipeline)

            if (epoch + 1) % config.save_model_epochs == 0 or epoch == config.num_epochs - 1:
                if config.push_to_hub:
                    repo.push_to_hub(commit_message=f"Epoch {epoch}", blocking=True)
                else:
                    pipeline.save_pretrained(config.output_dir)
Let's train!
Accelerateのnotebook_launcherを使ってトレーニング関数を起動させます.
from accelerate import notebook_launcher
args = (config, model, noise_scheduler, optimizer, train_dataloader, lr_scheduler)

notebook_launcher(train_loop, args, num_processes=1)
訓練終了後,訓練された拡散モデルを使って生成された画像サンプルを表示させてみます.
import glob

sample_images = sorted(glob.glob(f"{config.output_dir}/samples/*.png"))
Image.open(sample_images[-1])
まとめ
この記事では,Diffusersを使った拡散モデルの訓練の一例を紹介しました.
Diffusersを使った拡散モデルの訓練については,以下を参照してください.