JavaScript学習中の者です。
備忘録として学んだことを書いておきます。
今回は基礎編ということで、クイズを1問だけ解くだけのアプリにします。
次回応用編を書きますが、そちらは4問解き続ける仕様で作る予定です。
その後、応用編を作成しました。こちらになります→応用編
1. HTMLファイルの編集
HTMLファイルを用意するには、こちらのサイトが便利です。
トップページのダウンロードボタンを押して、ダウンロードしたデータのうち「index.html」だけ使用します。
(公式サイト「HTML5 Boilerplate」より)
また、以下を貼り付ければBootstrapを簡単に利用することができます。
<link href="https://cdn.jsdelivr.net/npm/bootstrap@5.2.0-beta1/dist/css/bootstrap.min.css" rel="stylesheet" integrity="sha384-0evHe/X+R7YkIZDRvuzKMRqM+OrBnVFBL6DOitfPri4tjfHxaWutUpFmBp4vmVor" crossorigin="anonymous">
(公式サイト「Build fast, responsive sites with Bootstrap」より)
index.html
<!doctype html>
<html class="no-js" lang="">

<head>
  <meta charset="utf-8">
  <title></title>
  <meta name="description" content="">
  <meta name="viewport" content="width=device-width, initial-scale=1">

  <meta property="og:title" content="">
  <meta property="og:type" content="">
  <meta property="og:url" content="">
  <meta property="og:image" content="">

  <link rel="manifest" href="site.webmanifest">
  <link rel="apple-touch-icon" href="icon.png">
  <!-- Place favicon.ico in the root directory -->

  <link href="https://cdn.jsdelivr.net/npm/bootstrap@5.2.0-beta1/dist/css/bootstrap.min.css" rel="stylesheet" integrity="sha384-0evHe/X+R7YkIZDRvuzKMRqM+OrBnVFBL6DOitfPri4tjfHxaWutUpFmBp4vmVor" crossorigin="anonymous">


  <meta name="theme-color" content="#fafafa">
</head>

<body>

  <div class="container">

    <div class="jumbotron mt-5">
      <div class="d-flex justify-content-center">
        <div id="js-question" class="alert alert-primary" role="alert">
          A simple primary alert—check it out!
        </div>
      </div>

      <div id="js-items" class="d-flex justify-content-center">
        <div class="m-2">
          <button type="button" id="js-btn-1" class="btn btn-primary">Primary</button>
        </div>
        <div class="m-2">
          <button type="button" id="js-btn-2" class="btn btn-primary">Primary</button>
        </div>
        <div class="m-2">
          <button type="button" id="js-btn-3" class="btn btn-primary">Primary</button>
        </div>
        <div class="m-2">
          <button type="button" id="js-btn-4" class="btn btn-primary">Primary</button>
        </div>
      </div>
    </div>
  </div>

  <script src="app.js"></script>
</body>

</html>
ここからはJSファイルを編集していきます。
2. JSファイルの編集
app.js
// (1) まずは問題文、選択肢、答えのプロパティを定義する
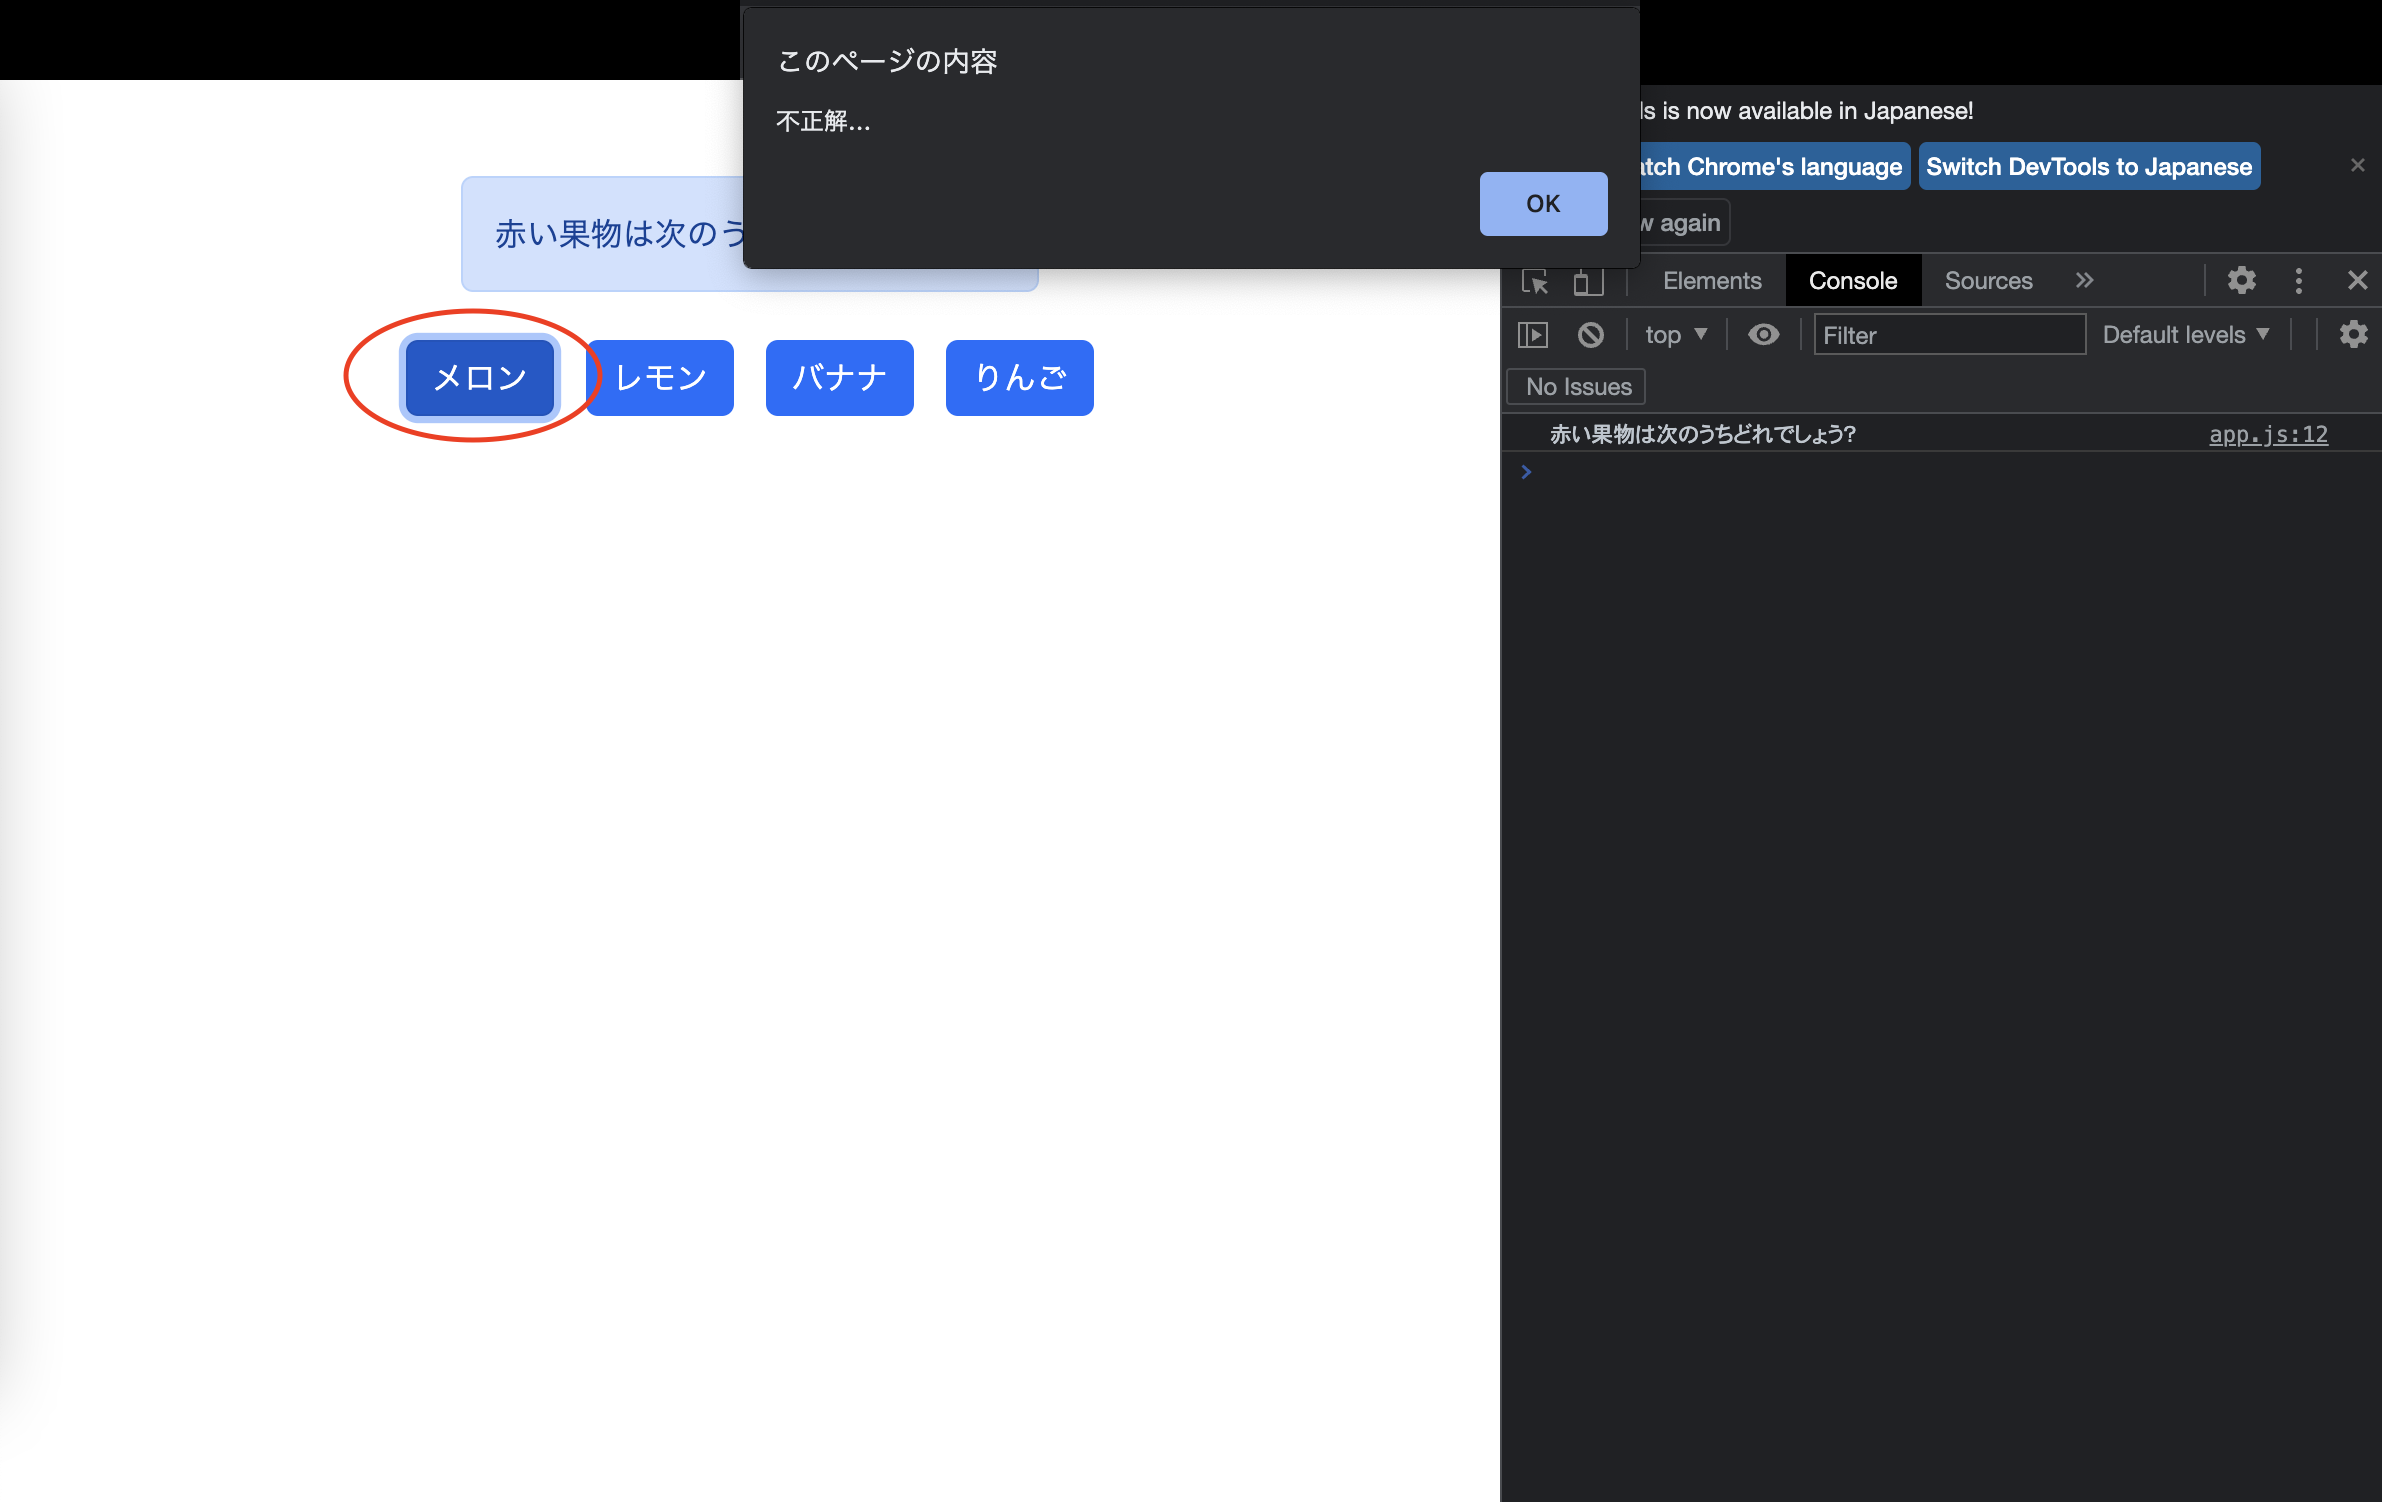
const question = '赤い果物は次のうちどれでしょう?';
const answers = [
'メロン',
'レモン',
'バナナ',
'りんご'
];
const correct = 'りんご';
// (2) HTMLで記述した文言を上で定義した問題文に上書きする。
document.getElementById('js-question').textContent = question;
// (3) HTMLで記述したボタン上のテキストを、上で定義した選択肢に上書きする。
document.getElementsByTagName('button')[0].textContent = answers[0];
document.getElementsByTagName('button')[1].textContent = answers[1];
document.getElementsByTagName('button')[2].textContent = answers[2];
document.getElementsByTagName('button')[3].textContent = answers[3];
// (4) ボタンをクリックした時に正解、不正解を表示させる関数を作る。
// まず、ボタンを表しているのはdocument.getElementsByTagName('button')であることを忘れないこと。
// 正解・不正解をif-elseで表現する。
// $button[0].textContentはあとでe.target.textContentに置き換えることも可能。
// 1個目のボタンにIventListenerを追加する。
document.getElementsByTagName('button')[0].addEventListener('click', () => {
if(correct === document.getElementsByTagName('button')[0].textContent ) {
window.alert('正解!');
}
else {
window.alert('不正解...');
}
})
// 2個目のボタンにIventListenerを追加する。
document.getElementsByTagName('button')[1].addEventListener('click', () => {
if(correct === document.getElementsByTagName('button')[1].textContent ) {
window.alert('正解!');
}
else {
window.alert('不正解...');
}
})
// 3個目のボタンにIventListenerを追加する。
document.getElementsByTagName('button')[2].addEventListener('click', () => {
if(correct === document.getElementsByTagName('button')[2].textContent ) {
window.alert('正解!');
}
else {
window.alert('不正解...');
}
})
// 4個目のボタンにIventListenerを追加する。
document.getElementsByTagName('button')[3].addEventListener('click', () => {
if(correct === document.getElementsByTagName('button')[3].textContent ) {
window.alert('正解!');
}
else {
window.alert('不正解...');
}
})
この時点で、クリックした時にこのように「正解!」「不正解...」のアラートが表示されるようになりました。
3. リファクタリング①
これだけでも間違っているわけではないですが、同じようなコードを繰り返している箇所は変数に格納してスッキリさせた方が良いです(リファクタリング)。
app.js
const question = '赤い果物は次のうちどれでしょう?';
const answers = [
  'メロン',
  'レモン',
  'バナナ',
  'りんご'
];
const correct = 'りんご';

document.getElementById('js-question').textContent = question;

// document.getElementsByTagName('button')[0].textContent = answers[0];
// document.getElementsByTagName('button')[1].textContent = answers[1];
// document.getElementsByTagName('button')[2].textContent = answers[2];
// document.getElementsByTagName('button')[3].textContent = answers[3];

// (5) 上の記述に関して、繰り返しているのをすっきりさせるために変数$buttonに格納
const $button = document.getElementsByTagName('button');

$button[0].textContent = answers[0];
$button[1].textContent = answers[1];
$button[2].textContent = answers[2];
$button[3].textContent = answers[3];

// (6) clickした時にfunction e を実行するようにアロー関数で記述する。
// (7) $button[0].textContentをe.target.textContentに置き換える。
// 1個目のボタン
$button[0].addEventListener('click', (e) => {
  if(correct === e.target.textContent ) {
    window.alert('正解!');
  }
  else {
    window.alert('不正解...');
  }
})
// 2個目のボタン
$button[1].addEventListener('click', (e) => {
  if(correct === e.target.textContent ) {
    window.alert('正解!');
  }
  else {
    window.alert('不正解...');
  }
})
// 3個目のボタン
$button[2].addEventListener('click', (e) => {
  if(correct === e.target.textContent ) {
    window.alert('正解!');
  }
  else {
    window.alert('不正解...');
  }
})
// 4個目のボタン
$button[3].addEventListener('click', (e) => {
  if(correct === e.target.textContent ) {
    window.alert('正解!');
  }
  else {
    window.alert('不正解...');
  }
})
4.リファクタリング②
ボタンの配列を取得してくる時の記述が長いので、while文による取得に変更していきます。
app.js
// 問題文、選択肢、答えのプロパティを定義する
const question = '赤い果物は次のうちどれでしょう?';
const answers = [
  'メロン',
  'レモン',
  'バナナ',
  'りんご'
];
const correct = 'りんご';

document.getElementById('js-question').textContent = question;

const $button = document.getElementsByTagName('button');

// $button[0].textContent = answers[0];
// $button[1].textContent = answers[1];
// $button[2].textContent = answers[2];
// $button[3].textContent = answers[3];

// 上の記述をもう少しシンプルにしていく。
// 繰り返す時に使用するための変数を設定
let i = 0;
// 選択肢のindexも設定
let choices_i = 0;
// 配列[]buttonの要素の数
let buttonLength = $button.length;
// 配列[]buttonの要素(メロンからりんごまで)が全て取得できるまで繰り返す
while ( i < buttonLength ) {
  // i=0の状態つまりメロンから順に取得していく
  $button[i].textContent = answers[choices_i];
  // 4個目のボタン(りんご)になるまでインクリメントしていく
  i++;
  // 選択肢も同様にインクリメントしていく
  choices_i++;
}

// 1個目のボタン
$button[0].addEventListener('click', (e) => {
  if(correct === e.target.textContent ) {
    window.alert('正解!');
  }
  else {
    window.alert('不正解...');
  }
})
// 2個目のボタン
$button[1].addEventListener('click', (e) => {
  if(correct === e.target.textContent ) {
    window.alert('正解!');
  }
  else {
    window.alert('不正解...');
  }
})
// 3個目のボタン
$button[2].addEventListener('click', (e) => {
  if(correct === e.target.textContent ) {
    window.alert('正解!');
  }
  else {
    window.alert('不正解...');
  }
})
// 4個目のボタン
$button[3].addEventListener('click', (e) => {
  if(correct === e.target.textContent ) {
    window.alert('正解!');
  }
  else {
    window.alert('不正解...');
  }
})
5. リファクタリング③
さらに、ボタンをクリックした時に「正解!」「不正解...」と表示される動き(関数)はどのボタンも同じです。
なのでこれも1つにまとめていきます。
関数で表現します。
app.js
const question = '赤い果物は次のうちどれでしょう?';
const answers = [
  'メロン',
  'レモン',
  'バナナ',
  'りんご'
];
const correct = 'りんご';

document.getElementById('js-question').textContent = question;

const $button = document.getElementsByTagName('button');

let i = 0;
let choices_i = 0;
let buttonLength = $button.length;

while ( i < buttonLength ) {
  $button[i].textContent = answers[choices_i];
  i++;
  choices_i++;
}

// $button[0].addEventListener('click', (e) => {
//   if(correct === e.target.textContent ) {
//     window.alert('正解!');
//   }
//   else {
//     window.alert('不正解...');
//   }
// })
// $button[1].addEventListener('click', (e) => {
//   if(correct === $button[1].textContent ) {
//     window.alert('正解!');
//   }
//   else {
//     window.alert('不正解...');
//   }
// })
// $button[2].addEventListener('click', (e) => {
//   if(correct === e.target.textContent ) {
//     window.alert('正解!');
//   }
//   else {
//     window.alert('不正解...');
//   }
// })
// $button[3].addEventListener('click', (e) => {
//   if(correct === e.target.textContent ) {
//     window.alert('正解!');
//   }
//   else {
//     window.alert('不正解...');
//   }
// })

// 上の記述をもう少しシンプルにしていく。
// クリックした時に正誤判定する関数を定義
const clickHandler = (e) => {
  if(correct === e.target.textContent ) {
    window.alert('正解!');
  } else {
    window.alert('不正解...');
  }
}
/* クリックした時にif-else文が走る記述をしていたが、
clickHandler()関数で上書きする */
$button[0].addEventListener('click', (e) => {
  // ここでclickHandler()関数を呼び出す
  clickHandler(e);
})
$button[1].addEventListener('click', (e) => {
  clickHandler(e);
})
$button[2].addEventListener('click', (e) => {
  clickHandler(e);
})
$button[3].addEventListener('click', (e) => {
  clickHandler(e);
})
6. リファクタリング④
app.js
const question = '赤い果物は次のうちどれでしょう?';
const answers = [
  'メロン',
  'レモン',
  'バナナ',
  'りんご'
];
const correct = 'りんご';

document.getElementById('js-question').textContent = question;

const $button = document.getElementsByTagName('button');

let i = 0;
let choices_i = 0;
// let からconstに変更
const buttonLength = $button.length;

while ( i < buttonLength ) {
  $button[i].textContent = answers[choices_i];
  i++;
  choices_i++;
}

const clickHandler = (e) => {
  if(correct === e.target.textContent ) {
    window.alert('正解!');
  } else {
    window.alert('不正解...');
  }
}

// $button[0].addEventListener('click', (e) => {
//   clickHandler(e);
// })
// $button[1].addEventListener('click', (e) => {
//   clickHandler(e);
// })
// $button[2].addEventListener('click', (e) => {
//   clickHandler(e);
// })
// $button[3].addEventListener('click', (e) => {
//   clickHandler(e);
// })

/* ポイントは2点ある。
1. 上の処理は同じ記述を繰り返していたため1つにまとめることができる。
2. ボタンをクリックするとイベントが発生する処理を繰り返し実行できるように設定する。 */

// イベント操作の回数を定義する。
let eventHandleIndex = 0;
// 該当ボタンをクリックした時にaddEventListenerが走るのを繰り返す。
while (eventHandleIndex < buttonLength) {
  $button[eventHandleIndex].addEventListener('click', (e) => {
  clickHandler(e);
  })
  eventHandleIndex++;
}