はじめに
ちょっとした事情でOCI上のNLBを経由したFTP(アクティブモード)の接続を行うことができるのか、を確認する必要がありました。
Qiitaの記事1などだとNLBの具体的な設定がわかり辛かったので、NLBの設定を残しておきたい、とか、FTPクライアント・ネットワークロードバランサ(NLB)・FTPサーバのセグメントが別でも大丈夫か、とか、NLBのネットワークセキュリティグループ(NSG)はどこまで絞れるのか、とかを確認した結果の記録です。
FTP接続構成・設定内容
次図のように、FTPクライアントから別のVCNのNLBに接続し、そのNLB経由でFTPサーバ#1、#2にロードバランスする、というような構成にしました。それぞれのVCNのROUTEは互いにLPG経由で接続に行く形になってます。
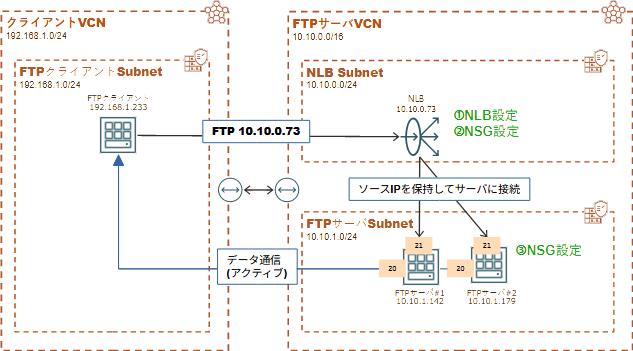
FTPクライアント、FTPサーバについては作成済み・設定済みの前提で、主に次の三点について解説します。
①NLB設定
②NLBのNSG設定
③FTPサーバのNSG設定
もちろんアクティブモードなのでクライアント側もサーバ側から接続されるためにNSGやポートの設定が必要なのですが、今回は主題ではないので省略します2。また、FTPサーバもSELinux、Firewalldは停止してます。
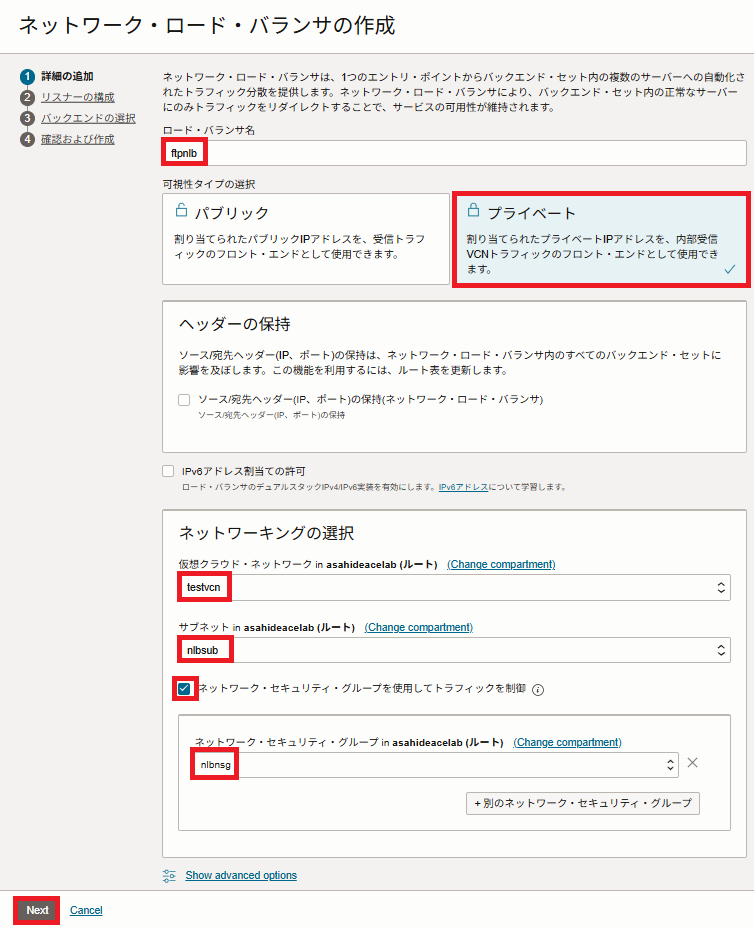
①NLB設定
NLBを作成します。今回は要件でプライベートにしてます。パブリックでも可能ですが、インターネット経由でftpをアクティブモードで利用したい、というニーズはほぼないとは思います。
- LBの設定
LB名、作成するVCN、サブネット、紐づけるNSGを設定し、「Next」を押下します。
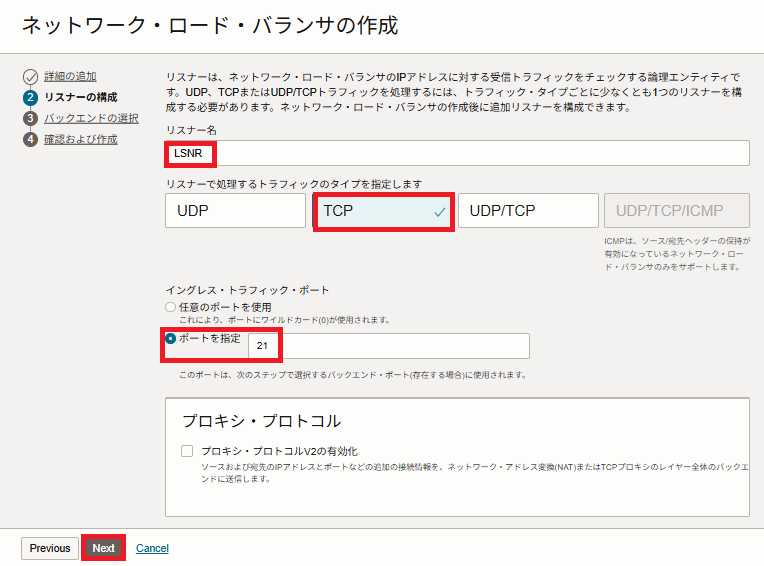
- リスナーの設定
リスナー名、トラフィックのタイプを「TCP」、ポート指定を「21」にし、「Next」を押下します。
- バックエンドセットの設定
バックエンドセット名を設定します。
「ソースIPの保持3」にチェックがされていることを確認し、プロトコルを「TCP」、ポートを「21」に設定します。
「バックエンドの追加」を押下するとサブページが開きます。
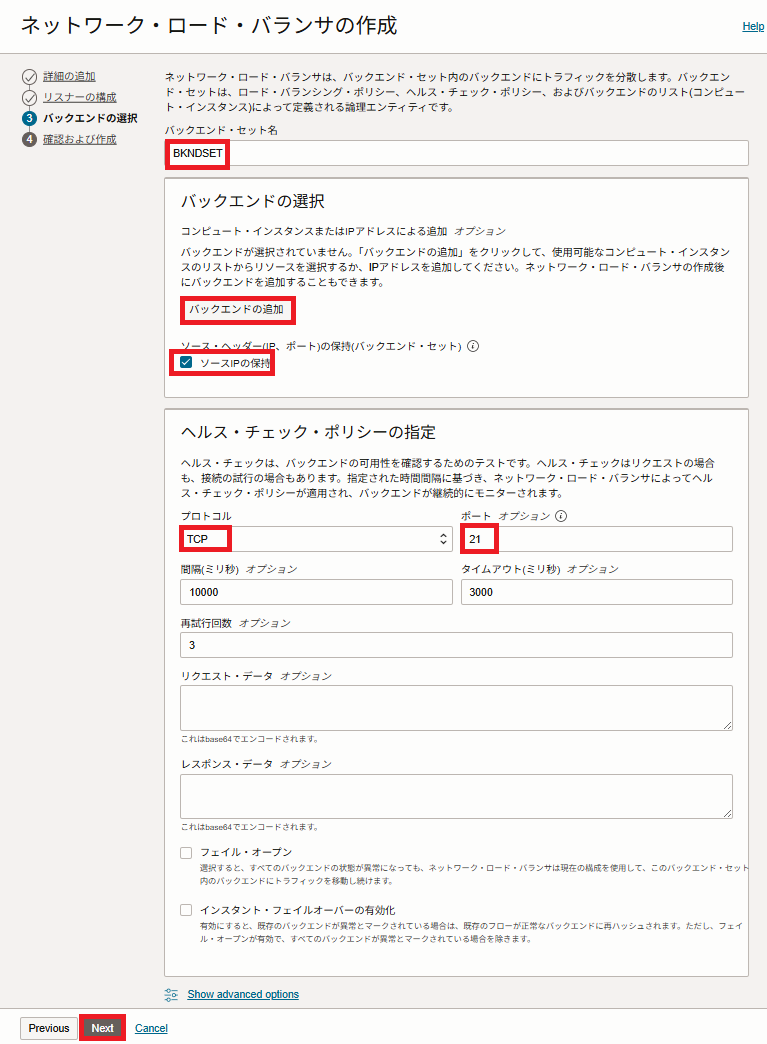
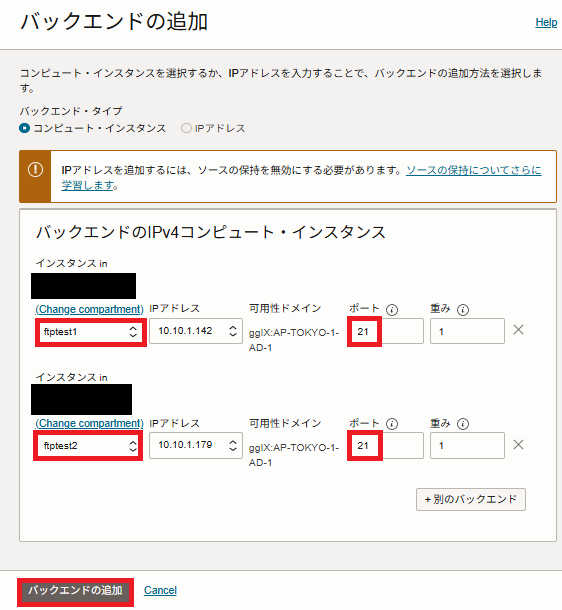
- バックエンドの追加
バックエンドのインスタンスにftpサーバ#1、#2を設定します。
「バックエンドの追加」を押下すると「バックエンドセットの設定」に戻りますので、「Next」を押下します。
最後に確認画面が出ますので、問題ないことを確認したらNLBを作成します。NLBは数分で作成が完了します。
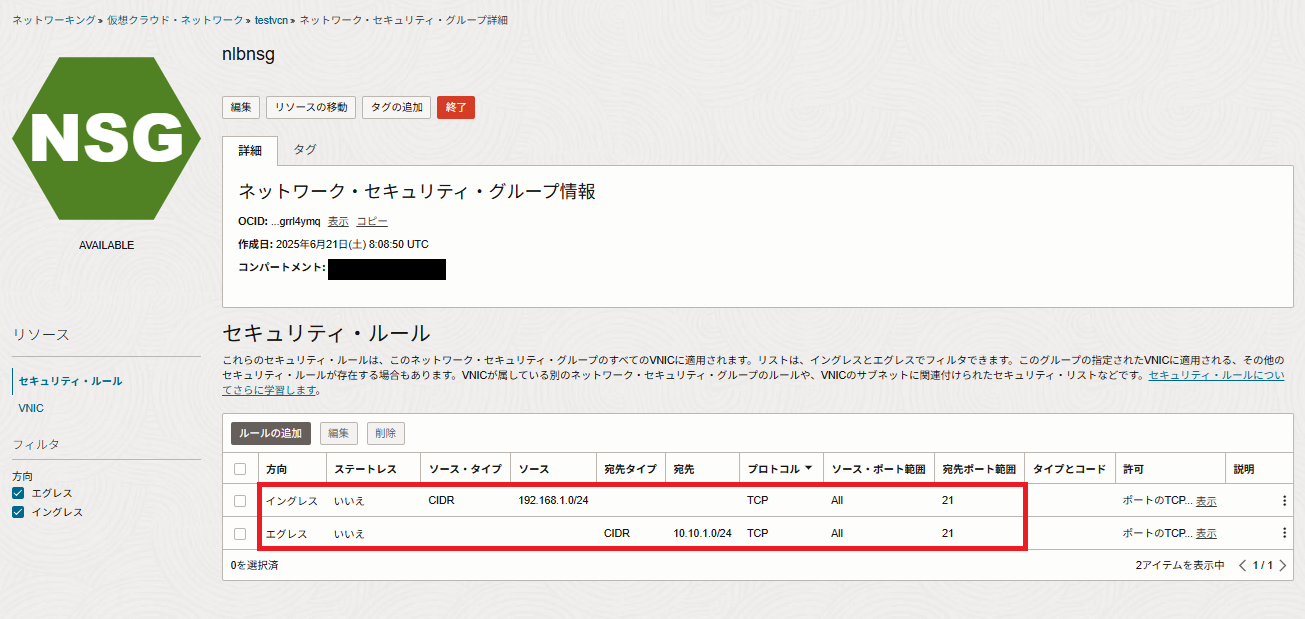
②NLBのNSG設定
NLBのNSGは次の二点を設定します。
- FTPクライアントからのイングレス
- FTPサーバへのエグレス
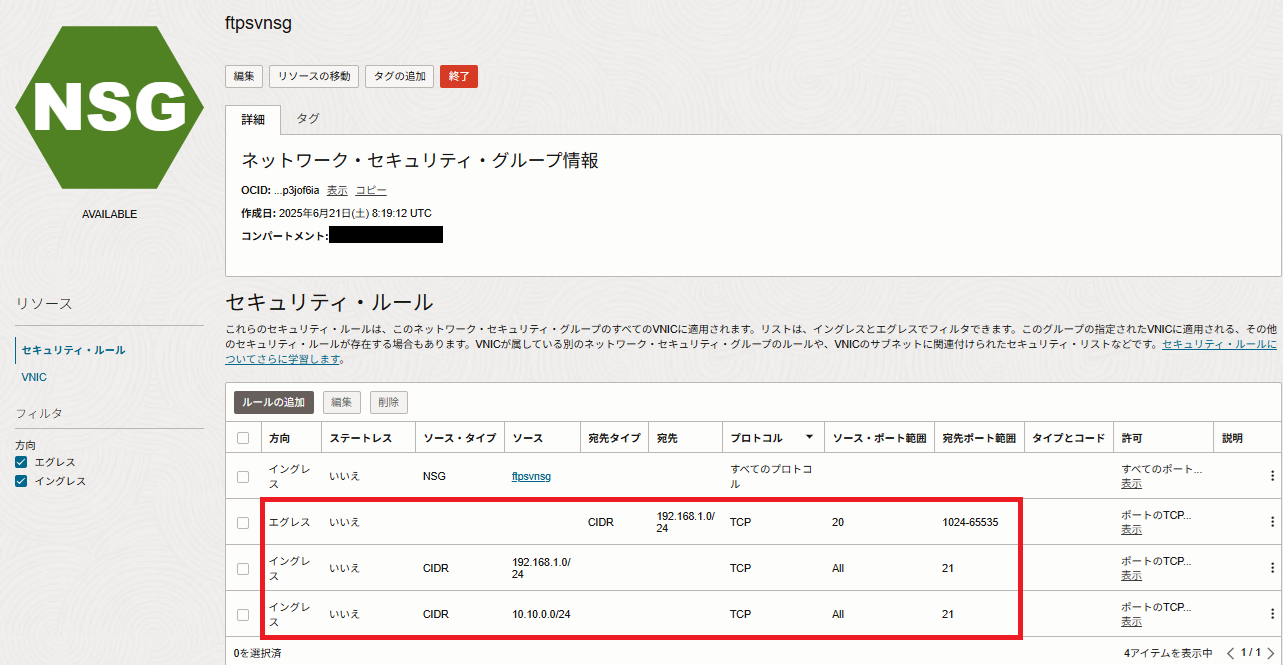
③FTPサーバのNSG設定
FTPサーバのNSGは次の三点を設定します。
- FTPクライアントへのエグレス(アクティブモードのデータ通信)
- FTPクライアントからのイングレス
- FTPサーバへのエグレス
接続確認
FTPクライアント(192.168.1.233)からNLB(10.10.0.73)にFTPアクセスをします。
(FTPサーバ#1に test1.txt を、FTPサーバ#2に test2.txt を配置してます)
$ ifconfig enp0s5
enp0s5: flags=4163<UP,BROADCAST,RUNNING,MULTICAST>  mtu 9000
        inet 192.168.1.233  netmask 255.255.255.0  broadcast 192.168.1.255
<略>

$ ftp 10.10.0.73
Connected to 10.10.0.73 (10.10.0.73).
220 (vsFTPd 3.0.3)
Name (10.10.0.73:opc): ftpuser
331 Please specify the password.
Password:
230 Login successful.
Remote system type is UNIX.
Using binary mode to transfer files.


ftp> passive
Passive mode off.
ftp> ls
200 PORT command successful. Consider using PASV.
150 Here comes the directory listing.
-rw-rw-r--    1 1001     1001            0 Jun 20 06:48 test.txt
-rw-rw-r--    1 1001     1001            6 Jun 21 09:03 test2.txt
226 Directory send OK.
ftp> get test2.txt
local: test2.txt remote: test2.txt
200 PORT command successful. Consider using PASV.
150 Opening BINARY mode data connection for test2.txt (6 bytes).
226 Transfer complete.
6 bytes received in 4.3e-05 secs (139.53 Kbytes/sec)
ftp> quit
221 Goodbye.

$ ftp 10.10.0.73
Connected to 10.10.0.73 (10.10.0.73).
220 (vsFTPd 3.0.3)
Name (10.10.0.73:opc): ftpuser
331 Please specify the password.
Password:
230 Login successful.
Remote system type is UNIX.
Using binary mode to transfer files.
ftp> passive
Passive mode off.
ftp> ls
200 PORT command successful. Consider using PASV.
150 Here comes the directory listing.
-rw-rw-r--    1 1001     1001            6 Jun 21 09:03 test1.txt
226 Directory send OK.
ftp> get test1.txt
local: test1.txt remote: test1.txt
200 PORT command successful. Consider using PASV.
150 Opening BINARY mode data connection for test1.txt (6 bytes).
226 Transfer complete.
6 bytes received in 2.6e-05 secs (230.77 Kbytes/sec)
FTPサーバ側でアクティブモードのみに制限しているため、パッシブモードでlsなどを実行すると以下のようにエラーができます。
ftp> ls
550 Permission denied.
Passive mode refused.
まとめ
アクティブモードのFTP自体はだいぶ減ってはいると思いますが、OCIへの単純移行で方式を変えたくない、という場合には必要になることもあるかもしれません。単純更改の場合、基本的にFTPクライアント側も元々アクティブモードなので、セキュリティが弱い点は「現行と同等」という形で収めることができる場合もあります。
一応紹介したようにNLBを経由することで設定することが可能ですので、要件とコストなどを鑑みて決めると良いでしょう。
ちなみにPassiveモードの場合には、LBを必ず通過する形になるのでLB側の設定は意外と複雑です。次のDocにありますので、Passiveモードを活用する場合には、確認しておきましょう。
- Setting Up Passive Mode FTP Service Behind OCI Loadbalancer (Doc ID 2817352.1)
-
【Oracle Cloud Infrastructure, OCI】FTP(アクティブモード)でネットワークロードバランサを通したデータ転送が可能かを検証 ↩
-
FTPクライアントのNSGは FTPサーバ側のVCNのCIDR(10.10.0.0/16)とイングレス・エグレスを全通しに、Firewalld、SELinuxはOFFにせっていしていま ↩