概要
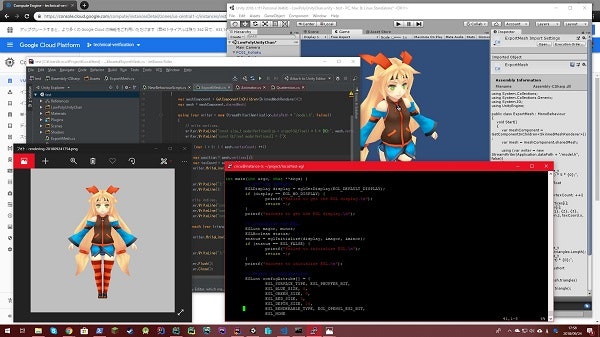
Google Cloud Platform(GPC)のGoogle Compute Engine(GCE)ではGPGPU向けのGPU付きインスタンスが作成可能ですが、GPGPU向けとはいえGPU積んでいるのであればOpenGLを動作させてサーバ用のマシーンでも3Dレンダリング出来るんじゃないかな?と考えOpenGLをGPU付きVMインスタンス上で動作させてみたので、その手順をまとめてみました。
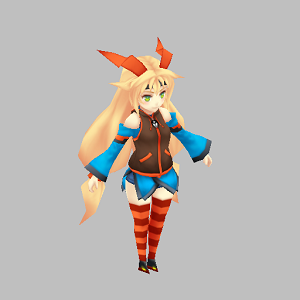
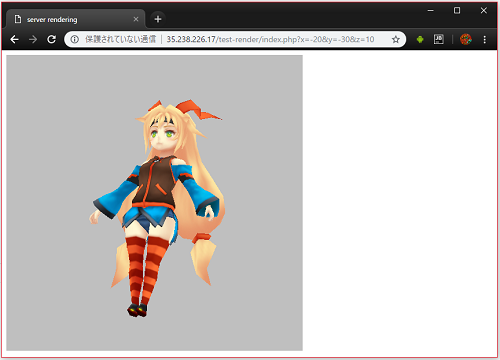
実際にGCE上でレンダリングされた3D画像
EGLとOpneGL
EGL、あまり聞き慣れないAPIかもしれませんがAndroidでOpenGLを使用されたことがあるのであれば、もしかしたら使用した事がある方もあるかもしれません。Androidのライブ壁紙とかでOpenGLを使う場合は、GLSurfaceViewを使わず、OpenGLの初期を手動で出来ます。
そう、EGLとはOpneGLやOpenCV等を使用するのにあたりGPU初期化するためのKronos Groupが策定しているAPIなのです。AndroidもLinuxのディストリビューションの一つなのでこれが使えるんじゃないかと思い調べてみると使えるようです。
NVIDIAのブログでEGLを使用したOpenGLの初期化方法が紹介されていましたので、その方法を使いたいと思います。
EGL Eye: OpenGL Visualization without an X Server
ここでは紹介しませんが、この記事の中ではGPUが複数台、取り付けられているマシンに対しての同時アクセスを行う方法も紹介されています。
おお!まさにサーバレンダリング向け!素晴らしい!
開発環境の準備
VMの用意
今回はUbuntuを使用します。頑張れば他のOSでも動作させることが可能です。(手順は違いますがCentOS 7でも動作確認済み)
- CPU vCPU x 1
- メモリ 3.75GB
- GPU NVIDIA tesla K80 x 1
- OS Ubuntu 16.04 Minimal
GPUドライバーのインストール
細かい手順はOSの種類やバージョンによって異なるのでここで扱っているOS以外を使用する場合はNVIDIAのドライバダウンロードページを参考にしてください。
ここでは Ubuntu 16.04 Minimal での方法を紹介します。
$ wget http://us.download.nvidia.com/tesla/396.44/nvidia-diag-driver-local-repo-ubuntu1604-396.44_1.0-1_amd64.deb
$ dpkg -i nvidia-diag-driver-local-repo-ubuntu1604-396.44_1.0-1_amd64.deb
$ apt-key add /var/nvidia-diag-driver-local-repo-396.44/7fa2af80.pub
$ apt-get update
$ apt-get install cuda-drivers
一通り上記の手順が終わったらサーバを再起動、サーバでGPUが認識されているかどうかを下記のコマンドを実行して確認してください。
$ nvidia-smi
そして、下記のようなメッセージが出力されればドライバのインストールは成功です。
+-----------------------------------------------------------------------------+
| NVIDIA-SMI 396.44                 Driver Version: 396.44                    |
|-------------------------------+----------------------+----------------------+
| GPU  Name        Persistence-M| Bus-Id        Disp.A | Volatile Uncorr. ECC |
| Fan  Temp  Perf  Pwr:Usage/Cap|         Memory-Usage | GPU-Util  Compute M. |
|===============================+======================+======================|
|   0  Tesla K80           Off  | 00000000:00:04.0 Off |                    0 |
| N/A   33C    P8    28W / 149W |     15MiB / 11441MiB |      0%      Default |
+-------------------------------+----------------------+----------------------+

+-----------------------------------------------------------------------------+
| Processes:                                                       GPU Memory |
|  GPU       PID   Type   Process name                             Usage      |
|=============================================================================|
|    0      1728      G   /usr/lib/xorg/Xorg                            14MiB |
+-----------------------------------------------------------------------------+
もし任意のOS、ハードウェア構成で上手くいかない場合はGCPのヘルプを参考にすると良いかも。
アプリケーション開発用のパッケージをインストール
C++用のコンパイラー、レンダリングに必要なEGLとOpenGL ES 2.0の開発用パッケージ、レンダリング結果をPNGデータとして吐き出すための開発用パッケージ、レンダリング結果をブラウザ等で表示するためにApacheのパッケージをインストールします。
$ apt-get install g++
$ apt-get install libgles2-mesa-dev libegl1-mesa-dev
$ apt-get install libpng++-dev
$ apt-get install apache2
PNG++はCentOSだとインストールが面倒くさい。
レンダリング・サーバの開発
実装は下記のURLで公開していますので詳細はそちらをご参考してください。
3Dモデルを用意
手順を簡略化するため、テクスチャは1枚、メッシュは1個、頂点数も少なめのモデルデータを使用します。そこで今回はユニティちゃんのローポリモデルを使用します。
この3Dデータの読み込み、C/C++でのデータロードも簡略化したいので簡単なフォーマットで吐き出したいと思います。
そこでC/C++の配列のソースコード出力して3DデータをUnityを使用して出力します。ちゃんとした方法でエクスポートしたいのであればBlenderとかで出力する方法が一番なんでしょうが、BlenderのAdd-Onは作成手順がUnityと比べ煩雑なので、ここは労力を減らすためにUnityを選びました。
Unityでダウンロードしたローポリユニティちゃんを読み込みます。
そして、ユニティちゃんのGameObjectに適当な名前でスクリプトコンポーネントを新規作成します。
そして実装
public class ExportMesh : MonoBehaviour
{
    void Start()
    {
        var meshComponent = GetComponentInChildren<SkinnedMeshRenderer>();
        var mesh = meshComponent.sharedMesh;

        using (var writer = new StreamWriter(Application.dataPath + "/model.h", false))
        {
            // write vertices.
            writer.WriteLine("const size_t modelVerticesSize = sizeof(GLfloat) * 5 * {0};", mesh.vertexCount);
            writer.WriteLine("const GLfloat modelVertices[] = {");

            for (var i = 0; i < mesh.vertexCount; ++i)
            {
                var position = mesh.vertices[i];
                var texCoord = mesh.uv[i];
                writer.WriteLine("{0}, {1}, {2}, {3}, {4},", position.x, position.y, position.z, texCoord.x, 1.0 - texCoord.y);
            }

            writer.WriteLine("};");
            writer.WriteLine();

            // write indices.
            writer.WriteLine("const size_t modelIndicesCount = {0};", mesh.triangles.Length);
            writer.WriteLine("const size_t modelIndicesSize = sizeof(GLushort) * {0};", mesh.triangles.Length);
            writer.WriteLine("const GLushort modelIndices[] = {");

            foreach (var triangle in mesh.triangles)
            {
                writer.WriteLine("{0},", triangle);
            }

            writer.WriteLine("};");

            writer.Flush();
            writer.Close();
        }
    }
}
これでユニティシーンをおいたシーンを実行すればC/C++の配列としてinclude出来る3Dデータを焼き込んだC/C++用ソースコードが生成されます。
const GLfloat modelVertices[] は頂点配列、頂点座標の3要素とテクスチャ座標の2要素の数値、計5要素を頂点の数分、float配列で並べたものになります。
const GLushort modelIndices[] は頂点インデックス、インデックス数分並べたunsigned short配列で並べたものになります。
EGLの初期化
OpneGLを動作させる前にEGLを初期化しないといけません。手順としては以下の順番で初期化を行っていきます。
- EGLディスプレイの取得
- EGLの初期化
- EGLのコンフィギュレーションを取得
- EGLサーフェスを生成
- EGLコンテキストを生成
- OpenGLのAPIをバインド
- EGLサーフェス、EGLコンテキストをバインド
これでOpneGLを使用する環境が整います。
EGLディスプレイの取得
まずはシングルGPUをとりあえずターゲットとしているので EGL_DEFAULT_DISPLAY を指定してデフォルトディスプレイを取得します。
// get the EGL's default display.
EGLDisplay display = eglGetDisplay(EGL_DEFAULT_DISPLAY);
if (display == EGL_NO_DISPLAY) {
    printf("failed to get the EGL display.\n");
    return -1;
}
printf("success to get the EGL display.\n");
これで EGL_NO_DISPLAY が帰ってくるようであればGPUドライバのインストールが上手く行っていない可能性があります。
EGLの初期化
次にEGLの初期化
// initialize the EGL.
EGLint magor, minor;
EGLBoolean status;
status = eglInitialize(display, &magor, &minor);
if (status == EGL_FALSE) {
    printf("failed to initialize EGL.\n");
    return -1;
}
printf("success to initialize EGL.\n");
ここでEGLの初期化に失敗するようであれば正常にOSにGPUが認識されていない可能性があります。
EGLコンフィギュレーションの取得
EGLが開発者が希望するEGLコンフィギュレーションを持っているかを取得します。
今回はオフラインレンダリング用のPbuffer、赤8bit、緑8bit、青8bit、深度16bit、OpenGL ES 2.0のコンフィグレーションが使用可能かをチェックします。
// select a configuration.
EGLint configAttribs[] = {
    EGL_SURFACE_TYPE, EGL_PBUFFER_BIT,
    EGL_BLUE_SIZE, 8,
    EGL_GREEN_SIZE, 8,
    EGL_RED_SIZE, 8,
    EGL_DEPTH_SIZE, 16,
    EGL_RENDERABLE_TYPE, EGL_OPENGL_ES2_BIT,
    EGL_NONE
};
EGLint numConfigs;
EGLConfig config;
status = eglChooseConfig(display, configAttribs, &config, 1, &numConfigs);
if (status == EGL_FALSE) {
    printf("failed to take a configuration.\n");
    return -1;
}
printf("success to take a configuration.\n");
EGLサーフェスとEGLコンテキストの生成
画像のサイズは512x512として描画サーフェスを生成します。それと描画サーフェスと紐づくEGLコンテキストも生成します。
// create a surface/
EGLint pbufferAttribs[] = {
    EGL_WIDTH, 512,
    EGL_HEIGHT, 512,
    EGL_NONE
};
EGLSurface surface = eglCreatePbufferSurface(display, config, pbufferAttribs);
if (surface == EGL_NO_SURFACE) {
    printf("failed to create a surface.\n");
    return -1;
}
printf("success to create a surface.\n");

// create a context.
EGLContext context = eglCreateContext(display, config, EGL_NO_CONTEXT, NULL);
if (context == EGL_NO_CONTEXT) {
    printf("failed to create a context.\n");
    return -1;
}
printf("success to create a context.\n");
OpenGL APIのバインドとEGLサーフェスとEGLコンテキストのバインド
今回はOpenGL ES 2.0を使用しますが、OpneGLやOpenCVを使用したい場合は必要に応じてここを書き換えてください。
// bind the OpenGL ES 2.0.
status = eglBindAPI(EGL_OPENGL_ES_API);
if (status == EGL_FALSE) {
    printf("failed to bind the OpenGL ES 2.0.\n");
    return -1;
}
printf("success to bind the OpenGL ES 2.0.\n");

// bind a context.
status = eglMakeCurrent(display, surface, surface, context);
if (status == EGL_FALSE) {
    printf("failed to bind the context.\n");
    return -1;
}
printf("success to bind the context.\n");
OpenGLによる描画
あとは通常のOpenGLと同様に処理を行うだけで、わざわざ深く説明しなくても良いかと思うので軽めに説明します。
シェーダ
エラー処理は最低限、モデル用の行列、頂点、テクスチャ座標、テクスチャ、必要最低限の機能だけを実装します。
頂点シェーダ
uniform mat4 uModelTransform;

attribute vec3 aPosition;
attribute vec2 aTexCoord;

varying vec2 vTexCoord;

void main() {
    gl_Position = uModelTransform * vec4(aPosition, 1.0);
    vTexCoord = aTexCoord;
}
フラグメントシェーダ
preision mediump float;

uniform sampler2D uTexture;

varying vec2 vTexCoord;

void main() {
    gl_FragColor = texture2D(uTexture, vTexCoord);
}
シェーダのコンパイルとシェーダプログラムのリンク
// compile a vertex shader.
std::ifstream vsFs("./shader.vs");
std::string vsStr((std::istreambuf_iterator<char>(vsFs)), std::istreambuf_iterator<char>());
std::cout << "vertex shader:\n" << vsStr << std::endl;
GLuint vertexShader = glCreateShader(GL_VERTEX_SHADER);
const char *vsCstr = vsStr.c_str();
glShaderSource(vertexShader, 1, &vsCstr, NULL);
glCompileShader(vertexShader);
GLint shaderCompileStatus;
glGetShaderiv(vertexShader, GL_COMPILE_STATUS, &shaderCompileStatus);
if (shaderCompileStatus == GL_FALSE) {
    printf("failed to compile a vertex shader.\n");
}
printf("success to compile a vertex shader.\n");

// compile a fragment shader.
std::ifstream fsFs("./shader.fs");
std::string fsStr((std::istreambuf_iterator<char>(fsFs)), std::istreambuf_iterator<char>());
std::cout << "fragment shader:\n" << fsStr << std::endl;
GLuint fragmentShader = glCreateShader(GL_FRAGMENT_SHADER);
const char *fsCstr = fsStr.c_str();
glShaderSource(fragmentShader, 1, &fsCstr, NULL);
glCompileShader(fragmentShader);
glGetShaderiv(fragmentShader, GL_COMPILE_STATUS, &shaderCompileStatus);
if (shaderCompileStatus == GL_FALSE) {
    printf("failed to compile a fragment shader.\n");
}
printf("success to compile a fragment shader.\n");

// link a shader program.
GLuint program = glCreateProgram();
glAttachShader(program, vertexShader);
glAttachShader(program, fragmentShader);
glLinkProgram(program);
GLint programLinkStatus;
glGetProgramiv(program, GL_LINK_STATUS, &programLinkStatus);
if (programLinkStatus == GL_FALSE) {
    printf("failed to link the shader to program.\n");
}
printf("success to link the shader to program.\n");
glDeleteShader(vertexShader);
glDeleteShader(fragmentShader);

// get the shader's attributes.
GLuint attrPosition = 0;
GLuint attrTexCoord = 1;
glBindAttribLocation(program, attrPosition, "aPosition");
glBindAttribLocation(program, attrTexCoord, "aTexCoord");
GLuint uniModelTransform = glGetUniformLocation(program, "uModelTransform");
GLuint uniTexture = glGetUniformLocation(program, "uTexture");
テクスチャのロード
PNG++を使用してテクスチャを読み込み、GPUに転送します。
// crate a texture.
png::image <png::rgb_pixel> texImage("PC01_Kohaku.png");
size_t texImageWidth = texImage.get_width();
size_t texImageHeight = texImage.get_height();
GLfloat *texPixels = new GLfloat[4 * texImageWidth * texImageHeight];
for (int i = 0; i < texImageHeight; ++i) {
    for (int j = 0; j < texImageWidth; ++j) {
        int index = 4 * texImageWidth * i + 4 * j;
        png::rgb_pixel pixel = texImage[i][j];
        texPixels[index + 0] = (float) pixel.red / 255.0f;
        texPixels[index + 1] = (float) pixel.green / 255.0f;
        texPixels[index + 2] = (float) pixel.blue / 255.0f;
        texPixels[index + 4] = 1.0f;
    }
}
GLuint texBuffer;
glGenTextures(1, &texBuffer);
glBindTexture(GL_TEXTURE_2D, texBuffer);
glTexImage2D(GL_TEXTURE_2D, 0, GL_RGBA, texImageWidth, texImageHeight, 0, GL_RGBA, GL_FLOAT, texPixels);
glTexParameteri(GL_TEXTURE_2D, GL_TEXTURE_MAG_FILTER, GL_LINEAR);
glTexParameteri(GL_TEXTURE_2D, GL_TEXTURE_MIN_FILTER, GL_LINEAR);
delete[] texPixels;
3Dモデルデータのロード
Unityで吐き出したC/C++の配列をユニティちゃんに読み込み、GPUに転送ます。
これは当然ですがUnityで吐き出したmodel.hをincludeしておいてください。
# include "./model.h"
// create buffers.
GLuint modelVerticesBuffer;
glGenBuffers(1, &modelVerticesBuffer);
glBindBuffer(GL_ARRAY_BUFFER, modelVerticesBuffer);
glBufferData(GL_ARRAY_BUFFER, modelVerticesSize, modelVertices, GL_STATIC_DRAW);

GLuint modelIndicesBuffer;
glGenBuffers(1, &modelIndicesBuffer);
glBindBuffer(GL_ELEMENT_ARRAY_BUFFER, modelIndicesBuffer);
glBufferData(GL_ELEMENT_ARRAY_BUFFER, modelIndicesSize, modelIndices, GL_STATIC_DRAW);
3Dモデルの描画
いよいよ描画を行います。
// draw the model.
GLfloat matrix[16];
setIdentityMatrix(matrix);
mulRotationMatrix(matrix, 0.0f, 0.0f, 1.0f, (float) zRot * (M_PI / 180.0f));
mulRotationMatrix(matrix, 1.0f, 0.0f, 0.0f, (float) xRot * (M_PI / 180.0f));
mulRotationMatrix(matrix, 0.0f, -1.0f, 0.0f, (float) yRot * (M_PI / 180.0f));
mulTranslateMatrix(matrix, 0.0f, 0.8f, 0.0f);
mulRotationMatrix(matrix, 1.0f, 0.0f, 0.0f, M_PI / 2.0f);
glUniformMatrix4fv(uniModelTransform, 1, GL_FALSE, matrix);

glActiveTexture(GL_TEXTURE0);
glUniform1i(uniTexture, 0);

glEnableVertexAttribArray(attrPosition);
glVertexAttribPointer(attrPosition, 3, GL_FLOAT, GL_FALSE, sizeof(GLfloat) * 5, (const GLvoid *) 0);
glEnableVertexAttribArray(attrTexCoord);
glVertexAttribPointer(attrTexCoord, 2, GL_FLOAT, GL_FALSE, sizeof(GLfloat) * 5, (const GLvoid *) (sizeof(GLfloat) * 3));

glDrawElements(GL_TRIANGLES, modelIndicesCount, GL_UNSIGNED_SHORT, (const GLvoid *) 0);

// swap the draw buffer.
glFinish();
パースとかクリッピングとか実装が面倒くさいので回転と移動だけを実装。行列操作用のユーティリティは敢えて説明はしないので興味のある方は各自GitHubのソースコードを参照してください。
レンダリング結果の書き出し
PNG++を使用してレンダリング結果を書き出します。
レンダリング画像を受け取る配列はnewするのが面倒だったのでグローバル変数として確保しています。
// out put a png with rendering result.
glReadPixels(0, 0, 512, 512, GL_RGBA, GL_UNSIGNED_BYTE, pixels);
png::image <png::rgb_pixel> image(512, 512);
for (int i = 0; i < 512; ++i) {
    for (int j = 0; j < 512; ++j) {
        int index = 512 * 4 * i + 4 * j;
        image[i][j] = png::rgb_pixel(pixels[index], pixels[index + 1], pixels[index + 2]);
    }
}
char fileName[256];
sprintf(fileName, "image/rendering-%d-%d-%d.png", xRot, yRot, zRot);
image.write(fileName);
これでアプリケーションの置かれているディレクトリのimageディレクトリに画像が出力されます。
コンパイル
最後にこれらの実装をコンパイルします。
$ g++ -o main main.cpp -lEGL -lGLESv2 -lpng
そしてコンパイルが終わったら下記で実行してみてください。
$ ./main
上手く行けばimageディレクトリにレンダリング結果がPNG画像として出力されるはずです。
Web APIとしての公開
実験用なのでサクッとApacheとPHPを使用し簡単な方法で実装します。セキュリティ?なにそれ美味しいの的な実装ですがそれはご容赦くださいw
このときGCEのHTTPアクセスを許可しておいてください。
ディレクトリ構成
コンパイルしたプログラム、モデルデータ用のPNG、レンダリング結果を出力するためのディレクトリをApacheの任意ディレクトリに配置します。
- main - レンダラー、PHPのexecで実行出来ないような事があれば適当に実行権限を与えておく。
- image - レンダリング画像保存用ディレクトリ
chmod 777等を与えて、あえず権限を緩くしておく。 - PC01_Kohaku.png - ユニティちゃんのテクスチャ
- shader.vs - 頂点シェーダ
- shader.fs - フラグメントシェーダ
- index.php - レンダラーをキックするためのPHPファイル
レンダラーをキックするPHPファイル
レンダラーをキックしレンダリングされたPNG画像をHTML形式のレスポンスを返すPHPのプログラムを実装します。
実行効率とか脆弱性とか全然考えていないので実験用途以外では、こんな実装は使用禁止です!
$x = (int)$_GET['x'] % 90;
$y = (int)$_GET['y'] % 180;
$z = (int)$_GET['z'] % 180;
exec("./main {$x} {$y} {$z}");
echo "<html><head><title>server rendering</title></head><body><img src='image/rendering-{$x}-{$y}-{$z}.png'></body></html>";
このindex.phpは3つのクエリパラメータをとり、X軸、Y軸、Z軸の回転を指定してレンダラーをキックすることが出来ます。
そして実行
無事、GCPのGPU付きVMインスタンスでユニティちゃんた描画されました。もちろんWebGLとかではなく正真正銘、サーバレンダリングですよ。
最後に
あとがき
Webの世界で3DといえばWebGLですが、Deep LearningとかのGPGPUをサーバで利用する需要が出てきGPUが搭載されたサーバが一般的になりつつある昨今、サーバサイドレンダリングも何かに使えないかなぁ?と考えています。
利用例としては3Dプリンタの業者でWebGL等の環境に依存されやすい実装ではなく最終的な納品物のプレビューをサーバによる、より高品質なレンダリングを行い品質を担保したりだったり、ゲーム等の3Dアバターの着せ替えアプリで高品質で且つ短時間なレンダリングが必要な場合に部分的に使ったり、最近、VTuberの配信アプリが流行っていますが3Dの描画と動画のエンコードをアプリ側で行っていてはアプリが重くなりすぎるのでサーバレンダリングを利用することにより高品質、高フレームレートな動画作成だとか利用できるんじゃないかな? とちょっと夢を膨らませてます。
WebGLとかも未来を感じていますが、ここで敢えてサーバサイドレンダリングで切り込んでいくのも技術者として面白いんじゃないかと思っています。
ソースコード
サーバ、公開しないの?
GPU付きVMインスタンスは高いんです!
24時間フルで動かすと月300ドルほどかかるんです、勘弁してください。 (´・ω・`)
