はじめに
SwiftとObjective-Cのコードは条件付きで異なる方法でコンパイルすることができます。
例えば、trueとfalseのリテラル、コマンドラインフラグやプラットフォームのテスト機能を利用することができます。
Using Swift with Cocoa and Objective-C: Interacting with C APIs
プラットフォームのテスト機能
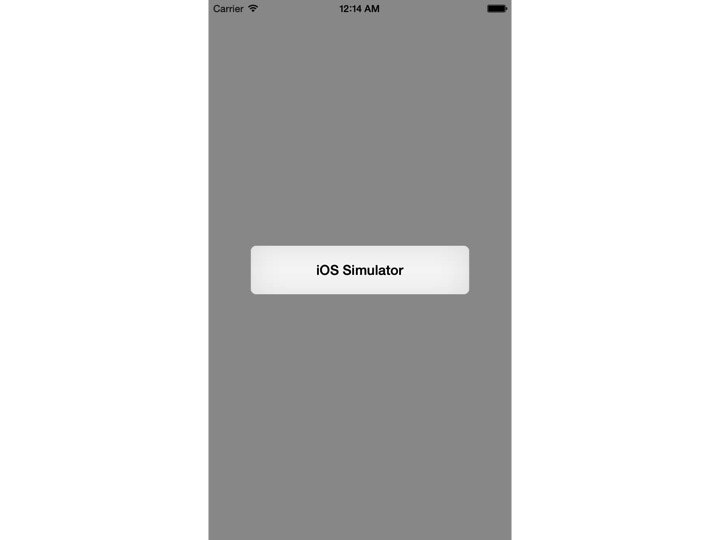
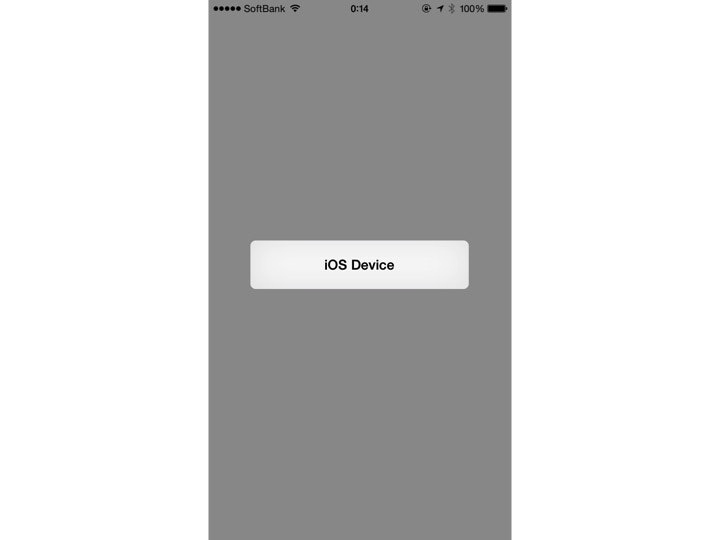
iOSシミュレータとiOSデバイス(実機)、その他で異なるメッセージを表示します。
sample1.swift
import UIKit

class ViewController: UIViewController {

    override func viewDidLoad() {
        super.viewDidLoad()
    }

    override func didReceiveMemoryWarning() {
        super.didReceiveMemoryWarning()
    }

    override func viewDidAppear(animated: Bool) {
        super.viewDidAppear(animated)

        #if (arch(i386) || arch(x86_64)) && os(iOS)
            let message = "iOS Simulator"
        #elseif (arch(arm) || arch(arm64)) && os(iOS)
            let message = "iOS Device"
        #else
            let message = "Other"
        #endif

        let alertController = UIAlertController(title: nil, message: message, preferredStyle: .Alert)
        self.presentViewController(alertController, animated: true, completion: {
        })
    }
}
iOSシミュレータで実行するとiOS Simulatorと表示されます。
iOSデバイスで実行するとiOS Deviceと表示されます。
os()とarch()の引数にとれる値は以下のとおりです。
| Function | Valid arguments |
|---|---|
| os() | OSX, iOS, watchOS |
| arch() | x86_64, arm, arm64, i386 |
ビルドコンフィグレーションには&& || ! を使用できます。
#if DEBUG
デバッグ時のみ実行にしたいコードがあるときは、以下のように#if DEBUGを使用します。
sample2.swift
import UIKit

class ViewController: UIViewController {

    override func viewDidLoad() {
        super.viewDidLoad()
    }

    override func didReceiveMemoryWarning() {
        super.didReceiveMemoryWarning()
    }

    override func viewDidAppear(animated: Bool) {
        super.viewDidAppear(animated)

        #if DEBUG
            let message = "true"
        #else
            let message = "false"
        #endif

        let alertController = UIAlertController(title: nil, message: message, preferredStyle: .Alert)
        self.presentViewController(alertController, animated: true, completion: {
        })
    }
}
デバッグが有効のときtrue、無効のときfalseを表示します。
このまま実行するとfalseが表示されます。
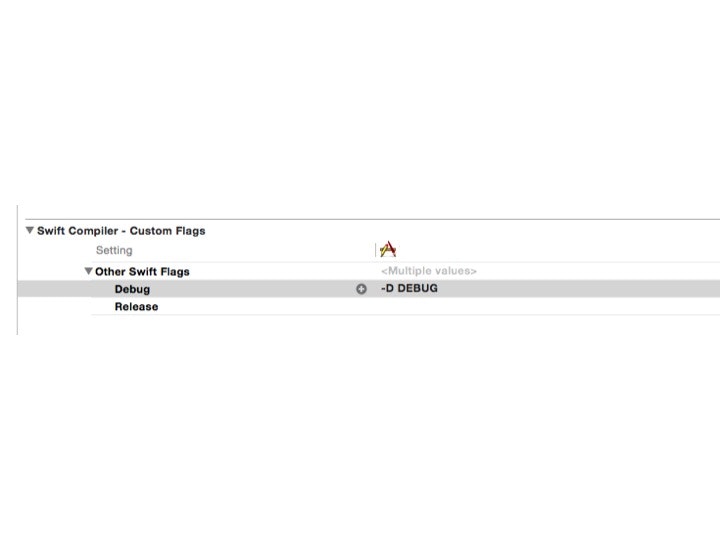
有効にするためには、Build SettingsのSwift Compiler -Custom FlagsにあるOther Swift Flagsに-D DEBUGを追加します。
ドキュメントには-D <#flag#>とあるので、-D Hogeとして#if Hogeと変更しても動作します。