Presentation-State Model (WinUI3)
ずっとMVVMに不満を持っていたので、自分なりにMVVMを改善し、Presentation-State Modelというモデルを考えた。
概略は、
Presentationは外観を担当。XAML+コードビハインド。下流のStateインスタンスは保持する(依存する)が、状態は保持しない。
Stateは状態を担当。Presentation-State間はデータバインディング。Service interfaceを介してPresentationとやり取りはするが、Presentationのインスタンスは保持しない(依存しない)。
Modelはそれ以外。PresentationとState以外の全てのコードで、特に意味はない。
図で表すと、
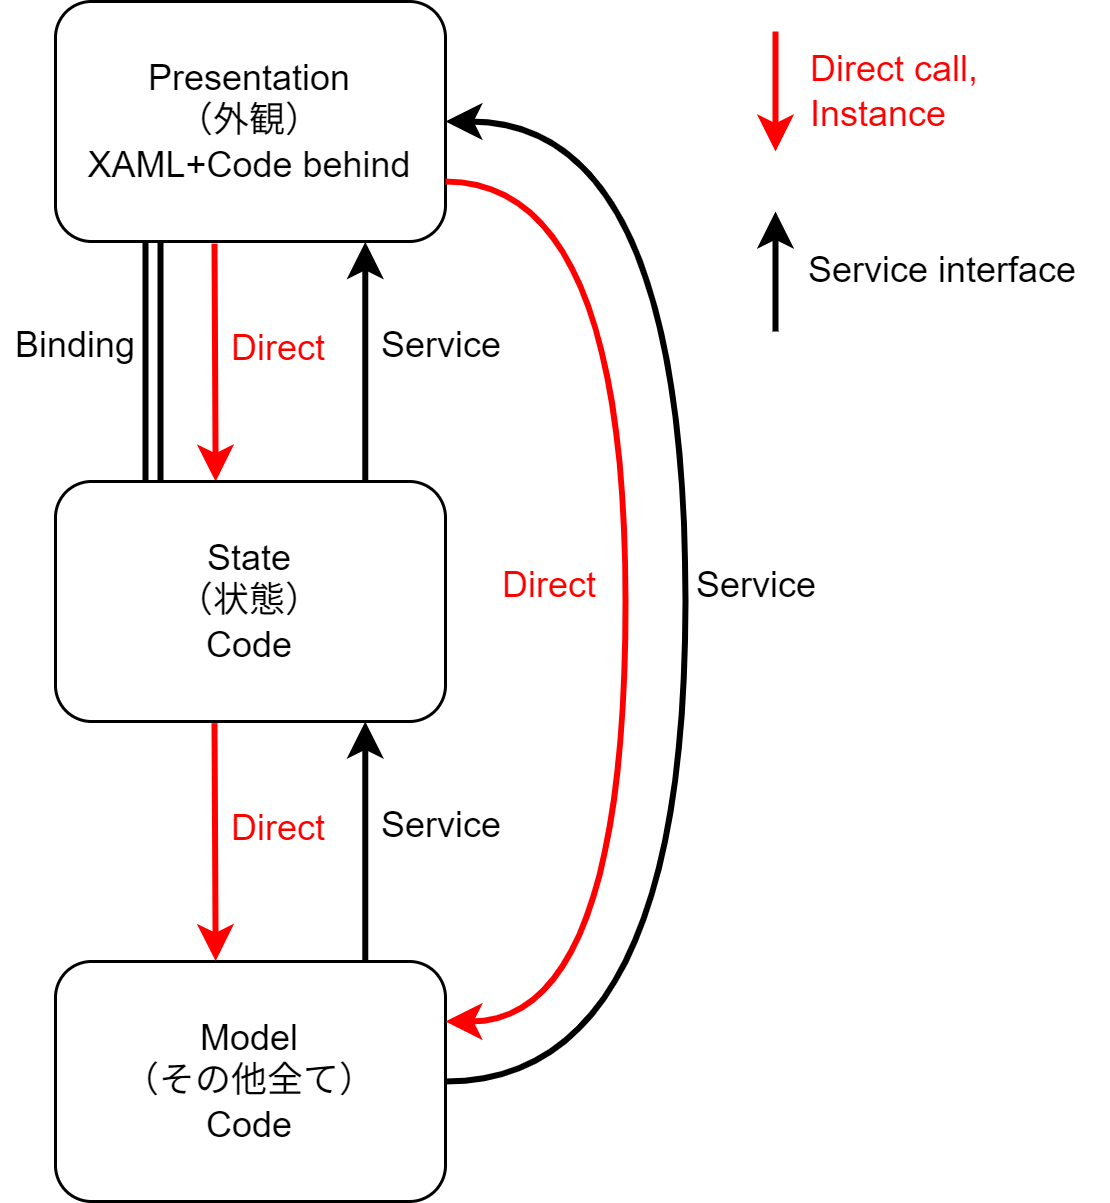
ポイントは、上流は下流に依存(インスタンスを保持したり、関数を直接呼び出したり)するが、下流は依存しないこと。
下流から上流を呼び出す際は、Service interfaceを介する。
PresentationとStateは、密に結合している(GUI)ので、ここはBindingを用いる。
それぞれの役割を再度まとめると、
Presentation
XAMLとコードビハインドで構成。
外観を担当し、状態は担当しない。
具体的にはGUIアイテム、文字列、言語、コンバーター等。
State
コードで構成。
状態を担当。
GUIの値を保持したり、データを永続化するための繋ぎの役割。
また、コマンドも担当。
Model
繰り返しになるが、PresentationとState以外の全てのコードで、特に意味はない。
疎結合にするべきなので、上流のStateやPresentationとのやり取りは、Service interfaceに限る。
また、Stateは状態(一時的なデータの保持)なので、永続化はModelが担当する。
流れ
StandardAppのStandardWinUIが、Presentation-State modelに基づいたデモアプリとなっている。
PresentationStateフォルダの中に、段階的なサンプルコードが入っている。
Hello world
フォルダ:PresentationState/1.Hello
まず隗より始めよ。
XAML+コードビハインドでどーぞ。
HomePage.xaml
<?xml version="1.0" encoding="utf-8"?>
<Page
    x:Class="StandardWinUI.Presentation.HomePage"
    xmlns="http://schemas.microsoft.com/winfx/2006/xaml/presentation"
    xmlns:x="http://schemas.microsoft.com/winfx/2006/xaml"
    xmlns:local="using:StandardWinUI.Presentation"
    xmlns:Arc="using:Arc.WinUI"
    xmlns:d="http://schemas.microsoft.com/expression/blend/2008"
    xmlns:mc="http://schemas.openxmlformats.org/markup-compatibility/2006"
    mc:Ignorable="d">

    <Grid Padding="12">
        <TextBlock>Hello, World!</TextBlock>
    </Grid>
</Page>
HomePage.xaml.cs
public sealed partial class HomePage : Page
{
    public HomePage()
    {
        this.InitializeComponent();
    }
}
面倒なことは考えずに、始めてみることが大事。
簡単な処理
フォルダ:PresentationState/2.Baibain
入力した数字を2倍にする。
コードビハインドで十分。ビシビシ使うべし。
public sealed partial class BaibainPage : Page
{
    public BaibainPage()
    {
        this.InitializeComponent();
    }

    private void Button_Click(object sender, Microsoft.UI.Xaml.RoutedEventArgs e)
    {
        if (int.TryParse(this.textBox1.Text, out int value))
        {
            this.textBox2.Text = (value * 2).ToString();
        }
    }
}
状態が必要
フォルダ:PresentationState/3.State
Hello worldから一歩踏み出すと、値保持が必要になる。
そしたら、Stateクラスを追加する。
public partial class StatePageState : ObservableObject, IState
{
    [ObservableProperty]
    public partial string SourceText { get; set; } = string.Empty;

    [ObservableProperty]
    public partial string DestinationText { get; set; } = string.Empty;

    public StatePageState()
    {
    }

    [RelayCommand]
    private void Baibain()
    {
        if (int.TryParse((string)this.SourceText, out int value))
        {
            this.DestinationText = (value * 3).ToString();
        }
    }
}
Presentationクラスで、対応するStateを作成するコードを追加する。
public sealed partial class StatePage : Page
{
    public StatePageState State { get; }

    public StatePage(App app)
    {
        this.InitializeComponent();
        this.State = app.GetAndPrepareState<StatePageState>(this);
    }
}
MessageBox
フォルダ:PresentationState/4.Message
開始3分でMessageBoxの壁に激突する。
そしたら、CrossChannelを使用したService interfaceを導入する。
使い方は、まずStateクラスでIMessageDialogServiceをコンストラクターインジェクションし、メソッド内で使用する。
public partial class MessagePageState : ObservableObject, IState
{
    private readonly IMessageDialogService messageDialogService;

    public MessagePageState(IMessageDialogService messageDialogService)
    {
        this.messageDialogService = messageDialogService;
    }

    [RelayCommand]
    private async Task Test()
    {
        var r = await this.messageDialogService.Show(string.Empty, "Test message", "OK");
    }
}
Serviceを実行する側はPresentationクラス(今回はNaviWindow)で、こちらはIMessageDialogServiceを実装して、CrossChannelに登録(Open)する。
public partial class NaviWindow : WindowEx, IBasicPresentationService
{
    public NaviWindow(IChannel<IMessageDialogService> messageDialogChannel)
    {
        this.InitializeComponent();
        messageDialogChannel.Open(this, true);
    }

    Task<RadioResult<ContentDialogResult>> IMessageDialogService.Show(string title, string content, string primaryCommand, string? cancelCommand, string? secondaryCommand, CancellationToken cancellationToken)
    => this.app.UiDispatcherQueue.EnqueueAsync(() => this.ShowMessageDialogAsync(title, content, primaryCommand, cancelCommand, secondaryCommand, cancellationToken));
}
要するに、PresentationクラスでMessageBox処理を実装し、StateクラスからIMessageDialogService経由で呼び出している。
内部では色々とやっているが、比較的シンプルに、かつ動線すっきり実装できているのではないかと思う。
シンプル
とにかく、MVVMの思想は理解できるが、複雑なところから入っていくからたまらない。
出来る限りシンプルが良い。
別にPresentation(XAML+コードビハインド)だけでいい。
状態が必要?そしたらStateを追加して下さい。
StateからPresentationへ処理が必要?そしたらService interfaceを追加して下さい。
要するに
MVVMの良いところをパクって、ViewをPresentation、ViewModelをStateに改名して機能を明確にし、コンポーネント間の結合を整理(インスタンス保持、Service interface)した。だけ。
大したものではないが、よかったら使ってください。
あと、疑問・文句・改善点etcあったら教えてください。