Next.jsの入門編をまとめてみました。
Next.jsはざっくりいうと、サーバーサイドで動作するReactJSです。
これを覚えればサーバーサイドも、フロントエンドもReactの感じで書けるようになりそうです。
こちらの公式ドキュメントを参考にしました。
https://nextjs.org/docs/
React Projectの作成
まずはyarnでReactのプロジェクトを作成します。
プロジェクト名はデフォルトのmy-appにしました。
$ yarn create next-app
yarn create v1.22.10
[1/4] 🔍  Resolving packages...
[2/4] 🚚  Fetching packages...
[3/4] 🔗  Linking dependencies...
[4/4] 🔨  Building fresh packages...

success Installed "create-next-app@10.0.6" with binaries:
      - create-next-app
✔ What is your project named? … my-app
(node:15206) ExperimentalWarning: The fs.promises API is experimental
Creating a new Next.js app in /Users/araya/Repository/my-app.

Installing react, react-dom, and next using yarn...
...
...
...
Nextのインストール
作成したプロジェクト内でyarnを利用してnextをインストールします。
$ cd my-app
$ yarn add next react react-dom
yarn add v1.22.10
[1/4] 🔍  Resolving packages...
[2/4] 🚚  Fetching packages...
[3/4] 🔗  Linking dependencies...
[4/4] 🔨  Building fresh packages...
success Saved 3 new dependencies.
info Direct dependencies
├─ next@10.0.6
├─ react-dom@17.0.1
└─ react@17.0.1
info All dependencies
├─ next@10.0.6
├─ react-dom@17.0.1
└─ react@17.0.1
✨  Done in 2.48s.
開発サーバーの起動
ひとまずこれで空のサイトが見られるようになります。
npxはnpmでインストールしたnode_module以下にインストールしたパッケージを利用するコマンドです。
開発サーバーのためdevとしています。
$ npx next dev
ブラウザで、http://localhost:3000/にアクセスしてみます。
 |
|---|
Typescriptの導入
一度サーバーを止めてTypescriptを導入します。
tsconfig.jsonを作成しておけば、nextが自動で書き込んでくれます。
$ yarn add --dev typescript @types/react @types/node
$ touch tsconfig.json
$ npx next dev
ページの作成
簡単なページを作成してみます。
Vimコマンドではなく、VSCodeなどでも大丈夫です。さっそくTypescript(.tsx)を使ってみます。
vim pages/about.tsx
about.tsxの内容は下記のようにします。
function About() {
  return <div>About</div>
}

export default About
about.tsxの保存後、再度サーバーを立ち上げるて、
http://localhost:3000/about
にアクセスするとシンプルにAboutと表示された、ページが表示されます。
$ npx next dev
ready - started server on 0.0.0.0:3000, url: http://localhost:3000
(node:16094) ExperimentalWarning: The fs.promises API is experimental
event - compiled successfully
event - build page: /about
wait  - compiling...
event - compiled successfully
 |
|---|
Tailwind CSSの導入
公式ドキュメントでお住めされているのでTailwind CSSを使ってみます。相性がいいのかな。
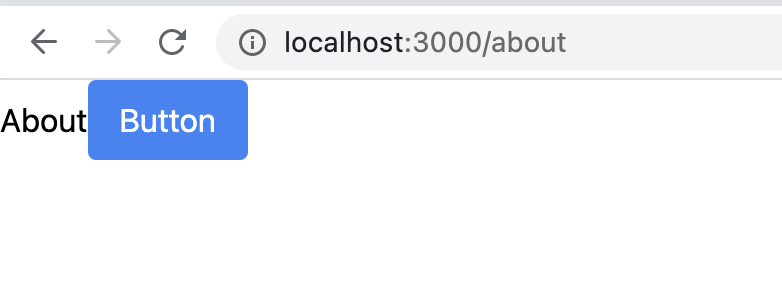
諸々インストールした後に、About.tsxに簡単なボタンを設置してみます。
ちなみにnodeのバージョンがv12以上ではないとエラーが出るようでした。
$ npm install tailwindcss@npm:@tailwindcss/postcss7-compat @tailwindcss/postcss7-compat postcss@^7 autoprefixer@^9

$ npx tailwindcss init -p # 設定ファイルの作成
その後順番にファイルを修正していきます。
$ vim tailwind.config.js
$ vim postcss.config.js
$ vim styles/globals.css
$ vim pages/about.tsx
module.exports = {
  purge: [],
  darkMode: false, // or 'media' or 'class'
  theme: {
    extend: {},
  },
  variants: {
    extend: {},
  },
  plugins: [],
}
module.exports = {
  plugins: {
    tailwindcss: {},
    autoprefixer: {},
  },
}
@tailwind base;
@tailwind components;
@tailwind utilities;
function About() {
  return <div>
    About
    <button className="bg-blue-500 hover:bg-blue-600 text-white px-4 py-2 rounded select-none">
      Button
    </button>
  </div>
}

export default About
最後にサーバーを立ち上げ直すと、tailwindcssの見た目のボタンが表示されています。
$ npx next dev
 |
|---|