はじめに
この記事は スタンバイ Advent Calendar 2023 の13日目の記事です。
昨日の記事は @smurai_ さんの「MCodeが変えるMy行動. 未来神々 視界良好」でした。
ごあいさつ
株式会社スタンバイでSEOエンジニアをやっております、本田と申します!
スタンバイでは、ScalaからGoへのリプレイスを行なっています!
この度Goのキャッチアップもかねてアドベントカレンダーに参加させていただきました!
今回のゴール
- [MUST]go-redisを使って簡単な値を取得する
- [MUST]go-redisを使ってJSON値を取得する
- [野心目標]httpリクエストを受けてredisから値を取得しJSONで返す
まずはRedisを立ち上げる
なにはともあれ、まずはRedisをローカルで立ち上げます。
version: '3.4'

services:
  cache:
    image: redis:7.0
    container_name: redis
    ports:
      - 6370:6379
docker-compose up -dコマンドで立ち上げたら次は適当に値を入れます。
$ redis-cli -h localhost -p 6370 --raw
localhost:6370> set test test
OK
localhost:6370> get test
test
いったんtestというキーで"test"という値を入れてみました。
go-redisを使って簡単な値を取得する
このgo-redisはRedisの公式のライブラリになっており、公式を使うのが良いと思ったので今回選択しています。
まずは、go mod initをおこないプロジェクトの初期化を行います。
pwd
-> stanby/learn-go-redis
cd stanby/learn-go-redis
go mod init xxxx ← initするときの名前
go.modが出来上がったところで次はgo getでgo-redisを入れていきます。
go get github.com/redis/go-redis/v9
古い記事だとv8になっているようでしたが、今はv9なので公式に従って入れていきます。
そうすると、go.modがこのようになっているはずです。
module xxxx ← initした時の名前
go 1.21.3

require (
	github.com/cespare/xxhash/v2 v2.2.0 // indirect
	github.com/dgryski/go-rendezvous v0.0.0-20200823014737-9f7001d12a5f // indirect
	github.com/redis/go-redis/v9 v9.3.0 // indirect
)
これで, このプロジェクトにgo-redisがはいったので次はコネクションを作っていきます。
package main

import (
	"github.com/redis/go-redis/v9"
)

func main() {
	rdb := redis.NewClient(&redis.Options{
		Addr: "localhost:6370",
	})
このように、redis.Optionsという構造体に、Addr(ホスト名:ポート)を指定して、NewClient関数に渡すことで、クライアントを作ることができました。オプションは他にもあり、dbの選択やリードオンリーなどのオプションもありましたが今回は簡単のためAddrしか使っていません。
クライアントをつくったので次に序盤でいれたtestを取り出したいと思います。
公式から引用しますと
Every Redis command accepts a context that you can use to set timeouts or propagate some information, for example, tracing context.
すべてのRedisコマンドはtimeoutをセットしたり、トレースコンテキストなどの情報を伝播させるためのcontextを許容しています
すべてのコマンドの引数にcontextが必要になってきます。
contextってなんぞ
overviewをみてみる(翻訳はこの記事から引用しました)
Package context defines the Context type, which carries deadlines, cancellation signals, and other request-scoped values across API boundaries and between processes.
和訳: Package contextはContext型を定義し、デッドライン、キャンセルシグナル、その他のリクエストに対応した値をAPI境界やプロセス間で伝達します。
Incoming requests to a server should create a Context, and outgoing calls to servers should accept a Context. The chain of function calls between them must propagate the Context, optionally replacing it with a derived Context created using WithCancel, WithDeadline, WithTimeout, or WithValue. When a Context is canceled, all Contexts derived from it are also canceled.
和訳: サーバーへのリクエストはContextを作成する必要があり、サーバーへの発信はContext を受け入れる必要があります。これらの関数呼び出しの連鎖によってContextは伝播され、オプションでWithCancel、WithDeadline、WithTimeout、WithValueを使って作成した派生Contextに置き換わる必要があります。Contextがキャンセルされると、そこから派生したすべてのContextもキャンセルされます。
つまり、今回はRedisという一つのサーバーに対してgo側からリクエストを行うときにContextをつかうということ。
なぜならば、Redisサーバーにコネクションをつなぎにいきコマンドを送信するときに、このコンテキストを渡しておくと、Timeoutの設定やコマンドのキャンセルなどをContextを通じて伝播させることができるから。
コンテキストの種類は以下のようになっている
- Background: キャンセルやデッドラインなど何もきまっていない空のコンテキスト、使うケースとしてmain関数、初期化、テストなどでmain関数で大元のcontextとして生成し、その後WithValue, WithoutCanelにラッピングして個々のContextとして派生させていく。
- TODO: キャンセルなどの設定が何も決まっていない時、仮置きとしてのcontext。決まったら実装を変えてね
- WithValue: キーバリューの値を含めることができる
- WithoutCancel: 親のContextがキャンセルしてもキャンセルを分断することができる
一旦、今回は簡単のためBackgroundを使うことにしました。
Getメソッドを使っていきます
package main

import (
	"context"
	"fmt"

	"github.com/redis/go-redis/v9"
)

func main() {
	rdb := redis.NewClient(&redis.Options{
		Addr: "localhost:6370",
	})
	ctx := context.Background()
	val, err := rdb.Get(ctx, "test").Result()
	fmt.Println(val, err)
}
これをgo run main.goで実行すると
$ go run main.go
test <nil>
と無事返ってきました。Result関数はstringが返ってくるとのことです
func (cmd *StringCmd) Result() (string, error) {
	return cmd.Val(), cmd.err
}
↑の中身が、Val()でとれているので、下記のようにVal()と書くこともできるとのこと。
get := rdb.Get(ctx, "badtest")
fmt.Println(get.Val(), get.Err())
仮にキーが存在しない場合はerrとしてredis.Nilが返えるとのことなので試してみました。
ctx := context.Background()
val, err := rdb.Get(ctx, "badtest").Result()
-> '' redis: nil
空文字とredis.nilが返ってくることが確認できました。
一応Redisのコマンドは全て網羅しているっぽいです。
type StringCmdable interface {
	Append(ctx context.Context, key, value string) *IntCmd
	Decr(ctx context.Context, key string) *IntCmd
	DecrBy(ctx context.Context, key string, decrement int64) *IntCmd
	Get(ctx context.Context, key string) *StringCmd
	GetRange(ctx context.Context, key string, start, end int64) *StringCmd
	GetSet(ctx context.Context, key string, value interface{}) *StringCmd
	GetEx(ctx context.Context, key string, expiration time.Duration) *StringCmd
	GetDel(ctx context.Context, key string) *StringCmd
	Incr(ctx context.Context, key string) *IntCmd
	IncrBy(ctx context.Context, key string, value int64) *IntCmd
	IncrByFloat(ctx context.Context, key string, value float64) *FloatCmd
	LCS(ctx context.Context, q *LCSQuery) *LCSCmd
	MGet(ctx context.Context, keys ...string) *SliceCmd
	MSet(ctx context.Context, values ...interface{}) *StatusCmd
	MSetNX(ctx context.Context, values ...interface{}) *BoolCmd
	Set(ctx context.Context, key string, value interface{}, expiration time.Duration) *StatusCmd
	SetArgs(ctx context.Context, key string, value interface{}, a SetArgs) *StatusCmd
	SetEx(ctx context.Context, key string, value interface{}, expiration time.Duration) *StatusCmd
	SetNX(ctx context.Context, key string, value interface{}, expiration time.Duration) *BoolCmd
	SetXX(ctx context.Context, key string, value interface{}, expiration time.Duration) *BoolCmd
	SetRange(ctx context.Context, key string, offset int64, value string) *IntCmd
	StrLen(ctx context.Context, key string) *IntCmd
}
一旦ここまでで第一目標の"go-redisを使って簡単な値を取得する"を達成しました ![]()
次は少し難しいJSON値を取得していきます!
go-redisを使ってJSON値を取得する
次に、このような形のJSONをredisに格納しようと思います。
localhost:6370> get breadcrumb/hondy
[{"url": "test1", "displayName": "テスト1"}, {"url": "test2", "displayName": "テスト2"}, {"url": "test3", "displayName": "テスト3"}, {"url": "test4", "displayName": "テスト4"}, {"displayName": "テスト5"}]
値は配列になっており、その要素はJSONの形になっています。そして、このJSONは最後だけurl属性を持っていないとします。
例えるとするならば、パンくずのようなものです。displayNameがリンクテキスト、urlがリンクテキストに対するurlになっており、パンくずは通常末尾はリンクがないので、このような形のJSONを取得してとってこれるかやってみたいと思います。
stringで返ってきたものをどうやって変換するんだ?
かなり悩みました。redisのGetメソッドは必ずstringになるので、それをどうやって配列みたいなものにするのか。
さらに、キーも不定(末尾にはurl属性がない)ので、
type BreadCrumb struct {
	DisplayName     string
	Url             string ←ここが不定
}

func main() {
	b := []byte(`{"url": "test1", "displayName": "テスト1"}`)
	var breadcrumb BreadCrumb
	if err := json.Unmarshal(b, &breadcrumb); err != nil {
		fmt.Println(err)
	}
}
このような形にできない。。
このような場合は、数個StackOverflowを調べましたが、[]map[string]string{}で受け取ってから変換して行うやりかたがあるそうです。(なお値がstringだけでない場合はinterface{}として用意したほうがいいらしい)
ここで、mapはpythonでいうところ連想配列みたいなもので、スライスで要素がmap, mapのキーはstringで値もstringという型宣言になっています。(※今回中身が絶対にStringしか来ないと断定しています。)
json.Unmarshalの第一引数はfunc json.Unmarshal(data []byte, v any) errorなのでstringでGetしてきた値を[]byte(result)と変換してあげて、そして第二引数に入れ物として宣言した[]map[string]string{}を与えてやることでよしなに変換してくれます。
下記のようにしてみました。
....
func main() {
	rdb := redis.NewClient(&redis.Options{
		Addr: "localhost:6370",
	})
	ctx := context.Background()
	result, err := rdb.Get(ctx, "breadcrumb/hondy").Result()
	if err != nil {
		panic(err)
	}
	data := []map[string]string{}

	err = json.Unmarshal([]byte(result), &data)
	if err != nil {
		panic(err)
	}
	fmt.Println(data)
}
そうすると結果は
$ go run main.go
[map[displayName:テスト1 url:test1] map[displayName:テスト2 url:test2] map[displayName:テスト3 url:test3] map[displayName:テスト4 url:test4] map[displayName:テスト5]]
とうまく変換できているようです。
ほんとはコンバート処理などをこの中におこなって構造体に詰め込む処理を行いたかったですが一旦スキップします!
これで第二目標の"go-redisを使ってJSON値を取得する"を達成しました ![]()
httpリクエストを受けてredisから値を取得しJSONで返す
いよいよ野心目標として掲げていたhttpリクエストを受けてredisから値を取得しJSONで先ほどの値を返してみようかと思います!
設定としては、pathを/breadcrumb/{key}として受け取って、下記のようにそのままJSON形式で返すことを想定します。
[
    {
        "displayName": "テスト1",
        "url": "test1"
    },
    {
        "displayName": "テスト2",
        "url": "test2"
    },
    {
        "displayName": "テスト3",
        "url": "test3"
    },
    {
        "displayName": "テスト4",
        "url": "test4"
    },
    {
        "displayName": "テスト5"
    }
]
まずは、goの公式チュートリアルを行いました。
最近は「A Tour of go」だけじゃなくて豊富にチュートリアル揃ってきましたね
↑の公式チュートリアル通り"net/http"パッケージをインポートし、http.HandleFuncメソッドにJSONを返すようなメソッドを定義してみます。そして前述で取得したキーをURLのパスパラメータとして受け取り、redisの操作はメソッドの中に持っていきました。
package main

import (
	"context"
	"encoding/json"
	"log"
	"net/http"

	"github.com/redis/go-redis/v9"
)

func getBreadCrumbs(w http.ResponseWriter, r *http.Request) {
	rdb := redis.NewClient(&redis.Options{
		Addr: "localhost:6370",
	})
	ctx := context.Background()
	key := r.URL.Path[len("/breadcrumb/"):] ← /breadcrumb/xxxxx←を取得する
	result, err := rdb.Get(ctx, "breadcrumb/"+key).Result()
	if err != nil {
		panic(err)
	}
	data := []map[string]string{}
	err = json.Unmarshal([]byte(result), &data)
	if err != nil {
		panic(err)
	}
	w.Header().Set("Content-Type", "application/json")
	json.NewEncoder(w).Encode(data) ←新しくJSONエンコードしてResponseWriterに書き込み
}

func main() {
	http.HandleFunc("/breadcrumb/", getBreadCrumbs) ←HandleFuncを定義
	log.Fatal(http.ListenAndServe(":8089", nil)) ←このようにすることで、Listenし続ける
}
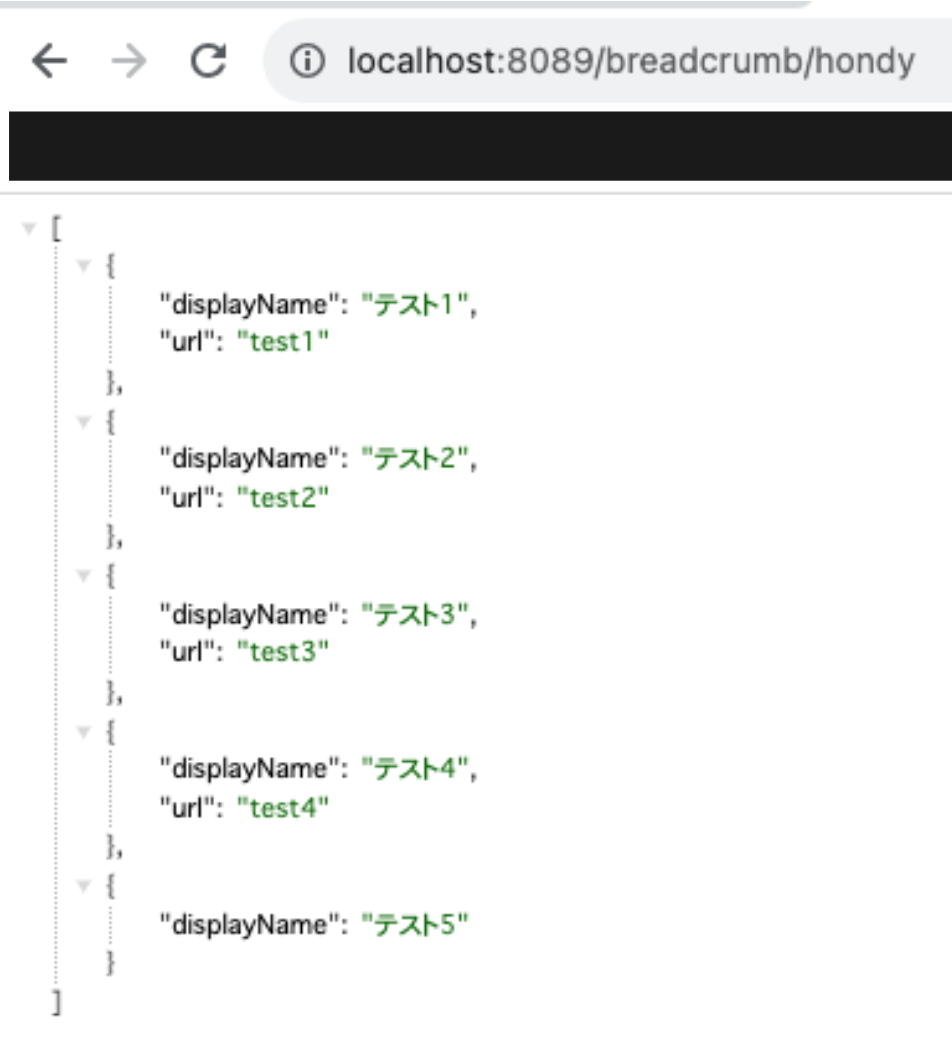
go run .で起動し, http://localhost:8089/breadcrumb/hondy にアクセスすると
JSONでかえってきてますね!
ほんとはもっとやり込みたかったですが、記事も長くなるので別記事にしようかと思います!
惜しくも時間切れで他記事に回そうとおもうこと
- Test書く
- Convert処理で構造体につめる
- 型のバリデーション
- ディレクトリを意識してパッケージ分割していきたい
- RedisのコネクションやGetしている部分をinfrastructureとかきってmainはあくまでContextをつくって渡すだけみたいな形にするなど
- エラーハンドリングは使用しているメソッドの中ですべきなのか、受け取る側ですべきなのか
感想
普段pythonを書いているとOptionalな値をよく扱うからgoだと厳密にしなければならないのでどうしよう!ってすごく頭を使いました。ただ新しい言語さわっていて刺激があったのでこれからもGoの勉強は続けていこうと思います!
明日は@shohei-nishimotoのコーポレートIT関連の内容らしいです!楽しみですね!!
参考文献
-
redis-go
- ほぼこれのGetting startでした
- how to parse desrialize dynamic json
- 【Go言語】Contextを理解したいんじゃ!!
- Writing Web Applications
