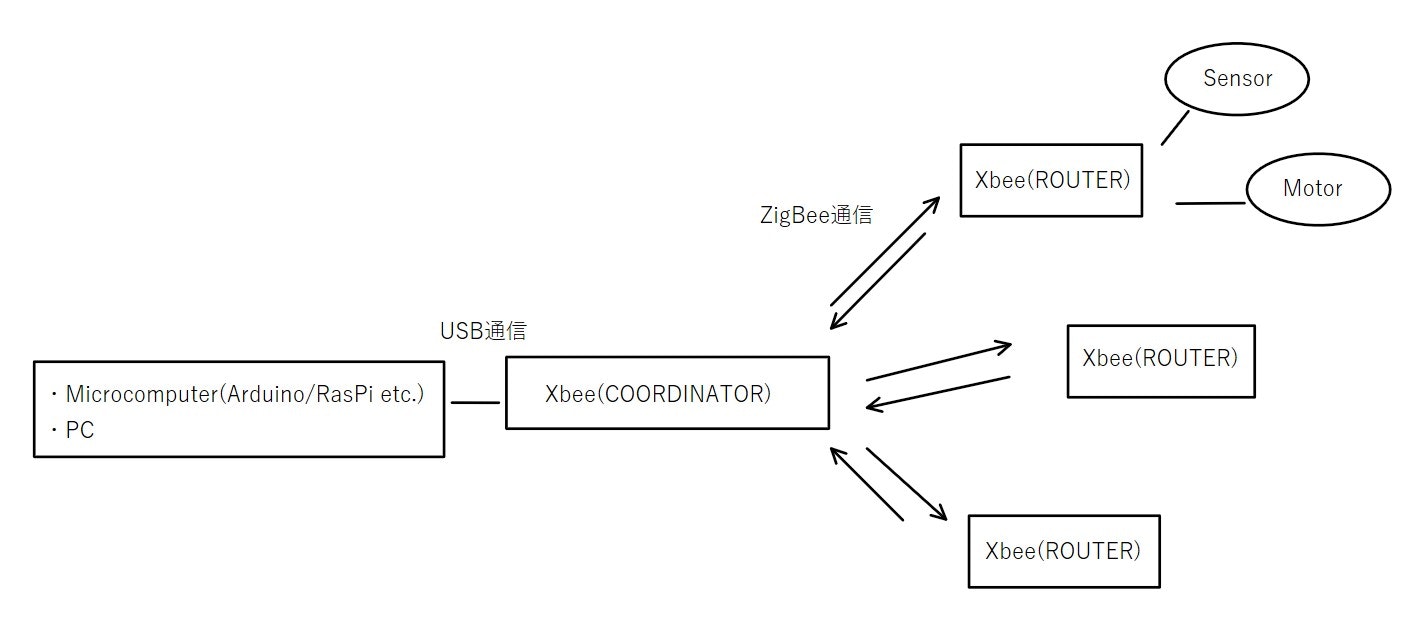
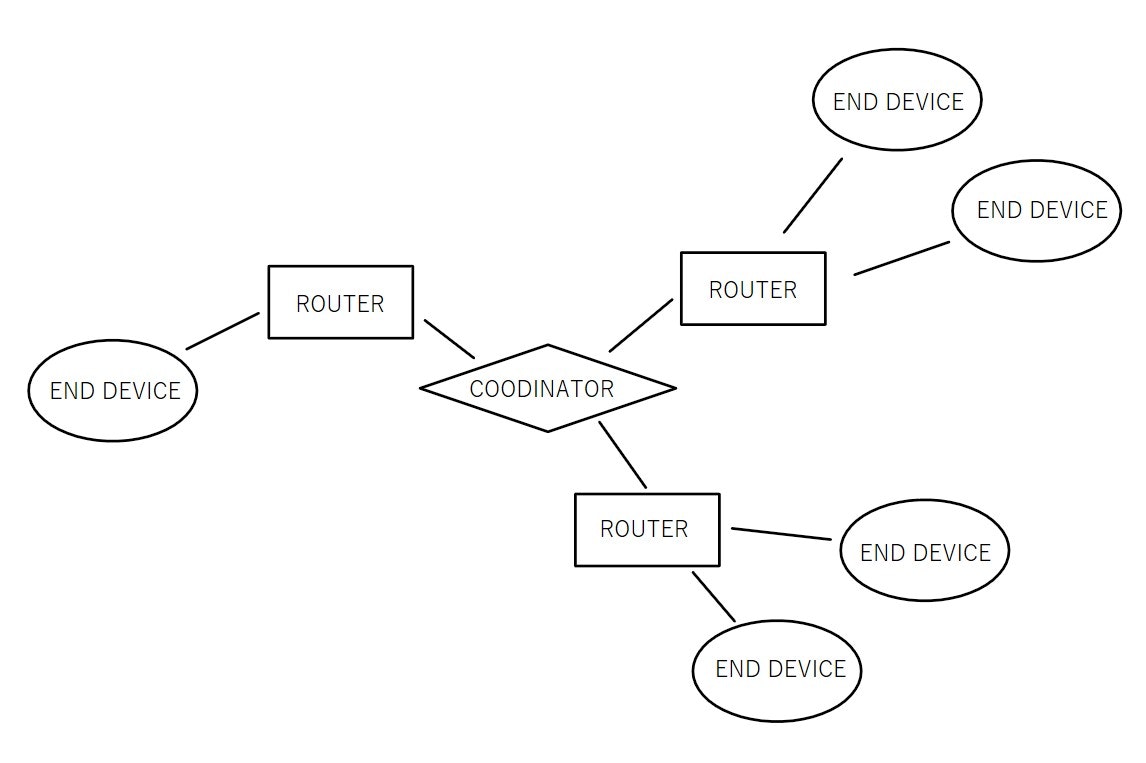
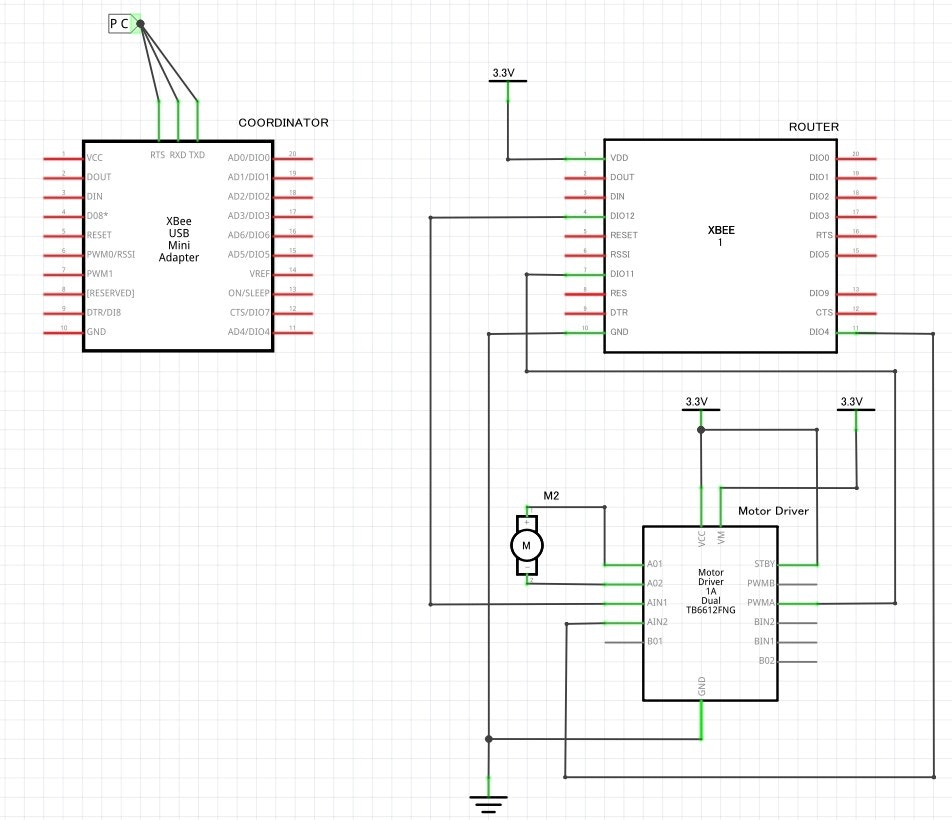
構成
使うもの
- XBee ZB (S2C) × 2
- DCモータ
- モータドライバ(TB6612)
http://akizukidenshi.com/download/ds/Toshiba/TB6612FNG_datasheet_ja_20141001.pdf - USBケーブル
- XBee USB アダプター
https://www.switch-science.com/catalog/1031/
XBeeの概要
XBee ・・・ ZigBee通信モジュール
 https://www.digi.com/resources/documentation/digidocs/90001458-13/default.htm#concept/c_90001458-13_start.htm%3FTocPath%3D_____1
 https://www.sparkfun.com/datasheets/Wireless/Zigbee/XBee-Datasheet.pdf
XBeeの設定
1.PCと接続する
PCとXBeeをUSB接続
2.役割設定
XCTU(XBee設定用ソフト)でXBeeの設定を変更する
※Firmware:DigiMesh 2.4 TH (バージョン 9002)
2.1 COORDINATORの設定
ID:(0000~FFFFの範囲で好きに決める)
CE:Indirect Msg Coordinator [1]
AP:API enabled with escaped characters[2]
2.2 ROUTERの設定
ID:(COORDINATORと同じ数字)
CE:Standard Router [0]
AP:API enabled with escaped characters[2]
モータの動かし方
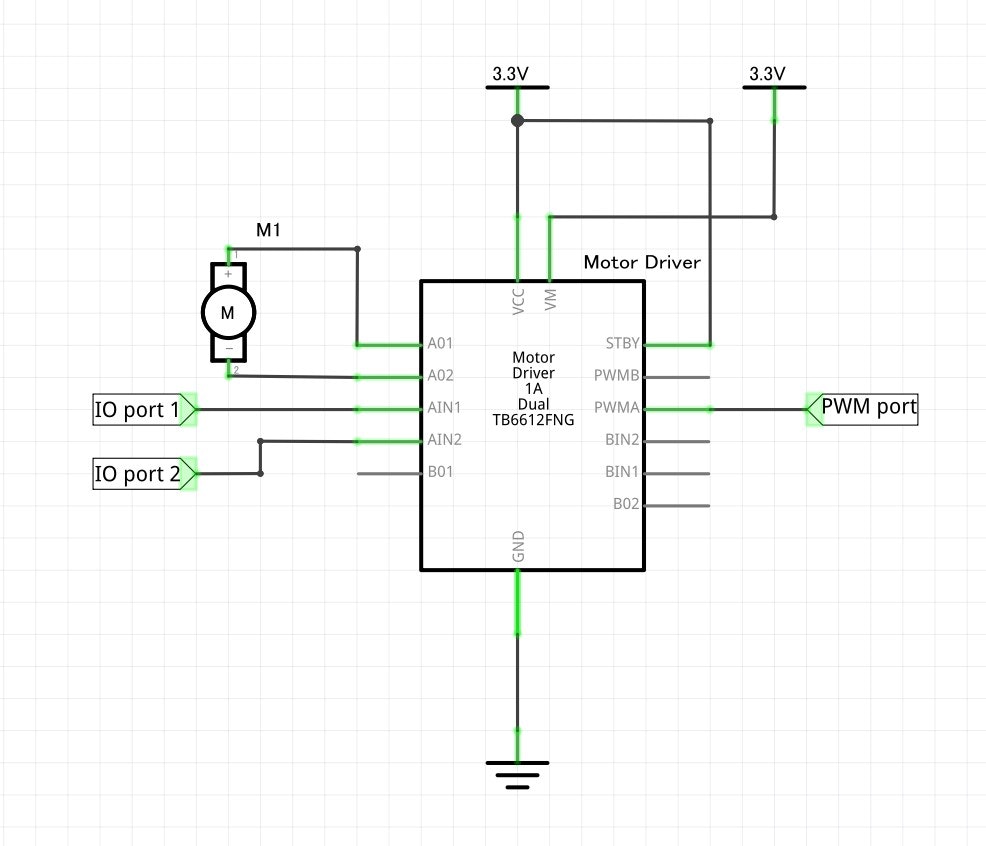
- モータの回転方向、回転速度をマイコンで制御するためにモータドライバを使う
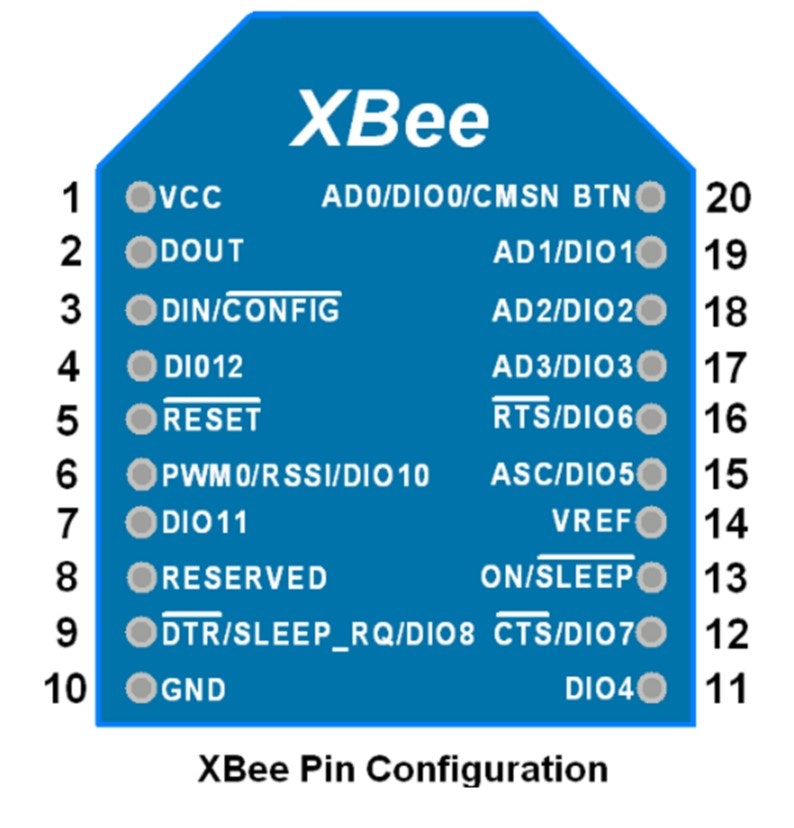
- モータ1つにつきXBeeのIOポート×2、PWMポート×1を使う
- IOポートのHIGH/LOWの組み合わせでモータの動作が変わる
| IO port1 | IO port2 | PWM port | モータ動作 |
|---|---|---|---|
| HIGH | LOW | 0~1023 (10bit) | 時計回り(CW) |
| LOW | HIGH | 0~1023 (10bit) | 反時計回り(CCW) |
| HIGH | HIGH | - | ブレーキ |
| LOW | LOW | - | ストップ(Hi-Z) |
- XBeeとモータは別電源 → 同一電源だとモータのノイズと起動電流でマイコンが落ちる
全体の配線
プログラム
Remote_PID.py
from digi.xbee.devices import XBeeDevice
from digi.xbee.devices import RemoteXBeeDevice
from digi.xbee.devices import XBee64BitAddress
from digi.xbee.io import IOLine, IOMode
import time
import threading

# TODO: Replace with the serial port where your local module is connected to.
PORT = "COM3"
# TODO: Replace with the baud rate of your local module.
BAUD_RATE = 9600

REMOTE_NODE_ID = "REMOTE"

# ピン名定義
# MOTOR_1 = IOLine.DIO12
# MOTOR_2 = IOLine.DIO5_AD5
# MOTOR_PWM = IOLine.DIO11_PWM1
SENSOR_1 = IOLine.DIO1_AD1
SENSOR_2 = IOLine.DIO2_AD2

MOTOR_1 = IOLine.DIO5_AD5
MOTOR_2 = IOLine.DIO7
MOTOR_PWM = IOLine.DIO10_PWM0

# ローカルデバイス名を定義
local_device = XBeeDevice(PORT, BAUD_RATE)
# Obtain the remote XBee device from the XBee network.
# xbee_network = local_device.get_network()

# リモートデバイス名を定義
# remote_device = xbee_network.discover_device(REMOTE_NODE_ID)
remote_device = RemoteXBeeDevice(local_device, XBee64BitAddress.from_hex_string("0013A2004196AE62"))
# remote_device = RemoteXBeeDevice(local_device, XBee64BitAddress.from_hex_string("0013A20041767079"))

'''************************************************
*	DCMotorPIDControl 		-- PID制御関数
*
*パラメータ
*	ch						        -- チャンネル
*	ControlledVariable		        -- (センサ出力など)
*	Target					        -- 目標値
*	Kp						        -- 比例ゲイン
*	Ki						        -- 積分ゲイン
*	Kd						        -- 微分ゲイン
*   output                          -- 制御量(PWMなど)
*
*戻り値
*
*
************************************************'''
def DCMotorPIDControl(ch, ControlledVariable, Target, Kp, Ki, Kd):
    # 初期化
    global e1
    global ei1
    global direction
    if time_process < 0.5:
        e1 = 0
        ei1 = 0

    ### 前回の制御偏差を記録する
    e1_pre = e1
	### 制御偏差を計算する
    e1 = Target - ControlledVariable
	### 積分偏差を計算する
    ei1 += e1
	### 微分偏差を計算する
    ed1 = (e1 - e1_pre) / 0.5

	### 入力値を計算する
    output = Kp * e1 + Ki * ei1 + Kd * ed1

    if ControlledVariable < 0.0:
        remote_device.set_dio_value(MOTOR_1, IOMode.DIGITAL_OUT_HIGH) #CW
        remote_device.set_dio_value(MOTOR_2, IOMode.DIGITAL_OUT_LOW)
        direction = "CW"
    else :
        remote_device.set_dio_value(MOTOR_1, IOMode.DIGITAL_OUT_LOW) #CCW
        remote_device.set_dio_value(MOTOR_2, IOMode.DIGITAL_OUT_HIGH)
        direction = "CCW"

    # オーバーフロー防止
    if output < 0:
        output *= -1.0
    if output >= 100:
        output = 100

    return output

def main():

    print(" +---------------------+")
    print(" | PWM Duty Cycle Test |")
    print(" +---------------------+\n")

    try:
        # ローカルデバイスと通信開始
        local_device.open()

        # ピンモード設定 PWM
        remote_device.set_io_configuration(MOTOR_PWM, IOMode.PWM)
        #remote_device.set_io_configuration(MOTOR_1, IOMode.DIGITAL_OUT)
        #remote_device.set_io_configuration(MOTOR_2, IOMode.DIGITAL_OUT)
        remote_device.set_io_configuration(SENSOR_1, IOMode.ADC)
        remote_device.set_io_configuration(SENSOR_2, IOMode.ADC)

        '''******************************************
        *************** 制御プログラム ***************
        ******************************************'''
        while True:

            # 実行時間
            global time_process
            time_process = time.time() - time_process_start

            # センサ値をGET
            sensor_1 = remote_device.get_adc_value(SENSOR_1)
            sensor_2 = remote_device.get_adc_value(SENSOR_2)

            sensor_mid = sensor_1-sensor_2
            pwm_1 = DCMotorPIDControl(1, sensor_mid, 0, 0.5, 0, 0)
            remote_device.set_pwm_duty_cycle(MOTOR_PWM, pwm_1)

            print(
            '{:.2f}'.format(time_process),
            sensor_1,
            sensor_2,
            '{:.2f}'.format(pwm_1),
            direction
            )

        '''******************************************
        *************** 制御プログラム END ***********
        ******************************************'''

    # 通信終了
    finally:
        if local_device is not None and local_device.is_open():
            local_device.close()

if __name__ == "__main__":
    global time_process_start
    time_process_start = time.time()
    main()
