まえおき
それって何番煎じ?
ちっちゃい事は気にしない♪ それワカチコワカチコ~♪
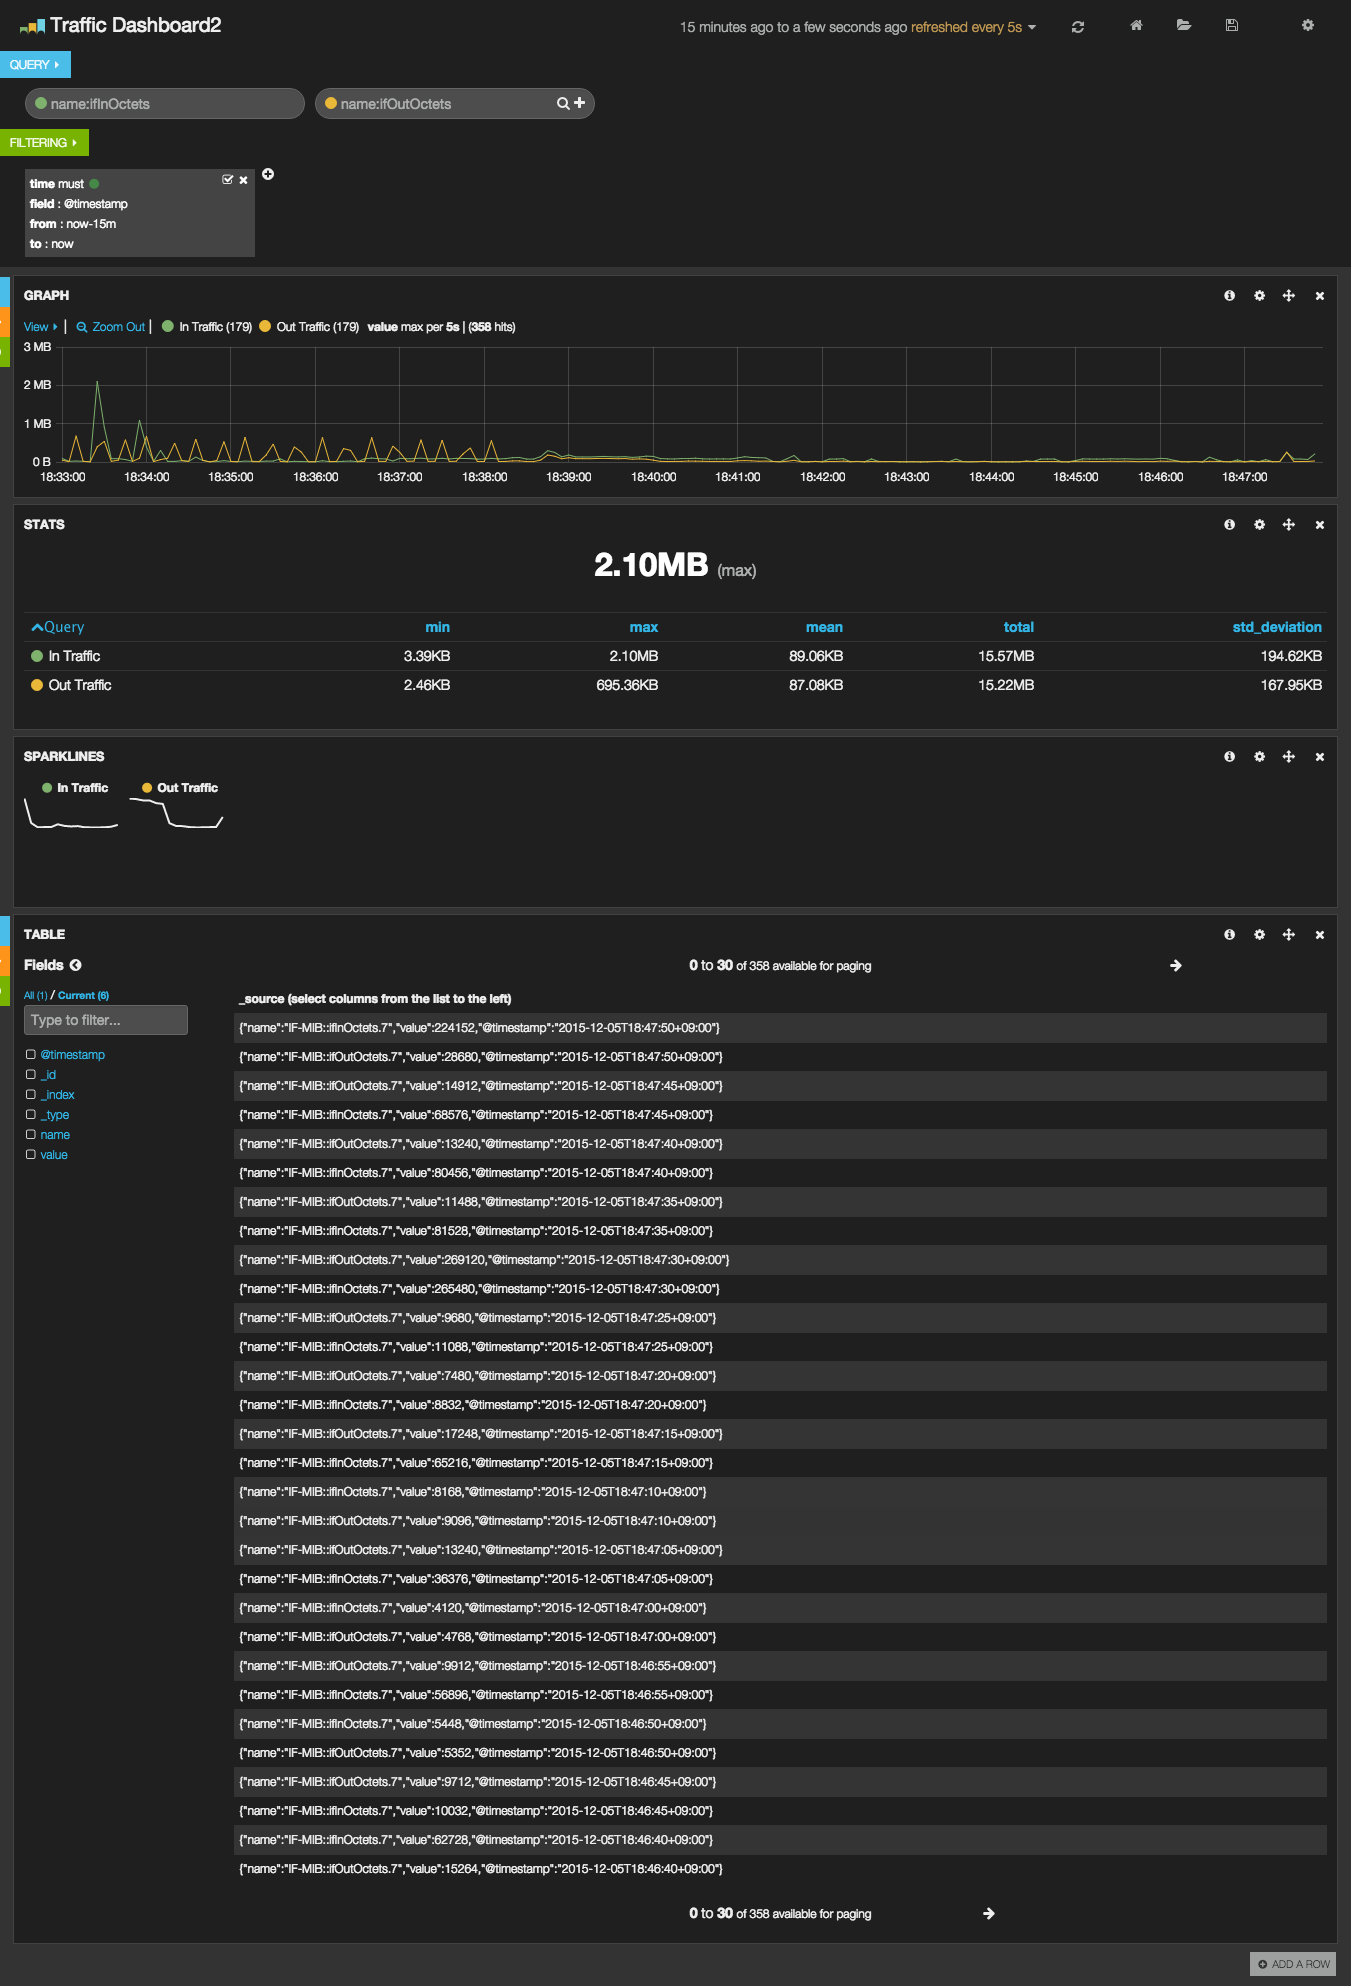
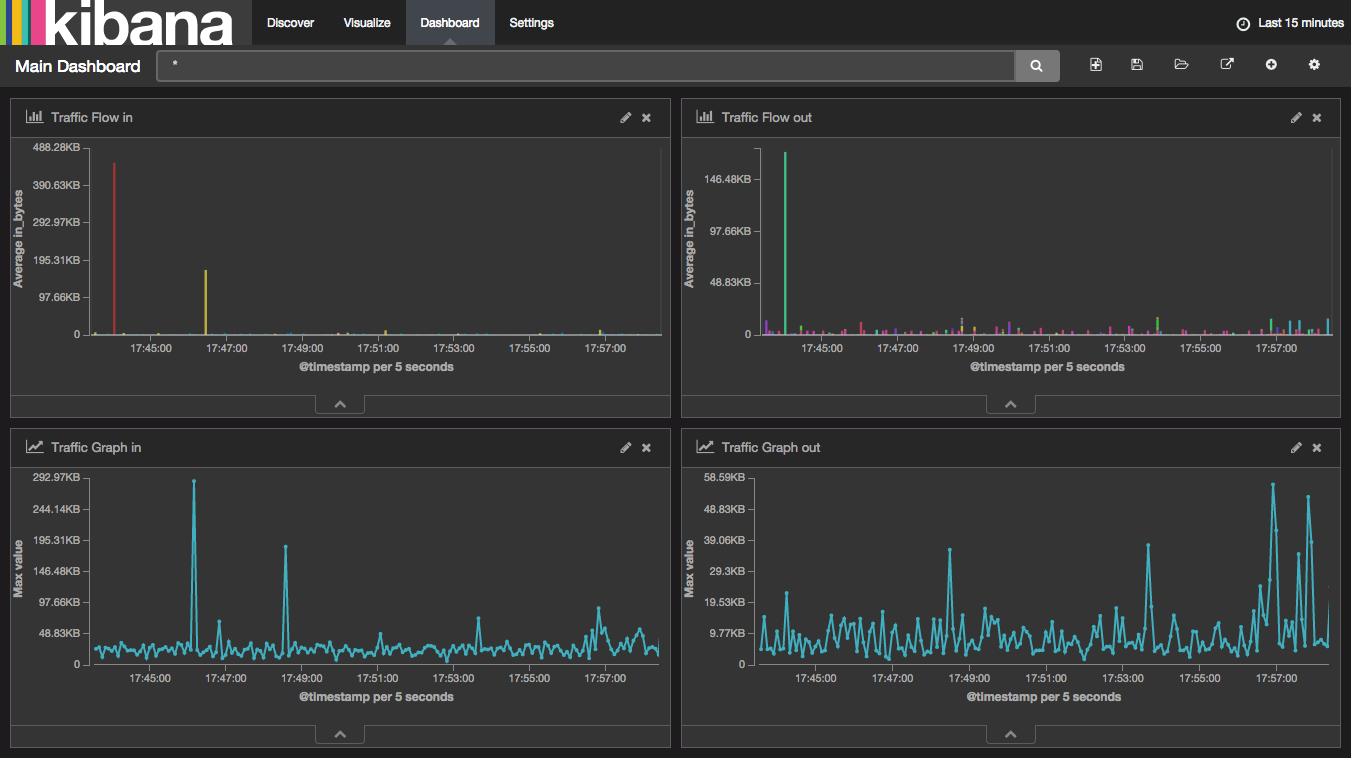
スクリーンショット
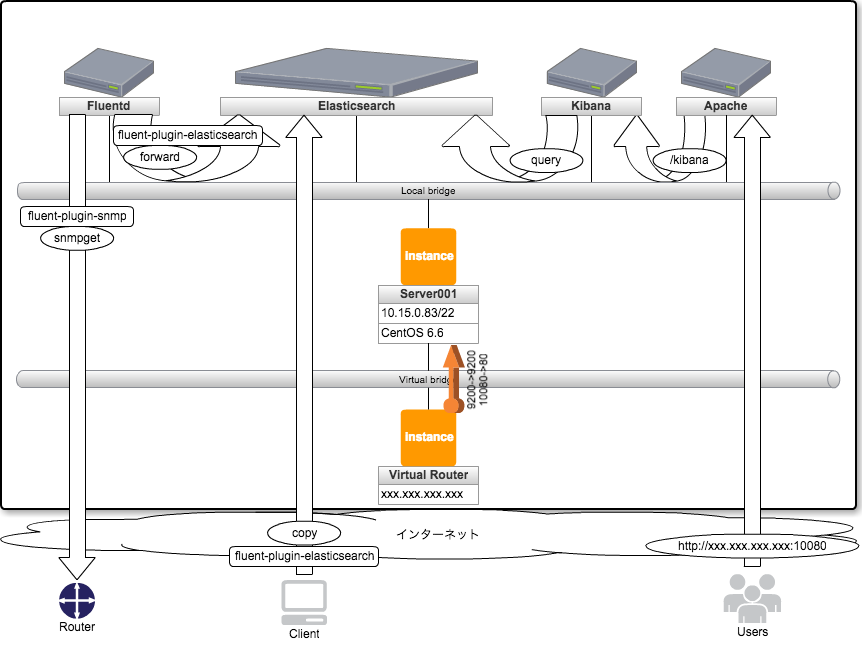
構成
インストール
Elasticksearch
vim /etc/yum.repos.d/elasticsearch.repo
[elasticsearch-1.1]
name=Elasticsearch repository for 1.1.x packages
baseurl=http://packages.elasticsearch.org/elasticsearch/1.1/centos
gpgcheck=1
gpgkey=http://packages.elasticsearch.org/GPG-KEY-elasticsearch
enabled=1
yum install elasticsearch java-1.7.0-openjdk-devel.x86_64
service elasticsearch start
elasticsearch を起動中: [ OK ]
chkconfig elasticsearch on
curl localhost:9200
{
"status" : 200,
"name" : "Freedom Ring",
"version" : {
"number" : "1.1.2",
"build_hash" : "e511f7b28b77c4d99175905fac65bffbf4c80cf7",
"build_timestamp" : "2014-05-22T12:27:39Z",
"build_snapshot" : false,
"lucene_version" : "4.7"
},
"tagline" : "You Know, for Search"
}
Apache
yum install httpd
service httpd start
httpd を起動中: [ OK ]
Kibana
curl -L -O https://download.elasticsearch.org/kibana/kibana/kibana-3.1.0.tar.gz
tar zxvf kibana-3.1.0.tar.gz
mv kibana-3.1.0 /var/www/html/kibana
設定ファイル
vim /var/www/html/kibana/config.js
 /** @scratch /configuration/config.js/1
 *
 * == Configuration
 * config.js is where you will find the core Kibana configuration. This file contains parameter that
 * must be set before kibana is run for the first time.
 */
define(['settings'],
function (Settings) {


  /** @scratch /configuration/config.js/2
   *
   * === Parameters
   */
  return new Settings({

    /** @scratch /configuration/config.js/5
     *
     * ==== elasticsearch
     *
     * The URL to your elasticsearch server. You almost certainly don't
     * want +http://localhost:9200+ here. Even if Kibana and Elasticsearch are on
     * the same host. By default this will attempt to reach ES at the same host you have
     * kibana installed on. You probably want to set it to the FQDN of your
     * elasticsearch host
     *
     * Note: this can also be an object if you want to pass options to the http client. For example:
     *
     *  +elasticsearch: {server: "http://localhost:9200", withCredentials: true}+
     *
     */
    //elasticsearch: "http://"+window.location.hostname+":9200",
    elasticsearch: "http://xxx.xxx.xxx.xxx{Server IP or localhost}:9200",

    /** @scratch /configuration/config.js/5
     *
     * ==== default_route
     *
     * This is the default landing page when you don't specify a dashboard to load. You can specify
     * files, scripts or saved dashboards here. For example, if you had saved a dashboard called
     * `WebLogs' to elasticsearch you might use:
     *
     * default_route: '/dashboard/elasticsearch/WebLogs',
     */
    default_route     : '/dashboard/file/default.json',

    /** @scratch /configuration/config.js/5
     *
     * ==== kibana-int
     *
     * The default ES index to use for storing Kibana specific object
     * such as stored dashboards
     */
    kibana_index: "kibana-int",

    /** @scratch /configuration/config.js/5
     *
     * ==== panel_name
     *
     * An array of panel modules available. Panels will only be loaded when they are defined in the
     * dashboard, but this list is used in the "add panel" interface.
     */
    panel_names: [
      'histogram',
      'map',
      'goal',
      'table',
      'filtering',
      'timepicker',
      'text',
      'hits',
      'column',
      'trends',
      'bettermap',
      'query',
      'terms',
      'stats',
      'sparklines'
    ]
  });
});
Fluentd
curl -L http://toolbelt.treasuredata.com/sh/install-redhat.sh | sh
/etc/init.d/td-agent start
Starting td-agent: [ OK ]
chkconfig td-agent on
Elasticsearch Plugin
yum install gcc libcurl-devel
/usr/lib64/fluent/ruby/bin/fluent-gem install fluent-plugin-elasticsearch
SNMP Plugin
/usr/lib64/fluent/ruby/bin/fluent-gem install fluent-plugin-snmp
Derive Plugin
/usr/lib64/fluent/ruby/bin/fluent-gem install fluent-plugin-derive
Ping Plugin
/usr/lib64/fluent/ruby/bin/fluent-gem install fluent-plugin-ping-message
設定ファイル
vim /etc/td-agent/td-agent.conf
####
## Output descriptions:
##

# Treasure Data (http://www.treasure-data.com/) provides cloud based data
# analytics platform, which easily stores and processes data from td-agent.
# FREE plan is also provided.
# @see http://docs.fluentd.org/articles/http-to-td
#
# This section matches events whose tag is td.DATABASE.TABLE
<match td.*.*>
  type tdlog
  apikey YOUR_API_KEY

  auto_create_table
  buffer_type file
  buffer_path /var/log/td-agent/buffer/td
</match>

## match tag=debug.** and dump to console
<match debug.**>
  type stdout
</match>

####
## Source descriptions:
##

## built-in TCP input
## @see http://docs.fluentd.org/articles/in_forward
<source>
  type forward
</source>

## built-in UNIX socket input
# <source>
#  type unix
# </source>

# HTTP input
# POST http://localhost:8888/<tag>?json=<json>
# POST http://localhost:8888/td.myapp.login?json={"user"%3A"me"}
# @see http://docs.fluentd.org/articles/in_http
<source>
  type http
  port 8888
</source>

## live debugging agent
<source>
  type debug_agent
  bind 127.0.0.1
  port 24230
</source>

####
## Examples:
##

## File input
## read apache logs continuously and tags td.apache.access
# <source>
#  type tail
#  format apache
#  path /var/log/httpd-access.log
#  tag td.apache.access
# </source>

## File output
## match tag=local.** and write to file
# <match local.**>
#  type file
#  path /var/log/td-agent/access
# </match>

## Forwarding
## match tag=system.** and forward to another td-agent server
# <match system.**>
#  type forward
#  host 192.168.0.11
#  # secondary host is optional
#  <secondary>
#    host 192.168.0.12
#  </secondary>
# </match>

## Multiple output
## match tag=td.*.* and output to Treasure Data AND file
# <match td.*.*>
#  type copy
#  <store>
#    type tdlog
#    apikey API_KEY
#    auto_create_table
#    buffer_type file
#    buffer_path /var/log/td-agent/buffer/td
#  </store>
#  <store>
#    type file
#    path /var/log/td-agent/td-%Y-%m-%d/%H.log
#  </store>
# </match>

######
<source>
  type snmp
  tag snmp.server3
  nodes name, value
  host "xxx.xxx.xxx.xxx {Router IP}"
  community public
  mib ifInOctets.7
  method_type get
  polling_time 5
  polling_type async_run
</source>

<source>
  type snmp
  tag snmp.server4
  nodes name, value
  host "xxx.xxx.xxx.xxx {Router IP}"
  community public
  mib ifOutOctets.7
  method_type get
  polling_time 5
  polling_type async_run
</source>

<match snmp.server*>
  type copy

  <store>
    type derive
    add_tag_prefix derive
    key2 value *8
  </store>

  <store>
    type stdout
  </store>

  <store>
    type elasticsearch
    host localhost
    port 9200
    type_name traffic
    logstash_format true
    logstash_prefix snmp
    logstash_dateformat %Y%m

    buffer_type memory
    buffer_chunk_limit 10m
    buffer_queue_limit 10
    flush_interval 1s
    retry_limit 16
    retry_wait 1s
  </store>
</match>
service td-agent reload
Reloading td-agent: [ OK ]
Kibana4へのアップデート
http://qiita.com/nagomu1985/items/82e699dde4f99b2ce417
http://shiro-16.hatenablog.com/entry/2015/03/14/234023
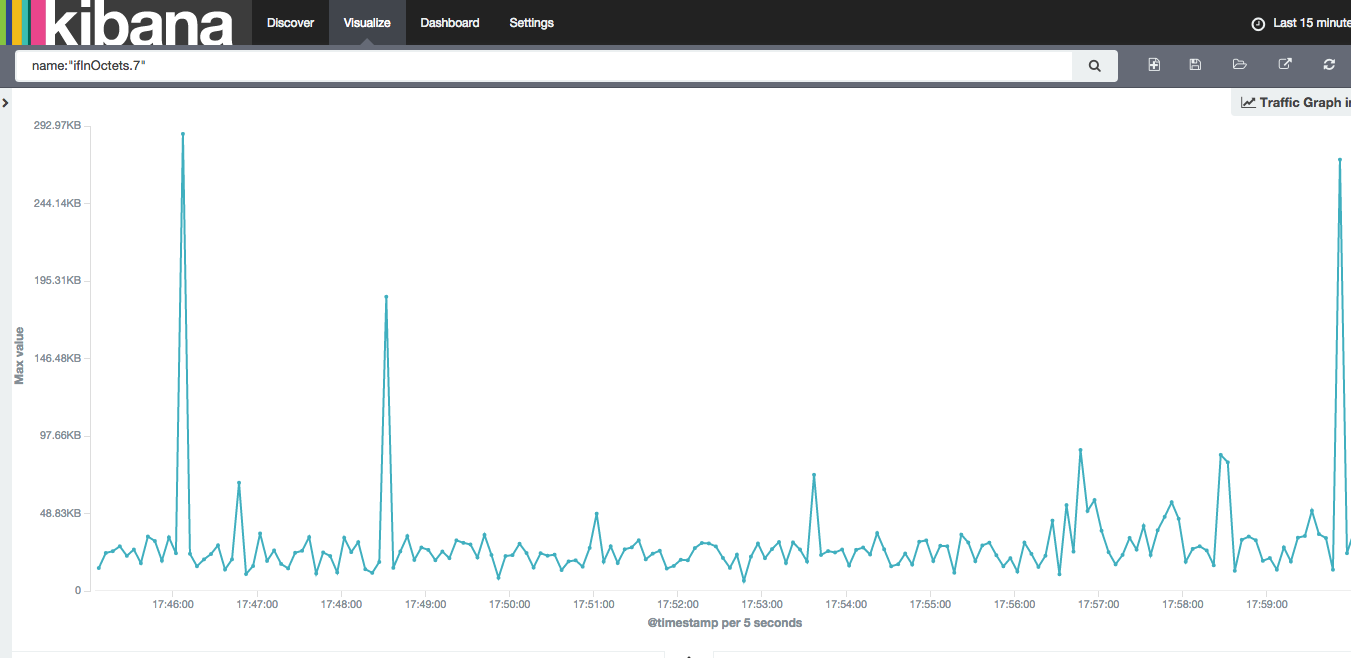
スクリーンショット
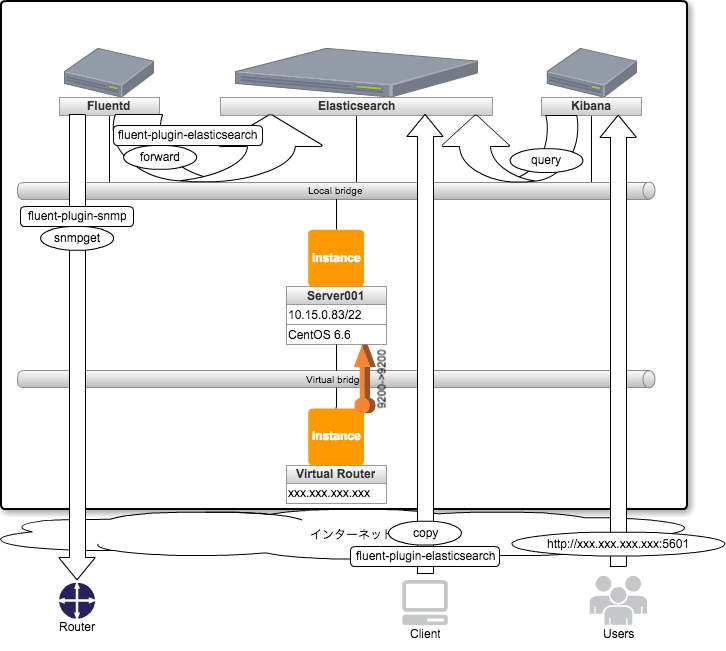
構成
Java
yum remove java-1.7.0-openjdk java-1.7.0-openjdk-devel.x86_64
yum install java-1.8.0-openjdk java-1.8.0-openjdk-devel.x86_64
Apache(念のため停止)
service httpd stop
chkconfig -del httpd
Elasticsearch
vim /etc/yum.repos.d/elasticsearch.repo
[elasticsearch-2.x]
name=Elasticsearch repository for 2.x packages
baseurl=http://packages.elastic.co/elasticsearch/2.x/centos
gpgcheck=1
gpgkey=http://packages.elastic.co/GPG-KEY-elasticsearch
enabled=1
yum update
================================================================================
 パッケージ          アーキテクチャ
                                  バージョン      リポジトリー             容量
================================================================================
更新:
 elasticsearch       noarch       2.1.0-1         elasticsearch-2.x        28 M

トランザクションの要約
================================================================================
アップグレード       1 パッケージ
service elasticsearch restart
elasticsearch を停止中: [ OK ]
elasticsearch を起動中: [ OK ]
Kibana
wget https://download.elastic.co/kibana/kibana/kibana-4.3.0-linux-x64.tar.gz
tar xvzf kibana-4.3.0-linux-x64.tar.gz
mv kibana-4.3.0-linux-x64 /opt/kibana
vi /opt/kibana/config/kibana.yml
# Kibana is served by a back end server. This controls which port to use.
# server.port: 5601

# The host to bind the server to.
# server.host: "0.0.0.0"

# A value to use as a XSRF token. This token is sent back to the server on each request
# and required if you want to execute requests from other clients (like curl).
# server.xsrf.token: ""

# If you are running kibana behind a proxy, and want to mount it at a path,
# specify that path here. The basePath can't end in a slash.
# server.basePath: ""

# The Elasticsearch instance to use for all your queries.
elasticsearch.url: "http://localhost:9200"

# preserve_elasticsearch_host true will send the hostname specified in `elasticsearch`. If you set it to false,
# then the host you use to connect to *this* Kibana instance will be sent.
# elasticsearch.preserveHost: true

# Kibana uses an index in Elasticsearch to store saved searches, visualizations
# and dashboards. It will create a new index if it doesn't already exist.
# kibana.index: ".kibana"

# The default application to load.
# kibana.defaultAppId: "discover"

# If your Elasticsearch is protected with basic auth, these are the user credentials
# used by the Kibana server to perform maintenance on the kibana_index at startup. Your Kibana
# users will still need to authenticate with Elasticsearch (which is proxied through
# the Kibana server)
# elasticsearch.username: "user"
# elasticsearch.password: "pass"

# SSL for outgoing requests from the Kibana Server to the browser (PEM formatted)
# server.ssl.cert: /path/to/your/server.crt
# server.ssl.key: /path/to/your/server.key

# Optional setting to validate that your Elasticsearch backend uses the same key files (PEM formatted)
# elasticsearch.ssl.cert: /path/to/your/client.crt
# elasticsearch.ssl.key: /path/to/your/client.key

# If you need to provide a CA certificate for your Elasticsearch instance, put
# the path of the pem file here.
# elasticsearch.ssl.ca: /path/to/your/CA.pem

# Set to false to have a complete disregard for the validity of the SSL
# certificate.
# elasticsearch.ssl.verify: true

# Time in milliseconds to wait for elasticsearch to respond to pings, defaults to
# request_timeout setting
# elasticsearch.pingTimeout: 1500

# Time in milliseconds to wait for responses from the back end or elasticsearch.
# This must be > 0
# elasticsearch.requestTimeout: 300000

# Time in milliseconds for Elasticsearch to wait for responses from shards.
# Set to 0 to disable.
# elasticsearch.shardTimeout: 0

# Time in milliseconds to wait for Elasticsearch at Kibana startup before retrying
# elasticsearch.startupTimeout: 5000

# Set the path to where you would like the process id file to be created.
# pid.file: /var/run/kibana.pid

# If you would like to send the log output to a file you can set the path below.
# logging.dest: stdout

# Set this to true to suppress all logging output.
# logging.silent: false

# Set this to true to suppress all logging output except for error messages.
# logging.quiet: false

# Set this to true to log all events, including system usage information and all requests.
# logging.verbose: false
vim /etc/init.d/kibana
chmod +x /etc/init.d/kibana
/etc/init.d/kibana start
chkconfig --add kibana
chkconfig kibana on
Netflowでフロー取得
スクリーンショット
構成
なし(イメージしてください)
設定
/usr/lib64/fluent/ruby/bin/fluent-gem install fluent-plugin-netflow
vi /etc/td-agent/td-agent.conf
####
## Router Flow
<source>
  type netflow
  tag netflow.event
  port 5141
</source>
<match netflow.**>
  type copy
  <store>
    type elasticsearch
    host localhost
    port 9200
    type_name netflow
    logstash_format true
    logstash_prefix traffic-flow
    logstash_dateformat %Y%m%d
    buffer_type memory
    buffer_chunk_limit 10m
    buffer_queue_limit 10
    flush_interval 1s
    retry_limit 16
    retry_wait 1s
  </store>
</match>
Kibanaアクセスログ取得
スクリーンショット
なし(イメージしてください)
構成
なし(イメージしてください)
設定
vi /etc/td-agent/td-agent.conf
####
## Kibana AccessLog
<source>
  type tail
  path /var/log/kibana/kibana.log
  tag kibana.access
  pos_file /var/log/td-agent/kibana_log.pos
  format json
</source>
<match kibana.access>
  type copy
  <store>
    type elasticsearch
    host localhost
    port 9200
    type_name access_log
    logstash_format true
    logstash_prefix kibana_access
    logstash_dateformat %Y%m
    buffer_type memory
    buffer_chunk_limit 10m
    buffer_queue_limit 10
    flush_interval 1s
    retry_limit 16
    retry_wait 1s
  </store>
</match>
セキュリティ強化 : Kibana4 on apache(ssl) using google-authenticator
目的
外部公開しているのにBasic認証だけは心もとないけど、Kerberosとかは面倒だからやりたくない。。
ワンタイムパスワード認証だったらOKじゃね?
2要素認証とかいっとけば会社で使うのもOKじゃね?
参考
https://github.com/elastic/kibana/issues/1559
http://nabedge.blogspot.jp/2014/05/apachebasicgoogle-2.html
スクリーンショット
なし(イメージしてください)
構成図
なし(イメージしてください)
インストール
流れ的には
kibana4 on apache using Basic認証
→ kibana4 on apache using google-authenticator
→ Kibana4 on apache(ssl) using google-authenticator
という感じで理解していったが、面倒くさいので結果だけ。
SSL
特に説明はなしで。
google-authenticator
yum install http://ftp.riken.jp/Linux/fedora/epel/6/i386/epel-release-6-8.noarch.rpm
yum install httpd httpd-devel subversion google-authenticator
svn checkout http://google-authenticator-apache-module.googlecode.com/svn/trunk/ google-authenticator-apache-module-read-only
cd google-authenticator-apache-module-read-only
make
make install
cp googleauth.conf /etc/httpd/conf.d/ ※結局使わなかったけど念のため。
google-authenticator
https://www.google.com/chart?chs=......
Your new secret key is: B3HHIJXXXXXXXXXX
Your verification code is ......
Your emergency scratch codes are:
  3575....
  8711....
  5639....
  9330....
  1386....

Do you want me to update your "~/.google_authenticator" file (y/n) y
OVLUR4XXXXXXXXXX

B3HHIJXXXXXXXXXX
Do you want to disallow multiple uses of the same authentication
token? This restricts you to one login about every 30s, but it increases
your chances to notice or even prevent man-in-the-middle attacks (y/n) y

By default, tokens are good for 30 seconds and in order to compensate for
possible time-skew between the client and the server, we allow an extra
token before and after the current time. If you experience problems with poor
time synchronization, you can increase the window from its default
size of 1:30min to about 4min. Do you want to do so (y/n) y

If the computer that you are logging into isn't hardened against brute-force
login attempts, you can enable rate-limiting for the authentication module.
By default, this limits attackers to no more than 3 login attempts every 30s.
# credendials. This file must be generated from the "google_authenticator"
Do you want to enable rate-limiting (y/n) y
mkdir /etc/httpd/ga_auth
vi /etc/httpd/ga_auth/kibana{ログイン時のユーザー名}
B3HHIJXXXXXXXXXX
" RATE_LIMIT 3 30
" WINDOW_SIZE 17
" TOTP_AUTH
" PASSWORD={第一要素のパスワード。なしでもいける}
vi /etc/httpd/conf/httpd.conf
NameVirtualHost *:5600
Listen 5600
<VirtualHost *:5600>
  SSLEngine on
  SSLProtocol all -SSLv2
  SSLCipherSuite DEFAULT:!EXP:!SSLv2:!DES:!IDEA:!SEED:+3DES
  SSLCertificateFile /var/www/kibana4/server.crt{証明書パス}
  SSLCertificateKeyFile /var/www/kibana4/server.key{キーパス}
  SetEnvIf User-Agent ".*MSIE.*" \
           nokeepalive ssl-unclean-shutdown \
           downgrade-1.0 force-response-1.0
  LogLevel warn
  ProxyPreserveHost On
  ProxyRequests Off
  ProxyPass / http://localhost:5601/{Kibana4へのアクセス}
  ProxyPassReverse / http://localhost:5601/{Kibana4へのアクセス}
  <Location />
    Order deny,allow
    Allow from all
    AuthType Basic
    AuthName "My Test"
    AuthBasicProvider "google_authenticator"
    Require valid-user
    GoogleAuthUserPath ga_auth
    GoogleAuthCookieLife 3600
    GoogleAuthEntryWindow 2
  </Location>
  CustomLog /var/log/httpd/access_5600.log combined
  ErrorLog /var/log/httpd/error_5600.log
</VirtualHost>
service httpd restart
chkconfig httpd on
運用WA
・KibanaとかElasticsearchが勝手にハングアップする
→ 多分メモリが足りてない。増やすかswap足しましょう。
→ あと、ときどきKibanaをrestartしてあげましょう。メモリクリアされます。
・設定はあってるはずなのにログ取得が出来ない。
→ format形式を変更したりしてませんか。posファイル削除してみましょう。
→ "# rm /var/log/td-agent/kibana_log.pos"
改善点
[v3]
・MIB指定のため必要なデータごとに設定を追加する必要がある(面倒)
・複数ノードの同時取得用には作ってない(作業用として使う?)
・IFindexとdescriptionの紐付けが出来ない
・本当は1s間隔での取得→更新がよかった
※1sにしてもfluentdが5s間隔でしか送信しない。。。設定で変更できるのかは不明。
・たぶん取得データが多くなるとすごく重くなる
・pps表記が出来ない
・Mbps表記ではなく、MB表記になる(データとしてはMbpsなので見た目の問題)
[v4]
・複数クエリのグラフ表示方法がわからない。。
・Netflowはとりあえず取得できるようにしただけ
次回予告
・Fluentd+Graphite+GrafanaでJavaを使わないNMSを作る
・Fluentd+Groonga+???でNSMを作る
・fluent-plugin-anomalydetectを使ってみる
