最近 Elm を始めた者です。
Elmでなにかを作る際にAPI連携をする際の基礎的な実装を知ろうと思い、まずはスモールステップの為に「OKと返すAPIを叩いて、画面上にOKと表示する。」という最小単位のアプリケーションを作ってみたのでその過程をメモしておこうと思います。
Elmのチュートリアルを触って次にAPIを使ってなにか作ろうとしている人の手助けになれば幸いです。
また初心者なので、間違った解釈をしている可能性があるので、詳しい方はご指摘をお願いします。 ![]()
The Elm Architecture とは
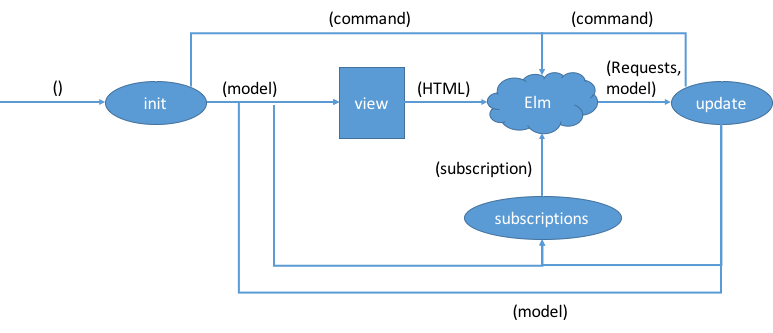
普通のJavascriptの場合は、実装する際にReactやAngular、Vueなど言語実装とは別にフレームワークがあり、開発者がそれを自由に選ぶ事ができるのに対して、Elmという言語そのものがフレームワークを持っている。Elmを動かす時は、このフローを理解する事から始まる。
この制約があるおかげで、
- データのフローが一方向になる。
- 副作用が分離される。
- 一度覚えればElmで書く際に、新たにフレームワークを覚える必要がない
などの利点がある。

出典: https://ralfw.de/2016/08/elm-architecture-flow/
この記事では上記の図をもとに実装の流れを書いていこうと思う。
main
図の "elm" の部分。ここを見れば、The Elm Architecture のメインは
- init
- update
- subscriptions
- view
だと言う事がわかるだろう。
main =
    Browser.element
        { init = init
        , update = update
        , subscriptions = subscriptions
        , view = view
        }
上記4つに加えて、状態を表す「model」、命令を表す「Cmd」「Msg」などが登場する。
model
modelは画面が持つ状態を表すオブジェクトである。
Modelというタイプエイリアスをつけて取り扱う。
今回は、APIを叩いて受け取った値だけをモデルとして持てばいいので、以下のようなシンプルな構成になる。
type alias Model =
    { message : String }
Msg
Msgは図の「Command」の部分で用いられる。init,update,subscriptions,view間でのやり取りのメッセージを意味する。
Msgはカスタムタイプで定義する。
今回は、APIを叩いた結果を持つ HealthCheckという型を定義する。
APIの結果値は、成功もしくは失敗する可能性もある為、 Result型 で定義する。
type Msg
    = HealthCheck (Result Http.Error String)
init
initの図を見ると、() を受け取り、 modelと command を返す関数なので、
型は init: () -> (Model, Cmd Msg)と表現される。
画面を開いた際に、APIを叩いて欲しい為、getHealthCheckというAPIを叩く関数をCmdに入れる。
modelには初期値として空のmessageを入れる。
init : () -> ( Model, Cmd Msg )
init _ =
    ( { message = "" }, getHealthCheck )
getHealthCheck
APIを叩く実装は以下のように定義する。
getHealthCheck : Cmd Msg
getHealthCheck =
    Http.send HealthCheck (Http.get getUrl decoder)


getUrl : String
getUrl =
    Url.crossOrigin "http://localhost:8080" [ "health" ] []


decoder : Decode.Decoder String
decoder =
    Decode.field "message" Decode.string
view
Viewは、Modelを受け取り、Html Msgを画面上(Elm)へ返す関数。
ここでは受け取ったModelのmessageを表示するようにする。
もし、initに Cmdを何も指定していない(Cmd.none)場合は、空文字が表示されるが、今回は、CmdにgetHealthCheckを設定しているのでそのままフローはupdateに移動する。
view : Model -> Html Msg
view model =
    div []
        [ h1 [] [ text model.message ]
        ]
update
Updateは Msg と Model を受け取り、 Model,Cmd Msg を返す関数である。
受け取った Msgをもとに Modelの状態を更新する役割を持つ。
Msgの内容によって処理が分岐するので、パターンマッチを用いて分岐をさせる。状態に副作用を与えない為に、レコードを用いて modelから messageを変更した新しいmodelを生成して返す。
この時、modelは図のように view に渡されて画面が更新される。
update : Msg -> Model -> ( Model, Cmd Msg )
update msg model =
    case msg of
        HealthCheck (Ok res) ->
            ( { model | message = res }, Cmd.none )

        HealthCheck (Err _) ->
            ( { model | message = "error" }, Cmd.none )
subscriptions
今回は使用しないので、 Sub.noneを返すように設定する。
subscriptions : Model -> Sub Msg
subscriptions model =
    Sub.none
API
API側は golangでサクッと用意する。
来たリクエストが localhost:8000 からのものであれば、 { message: "ok" } と返すだけのサーバーである。
(ここは気分で実装したので無視してください。笑)
package main

import (
	"github.com/iris-contrib/middleware/cors"
	"github.com/kataras/iris"
)

func main() {
	app := iris.Default()

	c := cors.New(cors.Options{
		AllowedOrigins: []string{"http://localhost:8000"},
	})
	app.Use(c)

	app.Get("/health", func(ctx iris.Context) {
		ctx.JSON(iris.Map{
			"message": "ok",
		})
	})

	app.Run(iris.Addr(":8080"))
}
全体像
いままでの実装を一つにすると以下のようになる。
実際に動くものは以下のレポジトリにあるのでよろしければ参考にしてください。
https://github.com/ap8322/elm-architecture-training
module Main exposing (Model, Msg(..), init, main, update, view)

import Browser
import Html exposing (Html, div, h1, img, text)
import Html.Attributes exposing (src)
import Http
import Json.Decode as Decode
import Url.Builder as Url


type alias Model =
 { message : String }


init : () -> ( Model, Cmd Msg )
init _ =
 ( { message = "" }, getHealthCheck )


type Msg
 = HealthCheck (Result Http.Error String)


update : Msg -> Model -> ( Model, Cmd Msg )
update msg model =
 case msg of
 HealthCheck (Ok res) ->
 ( { model | message = res }, Cmd.none )

 HealthCheck (Err _) ->
 ( { model | message = "error" }, Cmd.none )


view : Model -> Html Msg
view model =
 div []
 [ h1 [] [ text model.message ]
 ]


subscriptions : Model -> Sub Msg
subscriptions model =
 Sub.none


main =
 Browser.element
 { init = init
 , update = update
 , subscriptions = subscriptions
 , view = view
 }


getHealthCheck : Cmd Msg
getHealthCheck =
 Http.send HealthCheck (Http.get getUrl decoder)


getUrl : String
getUrl =
 Url.crossOrigin "http://localhost:8080" [ "health" ] []


decoder : Decode.Decoder String
decoder =
 Decode.field "message" Decode.string
動かしてみる
実際に動かしてみると「OK」という文字が画面上に表示される。失敗した場合の動作確認をしたい場合は、
AllowedOrigins: []string{"http://localhost:8000"},
のホスト部分を適当な値にすれば "error" という文字列が表示されるようになるはずです。