こんな人におすすめ
- プログラミング初心者でポートフォリオの作り方が分からない
- Rails Tutorialをやってみたが理解することが難しい
前回:#11 プロフィール編集編
次回:#13 パスワード再設定編
この記事は、動画を観た時間を記録するアプリのポートフォリオです。
今回はメールによるアカウントのアクティベーションができるようにします。
今回の流れ
- アクティベーションのイメージを掴む
- コントローラ、属性、トークン/ダイジェストを用意する
- メールを生成し、メール内のURLにトークンを仕込む
- トークン/ダイジェストを照らし合わせ、アクティベートする
- ログイン時にもアクティベーションを確認する
- アクティベーションに関するテストを書く
アクティベーションのイメージ
今の仕様だとどんなメールアドレスでも登録が完了してしまう。
だから登録時にメールを送ってアクティベーションしたい...
どうすればよい??
というわけでどんな風に行えば実装できるのか考えてみよう。
これまでは登録に成功すると/signupから/users/:idにリダイレクトするだけだった。
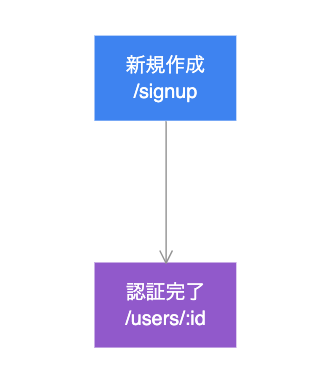
この間にアクティベーション用のメールを挟みたい。
アプリはホーム画面にリダイレクトする。
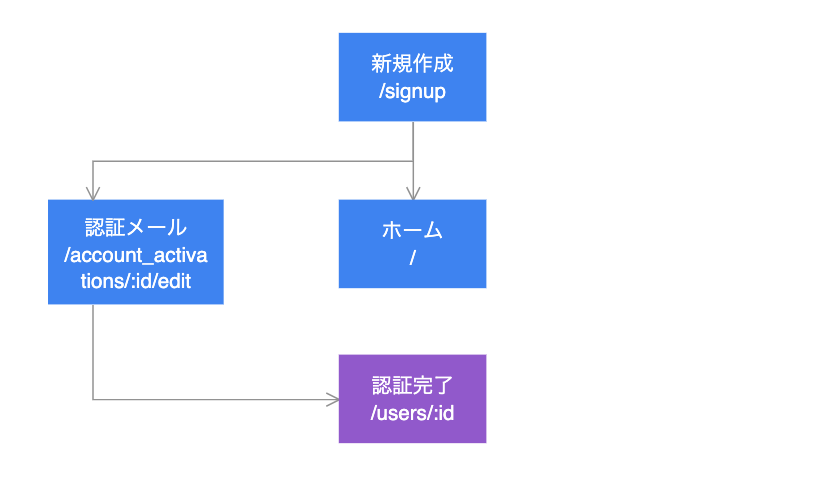
先述しちゃったけど、メール用に必要なパスは1つ。
その他必要なビューなどは存在しない。
よってAcountActivationsコントローラと対応するリソースを生成しよう。
$ rails g controller AccountActivations
Rails.application.routes.draw do
# 中略
  resources :account_activations, only: [:edit]
end
RESTに従うと、情報を更新するためにはpatchを使用する。
でもユーザにURLをクリックしてもらう以上それはgetだ。
よってupdateアクションではなくeditアクションを使用する。
アクティベーションの手順
- 新規作成時にトークンとダイジェストを生成する
- メールを生成する
- メール内のURLにトークンを忍ばせる
- URLをクリックしたらトークンとダイジェストと照らし合わせる
- 正しければアクティベーション済みにする
以上の動作に必要なものを列挙する。
- アクティベーション用トークン/ダイジェスト
- アクティベーション済みかどうかを確認する属性
- アクティベーション用メール
- アクティベーションするための動作コード
ポートフォリオ#9をご覧いただきたい。
アクティベーションに必要なトークンとダイジェストは同じような手順で生成できる。
対してメールを生成するメーラーは新たに使用する。
混乱する前に頭の中で整理しておくことをおすすめする。
それでは1つずつ用意していこう。
AccountActivationの属性を用意する
属性として必要なのはこの2つ。
- activation_digest → アクティベーション用ダイジェスト
- activated → アクティベーション済みかどうかの真偽値
$ rails g migration add_activation_to_users activation_digest:string activated:boolean
真偽値はデフォルトでfalseにしておく。
class AddActivationToUsers < ActiveRecord::Migration[5.2]
  def change
    add_column :users, :activation_digest, :string
    add_column :users, :activated, :boolean, default: false
  end
end
マイグレーションもお忘れなく。
$ rails db:migrate
トークンとダイジェストを生成する
トークンとダイジェストの生成に関しては、以前作成したUser.new_tokenとUser.digestでまかなえる。
アクティベーション用にcreate_activation_digestメソッドを作り、これらをまとめておこう。
加えてactivation_tokenは仮属性なのでattr_accessorに追加する。
class User < ApplicationRecord
  attr_accessor :remember_token, :activation_token
  # 中略
  private

    def create_activation_digest
      self.activation_token = User.new_token
      self.activation_digest = User.digest(activation_token)
    end
end
# 中略
どうやって新規作成時に生成させるか
以前emailを入力させる際before_saveを使用し、save前にアドレスをdowncaseメソッドで小文字化した。
今回はsave前ではなくcreate前に呼び出したい。
お察しのとおりRailsにはbefore_createというメソッドが用意されている。
...使おう![]()
ついでにリファクタリングとして小文字化の処理もメソッド化しておく。
最終的にはこうなる。
class User < ApplicationRecord
  attr_accessor :remember_token, :activation_token
  before_save :downcase_email
  before_create :create_activation_digest
  # 中略
  private

    def downcase_email
      email.downcase!
    end

    def create_activation_digest
      self.activation_token = User.new_token
      self.activation_digest = User.digest(activation_token)
    end
end
アクティベーション用メールを生成する
メールを生成するにはメーラーというものを使う。
早速生成してみよう。
ついでに次の章で紹介するパスワードリセット用のpassword_resetメソッドも生成しておく。
$ rails g mailer UserMailer account_activation password_reset
生成されたメーラーはコントローラのアクションと似ており、メーラーの各メソッドが同名のビューと対応する形。
Tutorialを参考に改変。
class ApplicationMailer < ActionMailer::Base
  default from: 'noreply@example.com'
  layout 'mailer'
end
class UserMailer < ApplicationMailer

  def account_activation(user)
    @user = user
    mail to: user.email, subject: "【重要】Lantern Lanternよりアカウント有効化のためのメールを届けました"
  end

  # この部分は次章
  def password_reset
    @greeting = "Hi"
    mail to: "to@example.org"
  end
end
「なんでaccount_activationに引数与えられるの?」
とちょっと疑問に思った。
答えはシンプルでコントローラのアクションと違い、メーラーのメソッドはコントローラ内で自発的に使っていくから(っぽい)。
まあ要は普通に定義したメソッドだから使えるよねって話。
メール内のURLにトークンを仕込む
ここからはビューでメール本文を作成しよう。
必要なのはトークンとキーにするメールアドレスを仕込んだURL。
以上を踏まえるとこんな感じ。
<%= @user.name %>さんへ

Lantern Lanternにいらして下さりありがとうございます。下記のリンクをクリックして認証を済ませてください。
<%= edit_account_activation_url(@user.activation_token, email: @user.email) %>
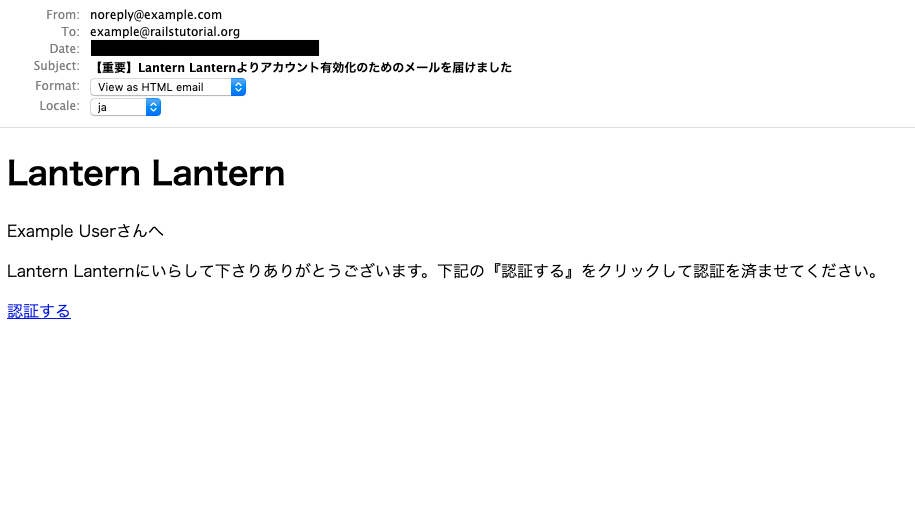
<h1>Lantern Lantern</h1>
<p><%= @user.name %>さんへ</p>
<p>Lantern Lanternにいらして下さりありがとうございます。下記の『認証する』をクリックして認証を済ませてください。</p>
<%= link_to "認証する", edit_account_activation_url(@user.activation_token, email: @user.email) %>
さてこの部分。
edit_account_activation_url(@user.activation_token, email: @user.email)
ルートを確認するとedit_account_activationのURLパターンを教えてくれる。
$ rails routes | grep edit_account_activation
edit_account_activation GET /account_activations/:id/edit(.:format)
:id部分には引数が入る。でも今回は第2引数まである。
実はこの第2引数にハッシュを使用するとクエリパラメータを付与することができる。
結果的にこんな感じのURLを生み出す。
http://www.example.com/account_activations/q5lt38hQDc_959PVoo6b7A/edit?email=foo%40example.com
これでURLにトークンとメールアドレスを仕込むことができた。
メールのプレビュー
メールができたとはいえプレビューを確認したい。
そのためには設定を変える必要がある。
まずdevelopment.rbのこの箇所を、
  # Don't care if the mailer can't send.
  config.action_mailer.raise_delivery_errors = false

  config.action_mailer.perform_caching = false
こうする。
  # Don't care if the mailer can't send.
  config.action_mailer.raise_delivery_errors = true
  config.action_mailer.delivery_method = :test
  host = '『〜自分の環境に合わせる〜』'
  config.action_mailer.default_url_options = { host: host, protocol: 'https' }
  config.action_mailer.perform_caching = false
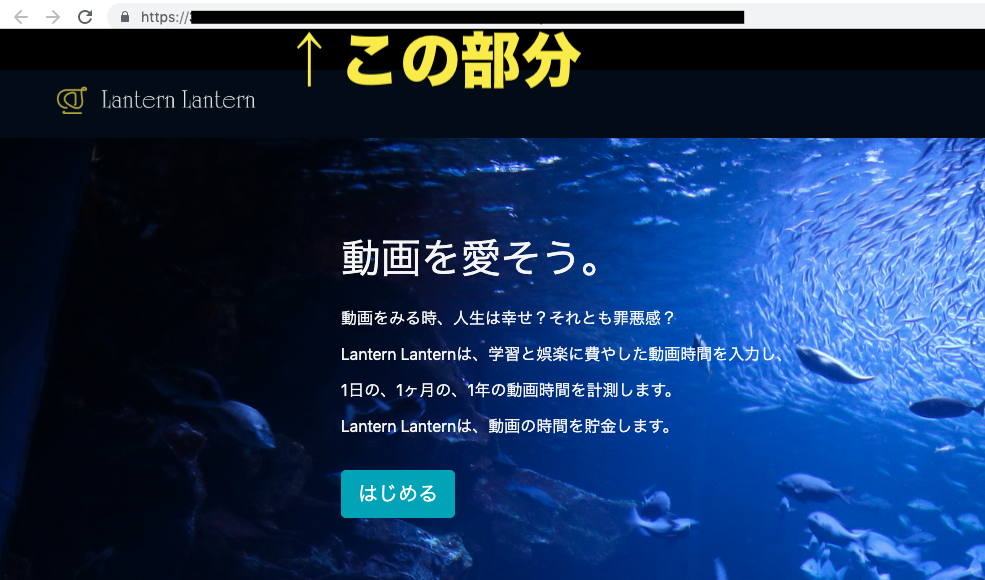
ここに注目。
host = '〇〇'
この箇所には自分の環境によって変更する必要がある。
具体的にはdevelopment環境のURLを挿入する。
本ポートフォリオではこの部分。
参考にさせていただきました↓
rails チュートリアルの11章の2・2にてクラウドIDEのホスト名がわからない
Railsのconfig/enviroments配下を読んでみる
あとはプレビュー用のメソッドもいじる必要がある。
class UserMailerPreview < ActionMailer::Preview

# https://〇〇/rails/mailers/user_mailer/account_activation
  def account_activation
    user = User.first
    user.activation_token = User.new_token
    UserMailer.account_activation(user)
  end

  def password_reset
    UserMailer.password_reset
  end
end
これで下記のリンクでプレビューを確認できるようになった。
https://〇〇/rails/mailers/user_mailer/account_activation
新規作成時にメールを送る
それではメールを送ろう。
手順としては、処理を書いた後、本番環境を整える。
しかし本番環境については、完成後に整える方がスムーズなので後回しにする。
メールを送る処理を書く
ユーザ新規作成時にメールを送るようにしよう。
メーラーで作成したメールを送るにはdeliver_nowメソッドを使用する。
UserMailer.account_activation(@user).deliver_now
ここは慣習的にメソッド化しておこう。
class User < ApplicationRecord
# 中略
  def send_activation_email
    UserMailer.account_activation(self).deliver_now
  end
あとはcreateアクションに書き込む。
class UsersController < ApplicationController
  # 中略
  def create
    @user = User.new(user_params)
    if @user.save
      UserMailer.account_activation(@user).deliver_now
      flash[:info] = "認証用メールを送信しました。登録時のメールアドレスから認証を済ませてください"
      redirect_to root_url
    else
      render 'new'
    end
  end
その他、flashメッセージやリダイレクト先などの変更がある。
これによりいくつかのテストが通らなくなる。
記事後半にテスト関係をまとめたので、この問題はあとで修正する。
知識を助けていただきました↓
【Rails入門】Action Mailerのメール送信を初心者向けに基礎から解説
アクティベーションを完了させる
メール内のURLをクリックしたらアクティベーション完了にしたい。
やることは2つ。
- トークンとダイジェストと照らし合わせるauthenticated?を編集する
- editアクションに処理を書く
authenticated?を編集する
以前remember_me機能を追加する際、authenticated?メソッドでトークンとダイジェストを照らし合わせていた。
アクティベーションでも同じメソッドが使えるよう、カスタマイズする。
class User < ApplicationRecord
  # 中略
  # 以前のauthenticated?を書き換え
  def authenticated?(attribute, token)
    digest = send("#{attribute}_digest")
    return false if digest.nil?
    BCrypt::Password.new(digest).is_password?(token)
  end
第1引数 → rememberに使うかactivationに使うかなど
第2引数 → 指定したトークン
これで汎用性の高いメソッドに生まれ変わった。
sendを使うことで文字列をメソッドとして認識してくれる。
そこに#{}を使うことで、引数によってメソッド名を変化させるという仕組み。
再び以前書いたテストが失敗する。
これも記事後半に。
それよりもauthenticated?を使用していたcurrent_userを編集しよう。
module SessionsHelper
  # 中略
  def current_user
    if (user_id = session[:user_id])
      @current_user ||= User.find_by(id: user_id)
    elsif (user_id = cookies.signed[:user_id])
      user = User.find_by(id: user_id)
      if user && user.authenticated?(:remember, cookies[:remember_token])
        log_in user
        @current_user = user
      end
    end
  end
authenticated?では第1引数を指定する際にシンボルを使用している。
ん?なんで?
文字列よりシンボルが推奨される理由
第1引数に指定する際はシンボルを推奨する。
理由はざっくりいうとこんな感じ。
- Rubyの内部実装は、速度面で名前を整数で管理している
- シンボルはソース上文字列、内部上整数という性質を持つ
- よって文字列ではなくシンボルを使用する
より詳しい解説↓
Rubyの文字列とシンボルの違いをキッチリ説明できる人になりたい
editアクションに処理を書く
ようやくAccountActivationsコントローラに処理を書ける。
以下の記述でactivatedをtrueにするが、
user.update_attribute(:activated, true)
ここも慣習にならってメソッド化する。
class User < ApplicationRecord
  # 中略
  def activate
    update_attribute(:activated, true)
  end
終わったらeditアクションに処理を書こう。
class AccountActivationsController < ApplicationController

  def edit
    user = User.find_by(email: params[:email])
    if user && !user.activated? && user.authenticated?(:activation, params[:id])
      user.activate
      log_in user
      flash[:success] = "Lantern Lanternへようこそ!"
      redirect_to user
    else
      flash[:danger] = "アクティベーションに失敗しました"
      redirect_to root_url
    end
  end
end
ここに注目。
!user.activated?
わざわざこうしているのは、アクティベーション済みにも関わらずtrueが可能になると、リンクを盗み出すだけで攻撃でアクティベーションが成功してしまうから。
ログイン時にアクティベーションを確認する
新規登録時のアクティベーションは完了した。
でもまだログイン時にアクティベーション済みかを確認する処理が書かれていない。
Sessionsコントローラを編集しよう。
class SessionsController < ApplicationController
  # 中略
  def create
    user = User.find_by(email: params[:session][:email].downcase)
    if user && user.authenticate(params[:session][:password])
      if user.activated?
        log_in user
        params[:session][:remember_me] == '1' ? remember(user) : forget(user)
        redirect_back_or user
      else
        flash[:danger] = "メールを確認してアクティベーションを済ませてください"
        redirect_to root_url
      end
    else
      flash.now[:danger] = 'メールアドレスかパスワードが正しくありません'
      render 'new'
    end
  end
これでアクティベーション関係は終了となる。
本番環境でメールが届くようにする
実際のアプリでメールを送信するにはいくつかやることがある。
- Herokuのアドオンを追加する
- production.rbを編集する
Herokuのアドオンを追加する
Herokuからメールを送信できるようにしよう。
そのためにはアドオンを追加する。
heroku addons:create sendgrid:starter
production.rbを編集する
production.rbにこういう記述があると思う。
config.action_mailer.raise_delivery_errors = false
このあたりをこんな感じに編集する。
# 中略
  config.action_mailer.raise_delivery_errors = true
  config.action_mailer.delivery_method = :smtp
  host = '〇〇.herokuapp.com'
  config.action_mailer.default_url_options = { host: host }
  ActionMailer::Base.smtp_settings = {
    :address        => 'smtp.sendgrid.net',
    :port           => '587',
    :authentication => :plain,
    :user_name      => ENV['SENDGRID_USERNAME'],
    :password       => ENV['SENDGRID_PASSWORD'],
    :domain         => 'heroku.com',
    :enable_starttls_auto => true
  }
〇〇の部分はHerokuで自分のアプリを開いたときのURLを挿入しよう。
(https除く)
host = '〇〇.herokuapp.com'
これで無事動作する。
メーラーのテストを書く
最後にメーラーのテストだ。
ただメーラーをテストするまでにいくつかやることがある。
- FactoryBotにactivated属性を与える
- ホスト側にドメイン名を与える
これが終わったら実際にテストといこう。
FactoryBotにactivated属性を与える
activated属性が新たに追加されたので、FactotyBotに追記しよう。
acitvatedがfalseのユーザも加えてみる。
FactoryBot.define do
  factory :user do
    name { "Michael Example" }
    email { "michael@example.com" }
    password { "password" }
    password_confirmation { "password" }
    activated { true }
  end

  factory :other_user, class: User do
    name { "Sterling Archer" }
    email { "duchess@example.gov" }
    password { "foobar" }
    password_confirmation { "foobar" }
    activated { true }
  end

  factory :no_activation_user, class: User do
    name { "No Activation" }
    email { "no@activation.co.jp" }
    password { "foobar" }
    password_confirmation { "foobar" }
    activated { false }
  end
end
ホスト側にドメイン名を与える
今のままではメールの送信元のアドレスがテスト環境に存在しないことになっている。
設定を変更しよう。
# 中略
  config.action_mailer.delivery_method = :test
  config.action_mailer.default_url_options = { host: 'example.com' }
# 中略
メーラーテストを書く
意外と面倒くさいメーラーテスト。
自動生成されたpassword_resetに関してはコメントアウト。
require "rails_helper"

RSpec.describe UserMailer, type: :mailer do

  let(:user) { create(:user) }

  describe "account_activation" do
    it "renders mails" do
      user.activation_token = User.new_token
      mail = UserMailer.account_activation(user)
      expect(mail.subject).to eq("【重要】Lantern Lanternよりアカウント有効化のためのメールを届けました")
      expect(mail.to).to eq(["michael@example.com"])
      expect(mail.from).to eq(["noreply@example.com"])
      expect(mail.body.encoded.split(/\r\n/).map{|i| Base64.decode64(i)}.join).to include("Michael Example")
    end
  end

  # describe "password_reset" do
  #   let(:mail) { UserMailer.password_reset }
  # end
end
これが気になる。
expect(mail.body.encoded.split(/\r\n/).map{|i| Base64.decode64(i)}.join).to include("Michael Example")
もちろんこうしたいのは山々だけれど、
expect(mail.body.encoded).to include("Michael Example")
これだと失敗する。理由はエンコードの関係。
このままだと訳がわからない文字列を参照することになる。
それをデコードする必要があるからこうなった訳だ。
参考にさせていただきました↓
Rails つまづき駆動投稿(TDP)
ActionMailerのメール送信テストをRSpecで行う
その他のテストを書く
テスト追加と修正を行う。
- アクティベートしていないユーザをログイン失敗にするテストを追加と修正
- 新規作成時のリダイレクト先をルートに修正
- authenticated?のモデルテストを修正
アクティベートしていないユーザをログイン失敗にするテスト
ユーザをログインさせる際、アクティベート済みとそうでないユーザを分けたい。
以前テストでユーザ情報をpostする際にはメソッドを使用した。
それの修正とリファクタリングを行い、テストを完成させる。
require 'rails_helper'

RSpec.describe "UsersLogins", type: :request do
  include SessionsHelper

  let(:user) { create(:user) }
  let(:no_activation_user) { create(:no_activation_user) }

  def post_invalid_information
    post login_path, params: {
      session: {
        email: "",
        password: ""
      }
    }
  end

  def post_valid_information(login_user, remember_me = 0)
    post login_path, params: {
      session: {
        email: login_user.email,
        password: login_user.password,
        remember_me: remember_me
      }
    }
  end

  describe "GET /login" do
    it "fails having a danger flash message" do
      get login_path
      post_invalid_information
      expect(flash[:danger]).to be_truthy
      expect(is_logged_in?).to be_falsey
      expect(request.fullpath).to eq '/login'
    end

    it "fails because they have not activated account" do
      get login_path
      post_valid_information(no_activation_user)
      expect(flash[:danger]).to be_truthy
      expect(is_logged_in?).to be_falsey
      follow_redirect!
      expect(request.fullpath).to eq '/'
    end

    it "succeeds having no danger flash message" do
      get login_path
      post_valid_information(user)
      expect(flash[:danger]).to be_falsey
      expect(is_logged_in?).to be_truthy
      follow_redirect!
      expect(request.fullpath).to eq '/users/1'
    end
# 中略
post_valid_informationに引数を定義したので、使用する際は引数を与えよう。
(中略している部分にも忘れずに![]() )
)
新規作成時のリダイレクト先をルートに修正する
あとは修正だけ。
# 中略
it "is valid signup information" do
  get signup_path
  expect { post_valid_information }.to change(User, :count).by(1)
  expect(is_logged_in?).to be_falsey
  follow_redirect!
  expect(request.fullpath).to eq '/'
  expect(flash[:info]).to be_truthy
end
# 中略
it "is valid because it fulfils form information" do
  visit signup_path
  submit_with_valid_information
  expect(current_path).to eq root_path
  expect(page).to have_selector '.alert-info'
end
authenticated?のテストを修正
# 中略
  describe "User model methods" do
    describe "authenticated?" do
      it "return false for a user with nil digest" do
        expect(user.authenticated?(:remember, '')).to be_falsey
      end
    end
  end
最後にテストを走らせておこう。
$ rails spec
これがグリーンならアクティベーションは完了。
お疲れ様ー。![]()
前回:#11 プロフィール編集編
次回:#13 パスワード再設定編