図書管理システムkaritakkeの製作記です。単なる備忘録です。
過去の投稿は以下から!
Amazon APIをつかってISBNから本の情報を取得
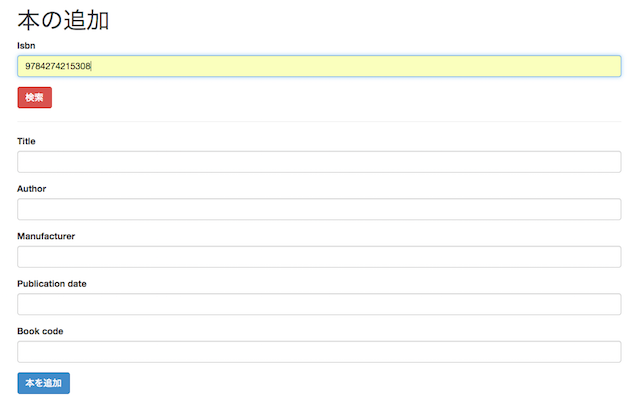
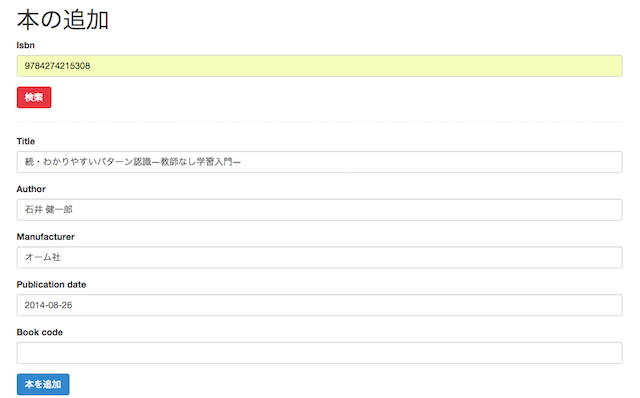
こんな感じでISBNコードを入力して検索ボタンを押すと、

書籍情報を取得できるようにします。

下準備
Amazonで
- アクセスキー
- シークレットキー
- アソシエイトタグ
を取得します。そしてconfig/application.rbに以下を追記します。中身は取得したものに適宜変更してください。
Amazon::Ecs.options = {
    :associate_tag =>     'アソシエイトタグ',
    :AWS_access_key_id => 'アクセスキー',
    :AWS_secret_key =>   'シークレットキー'
}
ルーティングの変更
config/routes.rbに以下を追加します。
get 'get_info', to: 'books#get_info', path: "/books/new/get_info"
/books/new/get_infoというURLはBooksコントローラーのget_infoというメソッドで処理するようにします。
コントローラー
上でルーティングの設定をしたので、Booksコントローラーにget_infoメソッドを追加していきます。
  def get_info
    Amazon::Ecs.debug = true
    res = Amazon::Ecs.item_search(params[:isbn],
         :search_index   => 'Books',
         :response_group => 'Medium',
         :country        => 'jp'
       )
    info = {'Title' => res.first_item.get('ItemAttributes/Title'),
            'Author' => res.first_item.get('ItemAttributes/Author'),
            'Manufacturer' => res.first_item.get('ItemAttributes/Manufacturer'),
            'Publication_Date' => res.first_item.get('ItemAttributes/PublicationDate')
            }
    render json: info
  end
Amazon APIからISBNコードで書籍情報を取得し、タイトル・著者名・出版社・出版日をJSON形式で吐き出します。
CoffeeScript
こちらのページを参考に、
- ISBNコードを数値のみ入力させる
- Amazon APIにISBNコードを投げて帰ってきた書籍情報をフォームに入力するAjax処理
を作ります。
$(document).on 'ready page:load', -> # turbolinks対策
  ### ISBNコード入力フォーム:数値のみの入力 ###
  $('#book_isbn').keydown ->
    presskey = String.fromCharCode(event.keyCode);
    event.returnValue = /[0-9\b\t\n]/.test(presskey) # 入力受付キーを正規表現で指定

  ### 書籍情報取得ボタン:Ajaxで情報取得 ###
  $('#info_search_button').click ->
    isbncode = $('#book_isbn').val()
    $.ajax
      async:    true
      url:      "/books/new/get_info/"
      type:     "GET"
      data:     {isbn: isbncode}
      dataType: "json"
      context:  this
      error: (jqXHR, textStatus, errorThrown) -> # 通信/サーバエラーなど
        $("#msg").css("color","#ff0000").html(errorThrown)
      success:  (data, textStatus, jqXHR) ->
        if data?
          $("#book_title").val(data.Title) # タイトル
          $("#book_author").val(data.Author) # 著者
          $("#book_manufacturer").val(data.Manufacturer) # 出版社
          $("#book_publication_date").val(data.Publication_Date) # 出版日
        else
          $("#msg").css("color","#ff0000").html("書籍情報が見つかりませんでした。")

  ### MSGのリセット ###
  $("#book_isbn").change -> $("#msg").html("")
cancancanを使ってみる!
製作その1でcancancanの設定をしてあるので、実際に使ってみましょう。
まず、app/models/ability.rbを以下のように編集します。管理者には全ての権限を与え、一般ユーザーはUserモデルの更新、Bookの閲覧、Rentalに関する全ての操作を許可し、ログを閲覧、削除できないようにします。
class Ability
  include CanCan::Ability

  def initialize(user)
    user ||= User.new
    if user.admin?
      can :manage, :all
    else
      can :update, User
      can :read, Book
      can :manage, Rental
      cannot :read, Log
      cannot :destroy, Log
    end
  end
end
次に該当するコントローラに以下を追加します。
load_and_authorize_resource
例えば、
class BooksController < ApplicationController

  load_and_authorize_resource
  before_action :set_book, only: [:show, :edit, :update, :destroy]

  def index
  	...
のようになります。
さらに、app/controllers/apprication_controller.rbを以下のようにします。
class ApplicationController < ActionController::Base
  protect_from_forgery with: :exception

  before_action :authenticate_user!

  before_action :configure_permitted_parameters, if: :devise_controller?

  # 以下を追加
  rescue_from CanCan::AccessDenied do |exception|
    redirect_to root_url, :alert => exception.message
  end

  protected

  def configure_permitted_parameters
   # 省略 ...
  end
end
設定はこんな感じでオッケーです。
あとはViewを編集します。たとえば、
<div class="btn-group">
    <%= link_to 'Show', book_path(b.id), class: "btn btn-info" %>
    <% if can? :update, Book %>
    <%= link_to 'Edit', edit_book_path(b.id), class: "btn btn-success" %>
    <% end %>
    <% if can? :destroy, Book %>
    <%= link_to 'Destroy', book_path(b.id), method: :delete, data: { confirm: "削除してもよろしいですか?" }, :class => "btn btn-danger" %>
	<% end %>
</div>
こんな感じにすると、権限を持っているユーザーにはEditボタン、Deleteボタンが表示されます。Showは全てのユーザーに表示されます。
完成?
これでとりあえずおわり。