はじめに
Linux の netns veth といったネットワーク仮想化機能と systemd-nspawn や quagga を組み合わせて、仮想ネットワーク環境を構築してみました。
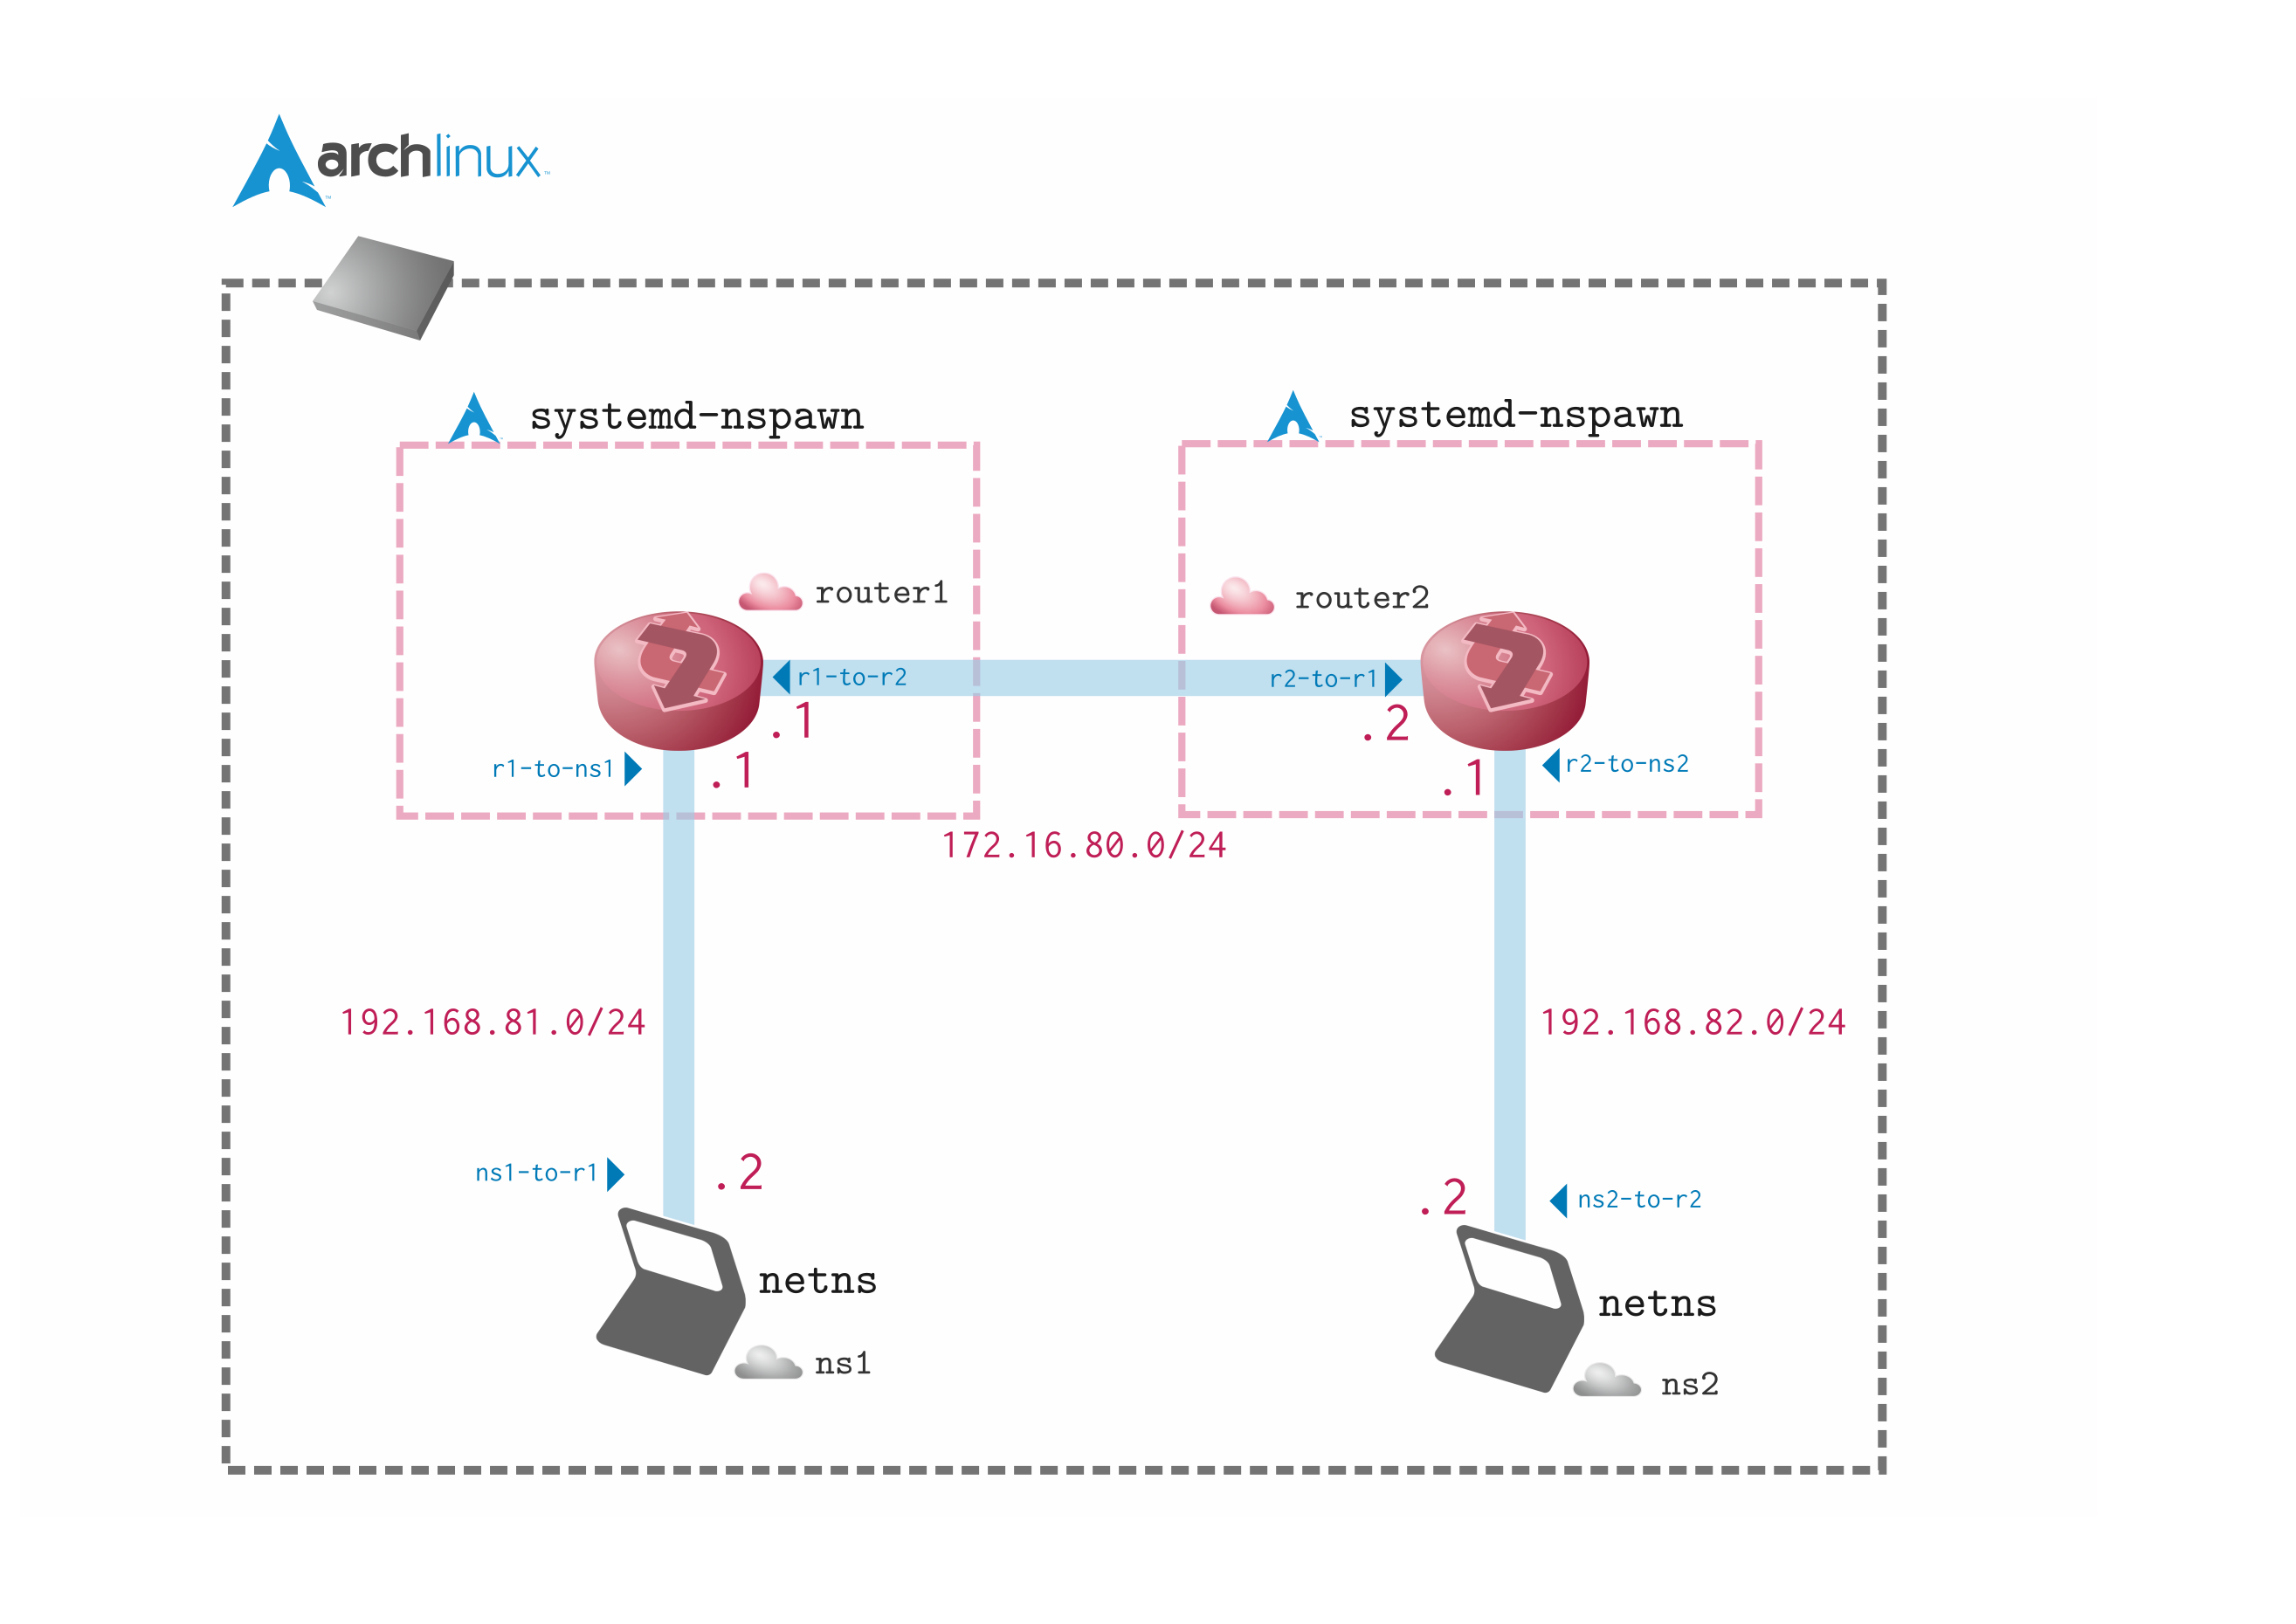
今回は下記のトポロジを構築します。
構成要素の簡単な説明
-
netns
- ネットワークの名前空間を分けれるやつ
- 今回はエンドデバイスとして使用
-
veth
- 仮想 LANケーブル
- 仮想NIC のペアを作る
-
systemd-nspawn
- chroot の強いやつ
-
quagga
- Linux 上でルーティングプロトコルを動かすやつ
環境
- ホストOS: Arch Linux (systemd が入っていればどのディストリでも OK?)
手順1 Arch Linux のインストール
省略
手順2 Arch Linux 内に systemd-nspawn で Arch Linux を構築
https://wiki.archlinuxjp.org/index.php/Systemd-nspawn これを参考に作る
$ sudo pacman -S arch-install-scripts
$ mkdir router1
$ sudo pacstrap -icd router1 base --ignore linux
手順3 systemd-nspawn Arch を設定
- 入る
$ sudo systemd-nspawn -bD router1 --capabilyty=all
# login: root
- quagga 入れる
systemd-nspawn内
pacman -S quagga

touch /etc/quagga/zebra.conf
touch /etc/quagga/ospfd.conf
chmod -R 777 /etc/quagga/

systemctl start zebra
systemctl start ospfd

systemctl enable zebra
systemctl enable ospfd

vtysh
# Cisco ライクなやつが立ち上がる事を確認する

# Ctrl + ]]] 連打で systemd-nspawn から抜ける
- router を複製する
sudp cp -r router1 router2
手順4 netns, veth の準備
# veth の作成
ip link add r1-to-r2 type veth peer name r2-to-r1
ip link add r1-to-ns1 type veth peer name ns1-to-r1
ip link add r2-to-ns2 type veth peer name ns2-to-r2

# netns の作成
ip netns add ns1
ip netns add ns2


ip netns exec ns1 ip link set dev lo up
ip netns exec ns1 ip addr add 127.0.0.1/8 dev lo

ip netns exec ns2 ip link set dev lo up
ip netns exec ns2 ip addr add 127.0.0.1/8 dev lo


ip link set ns1-to-r1 netns ns1
ip link set ns2-to-r2 netns ns2

ip netns exec ns1 ip link set dev ns1-to-r1 up
ip netns exec ns1 ip addr add 192.168.81.2/24 dev ns1-to-r1
ip netns exec ns1 ip route add default via 192.168.81.1

ip netns exec ns2 ip link set dev ns2-to-r2 up
ip netns exec ns2 ip addr add 192.168.82.2/24 dev ns2-to-r2
ip netns exec ns2 ip route add default via 192.168.82.1
手順5 各 router の設定
インタフェースに IP アドレスを割り振り、 OSPF でルーティングさせます。
- router1
$ sudo systemd-nspawn -bD router1 --capability=all --network-interface=r1-to-r2 --network-interface=r1-to-ns1

$ ip link set dev r1-to-r2 up
$ ip link set dev r1-to-ns1 up

$ ip addr add 172.16.80.1/24 dev r1-to-r2
$ ip addr add 192.168.81.1/24 dev r1-to-ns1

$ vtysh

router1# conf t
router1(config)# router ospf
router1(config-router)# network 172.16.80.0/24 area 0
router1(config-router)# network 192.168.81.0/24 area 0
- router2
$ sudo systemd-nspawn -bD router2 --capability=all --network-interface=r2-to-r1 --network-interface=r2-to-ns2

$ ip link set dev r2-to-r1 up
$ ip link set dev r2-to-ns2 up

$ ip addr add 172.16.80.2/24 dev r2-to-r1
$ ip addr add 192.168.82.1/24 dev r2-to-ns2


$ vtysh

router1# conf t
router1(config)# router ospf
router1(config-router)# network 172.16.80.0/24 area 0
router1(config-router)# network 192.168.82.0/24 area 0
手順6 疎通確認
ip netns exec r1 /bin/bash

ping 192.168.82.2

PING 192.168.82.2 (192.168.82.2) 56(84) bytes of data.
64 bytes from 192.168.82.2: icmp_seq=1 ttl=62 time=0.059 ms
64 bytes from 192.168.82.2: icmp_seq=2 ttl=62 time=0.060 ms
64 bytes from 192.168.82.2: icmp_seq=3 ttl=62 time=0.073 ms

--- 192.168.82.2 ping statistics ---
3 packets transmitted, 3 received, 0% packet loss, time 2022ms
rtt min/avg/max/mdev = 0.059/0.064/0.073/0.006 ms
まとめ
systemd-nspawn + quagga などを利用することで、簡単な仮想ネットワーク環境を構築しました。
今後は、kvm や ovs の接続などをやってみようと思います。