Apache Beam は一言でいうとデータ並列処理パイプラインなわけですが、もともとが Java 向けであったこともあり、python で使おうとするとなかなかサイトが見つからなかったので、まとめてみます。
Apache Beamとは
公式サイト のタイトルに大きく
Apache Beam: An advanced unified programming model.
Implement batch and streaming data processing jobs that run on any execution engine.
と書いてあるので、いろんなランナー(後述)で動きそうな気がしますが、python に限って言えば 2017 年 11 月時点ではローカル実行か GoogleDataflow のどちらかしかありません。
実際に FlinkRunner を使うと以下のエラーが出ました。
ValueError: Unexpected pipeline runner: FlinkRunner.
Valid values are DirectRunner, EagerRunner, DataflowRunner, TestDataflowRunner or
the fully qualified name of a PipelineRunner subclass.
※EagerRunner は Apache Gearpump のことらしいが、"incubating" とのこと。
ちなみにPythonは2.7.xにのみ対応です。(GoやR版も予定されているらしい)
Google DataFlow の事前準備
※ここの設定は必須ではありません。不要な方は設定しなくても最後まで読むことができます。
- Google Cloud Platform アカウントを作成する
- Google Cloud Platform コンソールで Dataflow APIを有効にする
- Google Cloud SDK のインストールと初期化
apt-get install -y install lsb-release
export CLOUD_SDK_REPO="cloud-sdk-$(lsb_release -c -s)"
echo "deb http://packages.cloud.google.com/apt $CLOUD_SDK_REPO main" | tee -a /etc/apt/sources.list.d/google-cloud-sdk.list
curl https://packages.cloud.google.com/apt/doc/apt-key.gpg | apt-key add -

apt-get update && apt-get install -y google-cloud-sdk

gcloud init

(途中でブラウザで開いてアクティベートしたのちコードを貼り付けるように言われるのでその通りにする)

# 追加コンポーネントをインストール
apt-get install google-cloud-sdk-app-engine-python

# Dataflow SDK for Python をインストール
pip install google-cloud-dataflow
- Storage でバケットを 1 つ作成する (データの出力に使用します)
quick-start
まず、Apache Beam Python SDK Quickstart をやってみます。
なお、環境は docker で python:2.7.14 を pull して使っています。
- Apache Beamをインストール
python --version
Python 2.7.14

pip install --upgrade setuptools
pip install apache_beam
- サンプルコードをダウンロード
git clone https://github.com/apache/beam.git
- サンプルを実行
サンプルは --input で与えられたテキストファイルの単語をカウントし、--output に出力するものです。
Apache Beam Python SDK Quickstart ではシェイクスピアのシナリオを渡すというかっこいいことをしていますが、手持ちの任意のテキストファイルを渡しても動きます。
python ./beam/sdks/python/apache_beam/examples/wordcount.py ¥
  --input ./beam/README.md ¥
  --output counts
今回のようにランナーを指定しない場合、デフォルトの DirectRunner (ローカル) で実行します。
用語解説
さて、Apache Beamの書き方を見ていく前にまず用語を理解しておく必要があります。
Apache Beam Programming Guide より
Runner
DataflowRunner や SparkRunner など、パイプラインを実行するランナー(エンジン)を指定します。
DirectRunner (デフォルト) を使用した場合、パイプラインはローカルで実行されます。
python においては前述の通り DirectRunner もしくは DataflowRunner のみ選択できます。
Pipeline
データ処理タスクのすべてのデータとステップをカプセル化したもの、というふわっとした理解でたぶん大丈夫です。
PCollection
「パイプラインのデータ」と考えることができ、パイプライン間のデータの受け渡しはすべてこの PCollection を介して行います。少し難しい概念ですが、これを理解すれば ApacheBeam を理解したといっても過言ではありません。
PCollection はパイプラインごとに1つ以上存在し、複数のパイプラインで共有できません。
Python のコレクション (dict や list) にも似ていますが、 PCollection にはいくつかの重要な特徴があります。
- 要素タイプ ... PCollection の要素はどのような型でもよいが、すべて同じ型でなければならない。
- 不変性 ... PCollection を作成後、要素を追加、削除、または変更することはできない。
- ランダムアクセス ... PCollection は個々の要素へのランダムアクセスをサポートしていない。
- サイズとboundedness ... PCollection に含めることができる要素の上限はない。
- 要素タイムスタンプ ... PCollection の各要素には、固有のタイムスタンプが関連付けられている。各要素のタイムスタンプは、最初にPCollection を作成する Source によって割り当てられる。
Transforms
Transform はパイプライン内のデータ処理操作またはステップを表します。
すべての Transform は、PCollection を入力として受け取り、その PCollection の要素に対し処理を実行し、新しい PCollection を生成します。
今回の例のデータフローを例にとると、青い矢印がデータの加工処理 (Transform) で、各処理の間を受け渡すデータが PCollection です。

Tramsform にはいくつかの種類があり、以下6つは Core Beam transforms と呼びます。
- ParDo ... 一般的な並列処理をする時に使用する。
- GroupByKey ... 共通なKeyを持っているデータを集約する。
- CoGroupByKey ... ↑と同じだが、少し複雑な集約ができる。
- Combine ... 各要素(各データ)を結合したり、マージする。
- Flatten ... 複数のPCollectionオブジェクトを単一の論理PCollectionにマージする。
- Partition ... 1つのPCollectionを一定数の小さなコレクションに分割する。
GroupByKeyの例
"""input"""

cat, 1
dog, 5
and, 1
jump, 3
tree, 2
cat, 5
dog, 2
and, 2
cat, 9
and, 6

"""output"""

cat, [1,5,9]
dog, [5,2]
and, [1,2,6]
jump, [3]
tree, [2]
CoGroupByKeyの例
"""input"""
emails_list = [
    ('amy', 'amy@example.com'),
    ('carl', 'carl@example.com'),
    ('julia', 'julia@example.com'),
    ('carl', 'carl@email.com'),
]
phones_list = [
    ('amy', '111-222-3333'),
    ('james', '222-333-4444'),
    ('amy', '333-444-5555'),
    ('carl', '444-555-6666'),
]

"""output"""

results = [
    ('amy', {
        'emails': ['amy@example.com'],
        'phones': ['111-222-3333', '333-444-5555']}),
    ('carl', {
        'emails': ['carl@email.com', 'carl@example.com'],
        'phones': ['444-555-6666']}),
    ('james', {
        'emails': [],
        'phones': ['222-333-4444']}),
    ('julia', {
        'emails': ['julia@example.com'],
        'phones': []}),
]
Combineの例
pc = [1, 10, 100, 1000]

def bounded_sum(values, bound=500):
  return min(sum(values), bound)

small_sum = pc | beam.CombineGlobally(bounded_sum)              # [500]
large_sum = pc | beam.CombineGlobally(bounded_sum, bound=5000)  # [1111]
Apache Beam WordCount Examples
ここから、Apache Beam が用意しているサンプルスクリプトを見てみます。なお、サンプルコードは quick-start と同じくテキストファイルを読み取り、単語の出現回数をカウントするパイプラインですので、新たにダウンロードする必要はありません。
DirectRunner:
※inputとoutputに gs://<your-gcs-bucket>/ を指定することもできます。
python ./beam/sdks/python/apache_beam/examples/wordcount.py \
  --input ./beam/README.md \
  --output ./counts \
  --runner DirectRunner
Google Dataflow:
Google Cloud Platform を設定し、適当なバケットを一つ作成しておく必要がありますが、なければここは飛ばしてもよいです。
# 初期設定として、Google Cloud Platform 固有の追加コンポーネントをインストールします
pip install apache-beam[gcp]

python ./beam/sdks/python/apache_beam/examples/wordcount.py \
  --input gs://dataflow-samples/shakespeare/kinglear.txt \
  --output gs://<your-gcs-bucket>/counts \
  --runner DataflowRunner \
  --project <your-gcp-project> \
  --temp_location gs://<your-gcs-bucket>/tmp/
./beam/sdks/python/apache_beam/examples/wordcount.py を見てみます。
"""
A word-counting workflow.
"""
from __future__ import absolute_import
import argparse
import logging
import re
import apache_beam as beam
from apache_beam.io import ReadFromText
from apache_beam.io import WriteToText
from apache_beam.metrics import Metrics
from apache_beam.metrics.metric import MetricsFilter
from apache_beam.options.pipeline_options import PipelineOptions
from apache_beam.options.pipeline_options import SetupOptions
# DoFn transform の実装例
class WordExtractingDoFn(beam.DoFn):
"""Parse each line of input text into words."""
def __init__(self):
super(WordExtractingDoFn, self).__init__()
self.words_counter = Metrics.counter(self.__class__, 'words')
self.word_lengths_counter = Metrics.counter(self.__class__, 'word_lengths')
self.word_lengths_dist = Metrics.distribution(self.__class__, 'word_len_dist')
self.empty_line_counter = Metrics.counter(self.__class__, 'empty_lines')
def process(self, element):
"""Returns an iterator over the words of this element.
The element is a line of text. If the line is blank, note that, too.
Args:
element: the element being processed
Returns:
The processed element.
"""
text_line = element.strip()
if not text_line:
self.empty_line_counter.inc(1)
words = re.findall(r'[A-Za-z\']+', text_line)
for w in words:
self.words_counter.inc()
self.word_lengths_counter.inc(len(w))
self.word_lengths_dist.update(len(w))
return words
def run(argv=None):
"""Main entry point; defines and runs the wordcount pipeline."""
parser = argparse.ArgumentParser()
parser.add_argument('--input',
dest='input',
default='gs://dataflow-samples/shakespeare/kinglear.txt',
help='Input file to process.')
parser.add_argument('--output',
dest='output',
required=True,
help='Output file to write results to.')
known_args, pipeline_args = parser.parse_known_args(argv)
###############################################
# (1) pipeline を作成する
###############################################
# まず PipelineOptions オブジェクトを作成
# パイプラインを実行する pipeline runner や、選択した runner が必要とする固有の設定など、さまざまなオプションを設定できる
pipeline_options = PipelineOptions(pipeline_args)
# 作成した PipelineOptions オプジェクトを直接編集する例
# 今回は DoFn transform を使用するため、save_main_sessionオプションを有効にする
pipeline_options.view_as(SetupOptions).save_main_session = True
# オプションを元に pipeline (p) を作成
p = beam.Pipeline(options=pipeline_options)
###############################################
# (2) Pipeline にtransforms を設定します
###############################################
# (transform 1) PCollection (p) から入力ファイルを読み込む
# テキストファイルを読み込む transform を Pipelineオブジェクト自体に設定
# output として lines (PCollection) を生成
# lines の各要素は、入力ファイルの1行のテキストを表す
lines = p | 'read' >> ReadFromText(known_args.input)
# Count the occurrences of each word.
def count_ones(word_ones):
(word, ones) = word_ones
return (word, sum(ones))
# (transform 2~5) 登場した単語の数を数えるtransformを lines (PCollection) に対して設定
# output として counts (PCollection) を生成
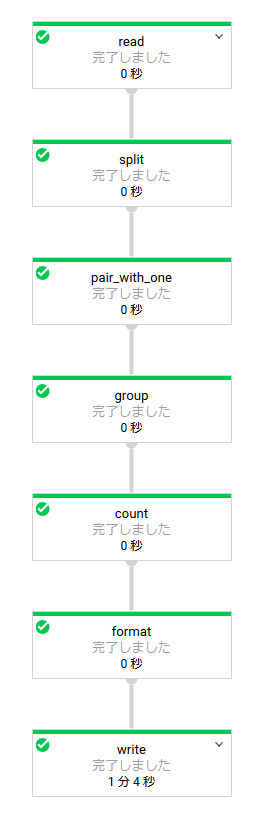
counts = (lines
| 'split' >> (beam.ParDo(WordExtractingDoFn())
.with_output_types(unicode))
| 'pair_with_one' >> beam.Map(lambda x: (x, 1))
| 'group' >> beam.GroupByKey()
| 'count' >> beam.Map(count_ones))
# (transform 6) PCollection のデータをテキストに変換
def format_result(word_count):
(word, count) = word_count
return '%s: %s' % (word, count)
# (transform 7) 出力
output = counts | 'format' >> beam.Map(format_result)
# Write the output using a "Write" transform that has side effects.
# pylint: disable=expression-not-assigned
output | 'write' >> WriteToText(known_args.output)
###############################################
# (3) Pipeline を実行
###############################################
result = p.run()
# 終了を待つ
# 記述しなければそのまま抜ける
# →DataFlowRunnerの場合、Ctrl-Cでもパイプラインは停止しない。Gooleコンソールから停止する必要がある
result.wait_until_finish()
# 最後にパイプラインの実行結果を取得する例
# 当然ながら、result.wait_until_finish() で終了を待ち合わせていなければ取得できない
# Dataflow側には表示されない
if (not hasattr(result, 'has_job') # direct runner
or result.has_job): # not just a template creation
# 空行の数を表示する
empty_lines_filter = MetricsFilter().with_name('empty_lines')
query_result = result.metrics().query(empty_lines_filter)
if query_result['counters']:
empty_lines_counter = query_result['counters'][0]
logging.info('number of empty lines: %d', empty_lines_counter.committed)
# 単語の出現数平均を表示する
word_lengths_filter = MetricsFilter().with_name('word_len_dist')
query_result = result.metrics().query(word_lengths_filter)
if query_result['distributions']:
word_lengths_dist = query_result['distributions'][0]
logging.info('average word length: %d', word_lengths_dist.committed.mean)
if __name__ == '__main__':
logging.getLogger().setLevel(logging.INFO)
run()
Google Dataflow での実行結果
実際に書いてみる
実際に手で書いて実行してみます。
ソースコードは上記で使用した wordcount.py をひな型にいじってみます。
主に↓の部分を編集します。
  ###############################################
  # (2) Pipeline にtransforms を設定します
  ###############################################
素通り
lines = p | 'read' >> ReadFromText("input.txt")
lines | 'write' >> WriteToText("output.txt")
input.txt
1
2
3
output.txt
1
2
3
functionを一つ通す
lines = p | 'read' >> ReadFromText("input.txt")

 # 2で割った余りを返す
def mod(line):
  num = int(line.strip())
  return num % 2

counts = lines | 'mod' >> beam.Map(mod)
counts | 'write' >> WriteToText("output.txt")
input.txt
1
2
3
output.txt
1
0
1
functionの戻り値がタプルの場合 (num, mod)
lines = p | 'read' >> ReadFromText("input.txt")

def mod(line):
  num = int(line.strip())
  return (num, num % 2)

counts = lines | 'mod' >> beam.Map(mod)
counts | 'write' >> WriteToText("output.txt")
input.txt
1
2
3
output.txt
(1, 1)
(2, 0)
(3, 1)
PCollectionのフォーマットを変更する
lines = p | 'read' >> ReadFromText("input.txt")

def mod(line):
  num = int(line.strip())
  return (num, num % 2)

def format(count):
  (num, mod) = count
  return '%s: %s' % (num, mod)

counts = lines | 'mod' >> beam.Map(mod)
output = counts | 'format' >> beam.Map(format)
output | 'write' >> WriteToText("output.txt")
input.txt
1
2
3
output.txt
1: 1
2: 0
3: 1
subprocessを使ってsleep
input.txt
# 1列目はインデックス
# 2列目はsleepする秒数
1,3
2,2
3,1
コード
class WaitDoFn(beam.DoFn):
  def __init__(self):
    super(WaitDoFn, self).__init__()

  def process(self, element):

    [i1, i2] = element.strip().split(",")
    logging.info("[%s,%s] %s" % (i1, i2, datetime.datetime.now()))

    apache_beam.utils.processes.call(["sleep", i2])

    logging.info("[%s,%s] %s" % (i1, i2, datetime.datetime.now()))

    # DoFnの場合、配列で返す必要がある
    return [element]

def run(argv=None):
  ...

  lines = p | 'read' >> ReadFromText(known_args.input)

  counts = (lines
            | 'wait' >> (beam.ParDo(WaitDoFn()))
           )

  counts | 'write' >> WriteToText("output.txt")
log (DirectRunnerの場合)
INFO:root:[1,3] 2017-12-08 05:57:27.502116
INFO:root:[1,3] 2017-12-08 05:57:30.505978

INFO:root:[2,2] 2017-12-08 05:57:30.506426
INFO:root:[2,2] 2017-12-08 05:57:32.511128

INFO:root:[3,1] 2017-12-08 05:57:32.511644
INFO:root:[3,1] 2017-12-08 05:57:33.515929
順番に実行されているようだ
subprocessを2つ繋げてみる
input.txt
1,3
2,2
3,1
コード
class WaitDoFn(beam.DoFn):
  def __init__(self):
    super(WaitDoFn, self).__init__()

  def process(self, element):

    [i1, i2] = element.strip().split(",")
    logging.info("[%s,%s] %s" % (i1, i2, datetime.datetime.now()))

    apache_beam.utils.processes.call(["sleep", i2])

    logging.info("[%s,%s] %s" % (i1, i2, datetime.datetime.now()))
    # 2回目とわかるようにインデックスに印 "--" を付ける
    return ["%s--,%s" % (i1, i2)]

def run(argv=None):
  ...

  lines = p | 'read' >> ReadFromText(known_args.input)

  # 2つつなげてみる
  counts = (lines
            | 'wait1' >> (beam.ParDo(WaitDoFn()))
            | 'wait2' >> (beam.ParDo(WaitDoFn()))
           )

  counts | 'write' >> WriteToText("output.txt")
log (DirectRunnerの場合は順番に実行される)
INFO:root:[1,3] 2017-12-08 06:00:16.843067
INFO:root:[1,3] 2017-12-08 06:00:19.846980
INFO:root:[2,2] 2017-12-08 06:00:19.847414
INFO:root:[2,2] 2017-12-08 06:00:21.851779
INFO:root:[3,1] 2017-12-08 06:00:21.852276
INFO:root:[3,1] 2017-12-08 06:00:22.856544

            ↓ 2回目の印
INFO:root:[1--,3] 2017-12-08 06:00:22.866287
INFO:root:[1--,3] 2017-12-08 06:00:25.870982
INFO:root:[2--,2] 2017-12-08 06:00:25.871581
INFO:root:[2--,2] 2017-12-08 06:00:27.875356
INFO:root:[3--,1] 2017-12-08 06:00:27.875901
INFO:root:[3--,1] 2017-12-08 06:00:28.880624
※Dataflowで実行すると、順番とは限らないようです。
subprocessを2つ繋げてみる その2
input.txt
1,3
2,2
3,1
コード
class WaitDoFn(beam.DoFn):
  def __init__(self):
    super(WaitDoFn, self).__init__()

  def process(self, element):

    [i1, i2] = element.strip().split(",")
    logging.info("[%s,%s] %s" % (i1, i2, datetime.datetime.now()))

    apache_beam.utils.processes.call(["sleep", i2])

    logging.info("[%s,%s] %s" % (i1, i2, datetime.datetime.now()))
    return ["%s--,%s" % (i1, i2)]

def run(argv=None):
  ...

  lines = p | 'read' >> ReadFromText(known_args.input)

  # パイプを分けてみる
  counts = (lines
            | 'wait1' >> (beam.ParDo(WaitDoFn()))
           )

  counts2 = (counts
            | 'wait2' >> (beam.ParDo(WaitDoFn()))
           )

  counts2 | 'write' >> WriteToText("output.txt")
パイプの間だけ待ち合わせるのかと思ったけどそうではなかった。
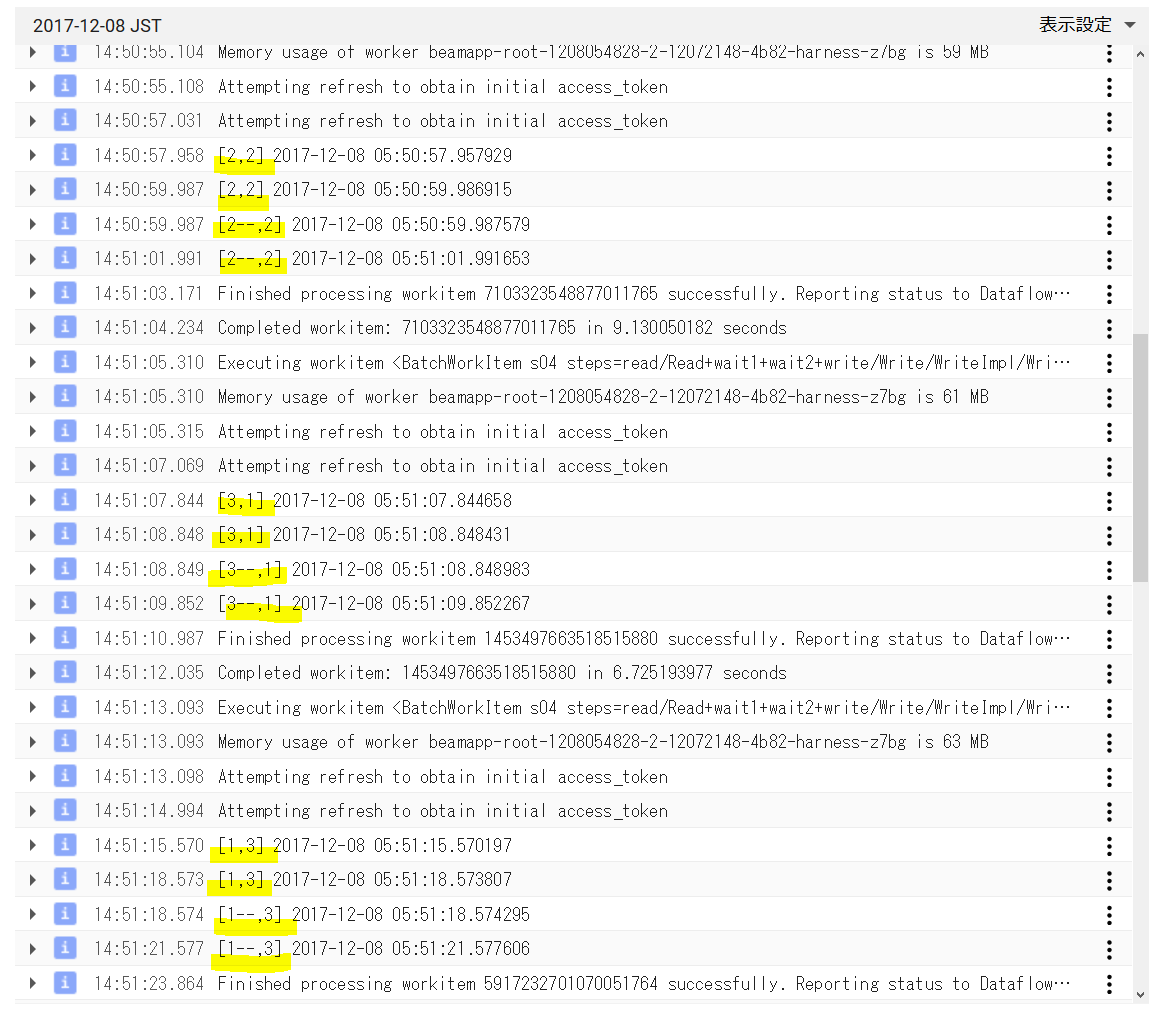
VM 数を指定して (3 にして) ↑を実行する
root@0a7886b57801:/work# python mikan.py \
  --input gs://<your-bucket>/input.txt \
  --output gs://<your-bucket>/output \
  --runner DataflowRunner \
  --project <your-project> \
  --temp_location gs://<your-bucket>/tmp/ \
  --num_workers 3 \
  --autoscaling_algorithm NONE
input.txt
1,30
2,20
3,10
Dataflowでの実行ログ
ちゃんと3並列で実行されている。
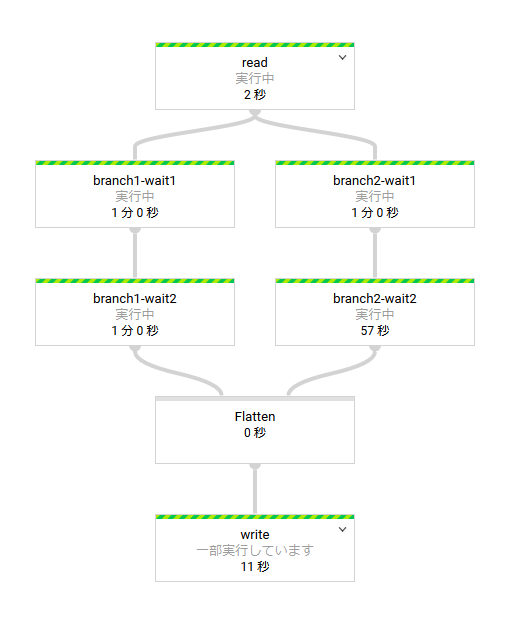
分岐させてみる
lines = p | 'read' >> ReadFromText(known_args.input)

counts1 = (lines
          | 'branch1-wait1' >> (beam.ParDo(WaitDoFn()))
          | 'branch1-wait2' >> (beam.ParDo(WaitDoFn()))
         )

counts2 = (lines
          | 'branch2-wait1' >> (beam.ParDo(WaitDoFn()))
          | 'branch2-wait2' >> (beam.ParDo(WaitDoFn()))
         )

merged = (counts1, counts2) | beam.Flatten()
merged | 'write' >> WriteToText(known_args.output)
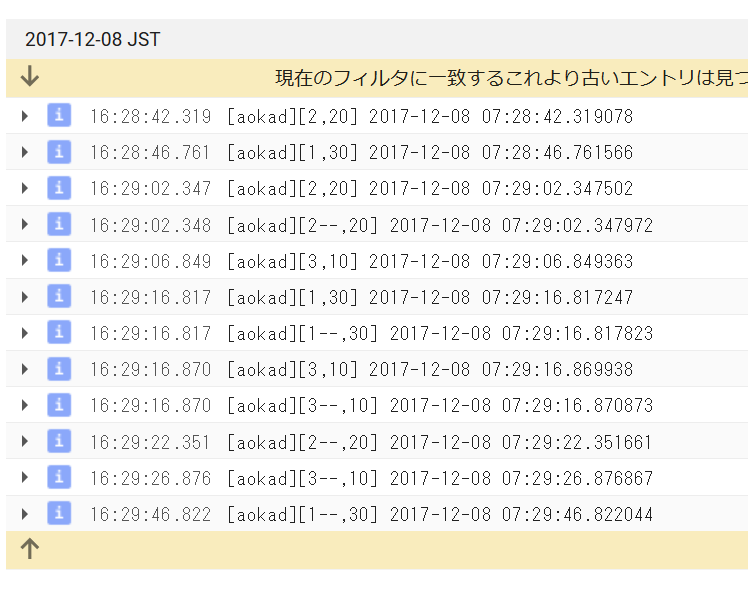
Dataflow での実行途中のようす
途中でデータが増える
class WaitDoFn(beam.DoFn):
  def __init__(self):
    super(WaitDoFn, self).__init__()

  def process(self, element):

    [i1, i2] = element.strip().split(",")
    logging.info("[aokad][%s,%s] %s" % (i1, i2, datetime.datetime.now()))
    apache_beam.utils.processes.call(["sleep", i2])

    logging.info("[aokad][%s,%s] %s" % (i1, i2, datetime.datetime.now()))

 # データを増やしてみる
 #    return ["%s--,%s" % (i1, i2)]
    return ["%s.1--,%s" % (i1, i2),
            "%s.2--,%s" % (i1, i2),
            "%s.3--,%s" % (i1, i2),
            "%s.4--,%s" % (i1, i2),
            "%s.5--,%s" % (i1, i2)]

def run(argv=None):
  ...

  lines = p | 'read' >> ReadFromText(known_args.input)

  counts = (lines
            | 'wait1' >> (beam.ParDo(WaitDoFn()))
            | 'wait2' >> (beam.ParDo(WaitDoFn()))
           )
  counts | 'write' >> WriteToText(known_args.output)
input.txt
1,30
2,20
3,10
log (DirectRunner)
増やしたデータ分だけ次のステップで実行されている。
INFO:root:[aokad][1,30] 2017-12-11 02:56:48.674423
INFO:root:[aokad][1,30] 2017-12-11 02:57:18.688679
INFO:root:[aokad][2,20] 2017-12-11 02:57:18.689242
INFO:root:[aokad][2,20] 2017-12-11 02:57:38.693304
INFO:root:[aokad][3,10] 2017-12-11 02:57:38.693928
INFO:root:[aokad][3,10] 2017-12-11 02:57:48.698002
INFO:root:[aokad][1.1--,30] 2017-12-11 02:57:48.703007
INFO:root:[aokad][1.1--,30] 2017-12-11 02:58:18.707546
INFO:root:[aokad][1.2--,30] 2017-12-11 02:58:18.707990
INFO:root:[aokad][1.2--,30] 2017-12-11 02:58:48.712119
INFO:root:[aokad][1.3--,30] 2017-12-11 02:58:48.712639
INFO:root:[aokad][1.3--,30] 2017-12-11 02:59:18.716858
INFO:root:[aokad][1.4--,30] 2017-12-11 02:59:18.717277
INFO:root:[aokad][1.4--,30] 2017-12-11 02:59:48.721179
INFO:root:[aokad][1.5--,30] 2017-12-11 02:59:48.721619
INFO:root:[aokad][1.5--,30] 2017-12-11 03:00:18.725761
INFO:root:[aokad][2.1--,20] 2017-12-11 03:00:18.726216
INFO:root:[aokad][2.1--,20] 2017-12-11 03:00:38.730235
INFO:root:[aokad][2.2--,20] 2017-12-11 03:00:38.730679
INFO:root:[aokad][2.2--,20] 2017-12-11 03:00:58.734658
INFO:root:[aokad][2.3--,20] 2017-12-11 03:00:58.735238
INFO:root:[aokad][2.3--,20] 2017-12-11 03:01:18.739650
INFO:root:[aokad][2.4--,20] 2017-12-11 03:01:18.740163
INFO:root:[aokad][2.4--,20] 2017-12-11 03:01:38.744654
INFO:root:[aokad][2.5--,20] 2017-12-11 03:01:38.745110
INFO:root:[aokad][2.5--,20] 2017-12-11 03:01:58.749353
INFO:root:[aokad][3.1--,10] 2017-12-11 03:01:58.749904
INFO:root:[aokad][3.1--,10] 2017-12-11 03:02:08.754442
INFO:root:[aokad][3.2--,10] 2017-12-11 03:02:08.754961
INFO:root:[aokad][3.2--,10] 2017-12-11 03:02:18.759117
INFO:root:[aokad][3.3--,10] 2017-12-11 03:02:18.759622
INFO:root:[aokad][3.3--,10] 2017-12-11 03:02:28.763618
INFO:root:[aokad][3.4--,10] 2017-12-11 03:02:28.764079
INFO:root:[aokad][3.4--,10] 2017-12-11 03:02:38.768118
INFO:root:[aokad][3.5--,10] 2017-12-11 03:02:38.768698
INFO:root:[aokad][3.5--,10] 2017-12-11 03:02:48.772727
Google Dataflow で独自ツールを使う
TensorFlow (機械学習ライブラリ) を使用したDataflowの使用例を見てみます。
GoogleCloudPlatform/dataflow-prediction-example
外部パッケージを使用する場合は実行スクリプトと同階層の setup.py に記入すれば DataFlow 側でインストールしてくれます。
CUSTOM_COMMANDS = [
    ['pip', 'install', 'https://storage.googleapis.com/tensorflow/linux/cpu/tensorflow-0.12.1-cp27-none-linux_x86_64.whl'],
    ['pip', 'install', '<your-tool>']
]
CUSTOM_COMMANDS を駆使すれば環境は構築できそうですが、複数の VM を立ち上げてそれぞれに環境構築させるのかと考えると。。。悩みどころです。
Google Cloud Dataflow SDK for Java, version 1.9.1 では
DataflowPipelineWorkerPoolOptions.WorkerHarnessContainerImageFactory: Returns the default Docker container image that executes Dataflow worker harness, residing in Google Container Registry.
VM のコンテナイメージを指定できたようですが、現行の version 2.x では無くなっています。
ともあれ、実際に実行します。
python prediction/run.py \
    --runner DataflowRunner \
    --project $PROJECT \
    --staging_location $BUCKET/staging \
    --temp_location $BUCKET/temp \
    --job_name $PROJECT-prediction-cs \
    --setup_file prediction/setup.py \
    --model $BUCKET/model \
    --source cs \
    --input $BUCKET/input/images.txt \
    --output $BUCKET/output/predict
普通に実行すると、エラーになります。
このサンプルではソース中に import tensorflow as tf の記述があるため、パイプラインを投入する側でも事前に pip install tensorflow しておく必要があります。
と、いうことは、python パッケージを使う場合は投入側と実行側でインストールする必要がある、ということです。