Kaggleの感情予測に挑戦
今回のKaggleでは、映画のレビューを学習させそこから肯定的な意見か否定的かを予測するタスクを行います。
もう既に難しさが滲み出ている感じなので、どうなるのか...
とりあえず練習も兼ねてアンサンブルを行います。
環境
- Python
- GoogleColabPro+
モデル
- BERT
- FastText
- Word2Vec
実際のプログラム
データの確認
とりあえず、データの中身を確認したいと思います。今回のデータセットは複数あります。
- labeledTrainData.tsv.zip
- unlabeledTrainData.tsv.zip
- testData.tsv.zip
トレーニング用に2つ用意されていますが、一つはラベルがなく教師なしになりそうなので、使いません。(unの方ですね)
BERTを使用するのでトークンの長さの分布は気になります。なので出力します。
import re
import matplotlib.pyplot as plt
import numpy as np
import pandas as pd

df = pd.read_csv('tokenized_bert.tsv', sep='\t')

# HTMLタグを削除する関数
def remove_html_tags(text):
    clean = re.compile('<.*?>')
    return re.sub(clean, '', text)

# レビューの長さを取得
df['review_clean'] = df['review'].apply(remove_html_tags)
review_lengths = [len(review) for review in df['review_clean']]

# ヒストグラムをプロット
plt.figure(figsize=(10, 6))
plt.hist(review_lengths, bins=50, color='skyblue', edgecolor='black', alpha=0.7)
plt.title('Distribution of Review Lengths')
plt.xlabel('Review Length')
plt.ylabel('Number of Reviews')
plt.grid(True)
plt.show()

# データをソートする
sorted_lengths = sorted(review_lengths)

# 累積分布関数(CDF)を計算する
cumulative_distribution = np.cumsum(sorted_lengths) / np.sum(sorted_lengths)

# 95%までの累積値を見つける
percentile_95 = np.percentile(cumulative_distribution, 95)

# 95%含まれる長さを求める
length_95_percent = sorted_lengths[np.argmax(cumulative_distribution >= percentile_95)]

print("95% of the text is contained within a length of:", length_95_percent)
出力結果
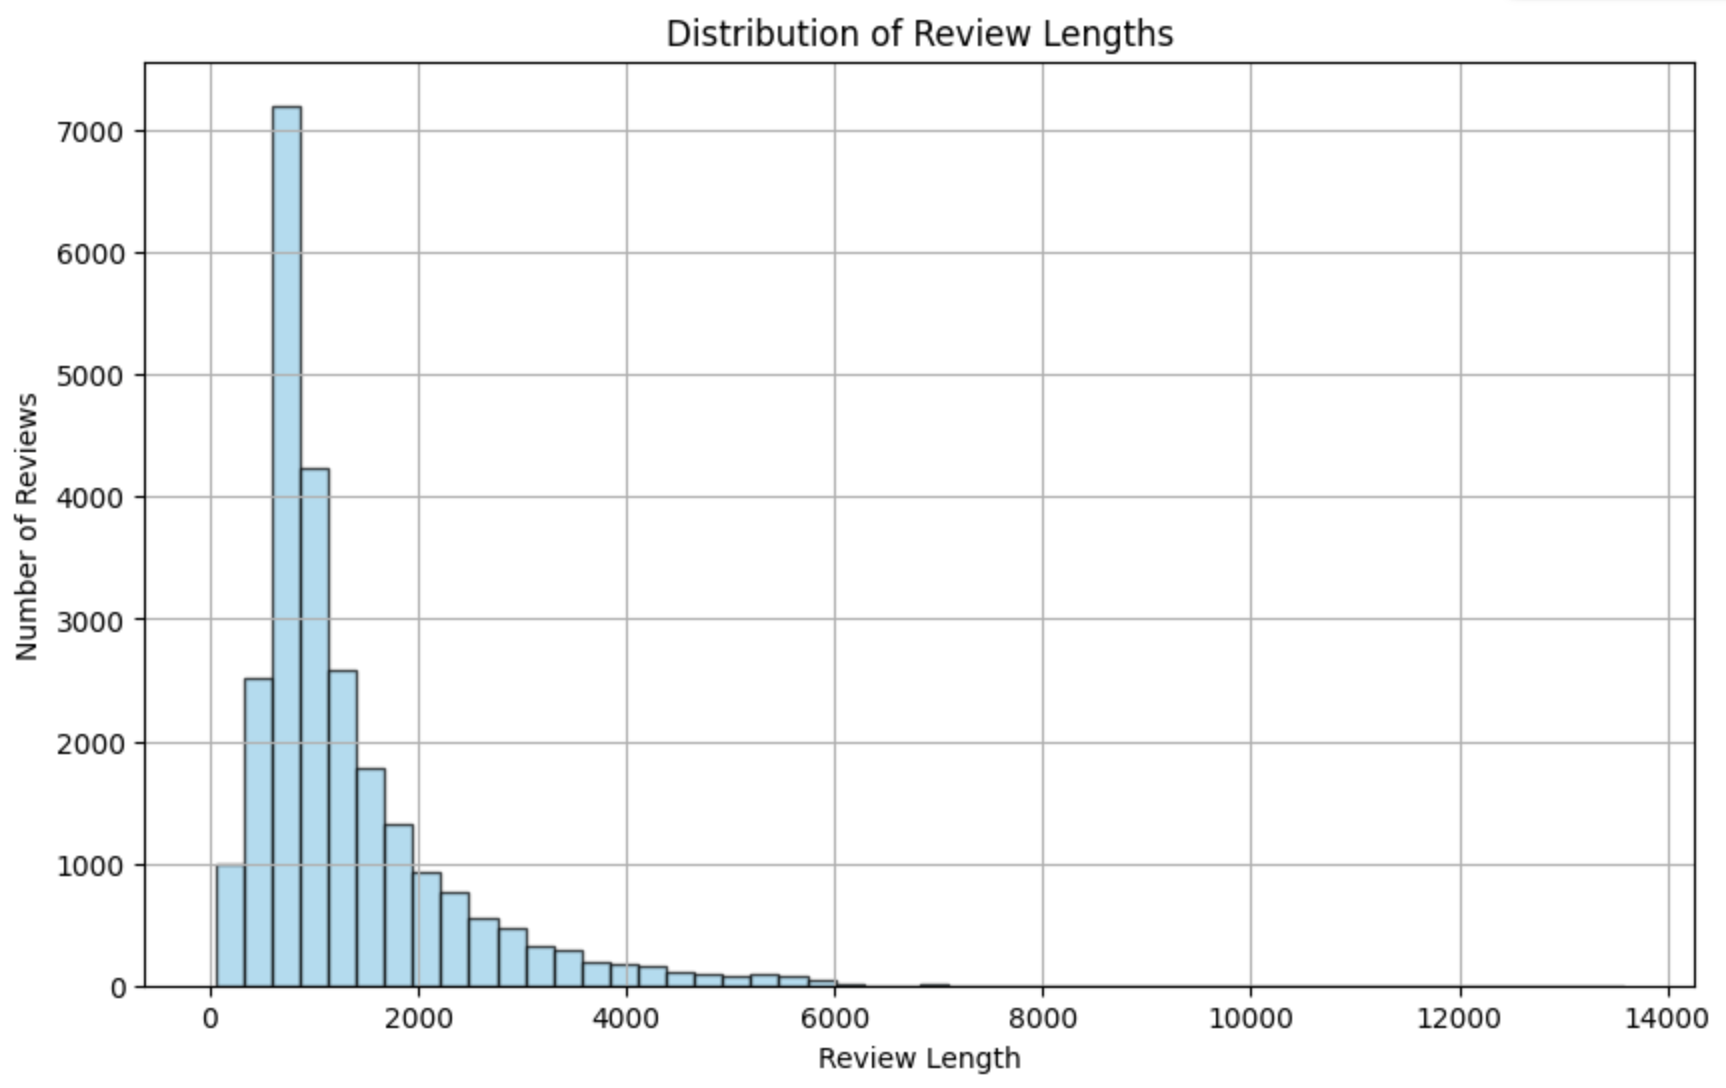
95% of the text is contained within a length of: 3381
ふむふむ。512を悠に超えているが大丈夫だろうか...とりあえず行ってみましょう!!
学習とテスト
まずは必要なものをインストールですね。
!pip install transformers
!pip install torch torchvision
ライブラリです。
import pandas as pd
import numpy as np
import re
import torch.nn as nn
from sklearn.model_selection import train_test_split
from sklearn.metrics import classification_report
from sklearn.ensemble import RandomForestClassifier
from gensim.models import FastText, Word2Vec
from transformers import BertTokenizer, BertForSequenceClassification, AdamW
import torch
from torch.utils.data import DataLoader, TensorDataset, Dataset, random_split
import gensim
from sklearn.metrics import accuracy_score
import matplotlib.pyplot as plt
import gensim.downloader as api
from sklearn.metrics import accuracy_score
from sklearn.linear_model import LogisticRegression
from sklearn.model_selection import train_test_split
BERT
# データの読み込み
df = pd.read_csv('labeledTrainData.tsv', sep='\t')

# 特殊文字をエスケープする関数
def remove_special_characters(text):
    return re.sub(r"[^a-zA-Z0-9\s]", "", text)

# 特殊文字をエスケープ
df['review'] = df['review'].apply(remove_special_characters)

# 各レビューのテキストを512トークンにトリミング
max_length = 512
df['review'] = df['review'].apply(lambda x: x[:max_length])

# BERTトークナイザーの読み込み
tokenizer = BertTokenizer.from_pretrained('bert-base-uncased')

# テキストをトークン化してエンコード
encoded_inputs = tokenizer(df['review'].tolist(), padding=True, truncation=True, max_length=max_length, return_tensors="pt")
input_ids = encoded_inputs['input_ids']
attention_masks = encoded_inputs['attention_mask']
labels = torch.tensor(df['sentiment'].tolist())

# データセットの作成
class CustomDataset(Dataset):
    def __init__(self, input_ids, attention_masks, labels):
        self.input_ids = input_ids
        self.attention_masks = attention_masks
        self.labels = labels

    def __len__(self):
        return len(self.labels)

    def __getitem__(self, idx):
        return {
            'input_ids': self.input_ids[idx],
            'attention_mask': self.attention_masks[idx],
            'labels': self.labels[idx]
        }

# データセットのインスタンス化
dataset = CustomDataset(input_ids, attention_masks, labels)

# 学習用とテスト用にデータを分割
X = [(input_ids[i], attention_masks[i]) for i in range(len(input_ids))]
y = labels.tolist()
X_train, X_test, y_train, y_test = train_test_split(X, y, test_size=0.2, random_state=1)


# X_trainからinput_idsとattention_masksを取得
input_ids_train, attention_masks_train = zip(*X_train)
input_ids_train = torch.stack(input_ids_train)
attention_masks_train = torch.stack(attention_masks_train)

# X_testからinput_idsとattention_masksを取得
input_ids_test, attention_masks_test = zip(*X_test)
input_ids_test = torch.stack(input_ids_test)
attention_masks_test = torch.stack(attention_masks_test)

# データローダーの作成
batch_size = 8
train_dataloader = DataLoader(TensorDataset(input_ids_train, attention_masks_train, torch.tensor(y_train)), batch_size=batch_size, shuffle=True)
test_dataloader = DataLoader(TensorDataset(input_ids_test, attention_masks_test, torch.tensor(y_test)), batch_size=batch_size)

# BERTモデルの読み込み
model = BertForSequenceClassification.from_pretrained('bert-base-uncased')

# GPUが利用可能な場合はGPUにモデルを配置
device = torch.device('cuda' if torch.cuda.is_available() else 'cpu')
model.to(device)

# 損失関数とオプティマイザーの定義
criterion = nn.CrossEntropyLoss()
optimizer = AdamW(model.parameters(), lr=2e-5)

# エポック数
epochs = 3

# 学習とテストの損失値の保存
train_losses = []
test_losses = []

# 学習
for epoch in range(epochs):
    # モデルを学習モードに設定
    model.train()

    # 学習データでの損失の初期化
    epoch_train_loss = 0.0

    # ミニバッチごとの学習
    for batch in train_dataloader:
        # バッチデータをGPUに配置
        input_ids = batch[0].to(device)
        attention_mask = batch[1].to(device)
        labels = batch[2].to(device)

        # 勾配を初期化
        optimizer.zero_grad()

        # 順伝播
        outputs = model(input_ids, attention_mask=attention_mask, labels=labels)
        loss = outputs.loss
        logits = outputs.logits

        # 損失を計算
        epoch_train_loss += loss.item()

        # 逆伝播
        loss.backward()

        # 勾配の更新
        optimizer.step()

    # 学習データでの平均損失を計算
    epoch_train_loss /= len(train_dataloader)
    train_losses.append(epoch_train_loss)

    # モデルを評価モードに設定
    model.eval()

    # テストデータでの損失の初期化
    epoch_test_loss = 0.0

    # 正解数の初期化
    correct = 0
    total = 0

    # BERTの予測結果を保持するリスト
    bert_preds = []

    # テストデータでの評価
    with torch.no_grad():
        for batch in test_dataloader:
            # バッチデータをGPUに配置
            input_ids = batch[0].to(device)
            attention_mask = batch[1].to(device)
            labels = batch[2].to(device)

            # 順伝播
            outputs = model(input_ids, attention_mask=attention_mask, labels=labels)
            loss = outputs.loss
            logits = outputs.logits

            # 損失を計算
            epoch_test_loss += loss.item()

            # 予測
            _, predicted = torch.max(logits, 1)

            # 予測結果をリストに追加
            bert_preds.extend(predicted.tolist())

            # 正解数の計算
            total += labels.size(0)
            correct += (predicted == labels).sum().item()

    # テストデータでの平均損失を計算
    epoch_test_loss /= len(test_dataloader)
    test_losses.append(epoch_test_loss)

    # 正答率を計算
    bert_accuracy = correct / total

    # ログを出力
    print(f'Epoch [{epoch+1}/{epochs}], Train Loss: {epoch_train_loss:.4f}, Test Loss: {epoch_test_loss:.4f}, Accuracy: {bert_accuracy:.4f}')

# エポック数に対する損失のプロット
plt.figure(figsize=(10, 6))
plt.plot(range(1, epochs+1), train_losses, label='Train Loss')
plt.plot(range(1, epochs+1), test_losses, label='Test Loss')
plt.xlabel('Epochs')
plt.ylabel('Loss')
plt.title('BERT')
plt.legend()
plt.grid(True)
plt.show()

# 最終的な正答率を出力
print(f'Final Accuracy: {bert_accuracy:.4f}')
結果
Epoch [1/3], Train Loss: 0.3658, Test Loss: 0.3043, Accuracy: 0.8668
Epoch [2/3], Train Loss: 0.2081, Test Loss: 0.3166, Accuracy: 0.8716
Epoch [3/3], Train Loss: 0.0945, Test Loss: 0.4149, Accuracy: 0.8690
Final Accuracy: 0.8690

FastText
相当苦戦しました。ベクトル系難しい...
# データの読み込みと特殊文字のエスケープ処理
def preprocess_data(file_path):
    df = pd.read_csv(file_path, sep='\t')
    # 特殊文字をエスケープする関数
    def remove_special_characters(text):
        return re.sub(r"[^a-zA-Z0-9\s]", "", text)
    # 特殊文字をエスケープ
    df['review'] = df['review'].apply(remove_special_characters)
    return df

# FastTextの評価
def evaluate_fasttext_model(df):
    # モデルの読み込み
    model = api.load("fasttext-wiki-news-subwords-300")

    # データの前処理
    sentences = [review.split() for review in df['review']]

    # モデルの評価
    X = []
    for tokens in sentences:
        valid_tokens = [token for token in tokens if token in model.key_to_index]
        if valid_tokens:
            vectors = [model.get_vector(token) for token in valid_tokens]
            mean_vector = sum(vectors) / len(vectors)  # ベクトルの平均を取得
            X.append(mean_vector)
        else:
            X.append([0] * model.vector_size)  # 該当する単語がない場合はゼロベクトルを追加

    y = df['sentiment']

    # データの分割
    X_train, X_test, y_train, y_test = train_test_split(X, y, test_size=0.2, random_state=1)

    # 分類器のトレーニング
    classifier = LogisticRegression()
    classifier.fit(X_train, y_train)

    # 予測結果を取得
    FastText_preds = classifier.predict(X_test)

    # 正答率の計算
    FastText_accuracy = classifier.score(X_test, y_test)

    return FastText_preds, FastText_accuracy

# データの前処理
df = preprocess_data('labeledTrainData.tsv')

# FastTextの評価
FastText_preds, FastText_accuracy = evaluate_fasttext_model(df)
print("FastText Test Accuracy:", FastText_accuracy)
結果
FastText Test Accuracy: 0.7888
Word2Vec
# データの読み込みと前処理
def preprocess_data(file_path):
    df = pd.read_csv(file_path, sep='\t')
    # 特殊文字をエスケープする関数
    def remove_special_characters(text):
        return re.sub(r"[^a-zA-Z0-9\s]", "", text)
    # 特殊文字をエスケープ
    df['review'] = df['review'].apply(remove_special_characters)
    return df

# Word2Vecの評価
def evaluate_word2vec_model(df):
    # モデルの読み込み
    model = api.load("word2vec-google-news-300")

    # データの前処理
    sentences = [review.split() for review in df['review']]

    # モデルの評価
    X = []
    for sentence in sentences:
        valid_tokens = [token for token in sentence if token in model.key_to_index]
        if valid_tokens:
            vectors = [model.get_vector(token) for token in valid_tokens]
            mean_vector = sum(vectors) / len(vectors)  # ベクトルの平均を取得
            X.append(mean_vector)
        else:
            X.append([0] * model.vector_size)  # 該当する単語がない場合はゼロベクトルを追加

    y = df['sentiment']

    # データの分割
    X_train, X_test, y_train, y_test = train_test_split(X, y, test_size=0.2, random_state=1)

    # 分類器のトレーニング
    classifier = LogisticRegression()
    classifier.fit(X_train, y_train)

    # テストデータの予測
    Word2Vec_preds = classifier.predict(X_test)

    # 正答率の計算
    Word2Vec_accuracy = accuracy_score(y_test, Word2Vec_preds)

    return Word2Vec_preds, Word2Vec_accuracy

# データの読み込みと前処理
df = preprocess_data('labeledTrainData.tsv')

# Word2Vecの評価
Word2Vec_preds, Word2Vec_accuracy = evaluate_word2vec_model(df)

# 正答率の出力
print("Word2Vec Test Accuracy:", Word2Vec_accuracy)
結果
Word2Vec Test Accuracy: 0.8396
アンサンブル
平均化しただけで行います。重み付け等は行いません。
# データの読み込み
df = pd.read_csv('labeledTrainData.tsv', sep='\t')

# テストデータの方のテーゲット変数のみを抽出
y_test = df['sentiment'].values

# テストデータのターゲット変数を8:2で分割
y_test, y_ensemble_test = train_test_split(y_test, test_size=0.2, random_state=1)

# アンサンブルの予測結果の計算
ensemble_preds = [max(set(pred), key=pred.count) for pred in zip(Word2Vec_preds, FastText_preds, bert_preds)]

# アンサンブルの正答率の計算
ensemble_accuracy = accuracy_score(y_ensemble_test, ensemble_preds)

print("Ensemble Test Accuracy:", ensemble_accuracy)
結果
Ensemble Test Accuracy: 0.8514
正答率結果
数字の位置は見やすいようにずらしています。
BERT Test Accuracy:     0.8784
FastText Test Accuracy: 0.7888
Word2Vec Test Accuracy: 0.8396
Ensemble Test Accuracy: 0.8514
アンサンブルも相当良い精度...BERTに至ってはepochs3でサラッと流していましたが、BERTに過学習の傾向が見られる中でこの数値とれるものなんですね...
ということで、それぞれのモデル・アンサンブルでファイルを作成しその結果を提出してみたいと思います。
学習と予測
ライブラリ
!pip install transformers
!pip install torch torchvision
import pandas as pd
import numpy as np
from sklearn.model_selection import train_test_split
from sklearn.metrics import classification_report
from sklearn.ensemble import RandomForestClassifier
from gensim.models import FastText, Word2Vec
from transformers import BertTokenizer, BertForSequenceClassification, AdamW
import torch
import torch.nn as nn
from torch.utils.data import DataLoader, TensorDataset, Dataset
import gensim
import matplotlib.pyplot as plt
import re
import gensim.downloader as api
from sklearn.linear_model import LogisticRegression
BERT
# データの読み込み
train_df = pd.read_csv('labeledTrainData.tsv', sep='\t')
test_df = pd.read_csv('testData.tsv', sep='\t')

# 特殊文字をエスケープする関数
def remove_special_characters(text):
    return re.sub(r"[^a-zA-Z0-9\s]", "", text)

# 特殊文字をエスケープ
train_df['review'] = train_df['review'].apply(remove_special_characters)
test_df['review'] = test_df['review'].apply(remove_special_characters)

# 各レビューのテキストを512トークンにトリミング
max_length = 512
train_df['review'] = train_df['review'].apply(lambda x: x[:max_length])
test_df['review'] = test_df['review'].apply(lambda x: x[:max_length])

# BERTトークナイザーの読み込み
tokenizer = BertTokenizer.from_pretrained('bert-base-uncased')

# テキストをトークン化してエンコード
encoded_train_inputs = tokenizer(train_df['review'].tolist(), padding=True, truncation=True, max_length=max_length, return_tensors="pt")
encoded_test_inputs = tokenizer(test_df['review'].tolist(), padding=True, truncation=True, max_length=max_length, return_tensors="pt")

train_input_ids = encoded_train_inputs['input_ids']
train_attention_masks = encoded_train_inputs['attention_mask']
test_input_ids = encoded_test_inputs['input_ids']
test_attention_masks = encoded_test_inputs['attention_mask']

# ターゲットラベルの抽出
train_labels = torch.tensor(train_df['sentiment'].tolist())

# データセットの作成
class CustomDataset(Dataset):
    def __init__(self, input_ids, attention_masks, labels=None):
        self.input_ids = input_ids
        self.attention_masks = attention_masks
        self.labels = labels

    def __len__(self):
        return len(self.input_ids)

    def __getitem__(self, idx):
        if self.labels is not None:
            return {
                'input_ids': self.input_ids[idx],
                'attention_mask': self.attention_masks[idx],
                'labels': self.labels[idx]
            }
        else:
            return {
                'input_ids': self.input_ids[idx],
                'attention_mask': self.attention_masks[idx],
            }

# データセットのインスタンス化
train_dataset = CustomDataset(train_input_ids, train_attention_masks, train_labels)
test_dataset = CustomDataset(test_input_ids, test_attention_masks)

# データローダーの作成
batch_size = 8
train_dataloader = DataLoader(train_dataset, batch_size=batch_size, shuffle=True)
test_dataloader = DataLoader(test_dataset, batch_size=batch_size)

# BERTモデルの読み込み
model = BertForSequenceClassification.from_pretrained('bert-base-uncased')

# GPUが利用可能な場合はGPUにモデルを配置
device = torch.device('cuda' if torch.cuda.is_available() else 'cpu')
model.to(device)

# 損失関数とオプティマイザーの定義
criterion = nn.CrossEntropyLoss()
optimizer = AdamW(model.parameters(), lr=2e-5)

# エポック数
epochs = 3

# 学習
for epoch in range(epochs):
    # モデルを学習モードに設定
    model.train()

    # 学習データでの損失の初期化
    epoch_train_loss = 0.0

    # ミニバッチごとの学習
    for batch in train_dataloader:
        # バッチデータをGPUに配置
        input_ids = batch['input_ids'].to(device)
        attention_mask = batch['attention_mask'].to(device)
        labels = batch['labels'].to(device)

        # 勾配を初期化
        optimizer.zero_grad()

        # 順伝播
        outputs = model(input_ids, attention_mask=attention_mask, labels=labels)
        loss = outputs.loss

        # 損失を計算
        epoch_train_loss += loss.item()

        # 逆伝播
        loss.backward()

        # 勾配の更新
        optimizer.step()

    # 学習データでの平均損失を計算
    epoch_train_loss /= len(train_dataloader)

    # ログを出力
    print(f'Epoch [{epoch+1}/{epochs}], Train Loss: {epoch_train_loss:.4f}')

# モデルを評価モードに設定
model.eval()

# BERTの予測結果を保持するリスト
bert_preds = []

# 予測
with torch.no_grad():
    for batch in test_dataloader:
        # バッチデータをGPUに配置
        input_ids = batch['input_ids'].to(device)
        attention_mask = batch['attention_mask'].to(device)

        # 順伝播
        outputs = model(input_ids, attention_mask=attention_mask)
        logits = outputs.logits

        # 予測
        _, predicted = torch.max(logits, 1)

        # 予測結果をリストに追加
        bert_preds.extend(predicted.tolist())

# 予測結果をDataFrameに格納
output_df = pd.DataFrame({'id': test_df['id'], 'sentiment': bert_preds})

# 予測結果をCSVファイルに書き出し
output_df.to_csv('BERT_prediction.csv', index=False)
結果
Epoch [1/3], Train Loss: 0.3452
Epoch [2/3], Train Loss: 0.1997
Epoch [3/3], Train Loss: 0.0972
FastText
# データの読み込みと特殊文字のエスケープ処理
def preprocess_data(file_path):
    df = pd.read_csv(file_path, sep='\t')
    # 特殊文字をエスケープする関数
    def remove_special_characters(text):
        return re.sub(r"[^a-zA-Z0-9\s]", "", text)
    # 特殊文字をエスケープ
    df['review'] = df['review'].apply(remove_special_characters)
    return df

# FastTextの学習
def train_fasttext_model(df):
    # モデルの読み込み
    model = api.load("fasttext-wiki-news-subwords-300")

    # データの前処理
    sentences = [review.split() for review in df['review']]

    # モデルの学習
    X = []
    for tokens in sentences:
        valid_tokens = [token for token in tokens if token in model.key_to_index]
        if valid_tokens:
            vectors = [model.get_vector(token) for token in valid_tokens]
            mean_vector = sum(vectors) / len(vectors)  # ベクトルの平均を取得
            X.append(mean_vector)
        else:
            X.append([0] * model.vector_size)  # 該当する単語がない場合はゼロベクトルを追加

    y = df['sentiment']

    # 分類器のトレーニング
    classifier = LogisticRegression()
    classifier.fit(X, y)

    return classifier

# テストデータの予測
def predict_test_data(test_df, classifier):
    # モデルの読み込み
    model = api.load("fasttext-wiki-news-subwords-300")

    # テストデータの前処理
    sentences = [review.split() for review in test_df['review']]

    # 予測
    X_test = []
    for tokens in sentences:
        valid_tokens = [token for token in tokens if token in model.key_to_index]
        if valid_tokens:
            vectors = [model.get_vector(token) for token in valid_tokens]
            mean_vector = sum(vectors) / len(vectors)  # ベクトルの平均を取得
            X_test.append(mean_vector)
        else:
            X_test.append([0] * model.vector_size)  # 該当する単語がない場合はゼロベクトルを追加

    # 予測結果の取得
    FastText_preds = classifier.predict(X_test)

    return FastText_preds

# データの前処理
train_df = preprocess_data('labeledTrainData.tsv')
test_df = preprocess_data('testData.tsv')

# FastTextの学習
classifier = train_fasttext_model(train_df)

# テストデータの予測
FastText_preds = predict_test_data(test_df, classifier)

# 予測結果をDataFrameに格納
output_df = pd.DataFrame({'id': test_df['id'], 'sentiment': FastText_preds})

# 予測結果をCSVファイルに書き出し
output_df.to_csv('FastText_prediction.csv', index=False)
Word2Vec
# データの読み込みと前処理
def preprocess_data(file_path):
    df = pd.read_csv(file_path, sep='\t')
    # 特殊文字をエスケープする関数
    def remove_special_characters(text):
        return re.sub(r"[^a-zA-Z0-9\s]", "", text)
    # 特殊文字をエスケープ
    df['review'] = df['review'].apply(remove_special_characters)
    return df

# Word2Vecの学習
def train_word2vec_model(df):
    # モデルの読み込み
    model = api.load("word2vec-google-news-300")

    # データの前処理
    sentences = [review.split() for review in df['review']]

    # 学習用データの作成
    X = []
    for sentence in sentences:
        valid_tokens = [token for token in sentence if token in model.key_to_index]
        if valid_tokens:
            vectors = [model.get_vector(token) for token in valid_tokens]
            mean_vector = sum(vectors) / len(vectors)  # ベクトルの平均を取得
            X.append(mean_vector)
        else:
            X.append([0] * model.vector_size)  # 該当する単語がない場合はゼロベクトルを追加

    y = df['sentiment']

    # 分類器のトレーニング
    classifier = LogisticRegression()
    classifier.fit(X, y)

    return classifier

# テストデータの予測
def predict_test_data(test_df, classifier):
    # モデルの読み込み
    model = api.load("word2vec-google-news-300")

    # テストデータの前処理
    sentences = [review.split() for review in test_df['review']]

    # 予測
    X_test = []
    for tokens in sentences:
        valid_tokens = [token for token in tokens if token in model.key_to_index]
        if valid_tokens:
            vectors = [model.get_vector(token) for token in valid_tokens]
            mean_vector = sum(vectors) / len(vectors)  # ベクトルの平均を取得
            X_test.append(mean_vector)
        else:
            X_test.append([0] * model.vector_size)  # 該当する単語がない場合はゼロベクトルを追加

    # 予測結果の取得
    Word2Vec_preds = classifier.predict(X_test)

    return Word2Vec_preds

# データの読み込みと前処理
train_df = preprocess_data('labeledTrainData.tsv')
test_df = preprocess_data('testData.tsv')

# Word2Vecの学習
classifier = train_word2vec_model(train_df)

# テストデータの予測
Word2Vec_preds = predict_test_data(test_df, classifier)

# 予測結果をDataFrameに格納
output_df = pd.DataFrame({'id': test_df['id'], 'sentiment': Word2Vec_preds})

# 予測結果をCSVファイルに書き出し
output_df.to_csv('W2V_prediction.csv', index=False)
アンサンブル
test_df = preprocess_data('testData.tsv')

# アンサンブルの予測結果の計算
ensemble_preds = [max(set(pred), key=pred.count) for pred in zip(Word2Vec_preds, FastText_preds, bert_preds)]

# 予測結果をDataFrameに格納
output_df = pd.DataFrame({'id': test_df['id'], 'sentiment': ensemble_preds})

# 予測結果をCSVファイルに書き出し
output_df.to_csv('Ensemble_prediction.csv', index=False)
結果
それぞれを提出したときのスコアをまとめる。
Score of BERT:     0.86836
Score of FastText: 0.78972
Score of W2V:      0.84568
Score of Ensemble: 0.85460
となった。したがって、BERTが最も精度が良かったです。BERTの結果からまだ下がりきっているのかわからないのでepochsを増やすことでより精度が上がりそう...
まとめ
さて今回はBERT, FastText, Word2Vecを使用したアンサンブル学習を行いました。ベクトル表現のモデルの難しさを再認識した回でした。しかし、なんとか使用できたので今回を糧に今後も使用していこうと思います。
最後までありがとうございました。