この記事でやること
・Python + Twitter APIでシャニマスカレンダーを自動で壁紙に設定します。
・環境はWindwos10、11です。
・Linux版はこちら
シャニマスカレンダー
毎月公式が出すシャニマスカレンダー
/
— アイドルマスター シャイニーカラーズ公式 (@imassc_official) July 1, 2022
7月の #シャニマスカレンダー
\
7月は透さん、真乃さんのカレンダーです♪
夏らしい空や海の青さが目に心地いいですね~
プロデューサーさん、ぜひカレンダーから夏を感じてくださいね♪#シャニマス pic.twitter.com/H9wXdY2s8z
おしゃれ〜〜〜〜!!!!!
かわいい〜〜〜〜!!!!!
経緯
でも毎月PCに画像をDLして壁紙に設定するのはなかなか面倒です。
普段PCではツイッターを見ない人も多いと思います。
ということで、これを自動化します!
皆さんの環境でも再現できるように作っているので、是非この記事の手順に沿って自動化してみてください。
使うもの
・Windows10 or 11のPC
・Twitter API Key
手順(全体概要)
手順をざっくり説明すると以下の通りです。
①python3とtweepyをインストール
②Twitter API Keyを取得
③この記事のコードをコピペ
④タスクスケジューラを設定
簡単ですね?
早速やってみましょう!
手順①:python3とtweepyのインストール
◆python3
python3をMicrosoft Storeからインストールします。
以下の記事を参考にインストールしてください。
https://netmaster.blog/python-python-install/
◆tweepy
python3をインストールし終わったら、次はtweepyです。
これをインストールすることでpython3からTwitterAPIを簡単に扱えるようになります。
コマンドプロンプトを開いて、以下のコマンドを実行してください。
※コマンドプロンプトの使い方がわからない方は以下のリンクを参考にしてください。
PythonJapan Pythonの実行方法
python3 -m pip install tweepy
特にエラーにならずに正常終了していればOKです!
手順②:Twitter API Keyを取得
TwitterAPIを使うにはそのためのKeyが必要になります。
リンク先を参考にKeyの取得しましょう。
・API Key、API Secret Key
https://wporz.com/twitterapi-apikey-accesstoken/#API_KeyAPI_secret_key
・Access token、Access token secret
https://wporz.com/twitterapi-apikey-accesstoken/#Access_tokenAccess_token_secret
取得したKeyは次の手順で使うのでメモしておきましょう。
また、Keyは他人に公開したりしないよう気を付けてください。
手順③:コードをコピペ
まずはコピペする先のファイルを作成します。
ファイルの構成は以下の通りです。
C:\Users\"ユーザ名"
├── gscc.py(pythonのコード)
└── gscc.bat(バッチファイル)
C:\Users\"ユーザ名"のフォルダに、「gscc.py」と「gscc.bat」というファイルを作ってください。
拡張子の変更方法はこちらが参考になります。
フォルダの"ユーザ名"は皆さんご自身のユーザ名です。
ファイルを作り終わると、以下の画像のような状態になると思います。
私の場合はユーザ名が「japan」になっています。

次に、今作ったそれぞれのファイルにコードをコピペしていきます。
・gscc.py
以下のコードをgscc.pyにコピペしてください。
末尾が「.py」「.bat」のファイルは普通にダブルクリックをしてもすぐには編集できません。
ファイルの編集方法はこちらを参考にしてください。
import os
import sys
import subprocess
import tweepy
import urllib.request
import datetime
import ctypes
import glob

#Twitter_API_Keyの値を設定
API_KEY = "xxxxxxxxxxxxxxxxxxxxxxxx"
API_SECRET_KEY = "xxxxxxxxxxxxxxxxxxxxxxxx"
ACCESS_TOKEN = "xxxxxxxxxxxxxxxxxxxxxxxx"
ACCESS_TOKEN_SECRET = "xxxxxxxxxxxxxxxxxxxxxxxx"

#画像をリネームし壁紙にセット
def set_background():
	image_files = glob.glob(folder_path + "\\" + date.strftime('%Y-%m') + "*.jpeg")
	for image in image_files:
		result = subprocess.check_output("powershell -c \"add-type -AssemblyName System.Drawing;$img=[System.Drawing.Image]::FromFile('" + image + "');''+$img.Width+','+$img.Height\"", shell=True).decode('cp932')
		result = result.strip()

		#画像が横長(PC用)の画像であればリネームし、壁紙に設定
		if result.split(",")[0] > result.split(",")[1]:
			rename_path = folder_path + "\\" + date.strftime('%Y-%m') + "-01_imassc_calendar.jpeg"
			os.rename(image, rename_path)
			ctypes.windll.user32.SystemParametersInfoW(20, 0, rename_path, 0)
			break
		else:
			continue
		break

#取得したURLを使って画像を保存
def save_image(url):
    count = 1
    for image_url in url:
        image_url = image_url + ":orig"
        file_path = folder_path + "\\" + date.strftime('%Y-%m') + "-01_imassc_calendar_" + str(count) + ".jpeg"
        data = urllib.request.urlopen(image_url, timeout=20).read()
        with open(file_path, mode="wb") as f:
            f.write(data)
        count += 1

#画像URLを取得
def get_image():
	since = date.strftime('%Y-%m')
	result_url = []
	for tweet in tweepy.Cursor(api.user_timeline, user_id="958615648799662080").items(200):
		if (list(tweet.text)[:2]!=['R', 'T']) & (list(tweet.text)[0]!='@'):
			if since in str(tweet.created_at):
				if "#シャニマスカレンダー" in tweet.text:
					for media in tweet.extended_entities['media']:
						result_url.append(media['media_url'])
					break
	return result_url

#インターネットにつながっているか確認
def ping_chk():
	res = subprocess.run(["ping","8.8.8.8","-n","2","-w","300"],stdout = subprocess.PIPE, stderr = subprocess.PIPE)
	#インターネットにつながらない場合、処理を終了
	if 'TTL' not in res.stdout.decode("sjis"):
		sys.exit(1)

#今月のファイルを取得済みか確認
def file_chk():
	file_chk_path = folder_path + "\\" + date.strftime('%Y-%m') + "-01_imassc_calendar.jpeg"
	#今月のファイルを取得済みであれば処理を終了
	if os.path.isfile(file_chk_path):
		sys.exit(1)

def start():
	file_chk()
	ping_chk()
	url = get_image()
	save_image(url)
	set_background()

if __name__ == "__main__":

	userprofile = os.environ['USERPROFILE']
	date = datetime.date.today()

	#保存先フォルダ作成
	folder_path = userprofile + '\\get_shiny_colors_calendar'
	if not os.path.isdir(folder_path):
		os.mkdir(folder_path)

	auth = tweepy.OAuthHandler(API_KEY, API_SECRET_KEY)
	auth.set_access_token(ACCESS_TOKEN, ACCESS_TOKEN_SECRET)
	api = tweepy.API(auth)

	start()
コードの中にはAPI Keyを設定する必要があります。
10行目~15行目がAPI Keyの設定箇所なので、「xxx」を消して先ほど取得したAPI Keyをコード内に記載してください。
以下のように「xxx」が消えてAPI Keyの値が入っていればOKです
#Twitter_API_Keyの値を設定
API_KEY = "abcdefghijklmnopqrstu"
API_SECRET_KEY = "123456789012345678901234567890"
ACCESS_TOKEN = "1qaz2wsx3edc4rfv5tgb"
ACCESS_TOKEN_SECRET = "6yhn7ujm8ik,9ol.0p;/"
・gscc.bat
次の作業です。
今度は以下のコードをgscc.batにコピペしてください。
ファイルの編集方法はさっきと同じくこちらを参考にしてください。
@echo off
setlocal

echo ====================================
echo Let's_get_shiny_colors_calendar!
echo ====================================

rem 変数を定義
set "gscc_date=%DATE:~0,4%-%DATE:~5,2%"
set "gscc_dir=%USERPROFILE%\get_shiny_colors_calendar\"
set "gscc_name=-01_imassc_calendar.jpeg"
set "gscc_path=%gscc_dir%%gscc_date%%gscc_name%"

rem メイン処理
python3 gscc.py

rem メイン処理が成功した場合、レジストリの値を変更
if %errorlevel% equ 0 (
	reg add "HKEY_CURRENT_USER\Control Panel\Desktop" /v "Wallpaper" /t REG_SZ /d "%gscc_path%" /f
)

endlocal
こちらはそのままコピペでOKです。
手順④:タスクスケジューラを設定
最後の手順です。タスクスケジューラにタスクを登録します。
(1)タスクスケジューラを起動する。
起動方法は以下のリンクを参考にしてください
https://pc-kaizen.com/windows10-launch-task-schedule
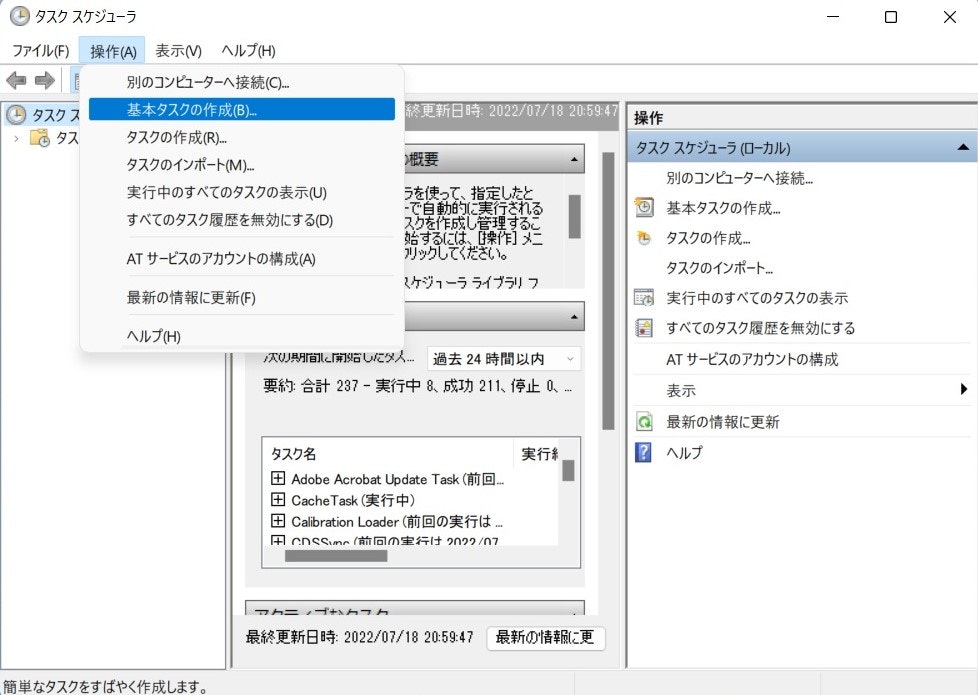
(2)基本タスクの作成を押す
以下の画像を参考に、基本タスクの作成をクリックしてください。

(3)名前と説明の項目を適当に埋める
自分がわかる内容であれば自由に設定していただいて大丈夫です。

(4)タスクのトリガーを「ログオン時」に設定する
ここではタスクが実行されるタイミングを設定します。
普段PCをシャットダウンしない人は「毎日」に設定した方が良いかもしれません

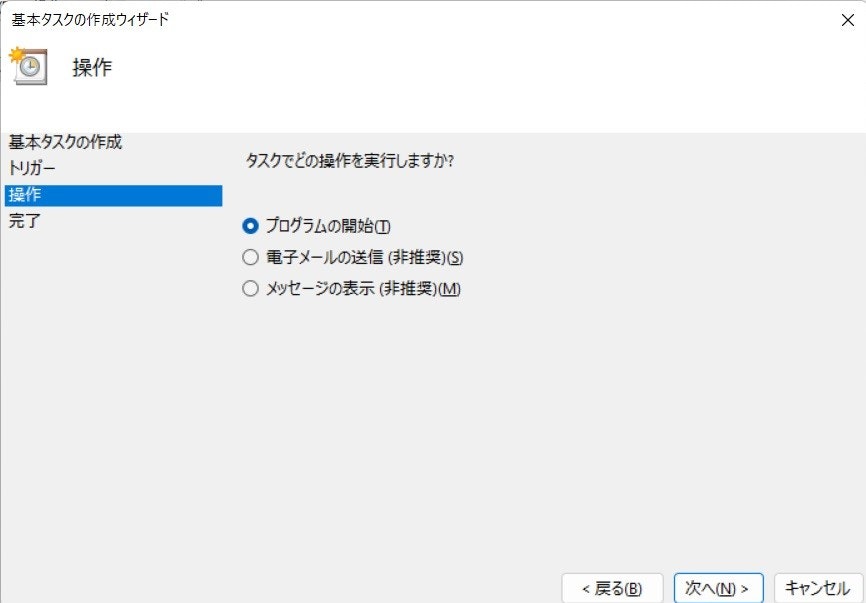
(5)プログラムの開始を選択
プログラムの開始を選択しましょう。

(6)実行するプログラムの設定
「プログラム/スクリプト」に先ほどコピペで作った「gscc.bat」を
「開始」に「C:\Users\"ユーザ名"」を設定してください。

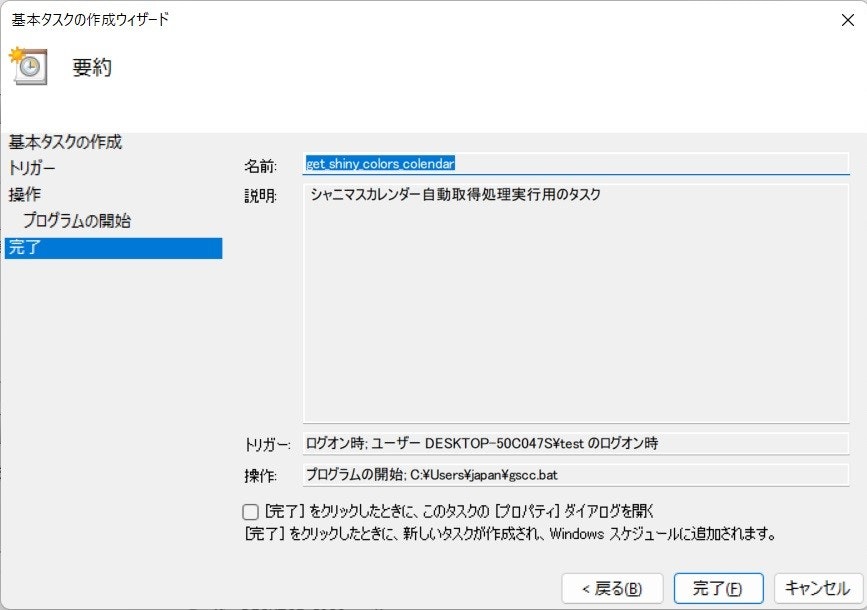
(7)要約を確認し、完了ボタンを押す
内容を確認し、問題なければ完了を押してください。

これで手順はすべて完了です!
1点注意しないといけないのが、デフォルトだとタスクマネージャーはPCが電源につながれている時しか動かないようになっています。
PCを電源につないでいなくても動くようにするには、タスクのプロパティを変更してください。

↑のチェックを外せばOKです。
実際に動かしてみる
全部の手順が終わったので実際に動かして、背景が自動でシャニマスカレンダーに代わることを確認します。
先ほどタスクのトリガーを「ログオン時」に設定したので、PCにログオンしなおしてみましょう。
この状態で、PCからサインアウトをして、もう一度ログオンしてみましょう
すると黒い画面が立ち上がり、、、

素晴らしい!
自動で背景が変わりました!
みなさんはどうでしょうか?
うまく切り替わらなかったなどがあればコメントで教えてください。
何をやっているか
壁紙の設定は以下のような流れで行っています。
①タスクスケジューラがgscc.batを起動
②gscc.batがgscc.pyを起動
③gscc.pyがシャニマスカレンダーをツイッターからダウンロードし壁紙に設定
④gscc.pyが終了し、gscc.batに制御が戻る
⑤gscc.batがシャニマスカレンダーをレジストリに設定
それぞれのファイルの内容については以下で説明します
gscc.bat
Windowsのバッチファイルです。
gess.pyを起動し、取得した画像をレジストリに設定します。
@echo off
setlocal

echo ====================================
echo Let's_get_shiny_colors_calendar!
echo ====================================

rem 変数を定義
set "gscc_date=%DATE:~0,4%-%DATE:~5,2%"
set "gscc_dir=%USERPROFILE%\get_shiny_colors_calendar\"
set "gscc_name=-01_imassc_calendar.jpeg"
set "gscc_path=%gscc_dir%%gscc_date%%gscc_name%"

rem メイン処理
python3 gscc.py

rem メイン処理が成功した場合、レジストリの値を変更
if %errorlevel% equ 0 (
	reg add "HKEY_CURRENT_USER\Control Panel\Desktop" /v "Wallpaper" /t REG_SZ /d "%gscc_path%" /f
)

endlocal
"%errorlevel%"は直前の処理の結果が格納される変数です。
Linuxでいうところの"$?"ですね。
この値が0だった場合gscc.pyは正常終了しており、0以外だった場合は異常終了しています。
正常終了していた場合は、取得した画像のパスをレジストリに設定します。
これをしないと再起動後に背景が保持されず真っ黒な画面になってしまいます。
(本当はgscc.pyのなかでレジストリへの設定も完結させたかったのですがうまい方法が見つけられませんでした。。。ご存じの方はコメント欄にご指摘ください。)
gscc.py
TwitterAPIを使ってシャニマスカレンダーを取得してくる処理です。
import os
import sys
import subprocess
import tweepy
import urllib.request
import datetime
import ctypes
import glob

#Twitter_API_Keyの値を設定
API_KEY = "xxxxxxxxxxxxxxxxxxxxxxxx"
API_SECRET_KEY = "xxxxxxxxxxxxxxxxxxxxxxxx"
ACCESS_TOKEN = "xxxxxxxxxxxxxxxxxxxxxxxx"
ACCESS_TOKEN_SECRET = "xxxxxxxxxxxxxxxxxxxxxxxx"

#画像をリネームし壁紙にセット
def set_background():
	image_files = glob.glob(folder_path + "\\" + date.strftime('%Y-%m') + "*.jpeg")
	for image in image_files:
		result = subprocess.check_output("powershell -c \"add-type -AssemblyName System.Drawing;$img=[System.Drawing.Image]::FromFile('" + image + "');''+$img.Width+','+$img.Height\"", shell=True).decode('cp932')
		result = result.strip()

		#画像が横長(PC用)の画像であればリネームし、壁紙に設定
		if result.split(",")[0] > result.split(",")[1]:
			rename_path = folder_path + "\\" + date.strftime('%Y-%m') + "-01_imassc_calendar.jpeg"
			os.rename(image, rename_path)
			ctypes.windll.user32.SystemParametersInfoW(20, 0, rename_path, 0)
			break
		else:
			continue
		break

#取得したURLを使って画像を保存
def save_image(url):
    count = 1
    for image_url in url:
        image_url = image_url + ":orig"
        file_path = folder_path + "\\" + date.strftime('%Y-%m') + "-01_imassc_calendar_" + str(count) + ".jpeg"
        data = urllib.request.urlopen(image_url, timeout=20).read()
        with open(file_path, mode="wb") as f:
            f.write(data)
        count += 1

#画像URLを取得
def get_image():
	since = date.strftime('%Y-%m')
	result_url = []
	for tweet in tweepy.Cursor(api.user_timeline, user_id="958615648799662080").items(200):
		if (list(tweet.text)[:2]!=['R', 'T']) & (list(tweet.text)[0]!='@'):
			if since in str(tweet.created_at):
				if "#シャニマスカレンダー" in tweet.text:
					for media in tweet.extended_entities['media']:
						result_url.append(media['media_url'])
					break
	return result_url

#インターネットにつながっているか確認
def ping_chk():
	res = subprocess.run(["ping","8.8.8.8","-n","2","-w","300"],stdout = subprocess.PIPE, stderr = subprocess.PIPE)
	#インターネットにつながらない場合、処理を終了
	if 'TTL' not in res.stdout.decode("sjis"):
		sys.exit(2)

#今月のファイルを取得済みか確認
def file_chk():
	file_chk_path = folder_path + "\\" + date.strftime('%Y-%m') + "-01_imassc_calendar.jpeg"
	#今月のファイルを取得済みであれば処理を終了
	if os.path.isfile(file_chk_path):
		sys.exit(1)

def start():
	file_chk()
	ping_chk()
	url = get_image()
	save_image(url)
	set_background()

if __name__ == "__main__":

	userprofile = os.environ['USERPROFILE']
	date = datetime.date.today()

	#保存先フォルダ作成
	folder_path = userprofile + '\\get_shiny_colors_calendar'
	if not os.path.isdir(folder_path):
		os.mkdir(folder_path)

	auth = tweepy.OAuthHandler(API_KEY, API_SECRET_KEY)
	auth.set_access_token(ACCESS_TOKEN, ACCESS_TOKEN_SECRET)
	api = tweepy.API(auth)

	start()
主に以下の関数を実行しています。
・file_chk()
⇒今月のシャニマスカレンダーを取得済みかどうかを判定します。
取得済みだった場合、sys.exit(1)で処理を終了します。
def file_chk():
	file_chk_path = folder_path + "\\" + date.strftime('%Y-%m') + "-01_imassc_calendar.jpeg"
	#今月のファイルを取得済みであれば処理を終了
	if os.path.isfile(file_chk_path):
		sys.exit(1)
・ping_chk()
⇒PCがインターネットにつながっているかどうかを確認します。
お馴染みの8.8.8.8にpingを送り、エラーだった場合sys.exit(2)で終了します。
def ping_chk():
	res = subprocess.run(["ping","8.8.8.8","-n","2","-w","300"],stdout = subprocess.PIPE, stderr = subprocess.PIPE)
	#インターネットにつながらない場合、処理を終了
	if 'TTL' not in res.stdout.decode("sjis"):
		sys.exit(2)
pingはsubprocessモジュールを使ってwindowsのpingを呼び出しています。
windowsのpingは注意が必要で、宛先IPアドレスにパケットが到達しなくても戻り値が0の場合があります
そのため、pingの標準出力の中に"TTL"という文字が含まれている場合はインターネットに接続できていると判断するようにしました。
ここはもう少しイケてる実装方法がありそうです。
・get_image()
シャニマス公式TwitterからシャニマスカレンダーのURLを取得します。
def get_image():
	since = date.strftime('%Y-%m')
	result_url = []
	for tweet in tweepy.Cursor(api.user_timeline, user_id="958615648799662080").items(200):
		#取得したツイートがRT・引用でなければ処理を継続
		if (list(tweet.text)[:2]!=['R', 'T']) & (list(tweet.text)[0]!='@'):
			#ツイートの作成日が今月以降であれば処理を継続
			if since in str(tweet.created_at):
				#ツイートに"#シャニマスカレンダー"が含まれていれば処理を継続
				if "#シャニマスカレンダー" in tweet.text:
					for media in tweet.extended_entities['media']:
						result_url.append(media['media_url'])
					break
	return result_url
取得したURLは戻り値として呼び出し元に返します。
・save_image(url)
先ほど取得したURLを使ってシャニマスカレンダーの画像をPCに保存します。
URLそのままで画像を保存しようとすると画像が圧縮されてしまうので、URLの末尾に":orig"をつけています。
def save_image(url):
    count = 1
    for image_url in url:
        image_url = image_url + ":orig"
        file_path = folder_path + "\\" + date.strftime('%Y-%m') + "-01_imassc_calendar_" + str(count) + ".jpeg"
        data = urllib.request.urlopen(image_url, timeout=20).read()
        with open(file_path, mode="wb") as f:
            f.write(data)
        count += 1
・set_background()
取得した画像が横長のPC用画像かどうかを判断し、壁紙にセットします。
def set_background():
	image_files = glob.glob(folder_path + "\\" + date.strftime('%Y-%m') + "*.jpeg")
	for image in image_files:
		result = subprocess.check_output("powershell -c \"add-type -AssemblyName System.Drawing;$img=[System.Drawing.Image]::FromFile('" + image + "');''+$img.Width+','+$img.Height\"", shell=True).decode('cp932')
		result = result.strip()

		#画像が横長(PC用)の画像であればリネームし、壁紙に設定
		if result.split(",")[0] > result.split(",")[1]:
			rename_path = folder_path + "\\" + date.strftime('%Y-%m') + "-01_imassc_calendar.jpeg"
			os.rename(image, rename_path)
			ctypes.windll.user32.SystemParametersInfoW(20, 0, rename_path, 0)
			break
		else:
			continue
		break
画像のサイズの取得はかなりめんどくさいことをしています。
具体的には”subprocess.check_output”でコマンドプロンプトのpowershellコマンドを呼び出し、引数にadd-typeコマンドを設定することでC#を動かしています(多分、、、)
この辺は正直理解しきれていません、、、
こちらをほとんど丸パクリしました。
サイズを取得するだけならpythonのOpenCV, Pillowなどが使えるようでしたが、いずれもpythonに標準では入っておらず、事前にコマンドプロンプトでインストールが必要でした。
今回目指していたことの一つに「利用者が使いやすいように、設定手順を減らすこと」があったのでこの形にしました。
壁紙の設定はSystemParametersInfoWで行っています。
ただしこの関数だけではレジストリの変更までは行わないので、壁紙の変更は一時的なものになります。だからgwcc.batでレジストリを設定する必要があったんですね。
ちなみに、この関数の第4引数に「SPIF_UPDATEINIFILE」という値を設定すればレジストリも合わせて変更してくれるという情報があったのですが、どう設定してもうまく動いてくれず断念しました。pythonだとできないんでしょうか?
一応pythonで実装している例もあったんですが、、、
また、pythonでレジストリを設定できるwinregというライブラリもありましたが、これもどう設定してもうまく動いてくれず、、、
レジストリ周りの試行錯誤だけで10時間くらい使った気がします。
まとめ
すでにLinuxである程度実装済みだったので、Windowsでもそれほど苦労せず自動化できるかなと思ったのですが甘かったです。めちゃめちゃ時間がかかりました
Linuxの実装も今見ると間違いだらけです。そのうち修正しなくては、、、
特にレジストリの操作や、バッチファイルの展開順序には苦労させられました。
Windows難しい…
しかし世の中でももっとも使われているOSがWindowsであるのも事実。
シャニマスカレンダーを多くの人に簡単に使ってもらうためには避けて通れない道でした。
今回の自動化で少しでもシャニマス界隈に貢献出来たら嬉しいです。
次はMacで自動化したいところですが、生憎Macは持っておらず、どうしたものか、、、
どなたか代わりに作ってもらえると大変助かります。

