Azure Bot Service には作成したチャットボットをさまざまなチャネルに接続する Bot Channel が用意されています。iframe で貼り付けるだけでチャットボットウインドウを追加できる Web Chat、直接 Microsoft Team や Skype、Slack、Facebook、LINE に接続できるチャネルなどが用意されています。

今回は、Web Chat のウインドウのカスタマイズに物足りなくなった時に、Direct Line (Rest API) を使って、オリジナルのチャットボット UI で表示するための方法を紹介します。
まずは、Direct Line での会話の仕組みを確認します。
Azure Bot Service の Direct Line とは?
Azure Bot Service に用意されている、外部の SNS ツールなどと接続する機能で、Web API で Azure Bot Service と会話のやり取りを行います。
Direct Line による接続の基本
準備
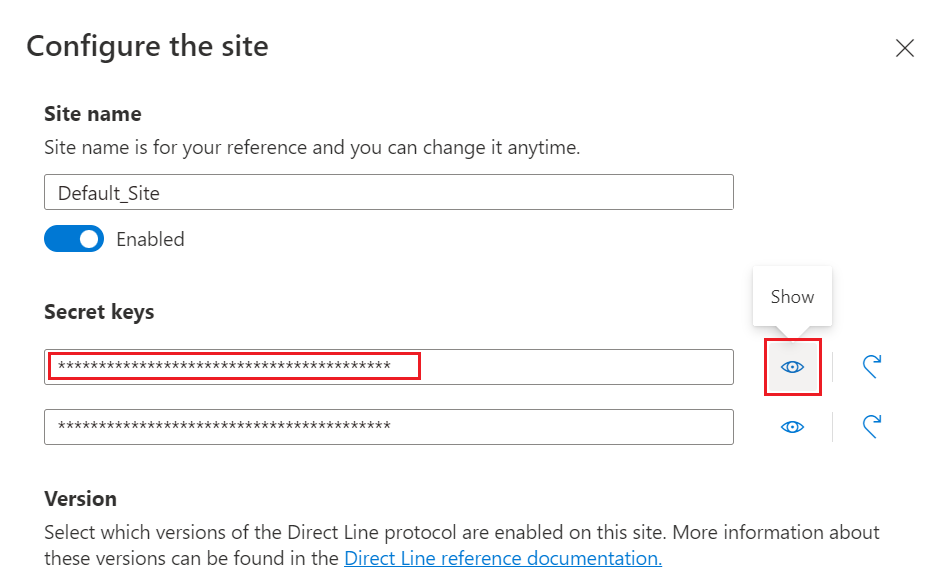
Azure Bot Service のチャネルに Direct Line を追加し、Secret Key をローカルに保存しておきます。
Start Conversation
Bot Service のエンドポイント(アクセスポイント) にリクエストを送信し、会話を管理するためのインスタンス( Conversation と呼びます) を作成します。
↓ YOUR_DIRECTLINE_SECRET を保存しておいた Secret Key と入れ替えます。
POST https://directline.botframework.com/v3/directline/conversations
Authorization:Bearer YOUR_DIRECTLINE_SECRET
会話を管理する Conversation は Conversation Id で識別されるので、Response には Convesation Id が記載されています。また、この Conversation にアクセスするための Token や、WebSocket で接続するための情報も合わせて記載されています。
ここで取得できる Conversation Id をローカルに保存しておきます。
{
  "conversationId": "YOUR_CONVERSATION_ID",
  "token": "YOUR_BOTSERVICE_TOKEN",
  "expires_in": 3600,
  "streamUrl": "wss://directline.botframework.com/v3/directline/conversations/CONVERSATION_ID/stream?watermark=-&t=YOUR_BOTSERVICE_TOKEN",
  "referenceGrammarId": "xxxxxxxx-XXXX-xxxx-xxxx-xxxxxxxxxxxx"
}
Send Activity
Conversation が作成されたら、実際にメッセージを送ってみます。文字や画像など、Bot が受信する & Bot からの返答するメッセージを Activity と呼びます。(ここでは WebSocket でなく REST API を使っています)
URL の YOUR_CONVERSATION_ID を保存しておいた Conversation Id に入れ替えます。
Body の "from" 配下にある "id" にユーザーの ID (ここではお好みのモノを入力します)、"text" に BOT に送信したいメッセージを (ここもお好みのモノを) 設定し、リクエストを送信します。
POST https://directline.botframework.com/v3/directline/conversations/YOUR_CONVERSATION_ID/activities
Authorization:Bearer YOUR_DIRECTLINE_SECRET
Content-Type:application/json

{
    "type": "message",
    "from": {
        "id": "annie"
    },
    "text": "こんにちは"
}
Activity が受け付けられると、Response で以下のようなフォーマットで Activity の ID (Activity Id) が取得できます。(Activity が増えていくと、時系列で採番されていきます。)
{
  "id": "YOUR_CONVERSATION_ID|YOUR_ACTIVITY_ID"
}
これまでの手順で Conversation を作成して最初の Activity だと以下のように 0000001 が返されます。
{
  "id": "YOUR_CONVERSATION_ID|0000001"
}
Get Conversations
ここで Conversation を取得してみます。
↓ YOUR_CONVERSATION_ID は 保存しておいた Conversation Id で置き換えます。
GET https://directline.botframework.com/v3/directline/conversations/YOUR_CONVERSATION_ID/activities
Authorization:Bearer YOUR_DIRECTLINE_SECRET
Response で Conversation の作成ログと、Post した Activity とそれに対する Bot からの返答 Activity を下記のようなフォーマットで取得できます。
Activity Id 0000001 として Post された「こんにちは!」というメッセージに対して、Activity Id 0000002 で Bot から「Echo: こんにちは!」というメッセージが返されています。
{
  "activities": [
    {
      "type": "message",
      "id": "YOUR_CONVERSATION_ID|0000000",
      "timestamp": "2019-08-20T02:41:00.2786387Z",
      "channelId": "directline",
      "from": {
        "id": "bot20190820",
        "name": "bot20190820"
      },
      "conversation": {
        "id": "YOUR_CONVERSATION_ID"
      },
      "text": "Hello and welcome!",
      "inputHint": "acceptingInput",
      "attachments": [],
      "entities": [],
      "replyToId": "A4FI3HrFcJe"
    },
    {
      "type": "message",
      "id": "YOUR_CONVERSATION_ID|0000001",
      "timestamp": "2019-08-20T02:40:58.9230521Z",
      "serviceUrl": "https://directline.botframework.com/",
      "channelId": "directline",
      "from": {
        "id": "annie"
      },
      "conversation": {
        "id": "YOUR_CONVERSATION_ID"
      },
      "text": "こんにちは!"
    },
    {
      "type": "message",
      "id": "YOUR_CONVERSATION_ID|0000002",
      "timestamp": "2019-08-20T02:41:00.6140828Z",
      "channelId": "directline",
      "from": {
        "id": "bot20190820",
        "name": "bot20190820"
      },
      "conversation": {
        "id": "YOUR_CONVERSATION_ID"
      },
      "text": "Echo: こんにちは!",
      "inputHint": "acceptingInput",
      "attachments": [],
      "entities": [],
      "replyToId": "YOUR_CONVERSATION_ID|0000001"
    }
  ],
  "watermark": "2"
}
上記の Conversation の例では、Conversation が作成されたことにより、Bot から「Hello and welcome!」というメッセージが返答されていることが分かります。
全ての Activity でなく、直近の Post した Activity に対する Bot の返答のみを取得したい場合は、Activity Id をパラメーターに設定します。
GET https://directline.botframework.com/v3/directline/conversations/YOUR_CONVERSATION_ID/activities?watermark=YOUR_ACTIVITY_ID
Authorization:Bearer YOUR_DIRECTLINE_SECRET
例えば、Conversation を作成して、一度 Activity を Post した状態 (=activity id は 0000001) だと以下のように GET リクエストを送信します。
GET https://directline.botframework.com/v3/directline/conversations/YOUR_CONVERSATION_ID/activities?watermark=0000001
Authorization:Bearer YOUR_DIRECTLINE_SECRET
このように Activity Id : 0000001 に対する返答のみが取得できます。
{
  "activities": [
    {
      "type": "message",
      "id": "YOUR_CONVERSATION_ID|0000002",
      "timestamp": "2019-08-20T02:47:41.5989011Z",
      "channelId": "directline",
      "from": {
        "id": "bot20190820",
        "name": "bot20190820"
      },
      "conversation": {
        "id": "YOUR_CONVERSATION_ID"
      },
      "text": "Echo: こんにちは!",
      "inputHint": "acceptingInput",
      "attachments": [],
      "entities": [],
      "replyToId": "YOUR_CONVERSATION_ID|0000001"
    }
  ],
  "watermark": "2"
}