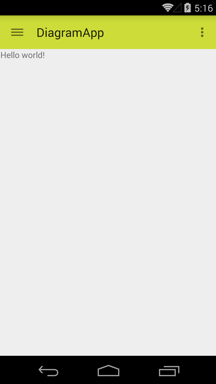
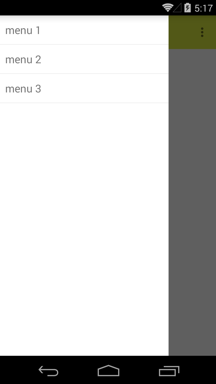
自分が関わるアプリにMaterialDesignを取り込んでいくために、試行錯誤したことをまとめます。(たぶん後で加筆すると思います。)
MaterialDesignにおけるActionBar
大きく分けると2種類あります。正確には本来のActionBarと、ActionBarの機能を持たせた新たなWidgetのToolBarの2つです。
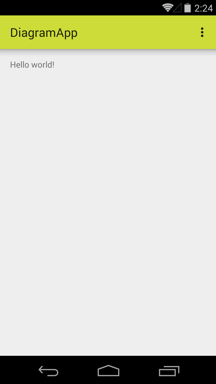
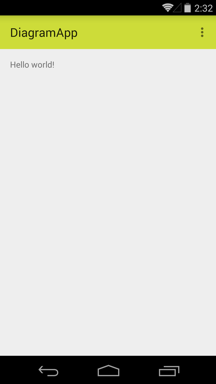
左図がActionBarで右図がToolBarです。デフォルトでの影の付き方が異なるだけで、あとはほとんど一緒です。
コードだと以下の通りです。(ここではAndroid4.4での実装を例にしてますので、appcompat-v7を使用してます。)
共通
dependencies {
    compile 'com.android.support:appcompat-v7:21.0.+'
}
ActinoBar
style.xml
    <style name="AppTheme" parent="Theme.AppCompat.Light.DarkActionBar">
    </style>
<RelativeLayout xmlns:android="http://schemas.android.com/apk/res/android"
    xmlns:tools="http://schemas.android.com/tools"
    android:layout_width="match_parent"
    android:layout_height="match_parent"
    android:paddingLeft="16dp"
    tools:context=".MainActivity">

    <TextView android:text="@string/hello_world"
        android:layout_width="wrap_content"
        android:layout_height="wrap_content" />

</RelativeLayout>
MainActivity.java
public class MainActivity extends ActionBarActivity {

    @Override
    protected void onCreate(Bundle savedInstanceState) {
        super.onCreate(savedInstanceState);
        setContentView(R.layout.activity_main);
    }
ToolBar
style.xml
    <style name="AppTheme" parent="Theme.AppCompat.Light.NoActionBar">
    </style>
activity_main.xml
<RelativeLayout xmlns:android="http://schemas.android.com/apk/res/android"
    xmlns:tools="http://schemas.android.com/tools"
    android:layout_width="match_parent"
    android:layout_height="match_parent"
    tools:context=".MainActivity">

    <android.support.v7.widget.Toolbar
        android:id="@+id/sample_toolbar"
        android:layout_width="match_parent"
        android:layout_height="wrap_content"
        android:minHeight="?attr/actionBarSize"
        android:background="?attr/colorPrimary"/>

    <TextView android:text="@string/hello_world" android:layout_width="wrap_content"
        android:layout_height="wrap_content"
        android:layout_below="@id/sample_toolbar"
        android:layout_marginTop="16dp"
        android:layout_marginLeft="16dp"/>

</RelativeLayout>
MainActivity.java
public class MainActivity extends ActionBarActivity {

    @Override
    protected void onCreate(Bundle savedInstanceState) {
        super.onCreate(savedInstanceState);
        setContentView(R.layout.activity_main);

        Toolbar toolbar = (Toolbar) findViewById(R.id.sample_toolbar);
        setSupportActionBar(toolbar);
    }
ActionBarの実装で気をつけること
- いくらstyleやxmlでActionBarについて設定したとしても、最終的には作成するActivityクラスにActionBarActivityを継承させないと表示されませんでした。
- 影をつけたくないときは、
getSupportActionBar().setElevation(0)すればいいっぽい。
ToolBarの実装で気をつけること
- styleで必ず
NoActionBarのテーマを使う - あくまでViewなのでレイアウトに気をつける
- 必ずonCreateで
setSupportActionBar()する
ナビゲーション・ドロワーを追加する
ActionBarでの実装の場合
ポイントは2点ありました。
- support.v7.app.ActionBarDrawerToggleクラスを使う
- 3本線と矢印の画像やアニメーションなども自動でつく
- ナビゲーション部分のレイアウトをStart側に寄せる指定をする
- 指定しないと実行は出来るけどクラッシュしました
activity_main.xml
<android.support.v4.widget.DrawerLayout
    xmlns:android="http://schemas.android.com/apk/res/android"
    android:id="@+id/drawer_layout"
    android:layout_width="match_parent"
    android:layout_height="match_parent">

    <!-- content -->
    <RelativeLayout
        android:layout_width="match_parent"
        android:layout_height="match_parent">

        <TextView
            android:text="@string/hello_world"
            android:layout_width="wrap_content"
            android:layout_height="wrap_content" />

    </RelativeLayout>

    <!-- nav drawer:ここをstart側に寄せる -->
    <LinearLayout
        android:layout_gravity="start"
        android:layout_width="280dp"
        android:layout_height="match_parent"
        android:background="#fff">

        <ListView
            android:id="@+id/listview"
            android:layout_width="wrap_content"
            android:layout_height="match_parent" />

    </LinearLayout>

</android.support.v4.widget.DrawerLayout>
MainActivity.java
public class MainActivity extends ActionBarActivity {

    private DrawerLayout vDrawerLayout;
    private ActionBarDrawerToggle vDrawerToggle;
    private ListView vListView;

    @Override
    protected void onCreate(Bundle savedInstanceState) {
        super.onCreate(savedInstanceState);
        setContentView(R.layout.activity_main);

        vDrawerLayout = (DrawerLayout) findViewById(R.id.drawer_layout);
        initDrawer();

        vListView = (ListView) findViewById(R.id.listview);
        vListView.setAdapter(new ArrayAdapter<String>(
                this, android.R.layout.simple_list_item_1, new String[]{"menu 1", "menu 2", "menu 3"}));
    }

    private void initDrawer() {
        // (3本線の)切り替えボタンの生成
        vDrawerToggle = new ActionBarDrawerToggle(this, vDrawerLayout, R.string.app_name, R.string.app_name);
        vDrawerToggle.setDrawerIndicatorEnabled(true);
        vDrawerLayout.setDrawerListener(vDrawerToggle);
        getSupportActionBar().setDisplayHomeAsUpEnabled(true);
        getSupportActionBar().setDisplayShowHomeEnabled(true);
    }

    @Override
    public boolean onCreateOptionsMenu(Menu menu) {
        getMenuInflater().inflate(R.menu.menu_main, menu);
        return true;
    }

    @Override
    public boolean onOptionsItemSelected(MenuItem item) {
        int id = item.getItemId();
        if (id == R.id.action_settings) {
            return true;
        }
        return vDrawerToggle.onOptionsItemSelected(item) || super.onOptionsItemSelected(item);
    }

    @Override
    protected void onPostCreate(Bundle savedInstanceState) {
        super.onPostCreate(savedInstanceState);
        vDrawerToggle.syncState();
    }

    @Override
    public void onConfigurationChanged(Configuration newConfig) {
        super.onConfigurationChanged(newConfig);
        vDrawerToggle.onConfigurationChanged(newConfig);
    }
}
Toolbarでの実装の場合
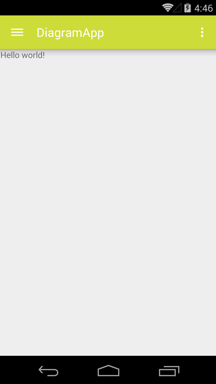
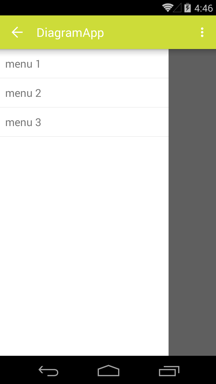
やることはActionBarの時と同じですが、Toolbarをコンテンツ領域のwidgetとしてLayoutファイルに記述するため、Navigation部分が覆いかぶさってきます。
activity_main.xml
<android.support.v4.widget.DrawerLayout
    xmlns:android="http://schemas.android.com/apk/res/android"
    android:id="@+id/drawer_layout"
    android:layout_width="match_parent"
    android:layout_height="match_parent">

    <!-- content -->
    <LinearLayout
        android:layout_width="match_parent"
        android:layout_height="match_parent"
        android:orientation="vertical">

        <android.support.v7.widget.Toolbar
            android:id="@+id/toolbar"
            android:layout_width="match_parent"
            android:layout_height="wrap_content"
            android:minHeight="?attr/actionBarSize"
            android:background="?attr/colorPrimary" />

        <TextView
            android:text="@string/hello_world"
            android:layout_width="wrap_content"
            android:layout_height="wrap_content" />

    </LinearLayout>

    <!-- nav drawer -->
    <LinearLayout
        android:layout_gravity="start"
        android:layout_width="280dp"
        android:layout_height="match_parent"
        android:orientation="vertical"
        android:background="#fff">

        <ListView
            android:id="@+id/listview"
            android:layout_width="wrap_content"
            android:layout_height="match_parent" />

    </LinearLayout>

</android.support.v4.widget.DrawerLayout>
MainActivity.java
public class MainActivity extends ActionBarActivity {

    private DrawerLayout vDrawerLayout;
    private ActionBarDrawerToggle vDrawerToggle;
    private ListView vListView;

    @Override
    protected void onCreate(Bundle savedInstanceState) {
        super.onCreate(savedInstanceState);
        setContentView(R.layout.activity_main);

        Toolbar toolbar = (Toolbar) findViewById(R.id.toolbar);
        setSupportActionBar(toolbar);

        vDrawerLayout = (DrawerLayout) findViewById(R.id.drawer_layout);
        initDrawer();

        vListView = (ListView) findViewById(R.id.listview);
        vListView.setAdapter(new ArrayAdapter<String>(
                this, android.R.layout.simple_list_item_1, new String[]{"menu 1", "menu 2", "menu 3"}));
    }

    private void initDrawer() {
        vDrawerToggle = new ActionBarDrawerToggle(this, vDrawerLayout, R.string.app_name, R.string.app_name);
        vDrawerToggle.setDrawerIndicatorEnabled(true);
        vDrawerLayout.setDrawerListener(vDrawerToggle);
        getSupportActionBar().setDisplayHomeAsUpEnabled(true);
        getSupportActionBar().setDisplayShowHomeEnabled(true);
    }

    @Override
    public boolean onCreateOptionsMenu(Menu menu) {
        getMenuInflater().inflate(R.menu.menu_main, menu);
        return true;
    }

    @Override
    public boolean onOptionsItemSelected(MenuItem item) {
        int id = item.getItemId();
        if (id == R.id.action_settings) {
            return true;
        }

        return vDrawerToggle.onOptionsItemSelected(item) || super.onOptionsItemSelected(item);
    }

    @Override
    protected void onPostCreate(Bundle savedInstanceState) {
        super.onPostCreate(savedInstanceState);
        vDrawerToggle.syncState();
    }

    @Override
    public void onConfigurationChanged(Configuration newConfig) {
        super.onConfigurationChanged(newConfig);
        vDrawerToggle.onConfigurationChanged(newConfig);
    }
}
どちらが良いか?
公式のガイドラインによると、Toolbarを使う形にしろと書いてあります。
けど、Google製アプリでもActionBarを使ってるものもあるし、今はまだケースバイケースかなーと感じます。
