こんにちは、Life is Tech!でWebサービスプログラミングコースのメンターをしております「がはく」です。
昨日のAWS re:Inventのkeynoteで発表されリリースされたAWS LambdaのRubyランタイム対応、早速試してみました。
今回作るもの
 初学者のメンバーには最初に作っていただく、カウントアプリを今回作っていきたいと思います。
プラスボタンが押されたらDB内の指定のレコードの値が1足されるというような実装を行っております。
AWSよりSinatraをLambdaで動かすサンプルがアップされていたので参考にしました。
こちら→[serverless-sinatra-sample
](https://github.com/aws-samples/serverless-sinatra-sample)
構成図
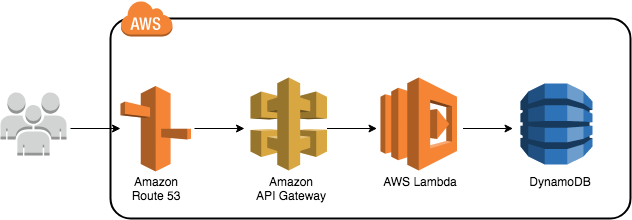
node.jsでWeb作るときの構成とほぼ同じです。API GatewayよりLambda関数を呼び出し、Lambdaと相性のいいNoSQLのDynamoDBにカウントした数字を入れます。
作業環境
・git
・Ruby(2.5.0)
・AWS CLI
等は必要になるので適宜インストールしてください。
使うgem
今回は以下のgemを使用します。
gem 'sinatra'
gem 'rack-contrib'
gem 'aws-record'
dynamoDBを使用するためこのような構成になっています。終わったら、bundle installをかけるのをお忘れなく。
#1 コントローラの作成
基本的には/がリクエストされたらdynamoDB内の指定のレコードの数字を返し、/minusや/plusがリクエストされたらdynamoDB内の指定のレコードの数字を1ずつ増減させ、/にリダイレクトさせるような実装を行っております。
require 'bundler/setup'
Bundler.require
require 'aws-record'

class CountTable
  include Aws::Record
  string_attr :id, hash_key: true
  integer_attr :number
  epoch_time_attr :ts
end


before do
  if CountTable.scan().empty?
    table = CountTable.new(id: SecureRandom.uuid,number: 0,ts: Time.now)
    table.save!
  end
end

get '/' do
  table = CountTable.scan()
  @number = table.first.number
  erb :index
end

get '/plus' do
  table = CountTable.scan()
  count = table.first
  number = count.number + 1
  record = CountTable.update(id: count.id,number: number,ts: Time.now)
  redirect "/"
end

get '/minus' do
  table = CountTable.scan()
  count = table.first
  number = count.number - 1
  record = CountTable.update(id: count.id,number: number,ts: Time.now)
  redirect "/"
end
#2 viewの実装
viewはよしなに作っていきます。
<!DOCTYPE html>
<html lang="ja">
<head>
  <meta charset="UTF-8">
  <title>Serverless-Count</title>
</head>

<body>
<h1><%= @number %></h1>
<form action="/plus" method="get">
  <input type="submit" value="+">
</form>

<form action="/minus" method="get">
  <input type="submit" value="-">
</form>
</body>
</html>
#3 lambdaの動きの実装
この辺はAWSが提供しているサンプルをそのまま使わせていただきました。(特に弄る必要はないと思ったので)
ただ、結構queryの返し方に癖があったり、rackの動きに気持ち悪いところがあるので、時間あるときに直していきたいですね。
require 'json'
require 'rack'

# Global object that responds to the call method. Stay outside of the handler
# to take advantage of container reuse
$app ||= Rack::Builder.parse_file("#{File.dirname(__FILE__)}/app/config.ru").first

def handler(event:, context:)
  # Environment required by Rack (http://www.rubydoc.info/github/rack/rack/file/SPEC)
  env = {
    "REQUEST_METHOD" => event['httpMethod'],
    "SCRIPT_NAME" => "",
    "PATH_INFO" => event['path'] || "",
    "QUERY_STRING" => event['queryStringParameters'] || "",
    "SERVER_NAME" => "localhost",
    "SERVER_PORT" => 443,

    "rack.version" => Rack::VERSION,
    "rack.url_scheme" => "https",
    "rack.input" => StringIO.new(event['body'] || ""),
    "rack.errors" => $stderr,
  }
  # Pass request headers to Rack if they are available
  unless event['header'].nil?
    event['headers'].each{ |key, value| env[key] = "HTTP_#{value}" }
  end

  begin
    # Response from Rack must have status, headers and body
    status, headers, body = $app.call(env)

    # body is an array. We simply combine all the items to a single string
    body_content = ""
    body.each do |item|
      body_content += item.to_s
    end

    # We return the structure required by AWS API Gateway since we integrate with it
    # https://docs.aws.amazon.com/apigateway/latest/developerguide/set-up-lambda-proxy-integrations.html
    response = {
      "statusCode" => status,
      "headers" => headers,
      "body" => body_content
    }
  rescue Exception => msg
    # If there is any exception, we return a 500 error with an error message
    response = {
      "statusCode" => 500,
      "body" => msg
    }
  end
  # By default, the response serializer will call #to_json for us
  response
end
require 'rack'
require 'rack/contrib'
require_relative './app'

set :root, File.dirname(__FILE__)

run Sinatra::Application
#4 CloudFormationのyaml作成
こちらも先程のAWSのサンプルを参考にし、改変しました。
変えた点がテーブル名だったり、Lambda関数の名前だったりします。ここでガガッとAWS周りの設定をしていきます。
AWSTemplateFormatVersion: '2010-09-09'
Transform: 'AWS::Serverless-2016-10-31'

Resources:
  SinatraFunction:
    Type: 'AWS::Serverless::Function'
    Properties:
      FunctionName: CountApp
      Handler: lambda.handler
      Runtime: ruby2.5
      Policies:
        - DynamoDBCrudPolicy:
            TableName: !Ref CountTable
      CodeUri: "./"
      MemorySize: 512
      Timeout: 30
      Events:
        SinatraApi:
            Type: Api
            Properties:
                Path: /
                Method: ANY
                RestApiId: !Ref SinatraAPI
  SinatraAPI:
    Type: AWS::Serverless::Api
    Properties:
      Name: SinatraAPI
      StageName: Prod
      DefinitionBody:
        swagger: '2.0'
        basePath: '/Prod'
        info:
          title: !Ref AWS::StackName
        paths:
          /{proxy+}:
            x-amazon-apigateway-any-method:
              responses: {}
              x-amazon-apigateway-integration:
                uri:
                  !Sub 'arn:aws:apigateway:${AWS::Region}:lambda:path/2015-03-31/functions/${SinatraFunction.Arn}/invocations'
                passthroughBehavior: "when_no_match"
                httpMethod: POST
                type: "aws_proxy"
          /:
            get:
              responses: {}
              x-amazon-apigateway-integration:
                uri:
                  !Sub 'arn:aws:apigateway:${AWS::Region}:lambda:path/2015-03-31/functions/${SinatraFunction.Arn}/invocations'
                passthroughBehavior: "when_no_match"
                httpMethod: POST
                type: "aws_proxy"
  ConfigLambdaPermission:
    Type: "AWS::Lambda::Permission"
    DependsOn:
    - SinatraFunction
    Properties:
      Action: lambda:InvokeFunction
      FunctionName: !Ref SinatraFunction
      Principal: apigateway.amazonaws.com
  CountTable:
    Type: AWS::Serverless::SimpleTable
    Properties:
      TableName: CountTable
      PrimaryKey:
        Name: id
        Type: String
      ProvisionedThroughput:
        ReadCapacityUnits: 5
        WriteCapacityUnits: 5
Outputs:
  SinatraAppUrl:
    Description: App endpoint URL
    Value: !Sub "https://${SinatraAPI}.execute-api.${AWS::Region}.amazonaws.com/Prod/"
#5 デプロイ
ここまで来たらあとはデプロイするだけです。まずはgemを vendor/bundle に入れます。(gemごとS3にアップし、lambdaにインポートしないといけないため)
bundle install --deployment
続いて、今までのファイルをパッケージし、S3にアップロードします。(S3バゲットは事前に作っておいてください)
$ aws cloudformation package \
     --template-file template.yaml \
     --output-template-file serverless-output.yaml \
     --s3-bucket <S3 budget>
最後にこちらをCloudFormationを用いてデプロイします。
$ aws cloudformation deploy --template-file serverless-output.yaml \
     --stack-name serverless-sinatra \
     --capabilities CAPABILITY_IAM
これで完成です。
https://<hogehoge>.execute-api.ap-northeast-1.amazonaws.com/Prod でアクセスできるはずです。
カスタムドメインにしたければARMを用意して、API GatewayとRoute53でよしなにやるとできます。
まとめ
いよいよRubyにもサーバレスの時代がやってきました。
乗るしかねえこのビッグウェーブにと触ってみましたが、IoTを用いたサービス等、ミニマムなサービスをデプロイするのにすごく便利だなと思いました。これからしっかり活用して行きたいですね。
