始めに
swiper.jsとはカルーセル機能を簡単に実装できるプラグインです。
バージョン6系よりディレクトリ構造が大きく変わったみたいなので、最新の導入方法と実装例を合わせて紹介したいと思います。
挙動
開発環境
- macOS Catalina
- Ruby 2.6.5
- Ruby on Rails 6.0.0
目次
1.導入方法
導入方法に関しては3つの手段があります。
1 CDNを通して実装
2 yarnでインストール
3 npmでインストール
僕の場合は3の方法でswiper.jsをインストールしました。Node.jsがmacにインストール済みであれば2と3はどちらの方法でもできます。1に関してはswiper.jsの提供側のサーバーに何らかの不具合が発生するとこちらで使用できなくなってしまうので、ファイルは自分の元にダウンロードしたほうがいいと判断しました。
今回はswiper.jsの説明に焦点を当てたいのでNode.jsのインストールに関しては割愛させていただきます。
npm install
公式リファレンスに準拠しインストールします。
↓
Swiper.js公式
$ npm install swiper
インストールが完了するとnode_modulesディレクトリ以下にいろんなファイルとフォルダが生成されます。
これで導入は完了です。
2. 実装準備
僕は不要なファイルは削除したので画像は生成されたものの一部ですがswiper-bundle.min.jsとswiper-bundle.min.cssの2つのファイルがあれば機能は実装できます。(僕の場合はScssで記述しているのでswiper-bundle.min.cssはswiper-bundle.min.scssにファイル名を変更しています)
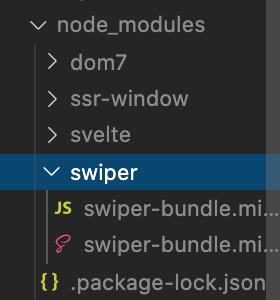
# 使用するファイルを抜粋
node_modules
|-swiper
    |-swiper-bundle.min.js
    |-swiper-bundle.min.css
Rails側の設定
node以下のファイルを読み込めるように設定します。
config/initializers/assets.rbが以下の記述になっているか確認してください。
Rails.application.config.assets.paths << Rails.root.join('node_modules')
ファイルの読み込み
jsファイルとcssファイルをアプリ全体に読み込みさせます。
# 最後尾に追記
//= require swiper/swiper-bundle.js
# ファイル名をcssをからcssに変更している場合は以下のように追記
@import 'swiper/swiper-bundle';
Viewの記述
この部分はひとによって変わってくるのですが、インストールしたswiper-bundle-min.cssを適用させるために
.swiper-container、.swiper-wrapper、.swiper-slideの3つのクラスは最低限記述しましょう。
僕の場合はデータベースに保存してある画像を繰り返し処理でスライドさせているのであくまで例ですが以下のように記述しています。
ここは公式も参考にしてください。
<div class="swiper-container">
  <div class="swiper-wrapper">
    <% @banners.each do |banner| %>
      <div class="swiper-slide" style="background-image: url(<%= banner.banner_image %>);">
        <%= link_to banner_path(banner.id), class: "bannerLink" do %>
        <% end %>
      </div>
    <% end %>
  </div>

  <!-- ナビゲーションバーが必要な場合は追記 -->
  <div class="swiper-pagination"></div>


  <!-- ボタンが必要な場合は追記 -->
  <div class="swiper-button-prev"></div>
  <div class="swiper-button-next"></div>
</div>
swiper-container {
  width: 100%;
  height: 350px; #お好みの高さ
  background-color: rgba(0,0,0,0.8  );

  .swiper-wrapper {

    .swiper-slide {
      background-repeat: no-repeat;
      background-position: center;
      background-size: cover;
      height: 350px;
      width: 350px;
      border-radius: 50%;
    }
  # 正面のスライド以外は小さく&半透明に
    .swiper-slide:not(.swiper-slide-active) {
      transform: scale(0.5);
      opacity: 0.3;
    }
  }
jsファイルの作成
任意のjsファイルを作成し、カルーセルの初期値を記述していきます。
const swiper = new Swiper('.swiper-container', {
  // Optional parameters
  direction: 'vertical',
  loop: true,

  // If we need pagination
  pagination: {
    el: '.swiper-pagination',
  },

  // Navigation arrows
  navigation: {
    nextEl: '.swiper-button-next',
    prevEl: '.swiper-button-prev',
  },

  // And if we need scrollbar
  scrollbar: {
    el: '.swiper-scrollbar',
  },
});
以上で準備は完了です!
あとはjsファイルにいろんな設定を記述していきましょう。
3. 実装例
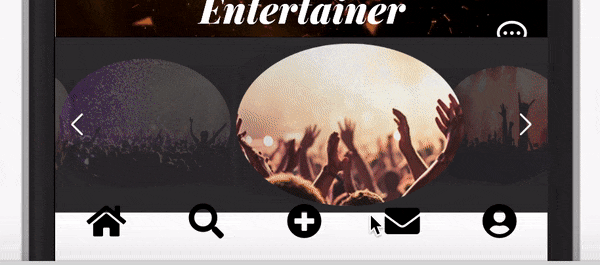
冒頭で紹介したカルーセルはこのような記述で実装しました。
# Turbolinksの無効化
$(document).ready(function() {
  const swiper = new Swiper('.swiper-container', {
    effect: 'coverflow',
    // エフェクトの設定
    coverflowEffect: {
      depth: 500,
      modifire: 20
    },
   // 回転
    rotate: 30,
    // 一度に表示するスライド数
    slidesPerView: 2,
    // 現在のスライドを真ん中に
    centeredSlides: true,
   // スライドがループ
    loop: true,
   //スライドが入れ替わる速さ
    speed: 1000,
    // 自動でスライド
    autoplay: {
      delay: 800
    },
  });
});
他にも様々なメソッドが用意されているので各自で試してみてください!
https://swiperjs.com/swiper-api