どうも、@amyu_sanです。
本稿はDroidKaigi2016にCFPで出した内容の一部書き出しとなります。
お断り
Interpolatorの解説は一切しないため、Interpolatorは何かを知りたい場合には全く役に立ちません。
Interpolatorを知りたい場合はググっていただくか、
- [Android Animations Tutorial 5: More on Interpolators] (http://cogitolearning.co.uk/?p=1078)
- Interpolatorを作ったリッチなViewのAnimation
などなどをぜひご参考ください。
また、本稿の最後に今回作ったViewのサンプルコードを公開したGithubへのリンクを貼っておきます。
そのため、コードを一部抜粋して解説します。
今回作るもの

recruit-lifestyle/WaveSwipeRefreshLayoutの円が落ちた時にバウンドするAnimationです。
もっと近寄ってみると、このようなアニメーションになっています。

様々な実装方法があるとは思いますが、実際に実装したInterpolatorの使い方をご紹介します。
Interpolatorの用意
public class DropBounceInterpolator implements Interpolator {

    public DropBounceInterpolator() {
    }

    @SuppressWarnings({"UnusedDeclaration"})
    public DropBounceInterpolator(Context context, AttributeSet attrs) {
    }

    @Override
    public float getInterpolation(float v) {
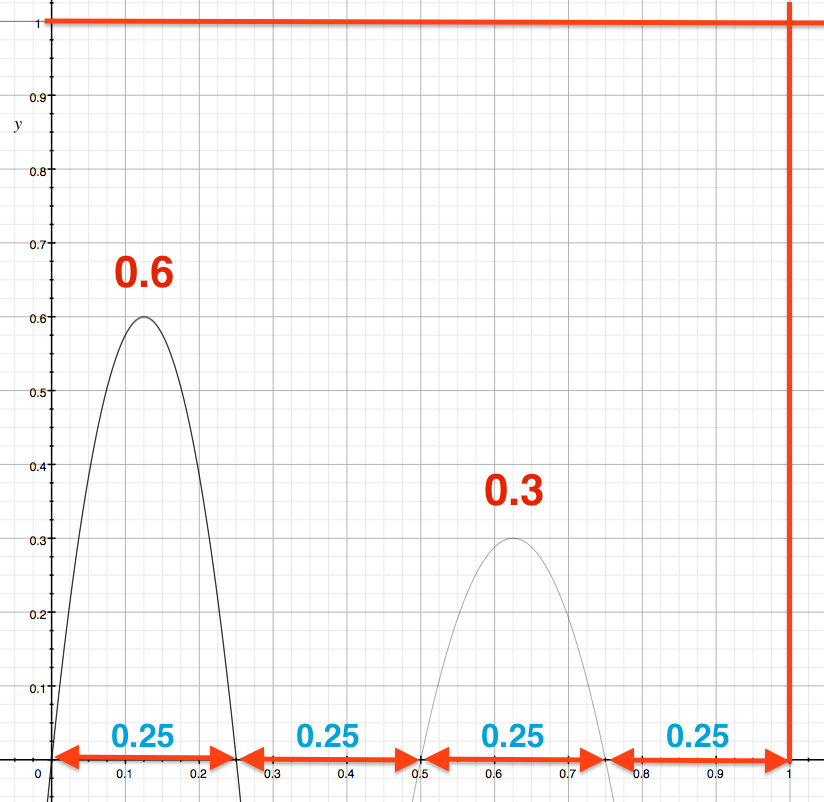
        //y = -19 * (x - 0.125)^2 + 1.3     (0 <= x < 0.25)
        //y = -6.5 * (x - 0.625)^2 + 1.1    (0.5 <= x < 0.75)
        //y = 0                             (0.25 <= x < 0.5 && 0.75 <= x <=1)

        if (v < 0.25f) {
            return -38.4f * (float) Math.pow(v - 0.125, 2) + 0.6f;
        } else if (v >= 0.5 && v < 0.75) {
            return -19.2f * (float) Math.pow(v - 0.625, 2) + 0.3f;
        } else {
            return 0;
        }
    }
}
コードだけではわかりにくいので、実際どういうグラフになっているのか解説します。

各グラフのx軸との接点どうしが、0.25ずつ、グラフ間を0.25とった数式になっています。
勘の良い方はこのグラフと上記のGifで実装方法が考えつくかと思います。
Viewの実装と解説
//横方向への伸びのAnimator
mDropBounceVerticalAnimator = ValueAnimator.ofFloat(0.f, 1.f);
mDropBounceVerticalAnimator.setDuration(DROP_BOUNCE_ANIMATOR_DURATION);
mDropBounceVerticalAnimator.addUpdateListener(mAnimatorUpdateListener);
//Interpolatorのセット
mDropBounceVerticalAnimator.setInterpolator(new DropBounceInterpolator());
mDropBounceVerticalAnimator.start();

mDropBounceHorizontalAnimator = ValueAnimator.ofFloat(0.f, 1.f);
mDropBounceHorizontalAnimator.setDuration(DROP_BOUNCE_ANIMATOR_DURATION);
mDropBounceHorizontalAnimator.addUpdateListener(mAnimatorUpdateListener);
mDropBounceHorizontalAnimator.setInterpolator(new DropBounceInterpolator());
mDropBounceHorizontalAnimator.setStartDelay((long) (DROP_BOUNCE_ANIMATOR_DURATION * 0.25));
mDropBounceHorizontalAnimator.start();
本稿のキモとなってくる部分が
mDropBounceHorizontalAnimator.setStartDelay((long) (DROP_BOUNCE_ANIMATOR_DURATION * 0.25));
この縦伸びのAnimatorにDelayを設定する部分になっています。
グラフで見て分かる通り0.25ずつずらしていたため、Delayを0.25*mDropBounceVerticalAnimator#Durationにしています。
すると、時間 0~1の間に以下のようになります。

赤色のグラフが横方向、青色のグラフが縦方向になっています。
横の伸びが終わった瞬間に縦がうまく始まるアニメーションを実装できているのが分かります。
うまくValueAnimatorを設定できたら、サクッとonDrawの中身を書けば完成です。
まとめ
An interpolator defines the rate of change of an animation. This allows the basic animation effects (alpha, scale, translate, rotate) to be accelerated, decelerated, repeated, etc.
と、Interpolatorの説明でありますが、使い方を工夫するだけで、様々なことが出来ます。
今回のように
- 2段階で大きさを変えたい
- 2段階で大きさを変えたい * 2 (縦横)
のような場合普通に脳筋で実装するとものすごいことになります。
ただ、Interpolatorを従来の使い方以外でうまく使うことによって、実装時間やコードの綺麗さも大きくかわると考えています。
Viewをゴリゴリ書くには必須のアイテムといえますね!
と言った感じで締めくくらせていただきます。