 概要
概要
Laravel 5.1でCSVインポート機能を実装するにあたり、LaravelのライブラリLaravel-Excelを使ったので、その方法について紹介したいと思います。
また、「CSV」とタイトルにありますが、Laravel-Excelではその名の通り、xls等の形式にも対応していますので、Excelのシートごとに処理するということもできます。大変便利です。
http://www.maatwebsite.nl/laravel-excel/docs/import
1. Laravel-Excelのインストール
まずはじめにLaravel-Excelのインストールを行います。
composer.jsonに以下のようにインストールするライブラリを追加します。
"require": {
    "php": ">=5.5.9",
    "laravel/framework": "5.1.*",
    "maatwebsite/excel": "~2.1.0"
}
そして、composer updateを実行し、インストールします。
$ composer update
インストール後は config/app.phpを下記の一行を追加します。
'providers' => [
    (中略)
    'Maatwebsite\Excel\ExcelServiceProvider',
],
'aliases' => [
    (中略)
    'Excel' => 'Maatwebsite\Excel\Facades\Excel',
],
2. 保存先のテーブルを用意する
CSVから取り込んだ値を保存するDBとテーブルを用意します。
サンプルとして下記のようなマイグレーションファイルを作成します。
$ php artisan make:migration create_tasks_table
<?php

use Illuminate\Database\Schema\Blueprint;
use Illuminate\Database\Migrations\Migration;

class CreateTasksTable extends Migration
{
    /**
     * Run the migrations.
     *
     * @return void
     */
    public function up()
    {
        Schema::create('tasks', function (Blueprint $table) {
            $table->increments('id')->comment('ID');
            $table->string('name')->comment('タスク名');
            $table->timestamps();
        });
    }

    /**
     * Reverse the migrations.
     *
     * @return void
     */
    public function down()
    {
        Schema::drop('tasks');
    }
}
マイグレーションを実行し、テーブルを作成します。
$ php artisan migrate
3. インポートするファイルを選択する画面の実装
まずルーティング設定をします。
画面の完成形のイメージとしては、DBにインサートしたいCSVファイル選択画面があって、そこでCSVファイルを選択して保存すると、DBに保存され、その結果が表示される、というものを想定します。
Route::get('/',  [
    'as' => 'index',
    'uses' => 'CsvController@index'
]);

Route::post('/import', [
    'as' => 'import',
    'uses' => 'CsvController@import'
]);
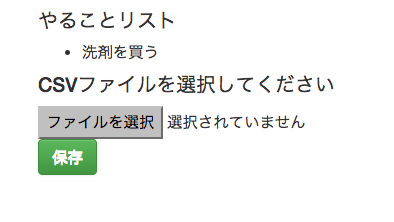
ファイル選択画面は下記のように実装しました。
サンプルなのでデザインが手抜き感満載ですが、ご了承ください![]()
CSVをアップロードすると、このやることリストにCSVに書かれた内容が追加されます。
ファイルアップロードのフォーム部分は、下記のようなコードになってます。
他にも記述していますが、今回はそこは省略します。
    <h4>CSVファイルを選択してください</h4>
    <form role="form" method="post" action="{{ route('import') }}" enctype="multipart/form-data">
        {{ csrf_field() }}
        <input type="file" name="csv_file" id="csv_file">
        <div class="form-group">
            <button type="submit" class="btn btn-default btn-success">保存</button>
        </div>
    </form>
4. CSVをパースしたデータをインポートする処理
さていよいよLaravel-Excelを使う処理です。
基本的にはライブラリを使用するコントローラにuse Excelを追加し、Excel::load()でアップロードされたファイルを読み込みます。
また、$this->task->firstOrNewを使用しているため、すでに同じ名前のタスクが登録されていた場合は、それを更新するようにしています。
ちなみに冒頭でも記載したとおり、拡張子が.xlsのExcelファイルでも問題ありません。
name
牛乳を買う
本をよむ
Qiitaに投稿する
<?php

namespace App\Http\Controllers;

use Illuminate\Http\Request;

use App\Http\Controllers\Controller;
use App\Task;
use Excel;

class CsvController extends Controller
{
    protected $task = null;

    public function __construct(Task $task)
    {
        $this->task = $task;
    }
    /**
     * Display a listing of the resource.
     *
     * @return \Illuminate\Http\Response
     */
    public function index()
    {
        $data = [];
        $data['tasks'] = $this->task->all();
        return view('index', $data);
    }

    /**
     * CSVインポート
     *
     * @param  Request
     * @return \Illuminate\Http\Response
     */
     public function import(Request $request)
     {
         $file = $request->file('csv_file');
         $reader = Excel::load($file->getRealPath());

         $rows = $reader->toArray();

         foreach ($rows as $row){
             if (!isset($row['name'])) {
                 return redirect()->back();
             }

             $record = $this->task->firstOrNew(['name' => $row['name']]);
             $record->name = $row['name'];
             $record->save();
         }
         return redirect()->action('CsvController@index');
     }
}
CSVファイルアップロード後、「保存」をクリックするとリストに無事追加されていることが確認できるはずです!

おまけ:遭遇したエラーとその解決方法
 tijsverkoyen/css-to-inline-stylesの2.2.0だと再帰処理のエラーが発生
Laravel-ExcelでCSVファイルを読み込もうとすると、下記のエラーが発生しました。
Maximum function nesting level of '100' reached, aborting!
エラー内容は、再帰処理が100回以上繰り返されてる時に出るエラーなのですが、今回実装した箇所に問題は無さそうでした。
どこでエラーが出てるのかを調べてみたところ、vendor/symfony/css-selector/XPath/Extension/ExtensionInterface.phpでエラーが発生していることから、
Laravel-Excelが使用してるライブラリtijsverkoyen/css-to-inline-stylesが怪しいのではないかと目処を付けました。
https://github.com/tijsverkoyen/CssToInlineStyles
Laravel-Excelのcomposer.jsonを見てみると、下記のように指定されており、2系の最新版がインストールされるような指定になっていました。
"tijsverkoyen/css-to-inline-styles": "~2.0"
実際にcomposer updateしたときのログを遡ってみると、2.2.0がインストールされていました。
どうやらこの最新版である2.2.0で発生しているようです。
 2.0.0のバージョンを指定することで解決
試しにバージョンを落として、2.0.0のtijsverkoyen/css-to-inline-stylesをインストールしてみたところ、このエラーが無くなりました。
根本的な原因は解決できていないですが、とりあえずは下記のようにcomposer.jsonでバージョンを2.0.0に指定してやると良いと思います。
"tijsverkoyen/css-to-inline-styles": "2.0.0"
参考
- Laravel Excel Documentation - Maatwebsite
- Maatwebsite/Laravel-Excel: An eloquent way of importing and exporting Excel and CSV files for Laravel with the power of PHPExcel
- Laravel-Excelではなく「goodby/csv」というライブラリを使用する方法もあります。それはこちらの記事が参考になります!
