はてなブログで画像の設定されていないブログ記事をシェアした際に、ブログタイトルと本文から画像を生成してアイキャッチに設定してくれる機能がリリースされ話題になりました。
昨今ブログ記事に限らず種々のサービスにおいて、コンテンツをSNSシェアした際にいかに目立たせるかという部分であるアイキャッチのOGP画像設定の重要性は言わずもがなかと思います。
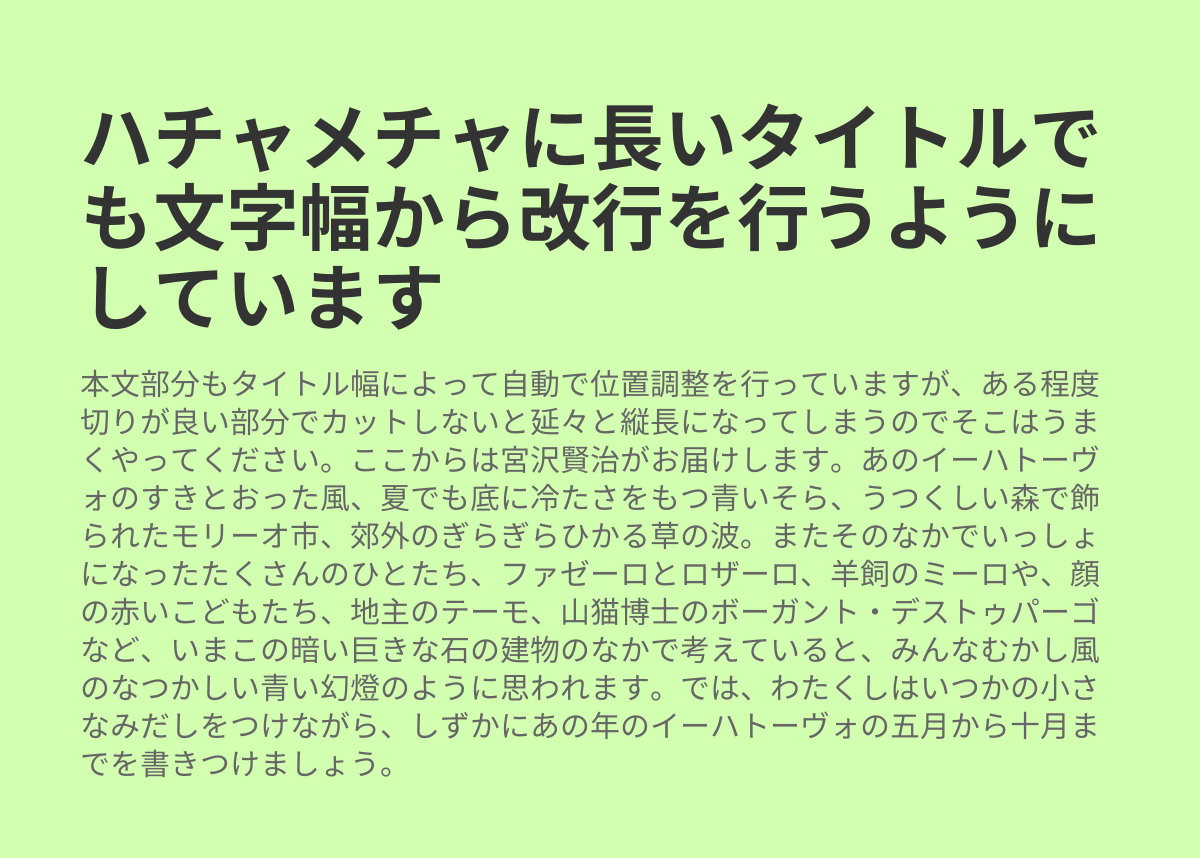
自分自身も運営しているサービスで動的にOGPを作成するいわゆる「OGP芸」をよくやっているのですが、今後ますます必要性が高まると考え、OGP芸用のたたき台にする処理テンプレートを作成しました。
成果物サンプル
ソースコード
const fs = require("fs");
const { createCanvas } = require('canvas')
const base64 = require('urlsafe-base64');
// canvasの横幅
let canvasWidth = 1200;
// canvasの縦幅
let canvasHeight = 630;
let canvas;
let ctx;

// タイトル部分の文字スタイル
const titleFontStyle = {
    font: 'bold 73px "Noto Sans CJK JP"',
    lineHeight: 80,
    color: '#333333'
};
// 本文部分の文字スタイル
const bodyFontStyle = {
    font: '30px "Noto Sans CJK JP"',
    lineHeight: 38,
    color: '#666666'
};
// 画像内側余白
let padding = 80;

// 背景色
let backgroundColor = "#d3ffb1";

let generate = (title, body, fileName) => {
    // 空白のcanvasを作成
    canvas = createCanvas(canvasWidth, canvasHeight)
    // コンテキスト取得
    ctx = canvas.getContext('2d')
    // -----
    // タイトル描画
    // -----
    // 行長さ
    let lineWidth = canvasWidth - (padding * 2);
    // フォント設定
    ctx.font = titleFontStyle.font;
    // 行数の割り出し
    let titleLines = splitByMeasureWidth(title, lineWidth, ctx);
    let titleLineCnt = titleLines.length;
    // タイトル分の高さ
    let titleHeight = titleLines.length * titleFontStyle.lineHeight;

    // -----
    // 本文部分描画
    // -----
    let titleMargin = 40;
    // フォント設定
    ctx.font = bodyFontStyle.font;
    // 行数の割り出し
    let bodyLines = splitByMeasureWidth(body, lineWidth, ctx);
    let bodyLineCnt = bodyLines.length;

    // 本文分の高さ
    let bodyHeight = bodyLines.length * bodyFontStyle.lineHeight;

    // 行高さと余白が最小高さ(630)を上回る場合はカンバスをリサイズする
    let contentHeight = titleHeight + titleMargin + bodyHeight + (padding * 2);
    if (canvasHeight < contentHeight) {
        canvasHeight = contentHeight
        canvas = createCanvas(canvasWidth, contentHeight)
        ctx = canvas.getContext('2d')
    }

    // 取り敢えず背景色をつける
    ctx.fillStyle = backgroundColor;
    ctx.fillRect(0, 0, canvasWidth, canvasHeight)

    // 文字描画のベースラインを設定
    ctx.textBaseline = 'top';
    // タイトルを描画
    ctx.fillStyle = titleFontStyle.color;
    ctx.font = titleFontStyle.font;
    for (let index = 0; index < titleLineCnt; index++) {
        const element = titleLines[index];
        ctx.fillText(element, padding, padding + (titleFontStyle.lineHeight * index))
    }
    // 本文を描画
    ctx.fillStyle = bodyFontStyle.color;
    ctx.font = bodyFontStyle.font;
    for (let index = 0; index < bodyLineCnt; index++) {
        const element = bodyLines[index];
        // タイトル分の高さと余白を加算する
        ctx.fillText(element, padding, padding + (titleHeight + titleMargin) + (bodyFontStyle.lineHeight * index))
    }

    let b64 = canvas.toDataURL().split(',');
    let img = base64.decode(b64[1]);
    // ファイル保存
    fs.writeFile(fileName, img, function (err) {
        console.log(err);
    });
}

function splitByMeasureWidth(str, maxWidth, context) {
    // サロゲートペアを考慮した文字分割
    let chars = Array.from(str);
    let line = '';
    let lines = [];
    for (let index = 0; index < chars.length; index++) {
        if (maxWidth <= context.measureText(line + chars[index]).width) {
            lines.push(line);
            line = chars[index];
        }
        else {
            line += chars[index];
        }
    }
    lines.push(line);
    return lines;
}

module.exports = {
    generate: generate
};
動作に必要なリソース
処理ライブラリ(node-canvas)
https://github.com/Automattic/node-canvas
画像の作成にはnode-canvasを使用します。
インストールとコンパイル用の必要リソースのセットアップ方法については当該ライブラリのReadmeをご参照いただき環境に合わせて準備を行ってください。
フォント
今回はNotoフォントを使用しており、動作環境にインストールされている前提としています。
動的に画像を作成する場合について、フォントによっては使用ライセンスが異なる取り扱いになる場合があるため注意が必要です。
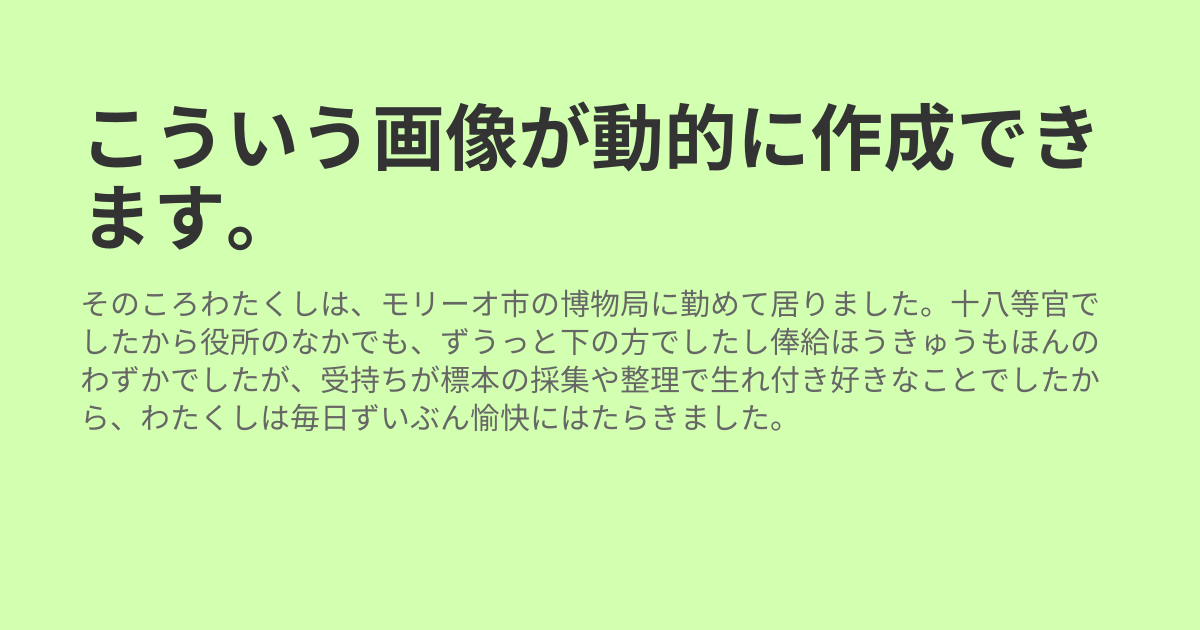
使い方
var ogpGenerator = require('./ogpGenerator');
ogpGenerator.generate(
    'こういう画像が動的に作成できます。',
    'そのころわたくしは、モリーオ市の博物局に勤めて居りました。十八等官でしたから役所のなかでも、ずうっと下の方でしたし俸給ほうきゅうもほんのわずかでしたが、受持ちが標本の採集や整理で生れ付き好きなことでしたから、わたくしは毎日ずいぶん愉快にはたらきました。',
    './YOUR_FILE_NAME.jpg'
);
背景に画像をつけたりとか、改行コードに対応したりとかそういうのは必要に応じて適宜どうぞ。