Redmineのための簡単なタイムトラッカー
0. 変更履歴
| 日付 | 変更点 |
|---|---|
| 2022-11-24 | Redmine に送信する時間がいつもゼロになっていた。javascript のstart=stop の場所を修正 |
1. はじめに
1.1 背景
redmine は各種共同開発のために利用される。ところが、機能が多い。一方で、REST API が提供されているので、redmine をバックエンドとして、フロントエンドのツールが開発されている。自分の仕事の成果を上げるためには、作業時間の見える化が必要で、そのためのツールも、もちろんある。ところが、そのようなツールは有料だったり、個人には過大だったりする。いくつもの仕事が同時平行で、他の人のチケットを気にしない、という人のためのツールがほしい。
自分で作る。
1.2 設計
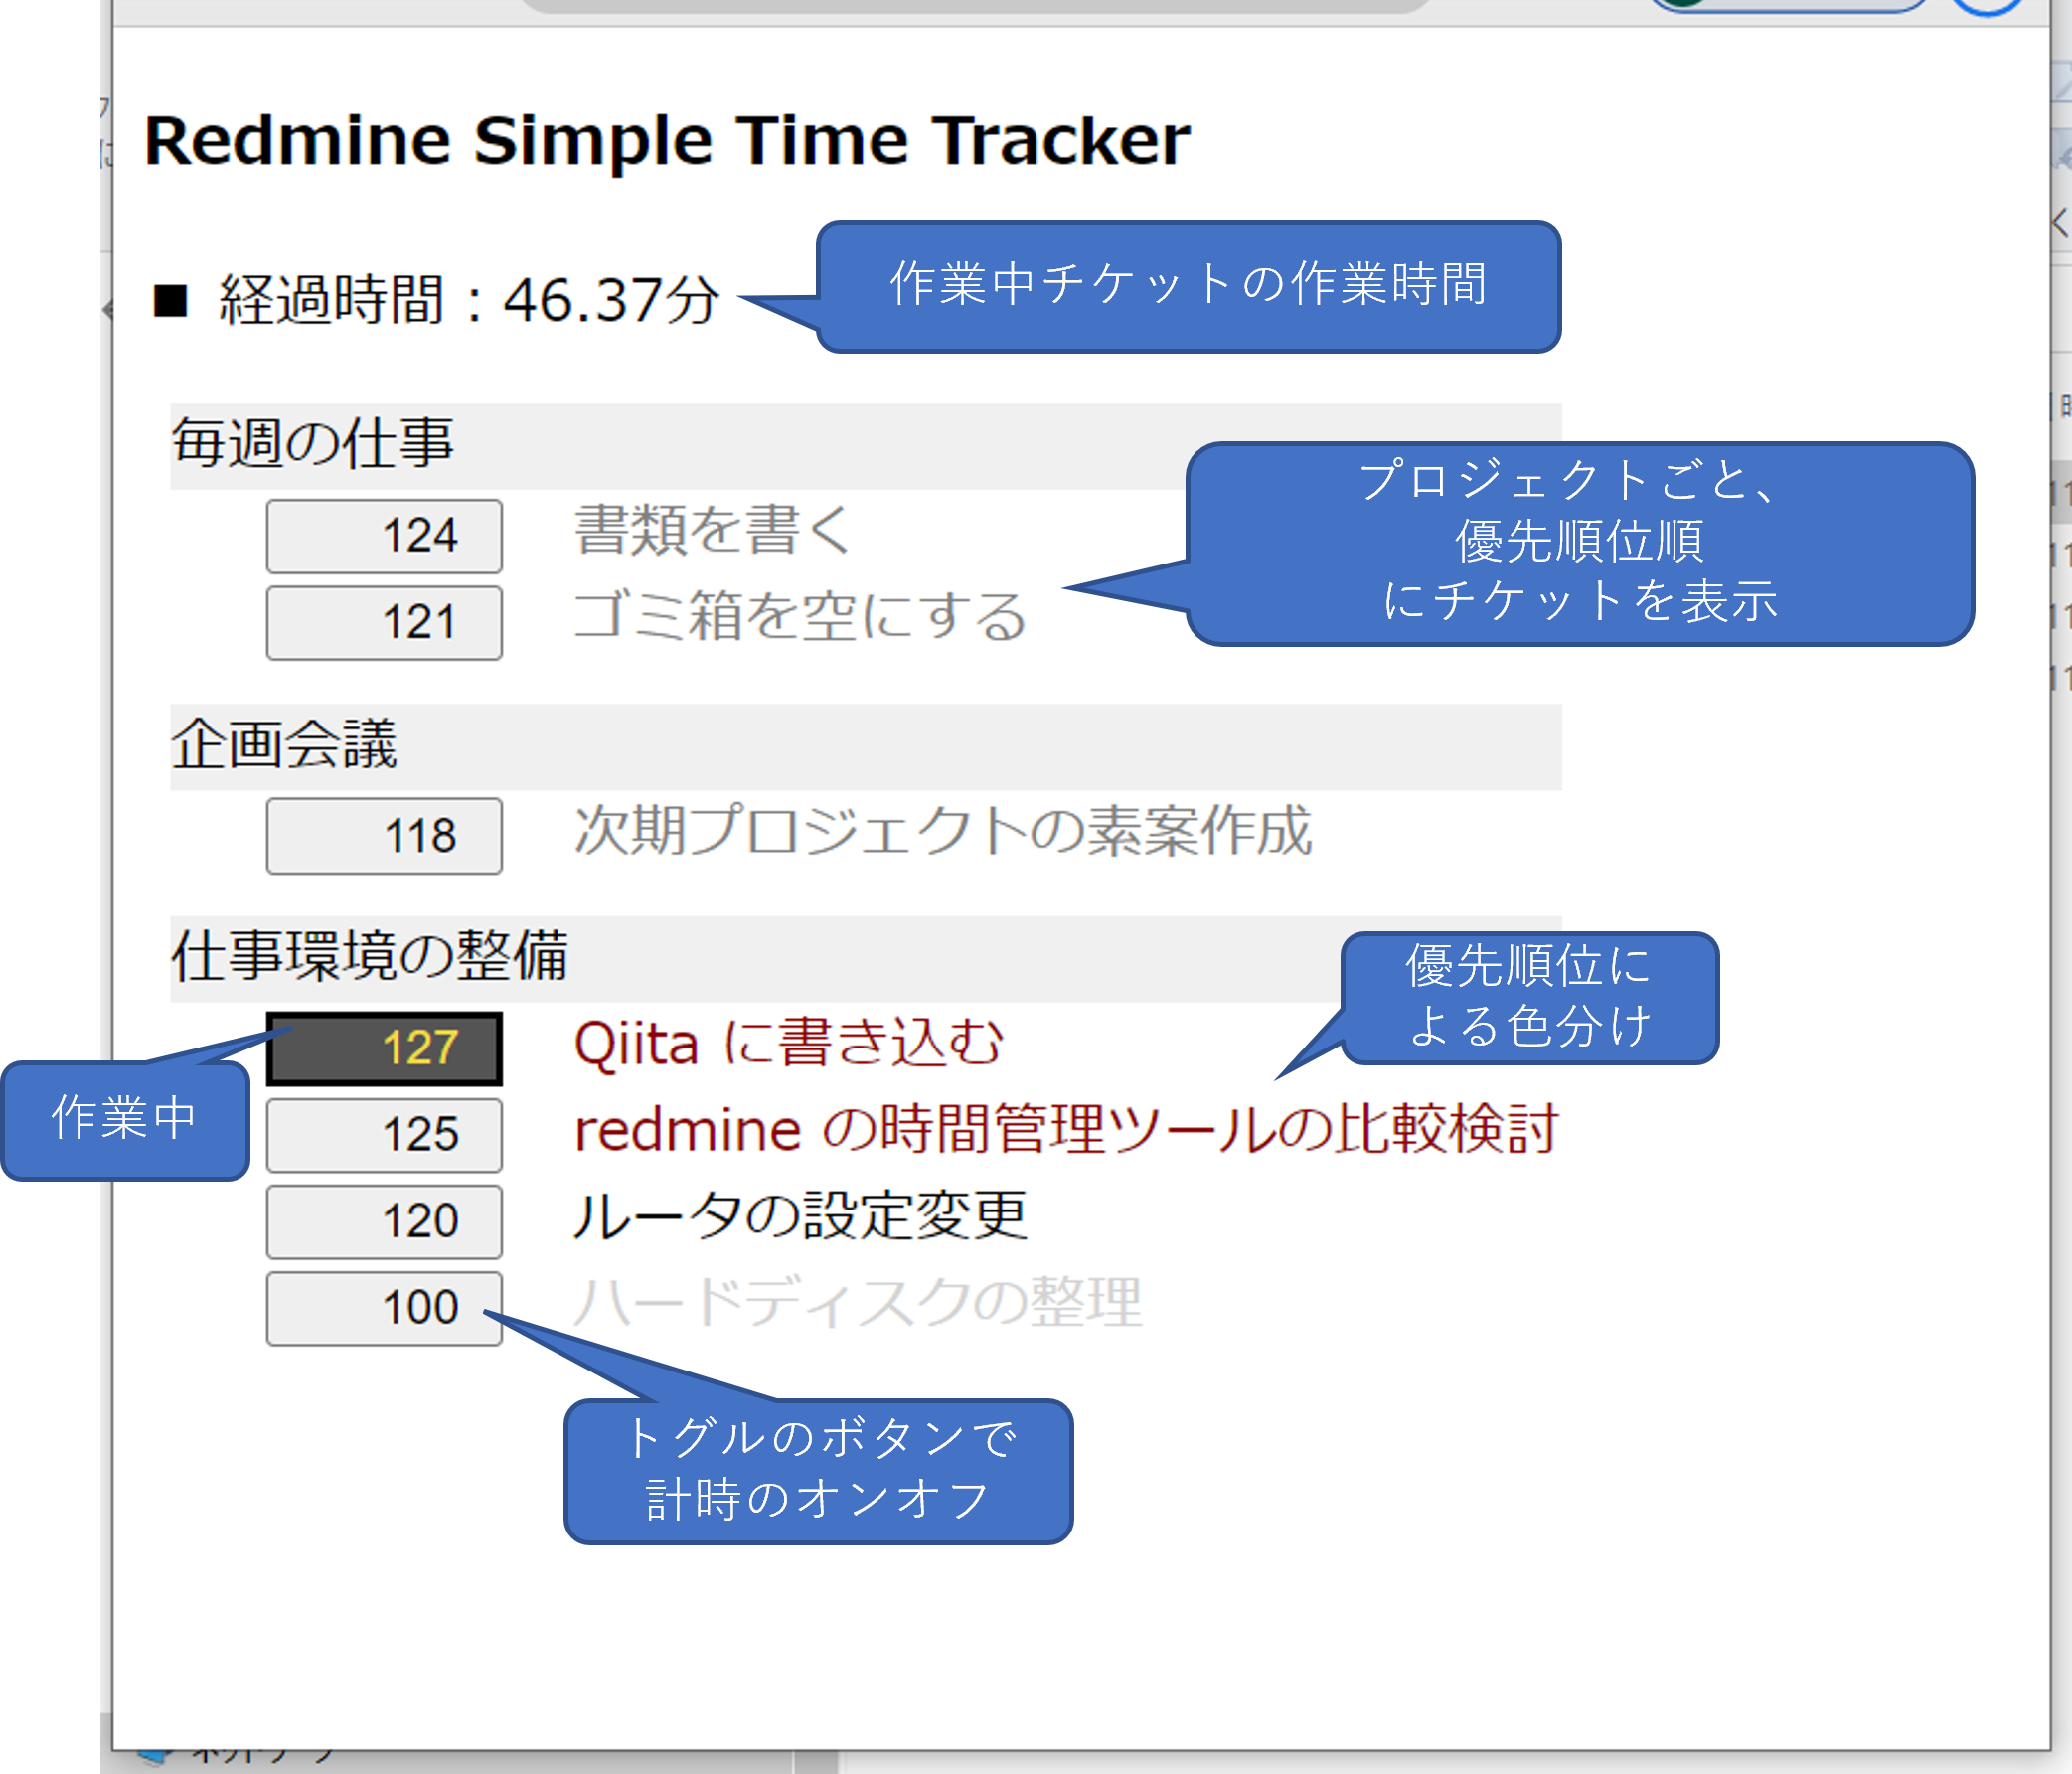
チケット一覧を表示するウェブページを perl の CGI で生成する。ページには javascript を埋め込んであり、ボタンをクリックすると計時を開始し、もう一度クリックすると、計時を止めて、作業時間を redmine サーバーへ送信する。それだけ。
素人なので、CGI は(ちょっと)使い慣れている perl で。javascript と併用しているので美しくないが、高望みしない。

1.3 投稿した理由
redmine の API の使い方、javascript での API の利用法、CSS を使ったトグルのボタンの使い方、など、個人的には備忘録として残す価値がある。だから、Qiita に残す。もしかしたら、他の人にも参考になったら、とも思う。
2. プログラム
だいたい見ればわかると思うので、あまりコメントはしない。
- CGI : redmine から自分担当のチケットを読み出して表示する
#!/usr/bin/perl
########################################################
# ・RedmineのREST APIを叩いてチケット情報を得る。
# ・javascript で作業時間を記録し、Redmine に送信するための準備をする。
#######################################################
use strict;
use warnings;
use LWP::UserAgent;
use JSON;
use Encode;
use CGI;

## 定数
my $url    = "https://example.example/redmine/issues.json";
my $APIKEY = "redmine から取得した APIアクセスキー";
my $CSS    = "https://example.example/RedmineSimpleTimeTracker/rstt.css";
my $JS     = "https://example.example/RedmineSimpleTimeTracker/rstt.js";
my @fncol  = ("black", "lightgray", "gray", "black", "darkred", "red");

## チケットのデータ
### 情報の仕入
my $req    = HTTP::Request->new(GET => $url);
$req->header("Content-Type" => "application/json");
$req->header("X-Redmine-API-Key" => $APIKEY);

my $ua     = LWP::UserAgent->new;
my $res    = $ua->request($req);
my $tickets;

if ($res->is_success) {
    my $json    = JSON->new->decode($res->content);
    $tickets = $json->{issues};
}
else {
    print $res->status_line, "\n";
}

### プロジェクトのリスト
my %projhash = ();
foreach my $ticket (@$tickets){
    $projhash{$ticket->{project}->{name}} ++;
}

## HTMLで出力
### ヘッダ部分
my $query  = new CGI;
print
    $query->header(-charset=>'UTF-8'),
    $query->start_html(-lang=>'ja',
		       -encoding=>'UTF-8',
		       -title=>'Redmine Simple Time Tracker',
		       -style=>[{'src'=>$CSS},],);


### 本体
print '<h3>Redmine Simple Time Tracker</h3>' . "\n";
print '<p id="spentTime">■ 経過時間</p>' . "\n";
print '<div class="changeButton">' . "\n";
print '<ul>' . "\n";

foreach my $proj (sort keys %projhash){
    print "<li>". $proj . "</li>\n";
    for( my $i = 5; $i > 0; $i-- ){
	foreach my $ticket (@$tickets){
	    if( $ticket->{project}->{name} eq $proj && $ticket->{priority}->{id} == $i ){
		print '<button class="btnToggle">' . $ticket->{id} . "</button>" .  "<font color=" . $fncol[$i] . ">" . $ticket->{subject} . "</font><br>\n";
	    }
	}
    }
}
print "</ul></div>\n";

### 末尾
print '<script src="' . $JS . '"></script>' . "\n";
print $query->end_html;
exit;
__END__
- CSS : 主にトグルのボタンの設定
ul {
    margin-top: -0.7em;
    margin-left: -2em;
    list-style-type: none;
}
li {
    margin-top: 0.7em;
    background-color: #f0f0f0;
}

div.changeButton {
    display: flex;
    flex-wrap: wrap;
    gap: 10px;
    justify-content: flex-start;
}

div.changeButton button {
    display: inline-block;
    margin-left: 2em;
    margin-right: 1.5em;
    padding-left: 2em;
    padding-right: 0.5em;
    width: 5em;
}

/* ボタンクリック後 */
button.btnToggle.activeOn {
    background: #545454;
    color: #f0db40;
}
- javascript : トグルのボタンの切り替え、計時、redmine への作業時間の送信
// 定数
const redmineURL = 'https://example.example/redmine/time_entries.json';
const APIkey     = 'redmine から取得した APIアクセスキー';

start = new Date(); // var で宣言すると変になる。
stop  = start;      // これも。

// 要素(ボタンの)を、クラス名を指定してすべて取得
const btn = document.getElementsByClassName('btnToggle');
for (var i = 0; i < btn.length; i++) {
    btnAction(btn[i],i);
}

// 実行本体
function btnAction(btnElm,btnId){

    btnElm.addEventListener("click", function(){
	// もし、アクティブな項目があったら、それを閉じて計時を止める。
        for (var i = 0; i < btn.length; i++) {
            if(btnId !== i){
		// activeOnを外す
                if(btn[i].classList.contains('activeOn')){
                    btn[i].classList.remove('activeOn');
        		    stop  = new Date();
        		    sendToRedmine( btn[i].innerHTML, stop.getTime() - start.getTime()); // 閉じるのは i 番目。
    	        }
            }
        }

	// 自身がアクティブなら、それを閉じて計時を止める。
	if( btn[btnId].classList.contains('activeOn')){
	    btn[btnId].classList.remove('activeOn');
	    stop = new Date();
	    sendToRedmine( btn[btnId].innerHTML, stop.getTime() - start.getTime());
	    start = stop;
	}else{

	// 自身がオフなら、計時を開始する。
	    btn[btnId].classList.toggle('activeOn');
            start = new Date();
	}
    })
}

// 送信
function sendToRedmine( id, workingMs ){
    // 要素の内容は innerHTML で取得。
    console.log(id + " 経過時間: " + workingMs/1000/60/60 + "時間");

    // JSON データの作成
     var json_data =
	    {
		"time_entry": {
		    "issue_id": id,
		    "hours"   : workingMs/1000/60/60
		}
	    };
    var json_text = JSON.stringify(json_data);

    // 送信
    let sendRequest = new XMLHttpRequest();
    sendRequest.onload = function (){
    	let data = this.response;
    	console.log(data)
    }
    sendRequest.onerror = function (){
    	console.log('Could not post');
    }
    sendRequest.open('POST', redmineURL);
    sendRequest.setRequestHeader('content-type', 'application/json');
    sendRequest.setRequestHeader('X-Redmine-API-Key', APIkey);
    sendRequest.send(json_text);
}

// 経過時間表示関数 ( HTML 内の <p id="spentTime"></p> に表示 )
function showSpentTime() {
    let nowTime = new Date();
    let msg = "";
    if( start == stop ){
    	msg = "■ 経過時間: -- 分<br>\n";
    }else{
	var mins = (nowTime.getTime() - start.getTime())/1000/60;
    	msg = "■ 経過時間:" + mins.toFixed(2) + "分<br>\n";
    }
    document.getElementById("spentTime").innerHTML = msg;
}

setInterval('showSpentTime()',1500);
3. 導入方法
- 各種ファイル
CSS, javascript のファイルは、適当なアクセスできる場所に置く。それに応じて、CGI のファイルを書き換える。CGI は CGI を設置できる場所に置く。 - redmine
2.1. APIアクセスキー
redmine に個人でログインして、右上の「個人設定」をクリックする。右側の API アクセスキーを表示させて取得する。(CGI, javascript に書き込む。)
2.2. 作業分類
redmine の管理者にお願いしなければならない。ログイン後、管理 > 選択肢の値 で、例えば、"Development" をクリックして、"デフォルト値" にクリックを入れる。作業時間を送信するときに、Activity_id を送らなければならないが、これが調べてもわからない。ここで"デフォルト値" を設定すれば、Activity_id を送信しなくて良くなる。 - 注意
ページをリロードしたり、閉じたりしたら計時データが失われる。
なお、このままでは誰でも変更できてしまうので、他の人がアクセスできないような場所に置くことが必要。