Once you know your Photoshop Gradient setting you can generate Gradient CSS using web based tools named angryTools
Problem: Why we need Gradient CSS?
Reason 1: Using gradient CSS instead of large images will make the website light and speedy.
Reason 2: Using gradient images will not make your website viewport compatible, that means for larger screen your fixed-sized Gradient images will not be stretched to full width, this is very important for User Interface (UI).
Step 1: Open Photoshop Gradient layer and memo the Gradient settings
a. Open Radial Gradient Image in Photoshop
b. Open Gradient Overlay window
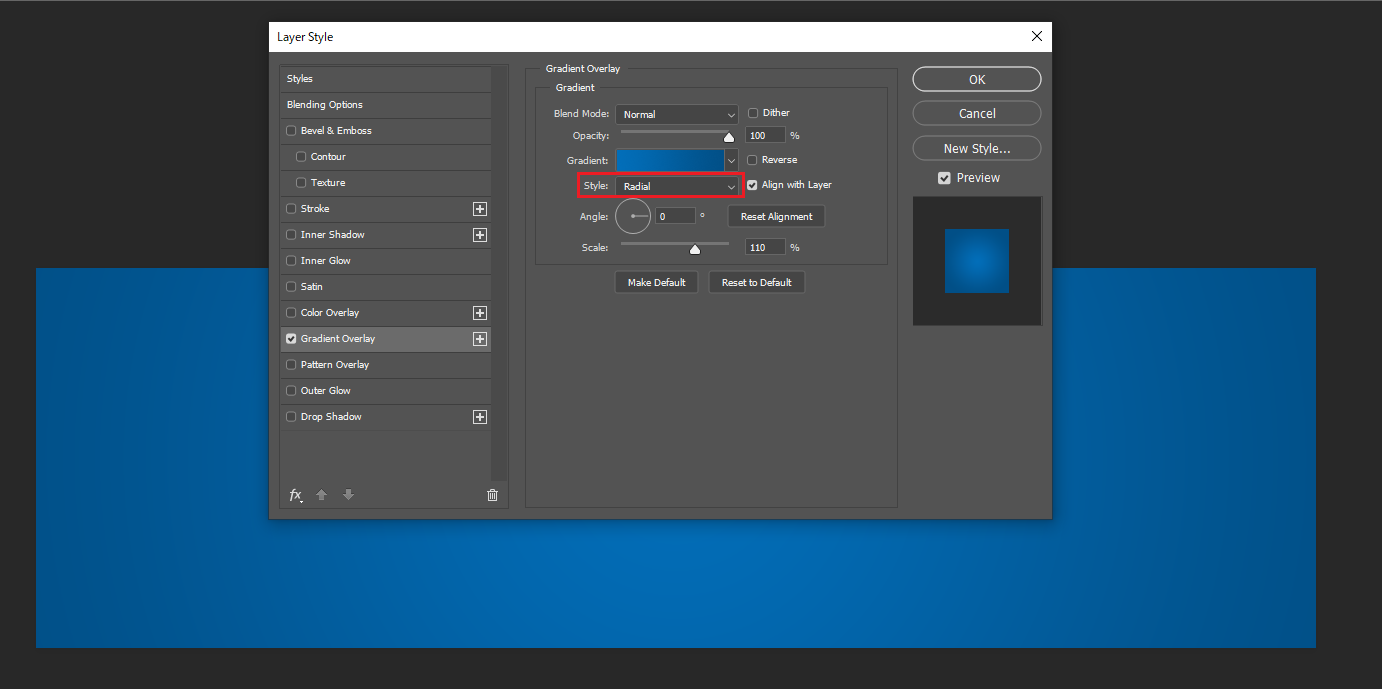
Right Click on the Gradient layer right corner (fx->Indicates layer effects) and select "Gradient Overlay". The following Layer Style window will open.Note: As we can see from the above image that the gradient style is "Radial" we now know that our Gradient style will be Radial.
c. Check the Gradient Overlay Settings
Click on the Gradient to check the Radial Gradient settings. Then, Gradient Editor dialogue window will open. Now we can check the Gradient Stops Color, Color values and Color Stop Positions from this windows.d. Gradient Overlay Settings: Left Color Stop setting: Color value: #026eb9
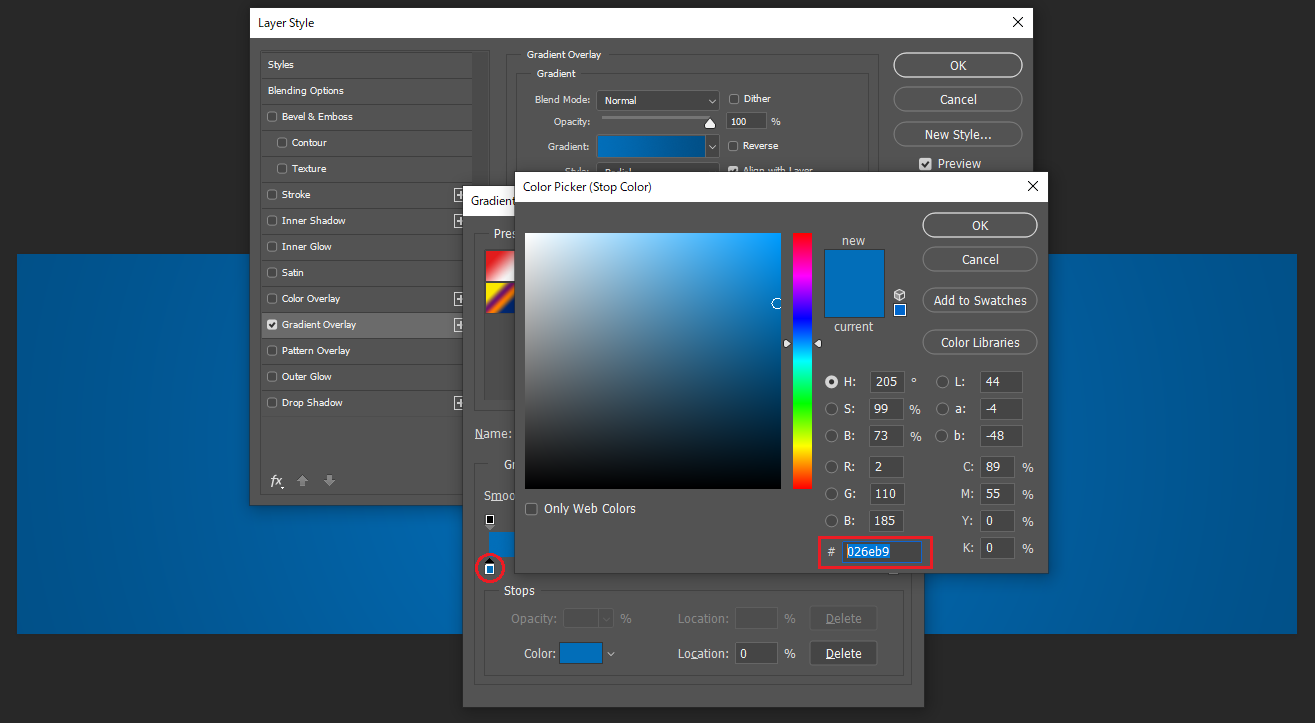
Click on Left Color Stops and Click on "Color" then Color Picker window will open, now we can see that the Left Color Stop Color Value is #026eb9.e. Gradient Overlay Settings: Color Mid point: 50%
Click on the Color Mid point Rhombus icon(◇) from the Gradient Editor window, then it will show the location of the Gradient between the Colors. For our example, the location is set to 50% according to the design.f. Gradient Overlay Settings: Right Color Stop setting: Color value: #014f87
Click on Right Color Stops and Click on "Color" then Color Picker window will open, now we can see that the Left Color Stop Color Value is #014f87. (Same as the Step 1.d)Now we have the following Gradient color settings for the above example.
Gradient style : Radial
Left Color value: #026eb9
Gradient Color Mid point: 50%
Right Color value: #014f87
Note: Using the above Gradient settings we will generate the Gradient CSS using angryTool. If your design has more gradient Stop Settings you can take memos for those Color Stops. It is possible to add multiples complexed Gradient Settings by adding Gradient from the tools described below
Step 2: Generate Gradient CSS using angryTools http://angrytools.com/gradient/
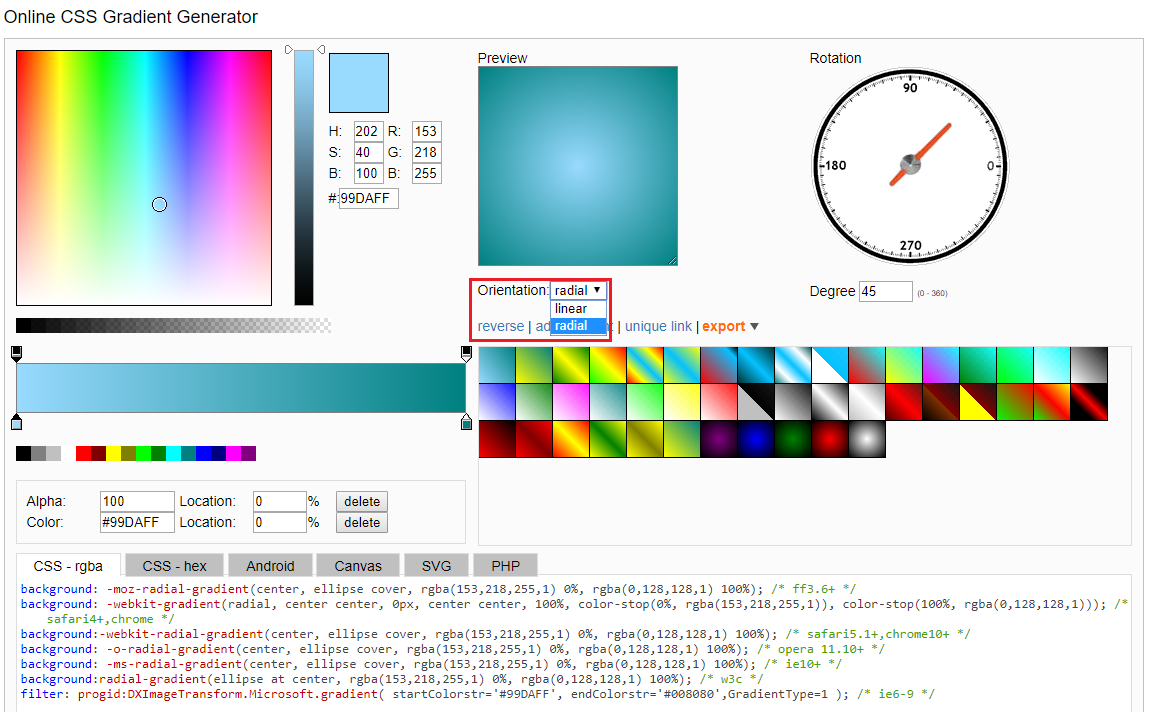
a. Change Gradient Orientation to Radial
The default Gradient Orientation is "Linear". So, we need to change the Orientation to "Radial" as described in the following image.b. Set Left Stop Color: #026eb9
Now we can set our Left Stop Color by clicking on the Left Stop Color indicated in the following image. And, set the Left Stop color to #026eb9.c. Set Right stop Color: #014f87 and the CSS will be generated in the CSS box
We can set our Right Stop Color by clicking on the Right Stop Color indicated in the following image. And, set the Right Stop color to #014f87.Note: We don't need to change the Location of the Gradient which is (50%) because by default the gradient location is set to 50% (center).
d. Copy the CSS
You can now copy the generated CSS from the "CSS-hex" or "CSS-rgba" window to your CSS. The CSS is given below. You can access the CSS also from here Generated CSSbackground: -moz-radial-gradient(center, ellipse cover, #026eb9 0%, #014f87 100%); /* ff3.6+ */
background: -webkit-gradient(radial, center center, 0px, center center, 100%, color-stop(0%, #026eb9), color-stop(100%, #014f87)); /* safari4+,chrome */
background: -webkit-radial-gradient(center, ellipse cover, #026eb9 0%, #014f87 100%); /* safari5.1+,chrome10+ */
background: -o-radial-gradient(center, ellipse cover, #026eb9 0%, #014f87 100%); /* opera 11.10+ */
background: -ms-radial-gradient(center, ellipse cover, #026eb9 0%, #014f87 100%); /* ie10+ */
background: radial-gradient(ellipse at center, #026eb9 0%, #014f87 100%); /* w3c */
filter: progid:DXImageTransform.Microsoft.gradient( startColorstr='#026eb9', endColorstr='#014f87',GradientType=1 ); /* ie6-9 */
Now, I would like to share how to generate linear style Gradient CSS:
Step 1: Open Photoshop Gradient layer and memo the Gradient settings
a. Open Linear Gradient Image in Photoshop
b. Linear Gradient Color Settings in Photoshop
From the Photoshop we can memo the following Gradient settings as explained for the example 1 (Radial Gradient):
Gradient style : Linear
Left Color value: #fe61a0
Left Color Starting Point: 20%
Gradient Color Mid point: 50%
Right Color value: #f20981
Step 2: Apply the above Linear Gradient settings to generate the CSS
a. Left Color Stop Settings is given below
b. Right Color Stop Settings is given below
c. Copy the CSS
The following CSS will be generated. Now, You can copy and paste it to your CSS.background: -moz-linear-gradient(90deg, #fe61a0 0%, #fe61a0 20%, #f20981 100%); /* ff3.6+ */
background: -webkit-gradient(linear, left top, left bottom, color-stop(0%, #f20981), color-stop(80%, #fe61a0), color-stop(100%, #fe61a0)); /* safari4+,chrome */
background: -webkit-linear-gradient(90deg, #fe61a0 0%, #fe61a0 20%, #f20981 100%); /* safari5.1+,chrome10+ */
background: -o-linear-gradient(90deg, #fe61a0 0%, #fe61a0 20%, #f20981 100%); /* opera 11.10+ */
background: -ms-linear-gradient(90deg, #fe61a0 0%, #fe61a0 20%, #f20981 100%); /* ie10+ */
background: linear-gradient(0deg, #fe61a0 0%, #fe61a0 20%, #f20981 100%); /* w3c */
filter: progid:DXImageTransform.Microsoft.gradient( startColorstr='#f20981', endColorstr='#fe61a0',GradientType=0 ); /* ie6-9 */


