View、および、そのサブクラスには以下の4つのコンストラクタがあります。
それぞれの使用方法などを調べてみました。
1. View(Context context)
2. View(Context context, AttributeSet attrs)
3. View(Context context, AttributeSet attrs, int defStyleAttr)
4. View(Context context, AttributeSet attrs, int defStyleAttr, int defStyleRes) // API Level 21から
まずはReferenceから
Referenceには、以下のように記載されています。
1. コードでViewを生成したときのコンストラクタ
2. XMLからViewをinflateした際のコンストラクタ
3. XMLからinflateして、Themeからクラス固有の基本スタイルを適用します
4. XMLからinflateして、Themeからクラス固有の基本スタイルまたは指定のスタイルを適用します
1はいいとして、2, 3, 4がどう区別されているのかとLayoutInflaterのソース(API Level 23)を見ても、
以下のように2のコンストラクタしか呼んでいません。
public abstract LayoutInflater {
  ...
  static final Class<?>[] mConstructorSignature = new Class[] {Context.class, AttributeSet.class};
  ...
  public final View createView(String name, String prefix, AttributeSet attrs) throws ClassNotFoundException, InflateException {
    Constructor<? extends View> constructor = sConstructorMap.get(name);
    ...
    if (constructor == null) {
      ...
      constructor = clazz.getConstructor(mConstructorSignature);
      ...
    } else {
      ...
    }

    Object[] args = mConstructorArgs;
    args[1] = attrs;

    final View view = constructor.newInstance(args);
    ...
  }
Androidのソースを検索しても、以下のTextViewのような例外もありますが、基本的には3, 4のコンストラクタは呼ばれていません。
public TextView(Context context, @Nullable AttributeSet attrs) {
  this(context, attrs, com.android.internal.R.attr.textViewStyle);
}
3, 4のコンストラクタの動作
Android内部では使われていないので、変化のわかりやすいTextViewで実際に使ってみました。
<attr name="customAttr" format="reference"/>

<style name="AppTheme.Custom">
  <item name="android:textColor">#cc0000</item>
  <item name="customAttr">@style/CustomStyle1</item>
</style>

<style name="CustomStyle1">
  <item name="android:textColor">#00cc00</item>
</style>

<style name="CustomStyle2">
  <item name="android:textColor">#0000cc</item>
  <item name="android:textStyle">italic</item>
</style>
styles.xmlなどに上記のように各値を定義します。
customAttrは第3引数、defStyleAttrに渡す値です。
formatはreferenceとして、実際の値はStyleとして別途定義します。
AppTheme.CustomはActivityに指定するThemeでandroid:textColorとcustomAttrを設定しています。それぞれ赤と緑です。
CustomStyle2は第4引数、defStyleResに渡す値です。
青以外にイタリック体にしている理由は後ほどわかります。
これらをTextViewの各コンストラクタに指定して表示したのが下の図です。
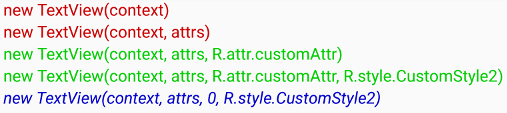
1, 2のコンストラクタは、AppTheme.Customに指定しているandroid:textColorの赤が反映されています。
3のコンストラクタは、AppTheme.CustomのcustomAttrに指定しているCustomStyle1のandroid:textColorの緑が反映されています。
4のコンストラクタの1番目(R.attr.customAttr, R.style.CustomStyle2)は、緑で、青でもイタリック体でもないので、R.style.CustomStyle2の指定は実質無視されています。
4のコンストラクタの2番目(0, R.style.CustomStyle2)は、青でイタリック体なのでCustomStyle2が正しく反映されています。
まとめると、以下の通りです。
1, 2のコンストラクタは、その View を持つ Activity などの Theme を参照する。
3, 4のコンストラクタで defStyleAttr が0以外の場合は、 Theme に設定されているその attr を参照する。
4のコンストラクタで defStyleAttr が0の場合は、その style を参照する。

つまり、 Theme に指定されているスタイルを適用したい場合は defStyleAttr 、
Theme に関係なくスタイルを適用したい場合は defStyleRes でしょうか。
まぁ、わかってしまえば、Referenceの通りですね。
1. コードでViewを生成したときのコンストラクタ
2. XMLからViewをinflateした際のコンストラクタ
3. XMLからinflateして、Themeからクラス固有の基本スタイルを適用します
4. XMLからinflateして、Themeからクラス固有の基本スタイルまたは指定のスタイルを適用します
しかし、4のコンストラクタの第3引数は、オーバーロードの制約から消せなかっただけじゃないのか。。。
実際、どうやって3, 4のコンストラクタを使うか
XMLをinflateしても呼ばれないため、呼ぶ方法は以下のいずれかでしょうか。
1.以下のようにコードでViewを生成する
new View(context, null, R.attr.customAttr)
2.TextViewのようにコンストラクタで指定する
public TextView(Context context, @Nullable AttributeSet attrs) {
  this(context, attrs, com.android.internal.R.attr.textViewStyle);
}
1はXMLが使えない、2はカスタムViewでしか使えない。どちらもイマイチですね。
3番目として、LayoutInflater#Factoryを使う方法があります。
LayoutInflatorには、Factory, Factory2クラスがあり、それらにViewの生成を委譲することができます。
public abstract class LayoutInflater {

  public interface Factory {
    public View onCreateView(String name, Context context, AttributeSet attrs);
  }

  public interface Factory2 extends Factory {
    public View onCreateView(View parent, String name, Context context, AttributeSet attrs);
  }

  View createViewFromTag(View parent, String name, Context context, AttributeSet attrs, boolean ignoreThemeAttr) {
    ...
    View view;
    if (mFactory2 != null) {
      view = mFactory2.onCreateView(parent, name, context, attrs);
    } else if (mFactory != null) {
      view = mFactory.onCreateView(name, context, attrs);
    } else {
      view = null;
    }

    if (view == null && mPrivateFactory != null) {
      view = mPrivateFactory.onCreateView(parent, name, context, attrs);
    }

    if (view == null) {
      final Object lastContext = mConstructorArgs[0];
      mConstructorArgs[0] = context;
      try {
        if (-1 == name.indexOf('.')) {
          view = onCreateView(parent, name, attrs);
        } else {
          view = createView(name, null, attrs);
        }
      } finally {
        mConstructorArgs[0] = lastContext;
      }
    }

    return view;
    ...
  }
}
ただし、設定できるのは1回のみで、2回目以降はIllegalStateExceptionがスローされます。
public void setFactory(Factory factory) {
  if (mFactorySet) {
    throw new IllegalStateException("A factory has already been set on this LayoutInflater");
  }
  if (factory == null) {
    throw new NullPointerException("Given factory can not be null");
  }
  mFactorySet = true;
  if (mFactory == null) {
    mFactory = factory;
  } else {
    mFactory = new FactoryMerger(factory, null, mFactory, mFactory2);
  }
}
そして、AppCompatActivityはAppCompatTextViewなどを生成するためにonCreate内でファクトリーを設定しています。。。
対処法はなくはないですが、それなりに面倒です。
しかも、乱用するのは危険でしょう。
というか、いつ使うのか
動的に画面全体の見た目を変えるなら、ActivityのsetThemeの方が良いと思います。
こんな苦労してまで使いたいときがあるのかどうか。。。
良い使い方知っていたら教えてください。