はじめに
SpringBootにhtmxを適用する第3弾です。今回はBootstrap5.3のModalを使ったモーダルダイアログを表示します。
ゴール
- 一覧結果から選択した行のデータを、Modalを使ったモーダルダイアログで表示する
- モーダルに関する動作はすべてBootstrap5.3にバンドルしているJavaScriptの動作そのままを利用する
- モーダルに表示する内容は、htmxを使って非同期にリクエストして取得する
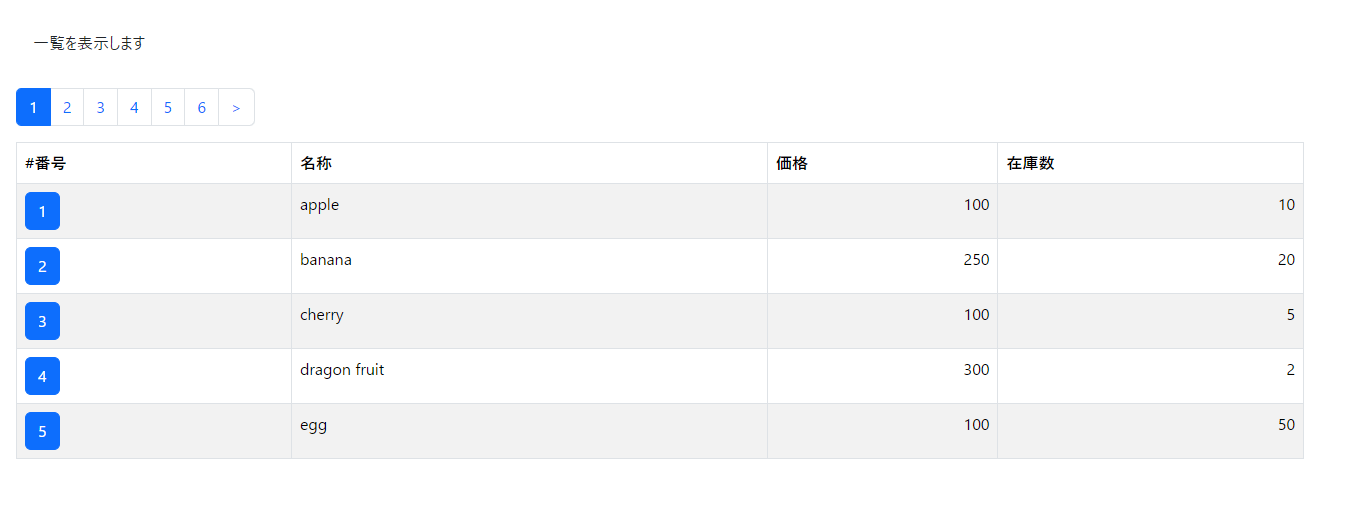
一覧画面の#番号列にてボタンを配置します。このボタンを押すと、選択した行の内容をモーダルダイアログにて表示します。
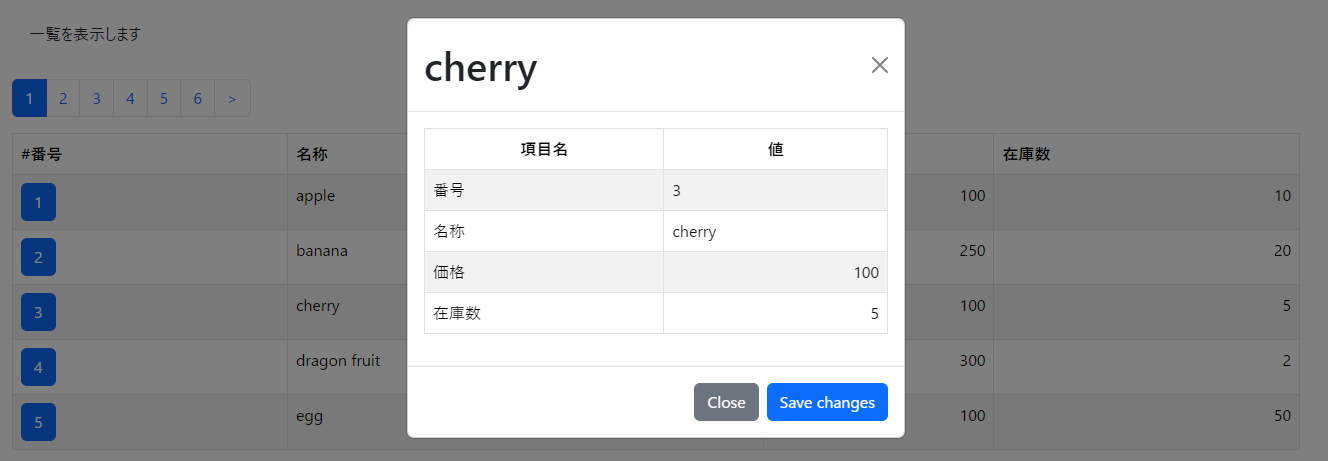
モーダルダイアログはBootstrap5.3のModalを使います。モーダルダイアログを開くと同時にモーダル以外の画面は暗くなり、モーダルダイアログを閉じると自動的に背景色が戻ります。
一覧画面の実装
元となる一覧画面のHTMLです。ページング部分は省略しています。
一覧表示している商品は、表示するデータを繰り返し出力している <tr th:each="item : ...."> で表示しています。一番左の列に商品の番号を表示し、その番号にボタンを設置します。
<table class="table table-bordered table-striped text-nowrap" th:if="${pages}">
    <thead>
        <tr>
            <th>#番号</th>
            <th>名称</th>
            <th>価格</th>
            <th>在庫数</th>
        </tr>
    </thead>
    <tbody>
        <tr th:each="item : ${pages.getContent()}">
            <td>
                <button th:hx-get="'/item/' + ${item.id}" hx-target="#modal-content" hx-trigger="click"
                        data-bs-toggle="modal" data-bs-target="#modals-here"
                        class="btn btn-primary" th:text="${item.id}">1</button>
            </td>
            <td th:text="${item.name}">name</td>
            <td th:text="${item.price}" class="text-end">100</td>
            <td th:text="${item.stock}" class="text-end">10</td>
        </tr>
    </tbody>
</table>
ボタン <button> 要素にてモーダル表示に使う属性を記述しています。
| 属性 | 説明 | 値 |
|---|---|---|
| hx-get | htmxの非同期リクエストURLを設定 | /item/{番号} |
| hx-target | htmxでリクエストした結果を出力するHTML要素のセレクタ。 | HTMLのid属性がmodal-contentの要素 |
| hx-trigger | htmxの非同期リスエストを実行するイベント | click:ボタンを押したとき |
| data-bs-toggle | Bootstrap5系のモーダルを起動するときに付与する属性 | modal |
| data-bs-target | Bootstrap5系のモーダルとして宣言したHTML要素のid | #modals-here:任意の属性名 |
モーダルダイアログを呼び出す準備は以上です。
モーダルダイアログの下地を実装する
次にモーダルダイアログのHTML実装です。まずは呼び出し元となるHTMLに、bootstrapのmodalを用意します。
<!doctype html>
<html lang="ja" xmlns:th="http://www.thymeleaf.org">
<head>
    <meta charset="UTF-8" />
    <meta name="viewport" content="width=device-width, initial-scale=1, shrink-to-fit=no" />
    <link rel="stylesheet" th:href="@{/webjars/bootstrap/{version}/css/bootstrap.min.css(version=${@webJarsProperties.bootstrap})}" />
    <script th:src="@{/webjars/bootstrap/{version}/js/bootstrap.min.js(version=${@webJarsProperties.bootstrap})}"></script> ・・・(1)
    <script th:src="@{/js/htmx.min.js}"></script>
</head>
<body>
<div class="container-fluid">
...省略...
</div>
<div id="modals-here" class="modal fade" tabindex="-1" aria-labelledby="exampleModalLabel" aria-hidden="true"> ・・・(2)
    <div class="modal-dialog" id="dialog">
        <div class="modal-content" id="modal-content">
        </div>
    </div>
</div>
</body>
</html>
(1) BootstrapにバンドルしてあるJavaScriptもwebjarsの中に含まれていますので、これをCSSと同様にwebjarsからインポートします。
<script th:src="@{/webjars/bootstrap/{version}/js/bootstrap.min.js(version=${@webJarsProperties.bootstrap})}"></script>
(2) モーダルダイアログは、<div id="modals-here">で実装している内容すべてです。今回はhtmxを使って非同期リクエストを行い、その内容は htmxで宣言したボタンの hx-target 属性にある modal-content 要素へ出力します。
モーダルに表示するコンテンツ
モーダルに表示するコンテンツは、htmxを定義している
<button hx-trigger="click"
        th:hx-get="'/item/' + ${item.id}"
        hx-target="#modal-content"
>
にて、
- ボタンをクリックしたとき
- 非同期で
/item/商品番号へリクエストし、 - そのレスポンスを
#modal-contentの中に出力する
と宣言しています。
具体的には、モーダルを定義するHTMLである ヘッダ部 <modal-header>、本文 <modal-body>、フッタ <nodal-footer>を返し、モーダルの内容を出力します。
<!doctype html>
<html lang="ja" xmlns:th="http://www.thymeleaf.org">
    <div class="modal-header">
        <h1 class="modal-title" th:inline="text">[[${item.name}]]</h1>
        <button type="button" class="btn-close" data-bs-dismiss="modal" aria-label="Close"></button>
    </div>
    <div class="modal-body">
        <!-- item -->
        <div>
            <table class="table table-bordered table-striped text-nowrap" th:if="${item}">
                <thead>
                    <tr>
                        <th class="text-center">項目名</th>
                        <th class="text-center">値</th>
                    </tr>
                </thead>
                <tbody>
                    <tr>
                        <td>番号</td>
                        <td th:inline="text">[[${item.id}]]</td>
                    </tr>
                    <tr>
                        <td>名称</td>
                        <td th:inline="text">[[${item.name}]]</td>
                    </tr>
                    <tr>
                        <td>価格</td>
                        <td class="text-end" th:inline="text">[[${item.price}]]</td>
                    </tr>
                    <tr>
                        <td>在庫数</td>
                        <td class="text-end" th:inline="text">[[${item.stock}]]</td>
                    </tr>
                </tbody>
            </table>
        </div>
    </div>
    <div class="modal-footer">
        <button type="button" class="btn btn-secondary" data-bs-dismiss="modal">Close</button>
        <button type="button" class="btn btn-primary">Save changes</button>
    </div>
</html>
Controller~Service~Repositoryの実装
一覧画面を実装していた Controller に、/item/商品番号 でリクエストした商品の情報を取得してitem.htmlを出力するを追加実装します。
Controller
package com.github.apz.sample.controller;

import java.util.List;

import org.springframework.data.domain.Page;
import org.springframework.data.domain.Pageable;
import org.springframework.stereotype.Controller;
import org.springframework.web.bind.annotation.GetMapping;
import org.springframework.web.bind.annotation.PathVariable;
import org.springframework.web.bind.annotation.RequestMapping;
import org.springframework.web.servlet.ModelAndView;

import com.github.apz.sample.model.Item;
import com.github.apz.sample.service.ItemService;

import lombok.AllArgsConstructor;

@Controller
@RequestMapping("/")
@AllArgsConstructor
public class ItemController {

    ItemService itemService;

    ...(省略)...

    @GetMapping("/item/{itemId}")
    public ModelAndView getItem(ModelAndView mnv, @PathVariable("itemId") Integer itemId) {
        Item item = itemService.getItem(itemId);
        mnv.addObject("item", item);
        mnv.setViewName("item");
        return mnv;
    }
}
Service
一覧結果を取得していたServiceクラスに、指定した商品を返す処理を実装します。
package com.github.apz.sample.service;

import org.springframework.stereotype.Service;

import com.github.apz.sample.model.Item;
import com.github.apz.sample.repository.ItemRepository;

import lombok.AllArgsConstructor;

@Service
@AllArgsConstructor
public class ItemService {
    ItemRepository itemRepository;

    ...(省略)...

    public Item getItem(Integer id) {
        return itemRepository.getItem(id);
    }
}
Repository
同様に、指定した商品番号の商品を返します。
package com.github.apz.sample.repository;

import org.springframework.stereotype.Repository;

import com.github.apz.sample.model.Item;
import com.github.apz.sample.model.Items;

import lombok.extern.slf4j.Slf4j;

@Repository
@Slf4j
public class ItemRepository {

    Items items;

    ...(省略)...

    public Item getItem(Integer id) {
        return items.getItem(id).orElseThrow(IllegalArgumentException::new);
    }
}
実装は以上です。
まとめ
bootstrap5のモーダルを使ったhtmxの実装を紹介しました。割と簡単ですね。
サンプルコードはこちらです。

