はじめに
Arduino(マイコン)を使わずに Bluetooth 経由で Nintendo Switch の自動操作 ができるようになりました。
自動化には、joycontrol とその拡張用のプラグインローダー(joycontrol-pluginloader)を使用しています。
Bluetooth 経由で制御するので、これまで面倒だった hex ファイルの書換え作業やシリアル変換アダプタの用意などが必要なくなりました。Arduino を別途購入する必要もないので、PCを持っていて Bluetooth アダプタがついている人は、ぜひ試してみてください。
本記事では、特に「自動化のための環境構築」と「プラグインの作成方法」について紹介します。
Nintendo Switch v14.0.0 以降のバージョンと NXBT について
Nintendo Switch v14.0.0 頃から joycontrol の動作がかなり不安定になりました。joycontrol のメンテナンスもあまり行われていない状態ですので、joycontrol の使用は推奨いたしません。
joycontrol の代わりに NXBT という別のプロジェクトがありますので、こちらのご使用をおすすめいたします。NXBT は、現時点(2022年12月05日)で最新版の Nintendo Switch v15.0.1 でも動作確認が取れています。
Nintendo Switch v12.0.0 について
2021年4月6日に配信された Nintendo Switch v12.0.0 で Bluetooth 関連のアップデートがありました。
このアップデートに伴い、本家の joycontrol では、ペアリングに失敗してしまうという現象が発生していました。
5月中旬頃に、この問題を修正した joycontrol が公開され、ちゃんと動作するようになっています。
本家の方にも Pull request が出ていましたが、まだマージされていないようです。
2021年9月15日、現時点で最新版の Nintendo Switch v13.0.0 でも動作確認が取れています。
本記事の「2. joycontrol のインストール」の手順が変わっていますので、ご確認ください。
- 参考
Nintendo Switch の自動化でできること
デモンストレーションとして、ポケモン剣盾の全自動タマゴ孵化を作成しました。
自由に拡張できるようにしたので、ポケモンだけでなく他のゲームにも簡単に応用可能です。
YouTube -【ポケモン剣盾】全自動タマゴ孵化【Bluetooth/マイコンなし】

注意事項
本記事の内容は、Nintendo Switch の本体やソフトウェア等を改造するものではありませんが、
Nintendo Switch利用規約 の第1条第5項に該当する可能性がありますので、ご利用は自己責任でお願いします。
(5)本ゲーム機本体、周辺機器、本ソフトウェア等を不正に改造しないこと、および任天堂の許諾を受けていない本ゲーム機の周辺機器およびソフトウェア等を使用しないこと
joycontrol について
joycontrol は、Bluetooth 経由で Nintendo Switch のコントローラーをエミュレートできます。
Joy-Con(L/R)や Nintendo Switch Proコントローラーに対応しており、コマンドラインからボタンやスティックの入力が可能です。また、Amiibo バックアップファイルの読込みもできるそうです。
海外のフォーラムでは、5月頃から話題になっていました。
動作検証
以下の環境で動作することを確認しました。
- Ubuntu Desktop 20.04 LTS
- Raspberry Pi 3 Model B(Raspberry Pi OS (32-bit) Lite Minimal image based on Debian Buster)
- Windows 10 Pro Version 1909(VirtualBox 6.1.12 + Ubuntu Desktop 20.04 LTS) ← 今回紹介する環境
- (非推奨)
Ubuntu Desktop 19.10 - (非推奨)
Windows 10 Pro Version 1909(VirtualBox 6.1.12 + Ubuntu Desktop 19.10)
※1 Windows Subsystem for Linux(WSL)では動作しませんでした。
※2 Ubuntu 19.10 は、動作確認が取れましたが、既にサポートが切れているので非推奨です。
自動化のための環境構築
今回は、Windows と VirtualBox を使用した環境構築方法について紹介します。
なお、構築を単純化するため、Ubuntu の Live Boot で導入します。
永続化させたい場合は、OSをインストールしてください。
既に Linux 環境がある場合は、「2. joycontrol のインストール」から参照してください。
必要なもの
-
ハードウェア
- Nintendo Switch(システムバージョン 11.0.1 以前)
- PC
- Bluetooth アダプタ(内蔵型、USBドングルどちらでも可)
※ 一部の Bluetooth アダプタは、動作しないことがあるそうです。
(GitHub - mart1nro/joycontrol の Issues より)
-
ソフトウェア
- VirtualBox 6.1(Windows10上で動作させる場合のみ)
- Ubuntu 20.04 LTS(Debian系のディストリビューションであれば動作すると思います)
- Python3.7
- GitHub - mart1nro/joycontrol
- GitHub - Almtr/joycontrol-pluginloader
1. Linux 環境の構築
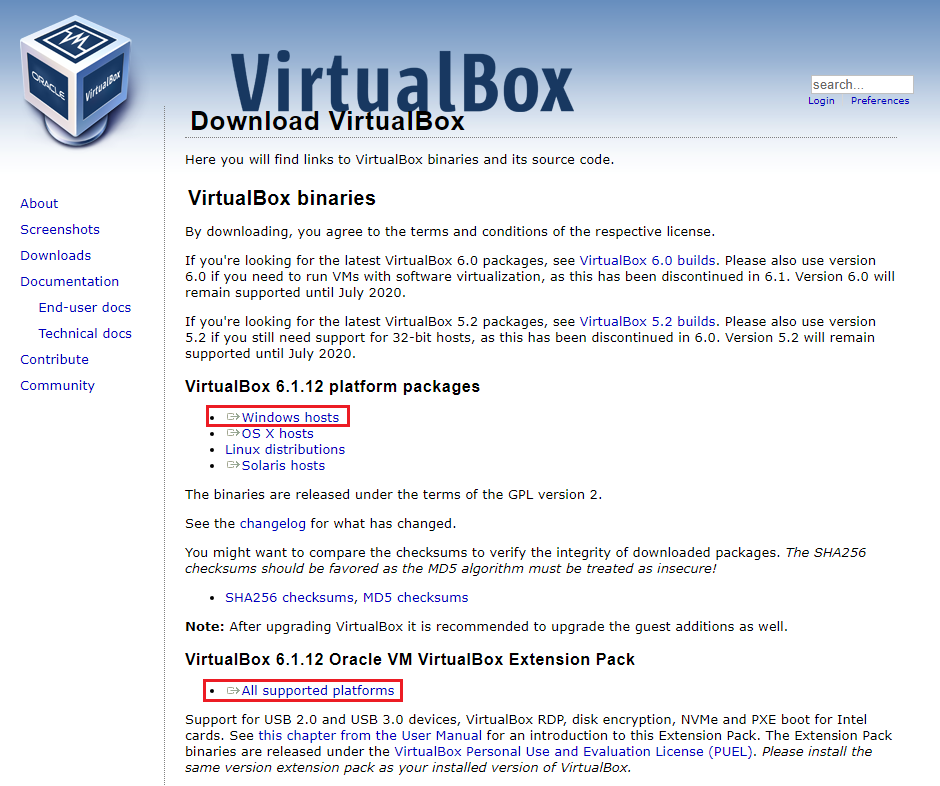
1-1. VirtualBox のインストール
以下のリンクから、VirtualBox と Extension Pack をダウンロードし、順にインストールしてください。
https://www.virtualbox.org/wiki/Downloads
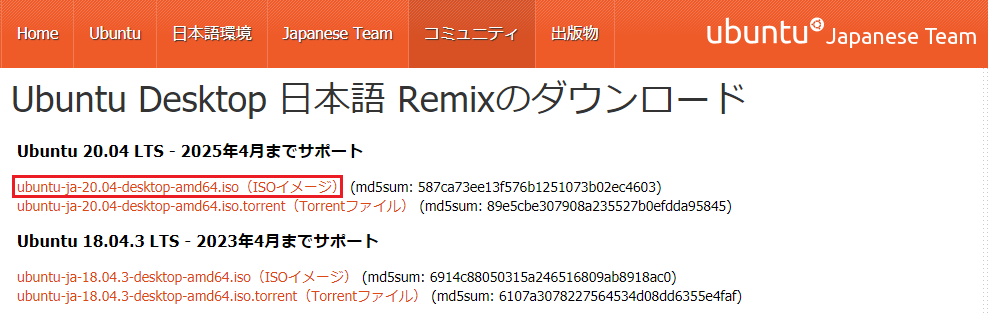
1-2. Ubuntu のダウンロード
以下のリンクから、Ubuntu 20.04 LTS の ISO イメージをダウンロードしてください。
https://www.ubuntulinux.jp/products/JA-Localized/download
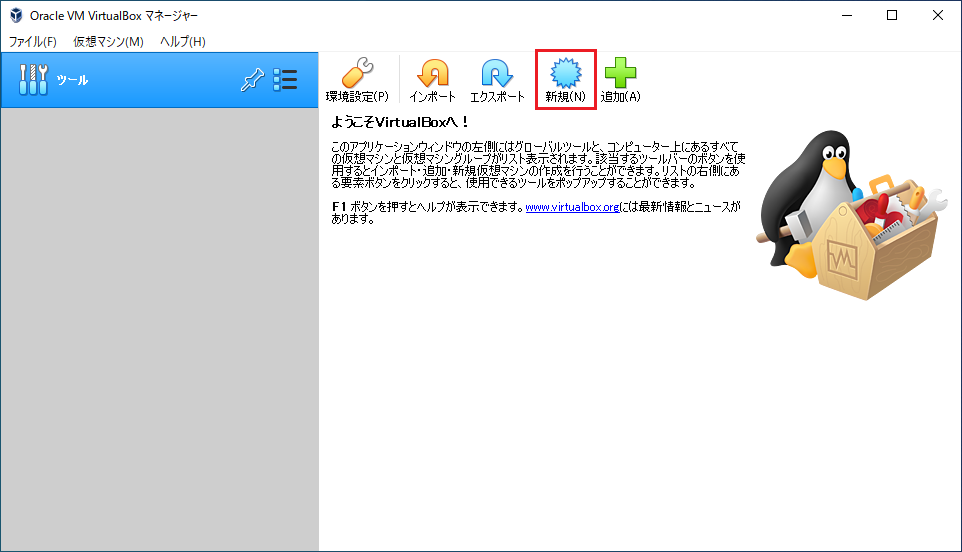
1-3. 仮想マシンの作成
-
VirtualBox を開き、「新規」を押してください。
-
適当な名前を付け、「Ubuntu(64-bit)」を選択して、「次へ」を押してください。
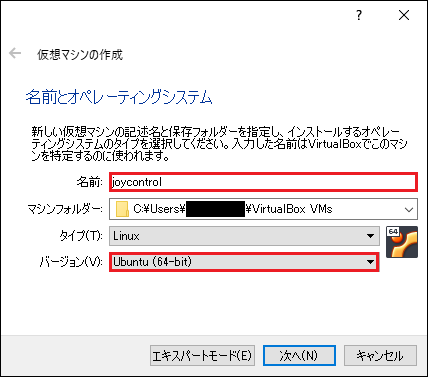
※ Ubuntu(64-bit)の項目が出ない場合、仮想化支援機能(Intel VT/AMD-V)が有効になっていない可能性があります。UEFI/BIOS を起動して仮想化支援機能を有効にしてください。マザーボードによって設定方法が異なるので、ここでは説明を割愛します。 -
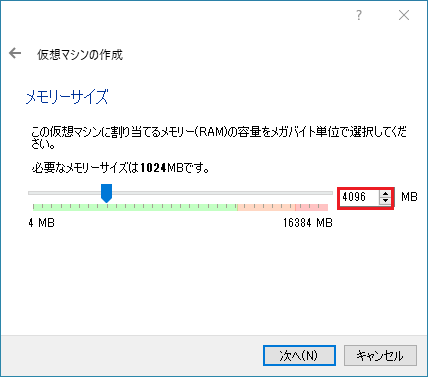
メモリサイズは、4096MB以上に設定して、「次へ」を押してください。
Ubuntu Desktop 20.04 LTS の推奨メモリサイズは、4096MB以上です。サイズが小さいと、フリーズする可能性があります。
-
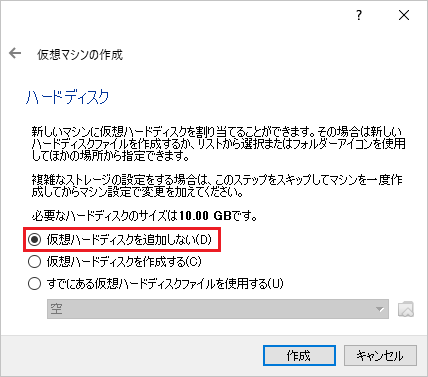
今回は、OSをインストールせずに使うので、「仮想ハードディスクを追加しない」を選択してください。
-
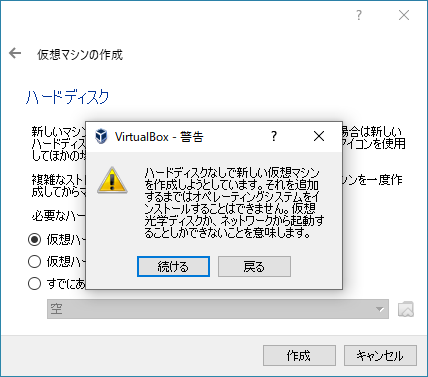
警告が出ますが、気にせず「続ける」「作成」を押してください。
1-4. Ubuntu の起動設定
-
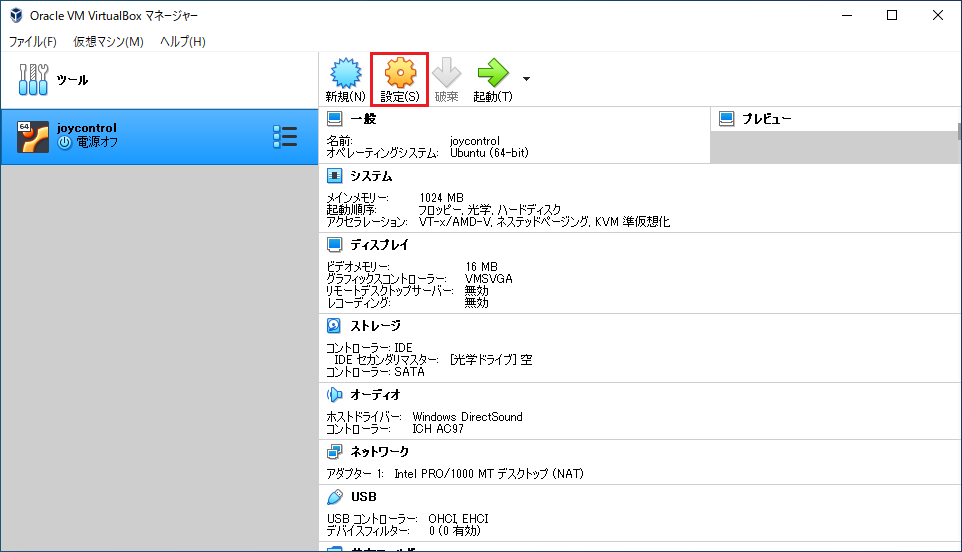
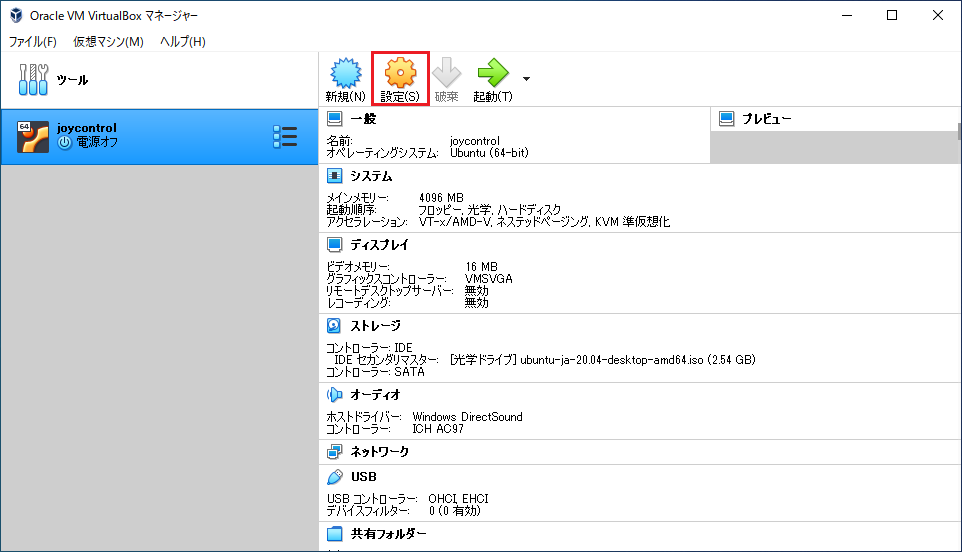
作成した仮想マシンを選択し、「設定」を押してください。
-
赤枠を矢印の通りにクリックし、「1-2. Ubuntu のダウンロード」でダウンロードした ISOイメージ(ubuntu-ja-20.04-desktop-amd64.iso)を指定してください。
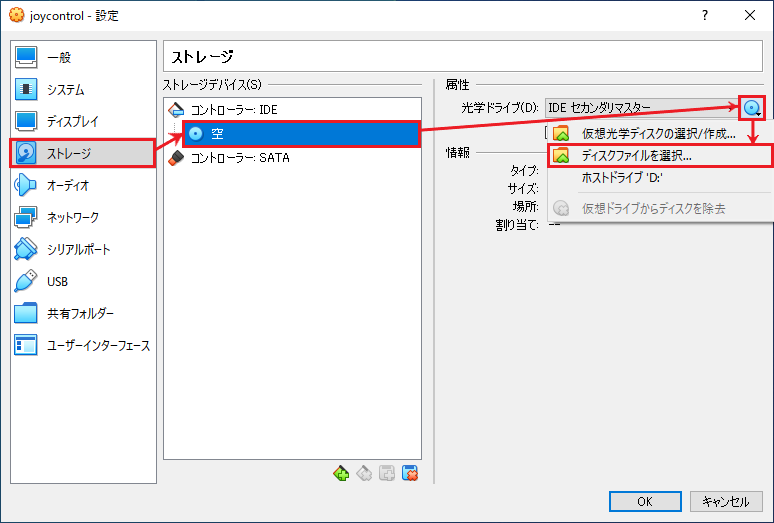
-
指定できたら、「OK」を押してください。

1-5. Bluetooth デバイスの接続設定
-
作成した仮想マシンを選択し、「設定」を押してください。
-
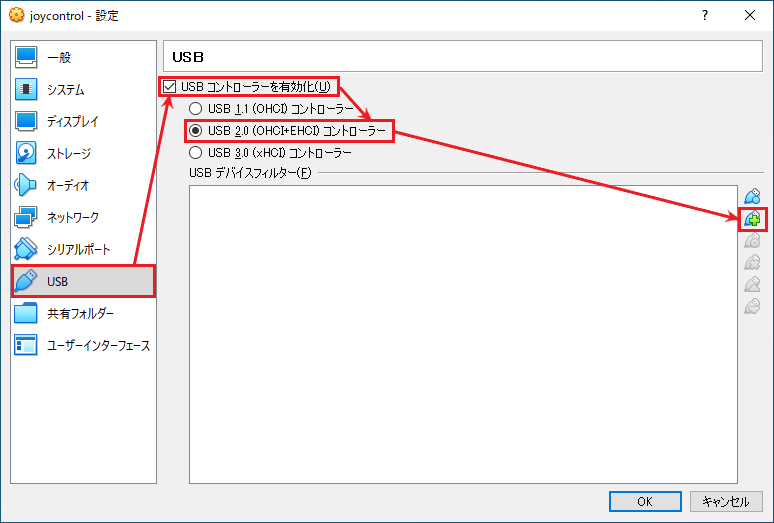
Bluetooth デバイスを指定してください。使用している環境によって名前が異なります。
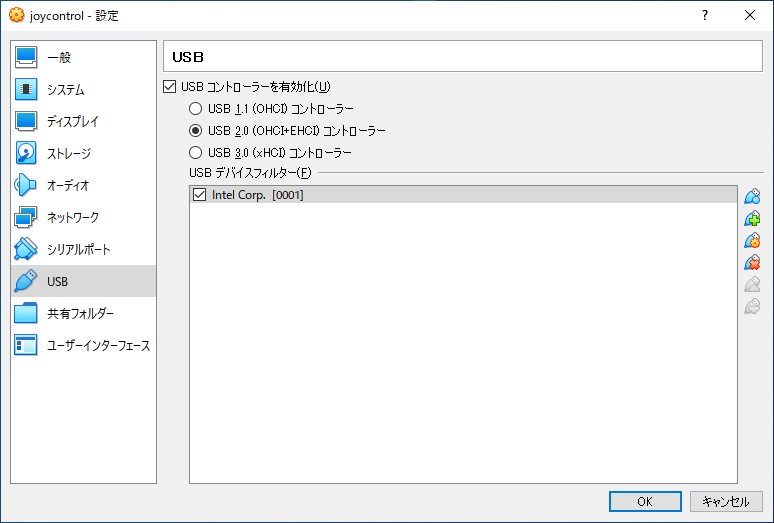
私の環境では、以下のような表記になっていました。- Intel Corp. [0001](内蔵型の Bluetooth デバイス)
- Cambridge Silicon Radio, Ltd Bluetooth Dongle (HCI mode)[8891]
(Bluetooth USB アダプタ: BUFFALO BSBT4D200BK)
-
デバイスが追加されたら、「OK」を押してください。
1-6. 仮想マシンの起動
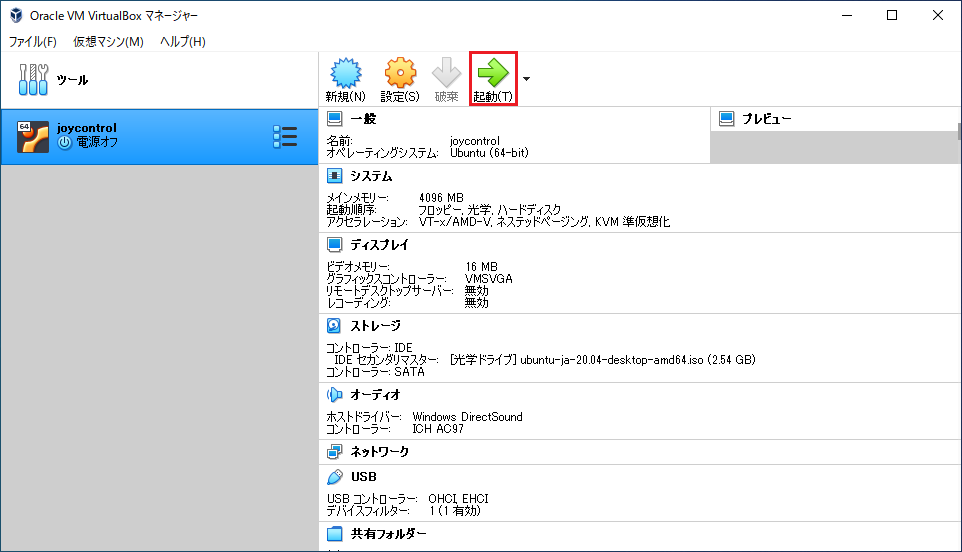
-
作成した仮想マシンを選択し、「起動」を押してください。
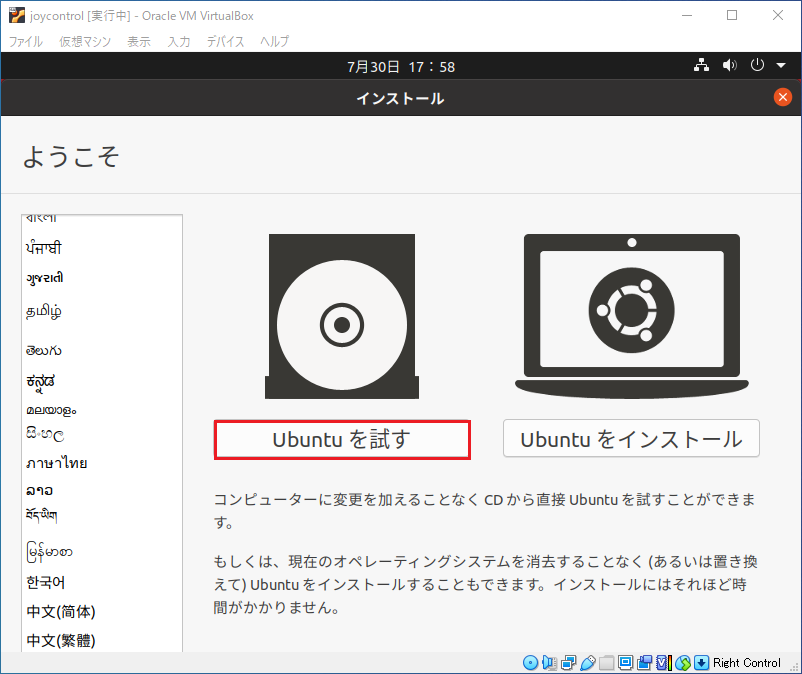
-
起動後しばらくしたら、以下のような画面になります。
今回は、OSをインストールせずに起動させるので、「Ubuntu を試す」を押してください。
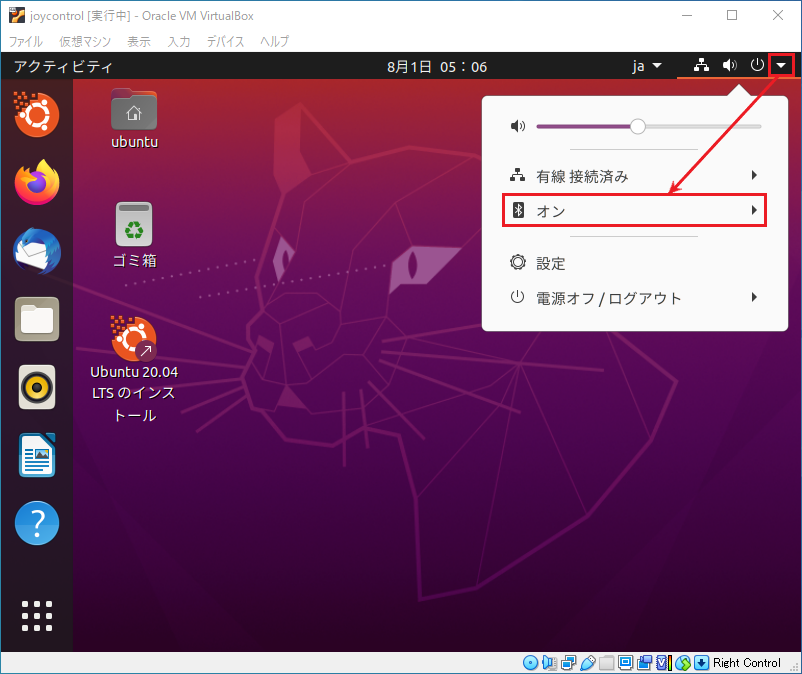
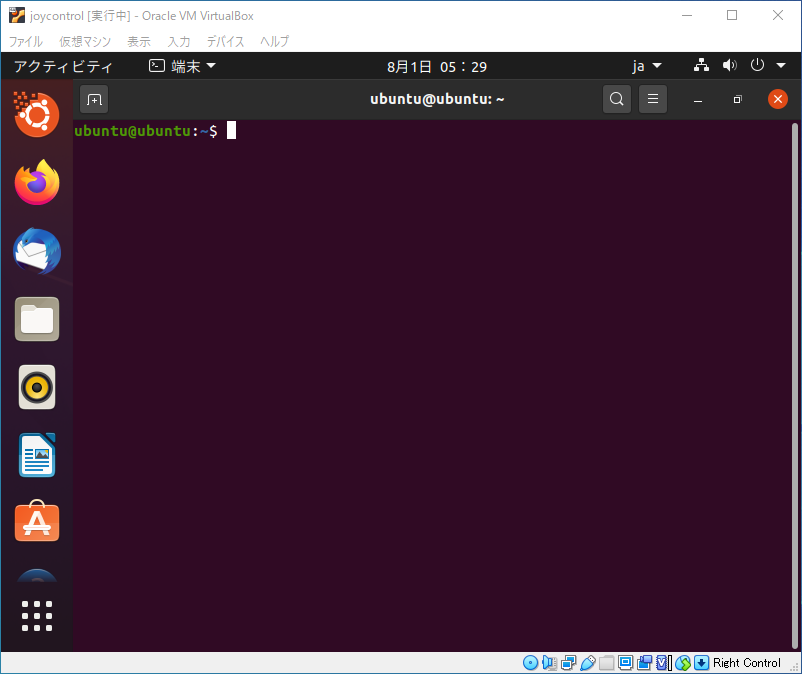
-
Ubuntu のデスクトップ画面が表示されたら、Bluetooth が「オン」になっているかを確認してください。
「オン」になっていない場合は、「Bluetooth がオンにならない場合」をご確認ください。
Bluetooth がオンにならない場合
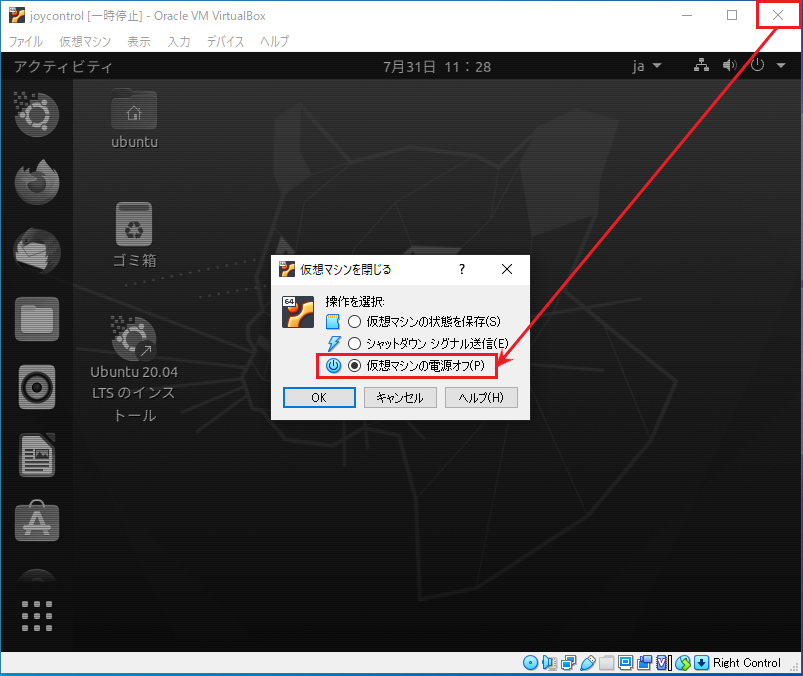
一度、仮想マシンの電源をオフにしてください。
Windows の Bluetooth 機能を無効にすると、仮想マシン側で認識される場合があります。
以下のいずれかをお試しください。以下の作業が完了したら、「1-6. 仮想マシンの起動」を行ってください。
-
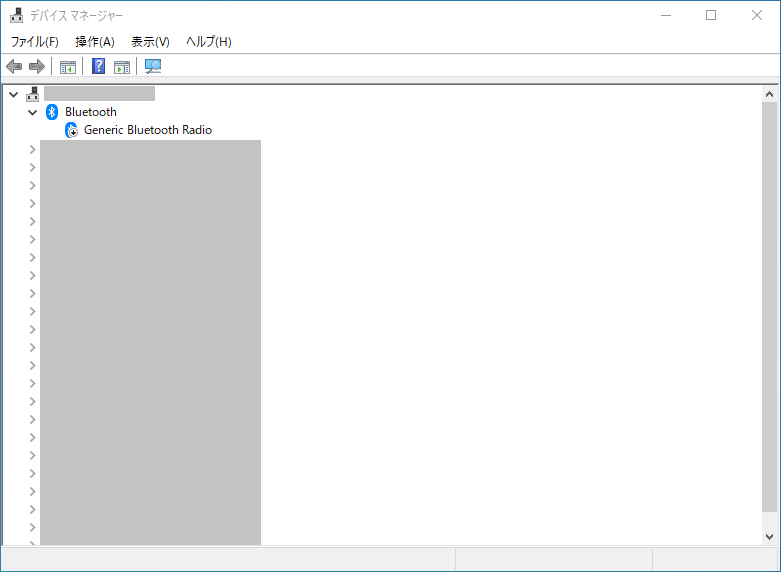
Bluetooth デバイスを無効にする。
- 「デバイスマネージャー」を起動してください。
- Bluetooth デバイスを右クリックして「デバイスを無効にする」を押してください。
※1 デバイス名は、環境によって異なります。
※2 私の環境では、この方法で Bluetooth USB アダプタ(BUFFALO BSBT4D200BK)が認識されました。
-
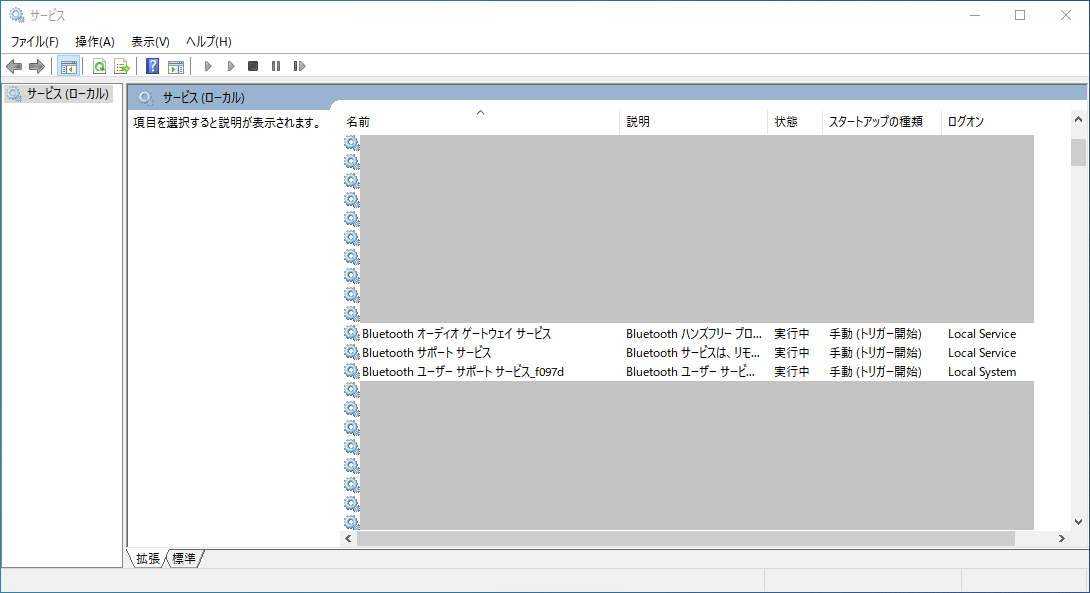
3つの Bluetooth 関連のサービスを停止させる。
- 「サービス」を起動してください。
- 各サービスを右クリックし、「停止」を押してください。
※1 仮想マシンの再起動を行うと、自動的にサービスが再起動される場合があります。
※2 私の環境では、この方法で 内蔵型の Bluetooth デバイスが認識されました。
2. joycontrol のインストール
ここからは、Terminal で作業を行います。Ubuntu の場合、Ctrl-Alt-T で Terminal を開くことができます。
自動インストール
以下のコマンドを実行すると、joycontrol のインストール作業をすべて自動で行ってくれます。
Ubuntu の仮想マシンを起動してすぐには、コピペが使えません。入力が面倒な人は、これを使ってください。
wget -O - https://bit.ly/3aqvkpu | sh
(オプション)手動インストール
-
依存関係のあるパッケージなどをインストールする。
sudo apt update sudo apt install git python3-pip python3-dbus libhidapi-hidraw0 libbluetooth-dev bluez -y -
Bluetooth の関連の設定(ペアリング時に必要な設定)
SDP を無効化させる。
sudo sed -i -e 's/bluetoothd$/bluetoothd -C -P sap,input,avrcp/' /lib/systemd/system/bluetooth.servicebluetooth-deamon を再起動して、設定を反映させる。
sudo systemctl daemon-reload sudo systemctl restart bluetooth.service -
joycontrol をインストールする。
git clone https://github.com/Poohl/joycontrol.git -b amiibo_edits ~/joycontrol sudo pip3 install aioconsole hid==1.0.0 crc8 sudo pip3 install joycontrol/ -
joycontrol-pluginloader をインストールする。
git clone --recursive https://github.com/Almtr/joycontrol-pluginloader.git
sudo pip3 install joycontrol-pluginloader/
3. コントローラーのペアリング
-
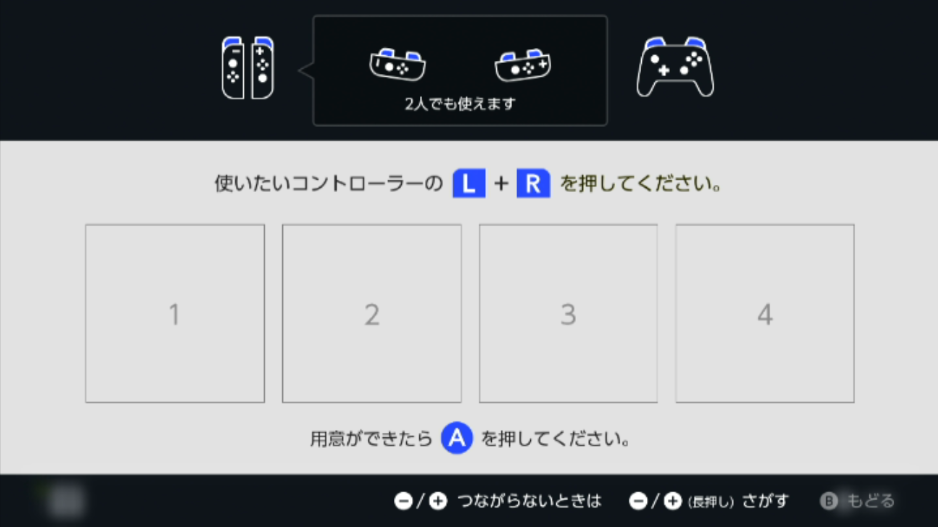
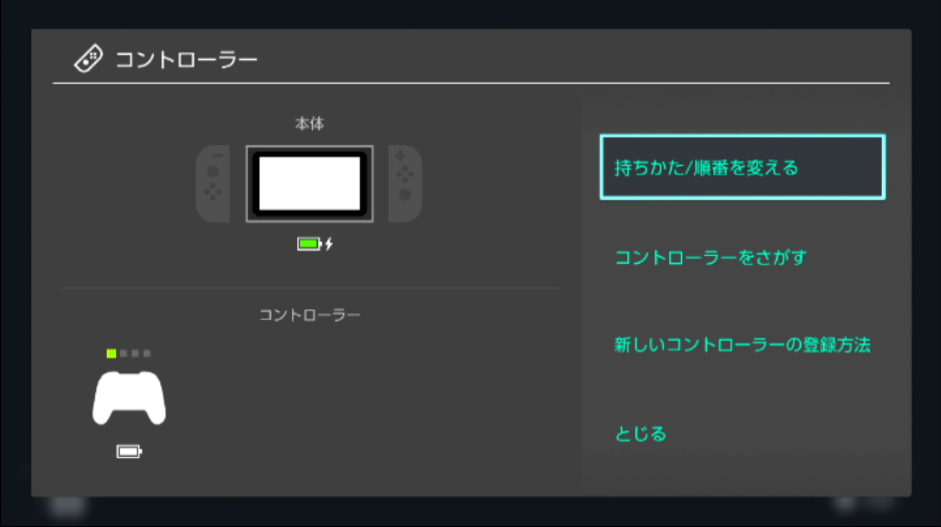
Nintendo Switch を起動し、以下の画面を開いてください。
「HOME」→「コントローラー」→「持ちかた/順番を変える」
-
ディレクトリを移動する。
cd joycontrol-pluginloader/ -
以下のコマンドを実行してください。
sudo joycontrol-pluginloader plugins/tests/PairingController.pyペアリングに成功すると、以下のような実行ログが表示されます。ペアリングがうまくいかない場合は、「ペアリングできない場合」をご確認ください。
[17:03:13] joycontrol.server create_hid_server::58 WARNING - [Errno 98] Address already in use
[17:03:13] joycontrol.server create_hid_server::60 WARNING - Fallback: Restarting bluetooth due to incompatibilities with the bluez "input" plugin. Disable the plugin to avoid issues. See https://github.com/mart1nro/joycontrol/issues/8.
[17:03:13] joycontrol.server create_hid_server::65 INFO - Restarting bluetooth service...
[17:03:14] joycontrol.device set_name::69 INFO - setting device name to Pro Controller...
[17:03:14] joycontrol.device set_class::61 INFO - setting device class to 0x002508...
[17:03:14] joycontrol.server create_hid_server::84 INFO - Advertising the Bluetooth SDP record...
[17:03:14] joycontrol.server create_hid_server::94 INFO - Waiting for Switch to connect... Please open the "Change Grip/Order" menu.
[17:03:16] joycontrol.server create_hid_server::98 INFO - Accepted connection at psm 17 from ('01:23:45:67:89:AB', 17)
[17:03:16] joycontrol.server create_hid_server::100 INFO - Accepted connection at psm 19 from ('01:23:45:67:89:AB', 19)
[17:03:18] root _reply_to_sub_command::295 INFO - received output report - Sub command SubCommand.REQUEST_DEVICE_INFO
[17:03:18] root _reply_to_sub_command::295 INFO - received output report - Sub command SubCommand.SET_SHIPMENT_STATE
[17:03:18] root _reply_to_sub_command::295 INFO - received output report - Sub command SubCommand.SPI_FLASH_READ
[17:03:18] root _reply_to_sub_command::295 INFO - received output report - Sub command SubCommand.SPI_FLASH_READ
[17:03:18] root _reply_to_sub_command::295 INFO - received output report - Sub command SubCommand.SET_INPUT_REPORT_MODE

<snip>

[17:04:04] root _reply_to_sub_command::295 INFO - received output report - Sub command SubCommand.SET_NFC_IR_MCU_CONFIG
[17:04:04] root _reply_to_sub_command::295 INFO - received output report - Sub command SubCommand.SET_PLAYER_LIGHTS
[17:04:04] JoycontrolPlugin.loader load_plugin::9 INFO - Loading: plugins/tests/PairingController.py
[17:04:05] plugins/tests/PairingController.py run::11 INFO - Pairing completed.
[17:04:06] JoycontrolPlugin.loader start::55 INFO - Stopping communication...
「Pairing completed. 」と表示され、Nintendo Switch が以下の画面に遷移したら、ペアリング成功です。
(ペアリング成功後、Aボタンを自動入力して、この画面に遷移させ、一度切断するように実装しています。)
ペアリングできない場合
まずは、Bluetooth がオンになっていることを確認してください。
-
「Waiting for Switch to connect... Please open the "Change Grip/Order" menu.」の表示から動かない。
3 分程度待っても何も起きない場合は、Ctrl-C で強制終了し、再度以下のコマンドを実行してください。何度か強制終了と再実行を繰り返すと、先に進む場合があります。
sudo joycontrol-pluginloader plugins/tests/PairingController.py -
「KeyError: 'Name'」というエラーが出る。
ペアリング時に以下のようなエラーが出る場合があります。
[14:56:17] joycontrol.server create_hid_server::64 WARNING - detected too many SDP-records. Switch might refuse connection.
Traceback (most recent call last):
  File "/usr/local/bin/joycontrol-pluginloader", line 8, in <module>
    sys.exit(main())
  File "/usr/local/lib/python3.8/dist-packages/JoycontrolPlugin/loader.py", line 90, in main
    loop.run_until_complete(loader.start(args))
  File "/usr/lib/python3.8/asyncio/base_events.py", line 616, in run_until_complete
    return future.result()
  File "/usr/local/lib/python3.8/dist-packages/JoycontrolPlugin/loader.py", line 39, in start
    transport, protocol = await create_hid_server(factory, reconnect_bt_addr=args.reconnect_bt_addr,
  File "/usr/local/lib/python3.8/dist-packages/joycontrol/server.py", line 65, in create_hid_server
    b = hid.get_paired_switches()
  File "/usr/local/lib/python3.8/dist-packages/joycontrol/device.py", line 77, in get_paired_switches
    if d and d['Name'] == "Nintendo Switch":
KeyError: 'Name
これは bluetooth-daemon を再起動すると、解決する場合があります。
以下のコマンドを実行して bluetooth-daemon を再起動してください。sudo systemctl restart bluetooth.service -
bluetoothd の input plugin を無効にする
bluetoothd の input plugin を無効にすると、ペアリングができる場合があるそうです。
(参考)https://github.com/Poohl/joycontrol/blob/amiibo_edits/README.md-
/lib/systemd/system/bluetooth.service をエディタで開く。
sudo gedit /lib/systemd/system/bluetooth.service -
「ExecStart=/usr/lib/bluetooth/bluetoothd」から始まる行を以下のように編集する。
ExecStart=/usr/lib/bluetooth/bluetoothd -C -P input -
bluetooth-daemon を再起動して設定を反映させる。
sudo systemctl daemon-reload
sudo systemctl restart bluetooth.service
-
-
上記の方法のいずれかでもペアリングできない場合
別の Bluetooth デバイスを試してみてください。呪われた Bluetooth ハードウェアがあるそうです。
(参考)Cursed Bluetooth Hardware · Issue #4 · Poohl/joycontrol
4. 動作テスト
-
Nintendo Switch の Bluetooth アダプタの MAC アドレスを確認する。
ペアリング時の実行ログを再度確認し、以下のようなメッセージを探してください。[17:03:16] joycontrol.server create_hid_server::98 INFO - Accepted connection at psm 17 from ('01:23:45:67:89:AB', 17)
上記の例の場合、「01:23:45:67:89:AB」が Bluetooth アダプタの MAC アドレスです。今後コマンドの実行時に使用するので、覚えておいてください。
※ 接続する Nintendo Switch によって MAC アドレスの値は、異なります。 -
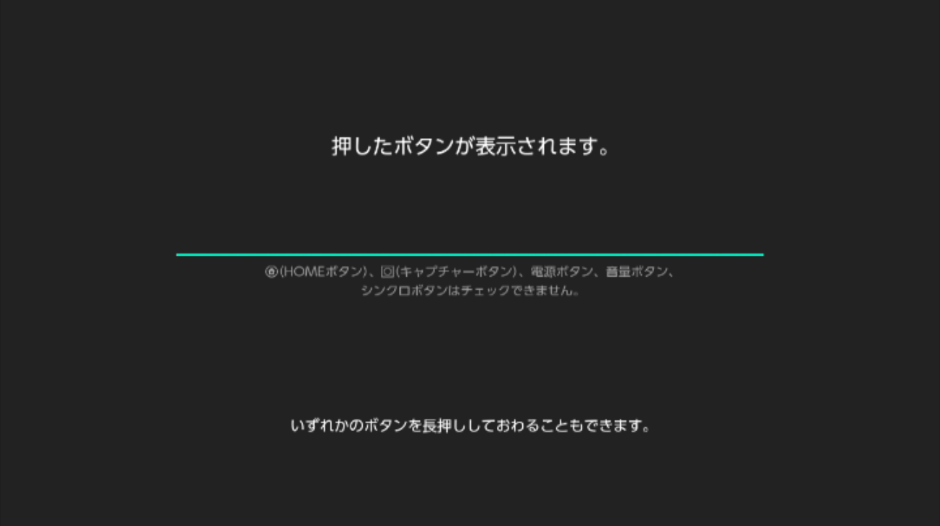
Nintendo Switch で以下の画面を開いてください。
「HOME」→「設定」→「コントローラーとセンサー」→「入力デバイスの動作チェック」
→「ボタンの動作チェック」
-
すべてのコントローラーの接続を切断してください。
※ 切断できていない場合、エラーになる可能性があります。 -
以下のコマンドを実行してください。
sudo joycontrol-pluginloader -r 01:23:45:67:89:AB plugins/tests/TestControllerButtons.py※「01:23:45:67:89:AB」には、ご自身の Nintendo Switch の Bluetooth アダプタの MAC アドレスを指定してください。
実行すると、いくつかのボタンが自動入力されます。

joycontrol プラグインについて
なるべく自動化の実装コストを下げるため、プラグインとして拡張できるようなツールを作成しました。
これらを使って、「Nintendo Switch の自動化でできること」の全自動タマゴ孵化や「4. 動作テスト」のボタン自動入力などを実現しています。
- joycontrol-pluginloader(joycontrol 拡張用のプラグインローダー)
- joycontrol-plugins(ポケモン自動化などのプラグイン)
同封しているプラグインと使い方
各プラグインの使い方は、Wikiをご確認ください。
- サンプルプラグイン
- サンプル(SamplePlugin)
- テスト用プラグイン
- ペアリングテスト(ParingController)
- コントローラーのボタン入力テスト(TestControllerButtons)
- コントローラーのスティック入力テスト(TestControllerSticks)
- ユーティリティプラグイン
- Aボタン連打(RepeatA)
- 簡易マクロ(SimpleMacro)
- ポケモンソード・シールドプラグイン
- 日付変更バグ(TimeSkipGlitch)
- ほりだしもの自動購入(BuyBargains)
- マックスレイドバトルのポケモン切替え(ChangeRaidPokemon)
- きのみ自動回収(GetBerries)
- ハネ自動回収(GetFeathers)
- ワット自動回収(GetWatts)
- 自動IDくじ(TryLotoID)
- マックスレイドバトル周回(AutoRaid)
- あまいミツとふしぎなアメの合成(CombineHoneyAndCandy)
- マックスレイドバトル配布(DistributeRaid)
- 自動タマゴ孵化(HatchEggs)
- トーナメント周回(LoopBattleTower)
- バトルタワー周回(LoopTournament)
- ポケモン自動逃がし(ReleasePokemons)
- 乱数調整用の日数消費(SkipDays)
- 日付変更バグ(TimeSkipGlitch)
今後余裕があれば、追加実装していきます。
(2020/08/09 追記)7つのプラグインを追加しました。
- 日付変更バグ(TimeSkipGlitch)
- ほりだしもの自動購入(BuyBargains)
- きのみ自動回収(GetBerries)
- ハネ自動回収(GetFeathers)
- ワット自動回収(GetWatts)
- 自動IDくじ(TryLotoID)
- マックスレイドバトル周回(AutoRaid)
- あまいミツとふしぎなアメの合成(CombineHoneyAndCandy)
(2020/08/23 追記)[@zobio_go](https://twitter.com/zobio_go) さんに3つのプラグインを作成していただきました。
- 日付変更バグ(TimeSkipGlitch)
- マックスレイドバトルのポケモン切替え(ChangeRaidPokemon)
- マックスレイドバトル配布(DistributeRaid)
- 乱数調整用の日数消費(SkipDays)
プラグインの作成方法
プラグイン作成用に4つのサンプルを用意しました。
ここに書かれているサンプルの組み合わせで大体の自動化ができると思います。
最小構成
プラグインを作成する場合、クラス名とファイル名を一致させてください。
作成したクラスの run メソッドがエントリーポイントです。
以下のサンプルでは、プラグインがロードされた後、「Hello joycontrol Plugin!」と出力されます。
-
ログ出力サンプル
MyPlugin.pyimport logging from JoycontrolPlugin import JoycontrolPlugin logger = logging.getLogger(__name__) # クラス名とファイル名を一致させる class MyPlugin(JoycontrolPlugin): # run メソッドがエントリーポイント async def run(self): logger.info('Hello joycontrol Plugin!') # ログ出力 -
実行方法
sudo joycontrol-pluginloader -r 01:23:45:67:89:AB MyPlugin.py※「01:23:45:67:89:AB」には、ご自身の Nintendo Switch の Bluetooth アダプタの MAC アドレスを指定してください。
-
実行結果
[21:28:33] root _reply_to_sub_command::295 INFO - received output report - Sub command SubCommand.REQUEST_DEVICE_INFO
[21:28:33] root _reply_to_sub_command::295 INFO - received output report - Sub command SubCommand.SET_SHIPMENT_STATE
[21:28:33] root _reply_to_sub_command::295 INFO - received output report - Sub command SubCommand.SPI_FLASH_READ

<snip>

[21:28:36] JoycontrolPlugin.loader __load_plugin::22 INFO - Loading: MyPlugin.py
[21:28:36] MyPlugin.py run::10 INFO - Hello joycontrol Plugin!
[21:28:36] JoycontrolPlugin.loader start::55 INFO - Stopping communication...
ボタンを押す
ボタンの入力用に3つのメソッド(button_push、button_press、button_release)を用意しています。
以下のサンプルでは、ボタンの入力、同時押し、順番に離す、長押しを行います。
-
ボタン入力サンプル
MyPlugin.pyimport logging from JoycontrolPlugin import JoycontrolPlugin logger = logging.getLogger(__name__) class MyPlugin(JoycontrolPlugin): async def run(self): await self.button_push('a') # Aボタンを押す await self.wait(0.3) # 0.3秒間待つ await self.button_push('a', 'b') # AとBボタンを同時に押す await self.wait(0.3) await self.button_press('a', 'b', 'x') # A、B、Xボタンを同時に押し続ける await self.wait(0.1) await self.button_release('x') # Xボタンだけ離す await self.wait(0.1) await self.button_release('a', 'b') # AとBボタンも離す await self.wait(0.1) await self.button_push('a', press_time_sec=3.0) # Aボタンを3秒間長押しする await self.wait(0.3) -
実行方法
sudo joycontrol-pluginloader -r 01:23:45:67:89:AB MyPlugin.py※「01:23:45:67:89:AB」には、ご自身の Nintendo Switch の Bluetooth アダプタの MAC アドレスを指定してください。
-
使用できるボタン
ラベル ボタン名 a Aボタン b Bボタン x Xボタン y Yボタン l Lボタン r Rボタン zl ZLボタン zr ZRボタン l_stick Lスティックボタン r_stick Rスティックボタン minus -ボタン plus +ボタン up 十字ボタン(上) down 十字ボタン(下) left 十字ボタン(左) right 十字ボタン(右) capture キャプチャーボタン home HOMEボタン
スティックを傾ける
スティックの入力用に2つのメソッド(left_stick、right_stick)を用意しています。
以下のサンプルでは、「左スティックと右スティックを傾ける」、「角度を指定して傾ける」、「少しだけ傾ける」、「中央に戻す」を行います。
-
スティック入力サンプル
MyPlugin.pyimport logging from JoycontrolPlugin import JoycontrolPlugin logger = logging.getLogger(__name__) class MyPlugin(JoycontrolPlugin): async def run(self): await self.left_stick('up') # 左スティックを上に傾ける await self.wait(0.3) # 0.3秒間待つ await self.right_stick('down') # 右スティックを下に傾ける await self.wait(0.3) await self.left_stick(angle=45) # 左スティックを左上(45度)に傾ける await self.wait(0.3) half_power = self.max_stick_power / 2 await self.left_stick('right', power=half_power) # 左スティックを半分の力で右に傾ける await self.wait(0.3) await self.left_stick('center') # 左スティックを中央に戻す await self.right_stick('center') # 右スティックを中央に戻す await self.wait(0.3) -
実行方法
sudo joycontrol-pluginloader -r 01:23:45:67:89:AB MyPlugin.py※「01:23:45:67:89:AB」には、ご自身の Nintendo Switch の Bluetooth アダプタの MAC アドレスを指定してください。
コマンドライン引数からオプションを指定する
--plugin-options や -p を使ってオプションを指定することができます。
以下のサンプルでは、2つのオプションを受け取り、それらをログに出力します。
-
オプション指定サンプル
MyPlugin.pyimport logging from JoycontrolPlugin import JoycontrolPlugin, JoycontrolPluginError logger = logging.getLogger(__name__) class MyPlugin(JoycontrolPlugin): async def run(self): # エラー処理 if self.options is None: raise JoycontrolPluginError('Plugin options is not set.') logger.info(self.options[0]) # 1つ目のオプション logger.info(self.options[1]) # 2つ目のオプション -
オプションの指定方法
sudo joycontrol-pluginloader -r 01:23:45:67:89:AB MyPlugin.py --plugin-options hello abcもしくは
sudo joycontrol-pluginloader -r 01:23:45:67:89:AB MyPlugin.py -p hello abc※「01:23:45:67:89:AB」には、ご自身の Nintendo Switch の Bluetooth アダプタの MAC アドレスを指定してください。
-
実行結果
[21:36:00] root _reply_to_sub_command::295 INFO - received output report - Sub command SubCommand.REQUEST_DEVICE_INFO
[21:36:00] root _reply_to_sub_command::295 INFO - received output report - Sub command SubCommand.SET_SHIPMENT_STATE
[21:36:00] root _reply_to_sub_command::295 INFO - received output report - Sub command SubCommand.SPI_FLASH_READ

<snip>

[21:36:03] JoycontrolPlugin.loader __load_plugin::22 INFO - Loading: MyPlugin.py
[21:36:03] MyPlugin.py run::8 INFO - hello
[21:36:03] MyPlugin.py run::9 INFO - abc
[21:36:03] JoycontrolPlugin.loader start::55 INFO - Stopping communication...
おわりに
これまでは、Arduino を使って自動化させていましたが、joycontrol を使って Bluetooth 経由で自動化することができるようになりました。hex ファイルの書換えが必要なくなったので、かなり便利になりました。
実装コストもかなり下がったので、時間のあるときに移植していきたいと思います。
参考資料
- GitHub - mart1nro/joycontrol
- Discord - Joy-ConDroid Discord #hacking チャンネル
- GitHub Gist - amiibo-emulation-with-linux-vm.md
- GitHub - Poohl/joycontrol (Nintendo Switch V12 に対応した joycontrol)
- Unable to connect with Switch update 12.0.0 · Issue #104 · mart1nro/joycontrol
- Support for SwitchOS 12.0.0 · Issue #18 · Brikwerk/nxbt
- V12 compatability and Amiibo-NFC support. by Poohl · Pull Request #110 · mart1nro/joycontrol
- Cursed Bluetooth Hardware · Issue #4 · Poohl/joycontrol