背景
ConohaのVPSにてWEBサーバーを構築中、SSL証明書を苦手と思っており、避けていた部分であったので今回まとめることに至った。環境
VPS:CentOS9 クライアント元:Windows 10 HomeSSL証明書とは
SSLはSecure Sockets Layerの略。WEBサイトとそのサイトを閲覧しているユーザーとのやりとりを暗号化するための仕組み。 保護されていない(=暗号されていない)通信は中身を見てその内容を悪用することも可能です。主に、
・データの改ざん
⇒中身を改ざんすることで通信相手の情報を操作することができます。
・データの盗聴
・なりすまし、フィッシング
⇒中間に悪用する偽のサーバーを立てて、偽ってメールを送付。そこからフィッシングすることも可能となっています。
以上のリスクがあることから、SSLまとはTLS通信は設定すべきであることがわかっていきます。設定することで以下のメリットが得られることができます。
・上記リスクの解消。セキュリティ向上
・サイトの表示速度向上
⇒HTTP/2が利用可能となるため。
・ユーザーからの信頼も得やすい
続いて、SSLの暗号化はどうやって行うのか
仕組みを説明していきます。 おおまかな流れとしては、クライアントとサーバー間でのやりとりは公開鍵にて行い、データについては共通鍵にてデータのやりとりを行う流れです。①クライアントがサーバーへSSL通信の要求を実施
すると、サーバー側は公開鍵を含んだ証明書をクライアントへ送り返し
②受け取ったクライアントは公開鍵を持っているため、サーバーとの通信を確立
③確立後、クライアント側が暗号化した共通鍵データをサーバーへ送付
④サーバー側も共通鍵を使用し、復号。両社ともに暗号と復号ができる形になる。
上記の流れを踏まえて、証明書と併せて使用するとどのようなものとなるのか確認していきます。
SSL証明書
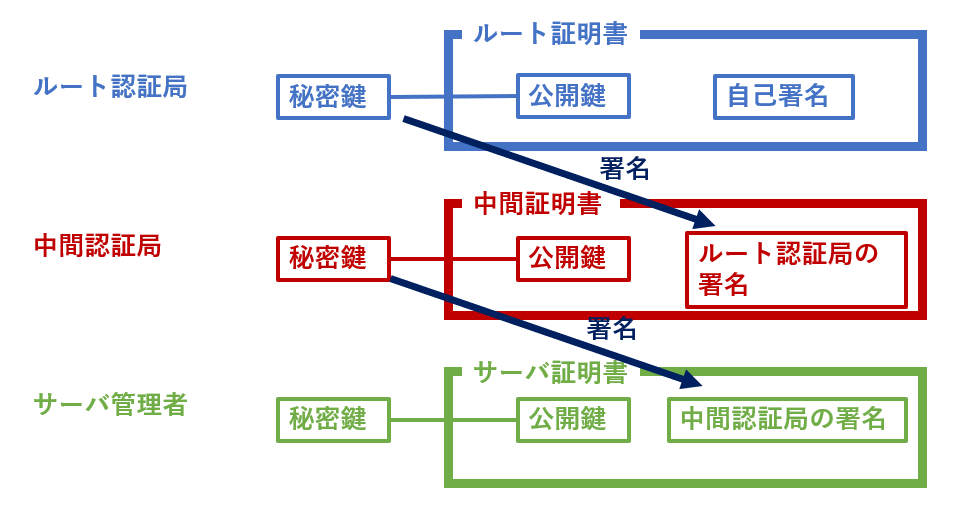
SSLと証明書を組み合わせることで得られるメリットとは「サーバーの実在性」です。もちろん暗号化することでセキュリティ対策はできるのは当然とはなりますが、通信相手のサーバーが偽りではないことを第三者である認証局が証明することはとてもメリットとして大きいです。仕組みとして、SSL証明書は上位の証明書が次の証明書に署名し、次の証明書が署名・・など信用のチェーンで成り立っている。
下記の図は引用であるが、とてもわかりやすかったので記載しております。

設定手順
後程設定手順として、Let's Encryptを使用したSSL証明書設定を行う予定です。 ここでは簡易的な手順と語彙について追っていきます。1,サーバー内に秘密鍵を生成する
2,秘密鍵を用いて、CSRを作成
3,CSRを用いて、サーバー証明書を生成する
4,秘密鍵と証明書をセットにして、暗号化設定を実施する
・中間認証局
・ルート認証局/証明書
⇒SSL証明書を発行する最上位の認証局は「ルート認証局」と呼ばれ、ルート認証局が自身を証明するために発行する証明書のことを「ル―ト証明書」と言います。
・サーバー証明書
⇒いわゆる「証明書」と呼ばれるものはサーバー証明書を指しています。
・中間CA証明書
⇒中間CA証明書はルート証明書によって署名・発行された別の(サーバー証明書とは異なる)SSL証明書です。ルート証明書がサーバー証明書を認証するという信用のチェーンの中間地点となります。
・CSR
⇒SSL/TLS サーバー証明書を発行するための証明書署名要求
Let's Encryptを用いたSSL設定
Let's Encryptとは? ⇒無料SSLサーバー証明書の認証局のこと。SSLのサーバー証明書の種類はドメイン認証に分類されます。 また、一回の作業で得られる証明書の有効期限は 90日ですでは早速実機を用いて設定していきます。
1、ApacheにSSL通信モジュールをインストールします。
# yum -y install mod_ssl
***
Installed:
  mod_ssl-1:2.4.53-7.el9.x86_64               sscg-3.0.0-5.el9.x86_64

Complete! ⇒成功
2、続いて、ssl.confを編集していきます。
個人的にコメントアウトがうざったいので、とりあえず削除します。
# cd /etc/httpd/conf.d/
# grep -E -v "^$|#$|#.+$|^\s+#.$" ssl.conf
Listen 443 https
SSLPassPhraseDialog exec:/usr/libexec/httpd-ssl-pass-dialog
SSLSessionCache         shmcb:/run/httpd/sslcache(512000)
SSLSessionCacheTimeout  300
SSLCryptoDevice builtin
<VirtualHost _default_:443>
ErrorLog logs/ssl_error_log
TransferLog logs/ssl_access_log
LogLevel warn
SSLEngine on
SSLHonorCipherOrder on
SSLCipherSuite PROFILE=SYSTEM
SSLProxyCipherSuite PROFILE=SYSTEM
SSLCertificateFile /etc/pki/tls/certs/localhost.crt
SSLCertificateKeyFile /etc/pki/tls/private/localhost.key
<FilesMatch "\.(cgi|shtml|phtml|php)$">
    SSLOptions +StdEnvVars
</FilesMatch>
<Directory "/var/www/cgi-bin">
    SSLOptions +StdEnvVars
</Directory>
BrowserMatch "MSIE [2-5]" \
         nokeepalive ssl-unclean-shutdown \
         downgrade-1.0 force-response-1.0
CustomLog logs/ssl_request_log \
          "%t %h %{SSL_PROTOCOL}x %{SSL_CIPHER}x \"%r\" %b"
</VirtualHost>

ここで一旦メモ帳かなにかに控えておいて、下記コマンドを実行します。

# cp -ip ssl.conf ssl.conf_bk
# :> ssl.conf  ⇒中身が消せればなんでも大丈夫です。
# vi ssl.conf  ⇒先ほどメモ帳にまとめたものを記載

そのほかのSSL設定については後程記事を書く予定
セキュリティ等
3、Let's Encrypt から 発行料 無料の SSL/TLS サーバー証明書を取得
Let's Encryptが推奨するSnap版certbotコマンドをインストール
EPELリポジトリについてはすでにインストールしてあることを想定して、実施を行う。
# yum --enablerepo=epel install snapd
# systemctl enable --now snapd.socket
Created symlink /etc/systemd/system/sockets.target.wants/snapd.socket → /usr/lib/systemd/system/snapd.socket.
# ln -s /var/lib/snapd/snap /snap

##続いて、certbotをインストールします。

# snap install --classic certbot
error: too early for operation, device not yet seeded or device model not acknowledged
⇒エラーには気にせず、再度同じコマンドを入力
# snap install --classic certbot
# ln -s /snap/bin/certbot /usr/bin/certbot
# certbot --version
certbot 1.31.0  ⇒バージョン確認

##続いて、証明書の取得

-w : ドキュメントルート
-d : SSL証明書認証を受けたいドメイン名

----
Type:   unauthorized
----

Hint: The Certificate Authority failed to download the temporary challenge files created by Certbot. Ensure that the listed domains serve their content from the provided --webroot-path/-w and that files created there can be downloaded from the internet.

Some challenges have failed.
⇒権限エラーのようなものが出力された。どうやら一時的にファイルを作成するときに権限ではじかれた可能性が高い
なので、ディレクトリ作成をしてみて再度チャレンジ
# mkdir -p /var/省略/.well-known/acme-challenge
# certbot certonly --webroot -w /var/www/html -d example.com

----
Type:   unauthorized
----

Hint: The Certificate Authority failed to download the temporary challenge files created by Certbot. Ensure that the listed domains serve their content from the provided --webroot-path/-w and that files created there can be downloaded from the internet.

Some challenges have failed.
やはりだめなので、調査したところhttpd.confのhttpsへリダイレクトする設定によってうまく.well-knownへ到達できないらしくエラーが出力されてしまうとのこと。。
# vi /etc/httpd/conf/httpd.conf
# RewriteCond %{REQUEST_URI} !(^/\.well-known/acme-challenge/[\w-]{43}$)
# RewriteEngine On
# RewriteCond %{HTTPS} off
# RewriteRule ^(.*)$ https://%{HTTP_HOST}%{REQUEST_URI} [R=301,L]

##一時的にコメントアウト設定
プロセス再起動実施して、証明書発行コマンド実施

⇒無事成功
# certbot certonly --webroot -w /var/~省略~/example.com
/ -d example.com
Saving debug log to /var/log/letsencrypt/letsencrypt.log
Requesting a certificate for example.com

Successfully received certificate.
Certificate is saved at: /etc/letsencrypt/live/example.com/fullchain.pem
Key is saved at:         /etc/letsencrypt/live/example.com/privkey.pem
This certificate expires on 2023-02-09.
These files will be updated when the certificate renews.
Certbot has set up a scheduled task to automatically renew this certificate in the background.

- - - - - - - - - - - - - - - - - - - - - - - - - - - - - - - - - - - - - - - -
If you like Certbot, please consider supporting our work by:
 * Donating to ISRG / Let's Encrypt:   https://letsencrypt.org/donate
 * Donating to EFF:                    https://eff.org/donate-le
- - - - - - - - - - - - - - - - - - - - - - - - - - - - - - - - - - - - - - - -
あとはssl.confの修正を行うことで設定可能です。
# vi /etc/httpd/conf.d/ssl.conf
SSLCertificateFile /etc/letsencrypt/live/example.com/cert.pem
SSLCertificateKeyFile /etc/letsencrypt/live/example.com/privkey.pem
SSLCertificateChainFile /etc/letsencrypt/live/example.com/chain.pem

# systemctrl restart httpd
自サイトへアクセスを行い、URL欄にhttpsが表示されたら無事設定完了
さいごに
今回SSLの概要から始まり、実機への設定を行うことでよりSSLをより身近に感じることができたのは自分の中では大きいことでした。 やっぱり、エラーが出てくれるとなんか嬉しさを覚えます(笑) 寄り添ってくれている感じがして好きですね。。参考
https://qiita.com/miyuki_samitani/items/35941e2389b8f62625ad
https://inaba-serverdesign.jp/blog/20210331/snap-lets-encrypt-ssl-certificate-update.html