はじめに
概要
ParallelClusterではクライアントPC上にクラスタ作成の設定等を行う環境を作成し,クラスタの作成を行う.クラスタを作成するとEC2の新しいインスタンスとしてMasterノードが作成される.Masterノードでジョブを実行すると,ジョブの規模に合わせてSlaveノードが作成されジョブが実行される.
ここではクライアントPC(ParallelClusterのインストール先)にもローカルPCではなくAWSのインスタンスを使用しました.ちなみに,ローカルPC(上記のクライアントPCへの接続元)の環境はmacOS Catalinaです.
つまり,(ローカルPC:mac)→(クライアントPC:EC2)→(クラスタ:Masterノード,Slaveノード)のような関係です.
この記事ではクラスタの作成(Masterノードの作成)を行うところまでをまとめておきます.
クライアントPCとしてのEC2インスタンス作成
インスタンスの作成
お試しなので一番小さいt2.nano(micro)を選択する.
また,セキュリティグループの設定では自宅のPCから接続できるように公開範囲(ソース)をマイIPとしておく.またssh接続のためにキーペアを作成しておき,公開鍵をダウンロードし~/.ssh/keysにでもコピーしておく.
インスタンスへ接続
macの場合terminalから接続できる.
パブリックIPv4アドレス(またはパブリックIPv4 DNS)を確認し,公開鍵を指定してssh接続する.
Ubuntuの場合,初期ユーザ名はubuntuである.
Red Hat系の場合,初期ユーザ名はec2-userである
ssh ec2-user@ec2-18-181-84-119.ap-northeast-1.compute.amazonaws.com -i ~/.ssh/keys/20210520_keypair.pem
環境構築
rootユーザのパスワードを変更する
sudo su -
passwd
パッケージ用リポジトリの追加
sudo dnf install https://dl.fedoraproject.org/pub/epel/epel-release-latest-8.noarch.rpm -y
sudo yum -y install epel-release
python および pipのインストール
なぜかpython3.7はリポジトリにないと言われたので3.8にした.
curlコマンドでpipをインストールするためのスクリプトを入手し実行.
yum install python38
curl -O https://bootstrap.pypa.io/get-pip.py
python3 get-pip.py --user
When you use the --user switch, pip installs AWS ParallelCluster to ~/.local/bin.
とのことで,パスを追加しておく.
export PATH=~/.local/bin:$PATH
リロード
source ~/.bash_profile
ParallelClusterのインストールと設定
ようやくparallel clusterをインストール.
python3 -m pip install aws-parallelcluster --upgrade --user
parallel clusterの設定をしようとpcluster configureとすると次のように怒られた.
[root@ip-xxx-xx-xx-xxx ~]# pcluster configure
ERROR: You must specify a region
Run `aws configure`, or add the `-r <REGION_NAME>` arg to the command you are trying to run, or set the `AWS_DEFAULT_REGION` environment variable.
INFO: Configuration file /root/.parallelcluster/config will be written.
Press CTRL-C to interrupt the procedure.


Failed with error: You must specify a region.
ERROR: No options found for AWS Region ID
AWS CLIを使用するためのIAMユーザの作成
pcluster configureで怒られたメッセージを読むと,You must specify a region.とある.regionの設定はAWS CLI(AWSのコマンドラインツール)を使用して行う必要があるが,
そのためには適切なアクセス権限(ポリシー)を持ったIAMユーザーが必要みたいです.
ので,以下のサイトを参考にIAMユーザを作成しました
awscliをインストール
pip install awscli
AWS CLIを使用する権限を持ったIAMユーザの作成
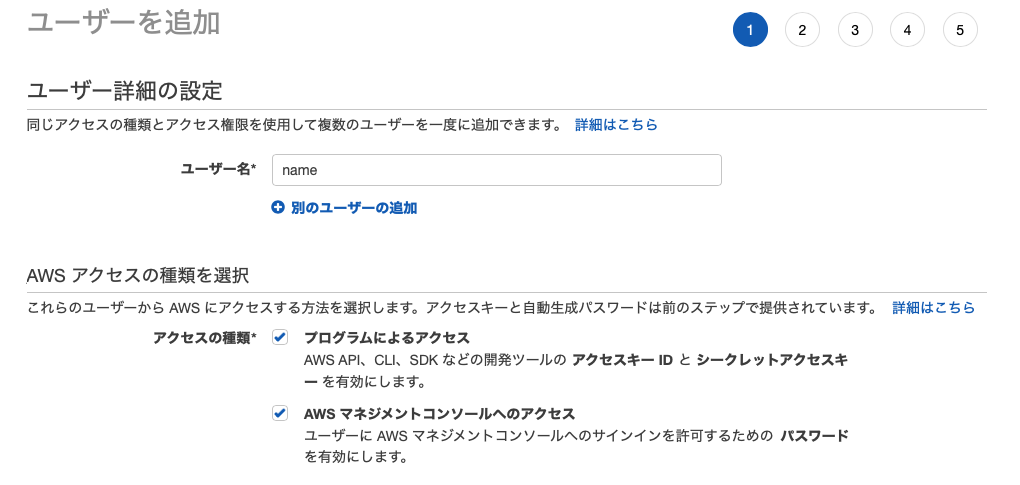
マネジメントコンソールからIAMユーザを新規作成する.
アクセスの種類はとりあえず「プログラムによるアクセス」と「AWSマネジメントコンソールへのアクセス」の両方をONにしておいたけど,後者はいらない気がする.

次に作成したIAMユーザにグループポリシーを適用する.
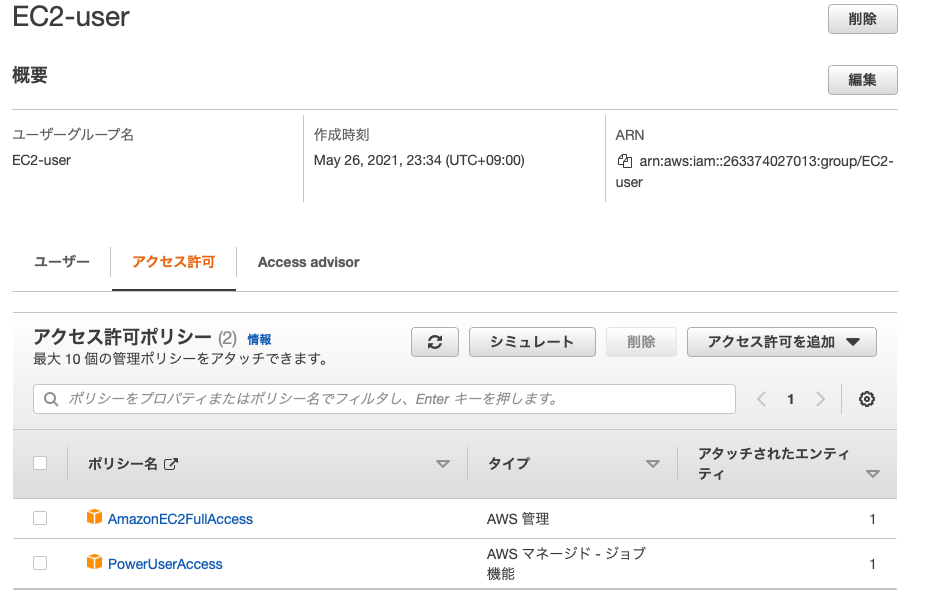
ここでは新しくEC2-userというグループを作成し,
- AmazonEC2FullAccess
- PowerUserAccess
の2つのポリシーを追加した.
参考サイトには2つ目しか載っていなかったので1つ目はいらないかも.
後ほど説明するが,この設定ではclusterの作成時に権限が足りなくてエラーが出た.
エラーを解消するにはAdministratorAccessのポリシーを追加する必要があった.
また,PowerUserAccessはいらなかった.
ユーザの作成を完了し,最終画面でアクセスキーやシークレットアクセスキーをメモるか,.csvをダウンロードしておく.
AWS CLIの設定
aws configureを実行しAWS CLIの環境設定を行う.
[root@ip-xxx-xx-xx-xxx ~]# aws configure
AWS Access Key ID [None]: # 先程作成したユーザのAccess Key
AWS Secret Access Key [None]: # 先程作成したユーザのsecret Access Key
Default region name [None]: # リージョンを選択します。東京の場合は「ap-northeast-1」となります。
Default output format [None]: # jsonやtable等のコマンド出力結果の表示形式を指定します。ここではjsonを入力します。
Parallel Clusterのセットアップ
AWS CLIの設定ができたので,再度Parallel Clusterの設定にチャレンジします.
今度はエラーなく実行できました.
参考サイト
[root@ip-172-31-44-147 ~]# pcluster configure
INFO: Configuration file /root/.parallelcluster/config will be written.
Press CTRL-C to interrupt the procedure.


Allowed values for AWS Region ID:
1. ap-northeast-1
2. ap-northeast-2
   ~中略~
16. us-west-2
AWS Region ID [ap-northeast-1]:
Allowed values for EC2 Key Pair Name:
1. hoge_keypair # キーペアを選ぶ
EC2 Key Pair Name [20210520_keypair]:
Allowed values for Scheduler:
1. sge
2. torque
3. slurm # これにした
4. awsbatch
Scheduler [slurm]: slurm
Allowed values for Operating System:
1. alinux
2. alinux2
3. centos7 # これにした
4. centos8
5. ubuntu1604
6. ubuntu1804
Operating System [alinux2]: centos7
Minimum cluster size (instances) [0]: 0
Maximum cluster size (instances) [10]: 2
Head node instance type [t2.micro]:
Compute instance type [t2.micro]:
Automate VPC creation? (y/n) [n]: y
Allowed values for Network Configuration:
1. Head node in a public subnet and compute fleet in a private subnet
2. Head node and compute fleet in the same public subnet
Network Configuration [Head node in a public subnet and compute fleet in a private subnet]:
Beginning VPC creation. Please do not leave the terminal until the creation is finalized
Creating CloudFormation stack...
Do not leave the terminal until the process has finished
Stack Name: parallelclusternetworking-pubpriv-20210526144159
Status: parallelclusternetworking-pubpriv-20210526144159 - CREATE_COMPLETE
The stack has been created
Configuration file written to /root/.parallelcluster/config
You can edit your configuration file or simply run 'pcluster create -c /root/.parallelcluster/config cluster-name' to create your cluster
[root@ip-172-31-44-147 ~]#
設定した内容はcat ~/.parallelcluster/configで確認することができる.
Clusterの起動
cluster create <cluster name>でクラスタを作成できる.
が,エラーが起こった.
pcluster create mycluster
Beginning cluster creation for cluster: mycluster
Creating stack named: parallelcluster-mycluster
Status: parallelcluster-mycluster - ROLLBACK_IN_PROGRESS
Cluster creation failed.  Failed events:
  - AWS::EC2::SecurityGroup MasterSecurityGroup Resource creation cancelled
  - AWS::CloudFormation::Stack CloudWatchLogsSubstack Resource creation cancelled
  - AWS::CloudFormation::Stack EBSCfnStack Resource creation cancelled
  - AWS::IAM::Role RootRole API: iam:CreateRole User: arn:aws:iam::263374027013:user/ryu is not authorized to perform: iam:CreateRole on resource: arn:aws:iam::263374027013:role/parallelcluster-mycluster-RootRole-1L9URXAMCS519
  - AWS::IAM::Role CleanupResourcesFunctionExecutionRole API: iam:CreateRole User: arn:aws:iam::263374027013:user/ryu is not authorized to perform: iam:CreateRole on resource: arn:aws:iam::263374027013:role/parallelcluster-mycluster-CleanupResourcesFunction-1DC1FOLRTY4YT
どうも,IAMユーザのpermmisionがうまく設定できていないみたいだ.
Default settings for cluster creation
When you use the default settings for cluster creation, an IAM role for Amazon EC2 is created by the cluster. The user that creates the cluster must have the right level of permissions to create all of the resources required to launch the cluster. This includes an IAM role for Amazon EC2. Typically, the IAM user must have the permissions of an AdministratorAccess managed policy. For information about managed policies, see AWS managed policies in the IAM User Guide.
公式ぺーじ(2つ目のサイト)にこのような記載してあったので,設定していたIAMユーザにAdministratorAccessの権限を付与した.
また,PowerUserAccessはいらなさそうなので消しておいた.
気を取り直して再度pcluster create mycluster
pcluster create mycluster
Beginning cluster creation for cluster: mycluster
Creating stack named: parallelcluster-mycluster
Status: MasterServerSubstack - CREATE_IN_PROGRESS
Status: parallelcluster-mycluster - CREATE_COMPLETE
ClusterUser: centos
MasterPrivateIP: 10.0.0.91
すると今度はうまく作成できた.
EC2のインスタンス一覧にはMasterという名前のインスタンスが作成されていた.
クラスタ(Master)にログインする.
クラスタに入るための秘密鍵を用いてクラスタにログインする.
pcluster ssh mycluster -i ~/.ssh/keys/<your key name>.pem
The authenticity of host '176.34.3.56 (176.34.3.56)' can't be established.
ECDSA key fingerprint is SHA256:EmNrdPAjWDncAWivlXvmrqOejzH4sQxV8swpN5VwGfc.
Are you sure you want to continue connecting (yes/no/[fingerprint])? yes
Warning: Permanently added '176.34.3.56' (ECDSA) to the list of known hosts.
Last login: Wed Jun  2 15:06:51 2021
squeueなど実行してみるとslurmのmasterノードであることを確認できる.
(おまけ)Parallel Clusterの各コマンド
pcluster list # 一覧を表示
pcluster delete <cluster name> # 削除
おわりに
今回はクラスタ(Masterノード)の作成まででした.
次回はクラスタを用いてジョブを実行してみたいと思います.
P.S.
会社でもこれがつかえたらめちゃくちゃ便利だなあ...

