[AWSLambda] GoとRustでも連携がしたい
新しいシステムをRustでがりがり書きたいけど、
Line BotのSDKはGoの方がライブラリやノウハウがあったりして、既存のGoリソースも使いたい。
そんなことありますよね。
そんな時はGoとRustをそれぞれLambda Functionでデプロイして連携させてあげれば良さそうです。
(RESTなどで連携しても良いけど、Lambdaの方がちょっとだけ便利、かも)
今回は環境構築とソースコードの連携部分について記載します。
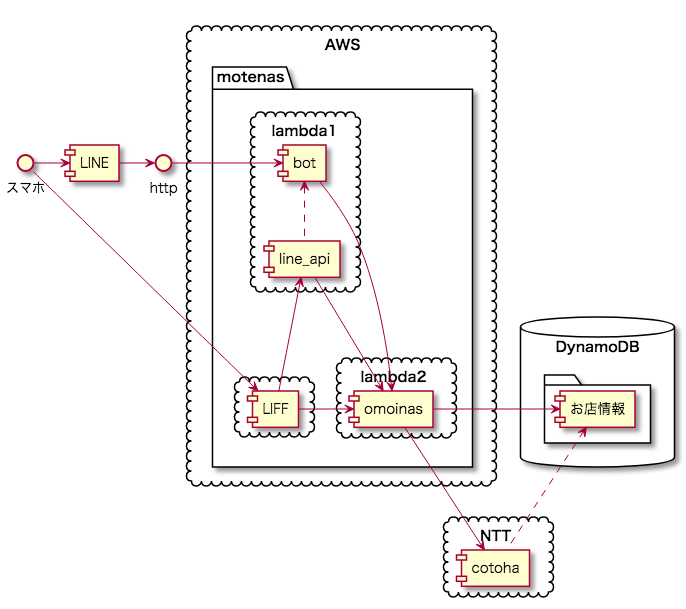
ざっくり機能を書くとこんな感じです。
プロジェクトとディレクトリ構造
今回はLine BotをGoで書いて、バックエンドの処理はRustで書きます。
こうしておくとLine以外のbotを増やす場合にもGoのライブラリを活用できるはずです。
Go Rust共にServerless Frameworkを使用しています。
なお、GoとRustを一つのServerless.ymlでビルドできないか試して見ましたが無理でした。
$ tree -L 2
├── bot ← GoのServerless Frameworkのプロジェクト
│   ├── bin
│   ├── conf
│   ├── docker-compose.yml
│   ├── Dockerfile
│   ├── line
│   ├── Makefile
│   ├── package-lock.json
│   └── serverless.yml
├── frontend ← LIFF用のフロントエンド。React。詳細は省く
│   ├── deploy
│   └── lichmenu
├── go.mod
├── go.sum
├── LICENSE
└── backend ← RustのServerless Frameworkのプロジェクト
    ├── Cargo.lock
    ├── Cargo.toml
    ├── conf
    ├── node_modules
    ├── package.json
    ├── package-lock.json
    ├── serverless.yml
    ├── src
    └── target
環境構築
Go側の設定
alpineベースのdockerからAWS周りの環境変数を指定してやるくらいです。
情報も多いし、特にハマりどころもありません。
今回は複数のbotがあるものの、バックエンドを呼び出すロジックは同一なので、
複数のエンドポイントに対してバイナリは一つだけで良い形になっています。
デプロイ用のAWSのアカウント情報
AWS_ACCESS_KEY_ID=アクセスキー
AWS_SECRET_ACCESS_KEY=シークレットキー
ここでAWS用の環境変数を読み込んでおく
FROM golang:1.12.17-alpine3.11
LABEL maintainer ""

ARG AWS_ACCESS_KEY_ID
ARG AWS_SECRET_ACCESS_KEY

RUN apk update
RUN apk --update-cache \
   add musl musl-dev \
   linux-headers \
   gcc g++ make git curl\
   gfortran \
   openblas-dev libressl-dev pkgconfig \
   python3 python3-dev \
   nodejs npm\
   musl-dev

RUN pip3 install --upgrade pip
RUN pip3 install awscli
RUN pip3 install boto3
RUN npm install -g serverless

RUN sls config credentials --provider aws --key $AWS_ACCESS_KEY_ID --secret $AWS_SECRET_ACCESS_KEY
docker-compose.ymlの方でも環境変数の読み込みを忘れずに
version: '3.3'
services:
  api:
    build:
      context: .
      args:
        - AWS_ACCESS_KEY_ID=$AWS_ACCESS_KEY_ID
        - AWS_SECRET_ACCESS_KEY=$AWS_SECRET_ACCESS_KEY
    image: お好きなイメージ名
    container_name: お好きなコンテナ名
    tty: true
    stdin_open: true
    env_file:
      - .env
    restart: always
    ports:
      - "3002:3002"
    volumes:
      - ./:/go/src/github.com/my_user/my_project/bot:cached
    working_dir: /go/src/github.com/my_user/my_project/bot
Makefileはこんな感じ。alpineなのでstaticリンクのフラグをつけておく
.PHONY: build clean deploy

build:
	cd line && go get .
	env GOOS=linux CGO_ENABLED=0 go build -ldflags='-d -s -w -extldflags "-static"' -a -tags netgo -installsuffix netgo -o bin/line line/*.go

clean:
	rm -rf ./bin/*

deploy: clean build
	sls deploy --verbose
confに予めbot毎の環境変数を入れておく
CHANNEL_SECRET: "シークレットキー"
CHANNEL_TOKEN: "アクセストークン"
serverless.yml
環境ごとのconfの読み分けと、複数エンドポイントを一つのバイナリに紐づけている。
service: bot
frameworkVersion: '>=1.28.0 <2.0.0'

provider:
  name: aws
  region: ap-northeast-1
  stage: ${opt:stage, self:custom.defaultStage}

  iamRoleStatements:
    - Effect: 'Allow'
      Action:
        - 'lambda:InvokeFunction'
      Resource:
        - '*'

custom:
  defaultStage: dev
  otherfile:
    lineBotA:
      dev: ${file(./conf/line-bot-a-dev.yml)}
    lineBotB:
      dev: ${file(./conf/line-bot-b-dev.yml)}

package:
  exclude:
    - ./**
  include:
    - ./bin/**

functions:
  lineBotB:
    handler: bin/line
    runtime: go1.x
    environment:
      CHANNEL_SECRET: ${self:custom.otherfile.lineBotA.${self:provider.stage}.CHANNEL_SECRET}
      CHANNEL_TOKEN: ${self:custom.otherfile.lineBotA.${self:provider.stage}.CHANNEL_TOKEN}
    events:
      - http:
          path: line-bot-a
          method: post
          cors: true

  lineBotB:
    handler: bin/line
    runtime: go1.x
    environment:
      CHANNEL_SECRET: ${self:custom.otherfile.lineBotB.${self:provider.stage}.CHANNEL_SECRET}
      CHANNEL_TOKEN: ${self:custom.otherfile.lineBotB.${self:provider.stage}.CHANNEL_TOKEN}
    events:
      - http:
          path: line-bot-b
          method: post
          cors: true
ここまで設定すれば docker-compose exec api make deploy でデプロイできます。
Rust側の設定
公式のserverless Rustプラグインを使う。
自分でdockerを立てたり、rustと他の言語を混ぜたりしたいのですが、どうもうまくいきません。(ライブラリのビルドが通らなかったり、lib-musl関連のリンクが解決できなかったり。。)
また、このプラグイン自体、dockerを使っているので自前でdockerを立てることもできません。
諦めて最新のnpmやらnodeやらを入れましょう。
serverless.ymlですが、customセクションのdockerTagを必ず指定しましょう。
指定しないとrust-1.32くらいの古いバージョンが入ってしまいます。
ディレクトリ構造
src/bin/*.rs にエンドポイントのソースコードを設置します。
(serverless-rustプラグインのサンプルは、Cargo.tomlが複数あるマルチアプリケーションのサンプルがありますが、こちらはCargo.tomlは一つです)
tree -L 2 -I node_modules
.
├── Cargo.lock
├── Cargo.toml
├── conf
│   └── dev.yml
├── package.json
├── package-lock.json
├── serverless.yml
├── src
│   ├── application
│   ├── application.rs
│   ├── bin
│   │   ├-- echo.rs
│   │   ├-- analyze.rs
│   │   ├-- get_shop.rs
│   ├── lib.rs
│   ├── model
│   ├── model.rs
│   ├── repository
│   ├── repository.rs
│   ├── service
│   ├── service.rs
│   ├── util
│   └── util.rs
└── target
serverless.yml
service: backend
provider:
  name: aws
  runtime: rust
  memorySize: 128
  region: ap-northeast-1
  iamRoleStatements:
    - Effect: Allow
      Action:
        - dynamodb:*
      Resource: "*"
package:
  individually: true
custom:
  defaultStage: dev
  otherfile:
    environment:
      dev: ${file(./conf/dev.yml)}
  rust:
    dockerTag: '0.2.6-rust-1.42.0'

plugins:
  - serverless-rust

functions:
  echo:
    handler: backend.echo
    environment:
      ENV: ${self:custom.otherfile.environment.${self:provider.stage}.ENV}
      ENV_HOGE: ${self:custom.otherfile.environment.${self:provider.stage}.ENV_HOGE}
    events:
      - http:
          path: /echo
          method: POST
  analyze:
    handler: backend.analyze
    environment:
      ENV: ${self:custom.otherfile.environment.${self:provider.stage}.ENV}
    events:
      - http:
          path: /analyze
          method: POST

# おまけ。こっちは普通のREST API
  getShop:
    handler: backend.get_shop
    environment:
      ENV: ${self:custom.otherfile.environment.${self:provider.stage}.ENV}
    events:
      - http:
          path: /shop/{clientId}/{shopId}
          method: GET
          cors: true,
          request:
            parameters:
              paths:
                clientId: true,
                shopId: true,
あとは、npx sls deployでデプロイでき、npx sls packageでビルドできます。
ソースコードのこと
Go側
エントリポイント
GoのエントリポイントはLINE BotなのでここはAPI gateway経由になります。
サンプルは多いので詳細は割愛します。
package main

import (
	"errors"
	"fmt"
	"os"

	"github.com/aws/aws-lambda-go/events"
	"github.com/aws/aws-lambda-go/lambda"
	"github.com/line/line-bot-sdk-go/linebot"
)

func Handler(request events.APIGatewayProxyRequest) (events.APIGatewayProxyResponse, error) {
	line, err := NewLine(
		os.Getenv("CHANNEL_SECRET"),
		os.Getenv("CHANNEL_TOKEN"),
	)
        ... リクエストのパース処理など

	// イベントの処理など。

	return events.APIGatewayProxyResponse{Body: request.Body, StatusCode: 200}, nil
}

func main() {
	lambda.Start(Handler)
}
GoからRustのLambdaを呼ぶ
リクエスト・レスポンス共にJSONでやりとりします。
FunctionNameで
ackage main

import (
	"encoding/json"
	"log"
	"os"

	"github.com/aws/aws-sdk-go/aws"
	"github.com/aws/aws-sdk-go/aws/session"
	"github.com/aws/aws-sdk-go/service/lambda"

...
)

const (
	ARN = "arn:aws:lambda:ap-northeast-1:[ACCOUNT_ID]:function:"
)

// リクエストパラメータ
type Event struct {
	Text    string `json:"text"`
}
// ;r-[yr
type Message struct {
	Type     string     `json:"type"`
	Message  string     `json:"message"`
}
func eventHandler(text string) {

	payload, _ := json.Marshal(Event{Text: text})

	res, err := lambda.New(session.New()).Invoke(&lambda.InvokeInput{
		FunctionName:   aws.String(ARN + "backend-dev-echo"),
		Payload:        payload,
		InvocationType: aws.String("RequestResponse"),
	})
	if err != nil {
		log.Println(err)
	}

	var result Message
	_ = json.Unmarshal(res.Payload, &result)

... あとは適当にLINEでリプライとかする
}
Rust側
Lambdaのエントリポイント
lambda_runtimeを使います。
structへのバインドはランタイム側でやってくれるようで楽チンです。
# ![deny(warnings)]

use log;
use simple_logger;

use lambda_runtime::{error::HandlerError, lambda, Context};
use serde::{Deserialize, Serialize};

use backend::application::echo;

# [derive(Deserialize, Debug)]
pub struct Event {
    text: String,
}

# [derive(Serialize, Debug)]
pub struct Response {
    r#type: String,
    message: String,
}

fn main() {
    simple_logger::init_with_level(log::Level::Debug).unwrap();
    lambda!(handler)
}

fn handler(e: Event, _: Context) -> Result<Response, HandlerError> {
    // この時点で独自に定義したEvent型にバインドされて呼び出される

    // 実際はアプリケーション層にデータを渡してごにょごにょする
    return Ok(Response {
            r#type: String::from("message"),
            message: format!("{}!", &e.text),
        });
}
おまけ REST APIのエントリポイント
Goと同じくlambda_httpを使います。
lambda_runtimeと違い、自分でhttpリクエストからデータを取り出さないといけません。
https://[lambda host]/api/v1/shop/(client_id)/(shop_id)のようにアクセスされる想定。
# ![deny(warnings)]

use log;
use simple_logger;

use lambda_http::{lambda, IntoResponse, Request, RequestExt, Response};
use lambda_runtime::{error::HandlerError, Context};

use backend::application::get_shop::{self, Event};
use backend::repository::shop::dynamodb::DbRepo;

fn main() {
    simple_logger::init_with_level(log::Level::Debug).unwrap();
    lambda!(handler)
}

fn handler(e: Request, _: Context) -> Result<impl IntoResponse, HandlerError> {
    return match get_shop::main::<DbRepo>(Event {
        client_id: e.path_parameters().get("clientId").unwrap().to_string(),
        shop_id: e.path_parameters().get("shopId").unwrap().to_string(),
    }) {
        Ok(r) => Ok(Response::builder()
            .status(200)
            .body(serde_json::to_string(&r).unwrap())
            .expect("failed to render response")),
        Err(err) => Ok(Response::builder()
            .status(404)
            .body(err)
            .expect("failed to render response")),
    };
}
CORSについて
上記の段階ではブラウザから叩く想定ではないのでCORS対策が入っていませんでしたが、
LIFFから連携できるようにCORS対策をまとめました。
[Go,Rust,React]AWS APIGatewayでもCORSがしたい