どこにもまとまってなかったので構築メモ
わけあってCOREじゃないです。
公開しますが、責任は持てません。
1.Node.jsをインストール
インストールフォルダはdefaultで、C:\Program Files\nodejs
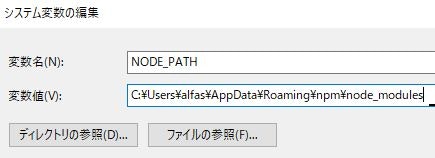
環境変数NODE_PATHに下記のコマンドで得た文字列を追加する。
npm root -g
2.VisualStudioでプロジェクトを作成する
新しい ASP.NET Web アプリケーションから好きなtemplateを選択して作成。
3.プロジェクトのrootフォルダで以下を実行する
npm install --save react react-dom @types/react @types/react-dom
npm install --save-dev typescript awesome-typescript-loader source-map-loader
npm install --save-dev webpack webpack-cli
4.VisualStudioの外部WebツールのPATH順を変える
5.VisualStudioに必要なコンポーネントをインストール(アンインストール)
拡張機能からwebpack task runnerをダウンロードしてインストール

6.適当にviewとtsxを書く
@{}
<div>
    <div id="content"></div>
    <script src="~/dist/Home.bundle.js"></script>
</div>
import * as React from "react";
import * as ReactDOM from "react-dom";
import { Hello } from "./components/Hello";//依存コンポーネント

ReactDOM.render(
    <Hello compiler="TypeScript" framework="React" />,
    document.getElementById("content")
);
7.構成ファイルを作成
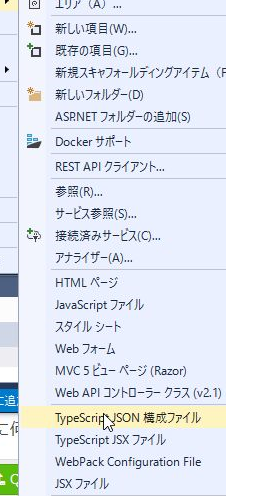
tsconfig.jsonとwebpack.config.jsをプロジェクト直下に作成。
※TypeScript JSON構成ファイルが選択できない場合はvisual studioのTypeScript関連を整える(TypeScript Tools for Microsoft Visual Studioとか)。
tsconfig.jsonの内容は以下のように記載。
{
  "compilerOptions": {
    "outDir": "./src/",
    "sourceMap": true,
    "noImplicitAny": true,
    "module": "commonjs",
    "target": "es6",
    "jsx": "react"
  },
  "include": [
    "./Scripts/**/*"
  ]
}
webpack.config.jsの内容は以下のように記載。entryの内容はviewやtsxに合わせる。下記はコントローラー(画面)毎に作るよう設定。画面が増えたら画面分付け足していく。
※index.jsはindex.tsxが上記tsconfig.jsonの設定でトランスパイルされたもの。
module.exports = [
	{
	    entry: {
	        "Home": "./src/Home/index.js"
	    },
	    output: {
	        filename: "[name].bundle.js",
	        path: __dirname + "/dist"
	    },
	    devtool: "source-map",
	    resolve: {
	        extensions: [".ts", ".tsx", ".js", ".json"]
	    },
	    module: {
	        rules: [
	            { test: /\.tsx?$/, loader: "awesome-typescript-loader" },
	            { enforce: "pre", test: /\.js$/, loader: "source-map-loader" }
	        ]
	    },
	    externals: {
	        "react": "React",
	        "react-dom": "ReactDOM"
    },
    {
        mode: 'development',
        entry: {
            'Sample.css': './Content/Less/Sample.less'
        },
        output: {
            path: __dirname + "/dist",
            filename: '[name]'
        },
        module: {
            rules: [
                {
                   test: /\.less$/,
                   use: ExtractTextPlugin.extract({ use: 'css-loader!less-loader' }) }
            ],

        },
        plugins: [
            //new ExtractTextPlugin('[name]')//これだとだめ
            new ExtractTextPlugin({
                filename: (getPath) => { return getPath('[name]') }
            })
        ],
    }
];
8.タスクランナーを設定
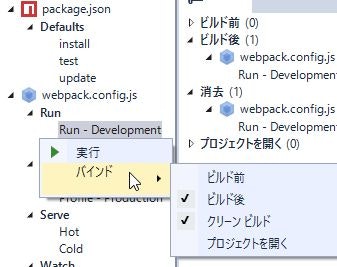
その後、タスクランナーエクスプローラーで以下のようにバインドする。

9.ビルド
cshtml選択してブラウザで表示でもOK
10.参考リンク
調べものは、本家見た方が早い。
- Node.js
- TypeScript
- React
-
WebPack
※webpackにcssの設定するの忘れた
→2018/8/10 CSS追加 - [参考]https://blog.hirokiky.org/entry/2018/05/03/172317


