ディファードレンダリングとは
ディファードレンダリングとは、2次元のスクリーンスペース上でシェーディングを行なう技術です。
1パス目でカラーや法線などの情報を出力し、2パス目でそれらの情報を使用しレンダリングしていきます。
カラーや法線などの情報はG-Bufferと呼ばれます。
今回はディファードレンダリングで法線を使用したディレクションライトのライティングを実装していきたいと思います。
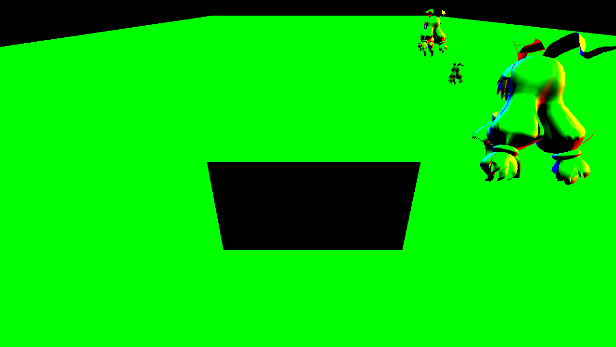
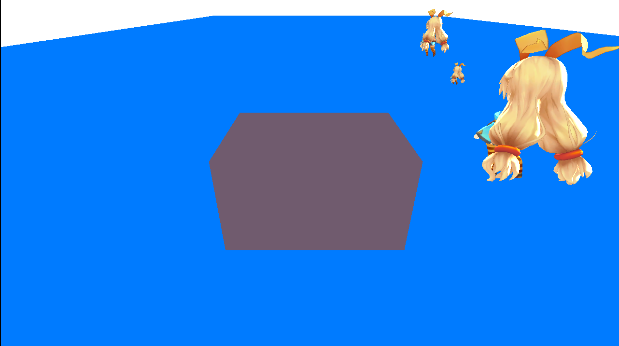
G-Buffer
カラー

法線
⇩
G-Bufferの作成
1パス目ではカラーや法線と言ったライティングに必要な情報を出力していきます。
main.cpp
//以下構築済みとする
ID3D11DeviceContext*	m_pd3dDeviceContext;	//D3D11デバイスコンテキスト
ID3D11RenderTargetView* m_colorMap;    //カラーマップ
ID3D11RenderTargetView* m_normalMap;    //法線マップ
ID3D11ShaderResourceView* m_ColorSRV;    //カラーマップのシェーダーリソースビュー
ID3D11ShaderResourceView* m_NormalSRV;    //法線マップのシェーダーリソースビュー
ID3D11DepthStencilView* m_depthStencilView;		//デプスステンシルビュー


//カラーマップと法線マップをレンダリングターゲットに設定する
ID3D11RenderTargetView* rts[] = {
    m_colorMap,
    m_normalMap
};
m_pd3dDeviceContext->OMSetRenderTargets(2,rts,m_depthStencilView);

//この後にモデルをドローしていく
ピクセルシェーダーでカラーや法線の情報を出力しています。
model.fx
Texture2D<float4> albedoTexture : register(t0);	   //アルベドテクスチャ
sampler Sampler : register(s0);    //サンプラー

ピクセルシェーダーの入力
struct PSInput{
	float4 Position 	: SV_POSITION;
	float3 Normal		: NORMAL;
	float2 TexCoord 	: TEXCOORD0;
};

//ピクセルシェーダーの出力構造体
struct PSOutPut {
	float4 Color : SV_Target0;
	float4 Normal : SV_Target1;
};

//モデル用のピクセルシェーダー
PSOutPut PSMain( PSInput In ) : SV_Target0
{
    PSOutPut output;

	float4 albedoColor = albedoTexture.Sample(Sampler, In.TexCoord);
	output.Color = albedoColor;
	output.Normal = float4(In.Normal.x, In.Normal.y, In.Normal.z, 1.0f);
	return output;
}
ライティング
2パス目では1パス目に作成したG-Bufferを使用してシェーディングしていきます。
main.cpp
//以下構築済みとする
ID3D11DeviceContext*	m_pd3dDeviceContext;	//D3D11デバイスコンテキスト
ID3D11ShaderResourceView* m_ColorSRV;    //カラーマップのシェーダーリソースビュー
ID3D11ShaderResourceView* m_NormalSRV;    //法線マップのシェーダーリソースビュー
ID3D11DepthStencilView* m_depthStencilView;		//デプスステンシルビュー
ID3D11RenderTargetView* m_frameBuffer;    //フレームバッファ
std::unique_ptr<DirectX::SpriteBatch> m_spriteBatch;    //スプライトバッチ
ID3D11PixelShader* m_pixelShader;    //ピクセルシェーダー
ID3D11Buffer* m_lightCb    //ライト用の定数バッファ

    ID3D11RenderTargetView* rt[] = {
		m_frameBuffer
	};
	//レンダリングターゲットの切り替え。
	m_pd3dDeviceContext->OMSetRenderTargets(1, rtTbl, m_depthStensilView);

    m_spriteBatch.get()->Begin(DirectX::SpriteSortMode_BackToFront, nullptr, nullptr, nullptr, nullptr, [=]
	{
        //定数バッファを設定
        m_pd3dDeviceContext->PSSetConstantBuffers(0, 0, &m_lightCb);
        //ピクセルシェーダーを設定
        m_pd3dDeviceContext>PSSetShader(m_pixelShader, nullptr, 0);
        //法線マップをシェーダーリソースビューに設定
        ID3D11ShaderResourceView* srv[]{
		    m_NormalSRV
	    };
        m_pd3dDeviceContext->PSSetShaderResources(1, 1, srv);
	}
	);
    //ドロー
	m_spriteBatch->Draw(m_ColorSRV, DirectX::XMFLOAT2(0.0f, 0.0f));
    m_spriteBatch.get()->End();
続いてシェーダーです。
defefferd.fx
cbuffer lightCb : register(b0){
    float3 dligDirection;    //ライトの方向
    float3 dligColor    //ライトの色
};
Texture2D<float4> ColorMap : register(t0);	//カラーマップ
Texture2D<float4> NormalMap : register(t1);	//法線マップ
sampler TextureSampler : register(s0);    //サンプラー

float4 PSMain(
	float4 color : COLOR0,
	float2 texCoord : TEXCOORD0) : SV_Target0
{
    float4 color = ColorMap.(TextureSampler, texCoord);
    float4 normal = NormalMap.(TextureSampler,texCoord);
    float3 lig = 0.0f;
    lig += max(0.0f, dot(normal.xyz * -1.0f, dligDirection)) * dligColor;
	lig += 1.0f;    //全体的に明るくする
    float4 finalColor = color;
    finalColor.xyz *= lig;
    return finalColor;
}