こんにちは、アーキテクトのやまぱんです。
補足コメントや質問、いいね、拡散、是非お願いします🥺!
間違ってたら優しく教えてください!
もしやってみてうまくいかなかったらコメントいただければ、わかる範囲で修正します~!
Azure PaaS サービスで掲示板つくってみよ!!
Azure PaaS サービスで掲示板を作ってみよう!!
ついでに SQLインジェクションの実例も紹介します
とりあえず作ることが目的です。
前書き
動機
- とりあえず Azure でなんか作ってみたい!
- いままでインフラ系担当だったし、 (Azure で)一つのサービス、動くモノを作った経験が無いけど作ってみたい!
- 自分や仲間内の掲示板(メモ)があったらいいなと思うことがあったので作ってみたい!
- SQL インジェクション攻撃を見てみたい!
対象読者
上記のようなモチベーションがある方!など!
今回使う技術スタック
- Azure Cosmos DB
- Azure App Service
- Node.js
今回使う技術スタックの紹介
- Azure Cosmos DB
Azure Cosmos DB の概要
https://learn.microsoft.com/ja-jp/azure/cosmos-db/introduction
Azure Cosmos DB は、AI、デジタル コマース、IoT、予約管理、その他の種類のソリューションを含む、現代のアプリ開発のためのフル マネージドの NoSQL とリレーショナルのデータベースです。 Azure Cosmos DB では、10 ミリ秒未満の応答時間と、自動および即時のスケーラビリティに加え、あらゆるスケールでの速度の保証が提供されています。 SLA に基づいた可用性とエンタープライズグレードのセキュリティにより、ビジネス継続性が保証されます。
- Azure App Service
App Service の概要
https://learn.microsoft.com/ja-jp/azure/app-service/overview
Azure App Service は、Web アプリケーション、REST API、およびモバイル バックエンドをホストするための HTTP ベースのサービスです。 開発には、.NET、.NET Core、Java、Node.js、PHP、Python のうち、お気に入りの言語をご利用いただけます。 アプリケーションの実行とスケーリングは、Windows ベースの環境と Linux ベースの環境の両方で容易に行うことができます。
App Service は、セキュリティ、負荷分散、自動スケーリング、自動管理などの Microsoft Azure の機能をアプリケーションに追加します。 さらに、Azure DevOps、GitHub、Docker Hub およびその他のソースからの継続的デプロイ、パッケージ管理、ステージング環境、カスタム ドメイン、TLS/SSL 証明書などの DevOps 機能を利用できます。
MS 公式Youtube / Azure 実践シリーズ 002 | App Service 入門[#くらでべ]
その他 仕組みについて は下記が詳しく書かれています
- Node.js
下記の記事が分かりやすい
MS Learn で Node.js も学べます(無料!)
前提環境
- VScode インストール済(ですが、PowerShell だけでもできます)
インストール参考
- Azure CLI をローカル (Windows PC) にインストール済
なお、az upgradeで作業までに最新バージョンに変更済
インストール参考
- 使える Azure Subscription がある
ない場合は下記などを参考に
- node.js インストール済
インストール参考
各種バージョン
今回バージョンはあまり意識せず進めましたが参考までに今回の各種バージョン情報載せておきます。
## PowerShell バージョン
PS C:\> $PSVersionTable.PSVersion
Major  Minor  Patch  PreReleaseLabel BuildLabel
-----  -----  -----  --------------- ----------
7      4      1

## node バージョン
PS C:\> node -v
v20.6.1

## npm バージョン
PS C:\> npm -v
9.8.1

## Azure CLI バージョン
PS C:\> az --version
azure-cli                         2.56.0
手順
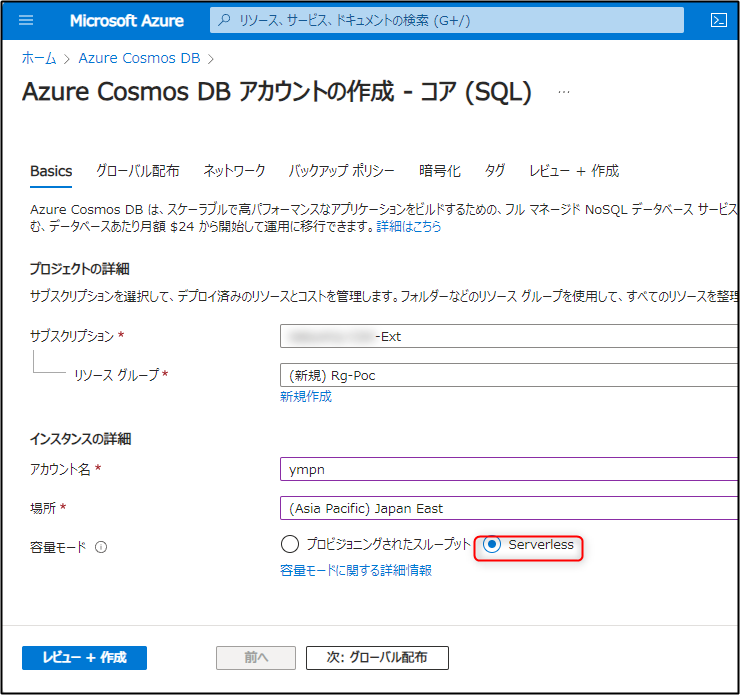
Azure Cosmos DB をつくる
PowerShell での操作は基本的に管理者権限で実施します。
その他はデフォルトの設定のままでデプロイします。
Azure Cosmos DB の接続情報 のメモ
Azure Cosmos DB → 作成した "Azure Cosmos DB アカウント(ympn)" の左ペインの キー に移動
"URI" と Read-write Keys の "Primary KEY" をメモしておきます。

Node.js アプリケーションを作る
- 今回はDドライブ直下にワークフォルダ (poc_BBS) / Expressプロジェクト を作ります。
*要管理者権限
express poc_BBS
PS D:\> express poc_BBS
############<省略>############
   create : poc_BBS\bin\www

   change directory:
     > cd poc_BBS

   install dependencies:
     > npm install

   run the app:
     > SET DEBUG=poc-bbs:* & npm start
こんな感じでフォルダができあがります。
Express(エクスプレス)は、Node.js 用のウェブアプリケーションフレームワークです。もし express がインストールされていない場合は管理者権限で下記コマンドを実行して Express をグローバルにインストールします。
install -g express
- 作成したワークフォルダ(D:\poc_BBS)に移動し、パッケージをインストールします。
*管理者権限で下記のコマンドを実行します。
cd .\poc_BBS\
npm install
npm install @azure/cosmos
- 下記コマンドで Web Server が立ち上がることを確認
npm start
下記 URL へアクセス
http://localhost:3000
更新するたび PowerShell 側にメッセージが出るのがわかる。

Ctrl + C を押してWeb Server を落としておきます。
Node.js アプリケーションをAzure Cosmos DBに接続する
この時点でのワークフォルダ (poc_BBS)は以下のような感じです。
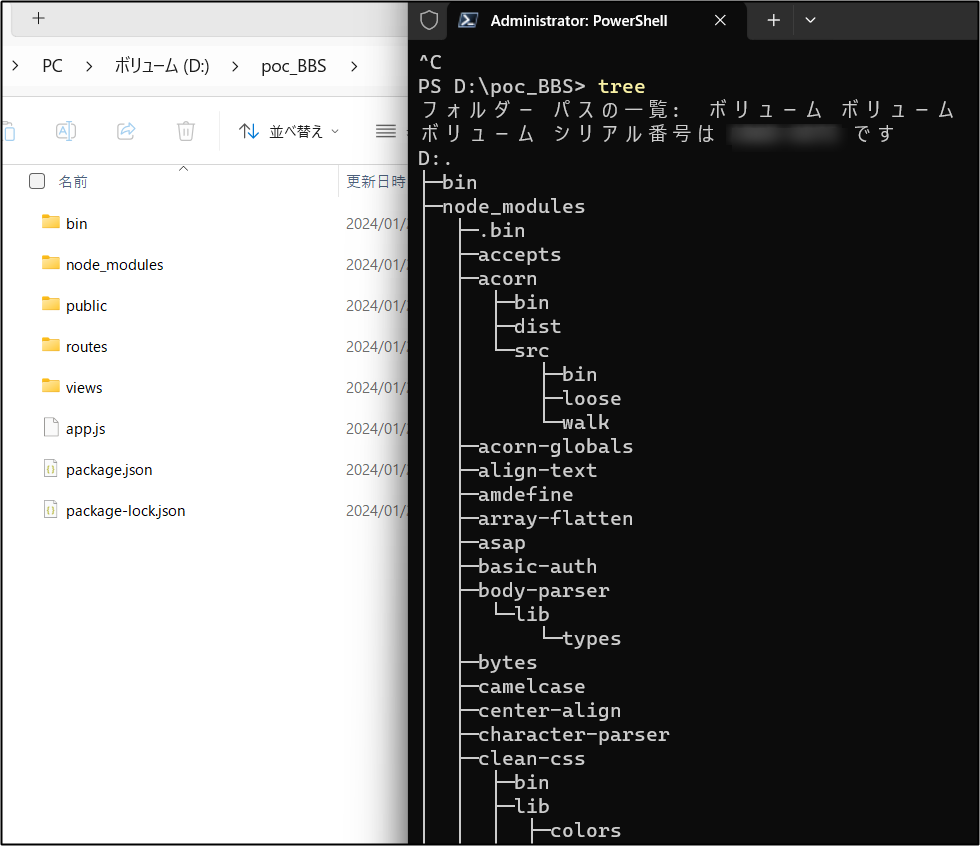
ここからVScodeで作業します。(VScodeがない場合は普通に作業してもOKです)
モデルの作成
- ワークフォルダ (poc_BBS)配下にmodels フォルダを作成します。
- models フォルダ内に、taskDao.js という名前の新しいファイルを作成します。 このファイルには、データベースとコンテナーの作成に必要なコードを含めます。 また、Azure Cosmos DB 内のタスクの読み取り、更新、作成、および検索を行うメソッドも定義します。
- 下記のコードを taskDao.js ファイルにコピーします。
taskdao.js
// @ts-check
 const CosmosClient = require('@azure/cosmos').CosmosClient
 const debug = require('debug')('todo:taskDao')

 // For simplicity we'll set a constant partition key
 const partitionKey = undefined
 class TaskDao {
   /**
    * Manages reading, adding, and updating Tasks in Azure Cosmos DB
    * @param {CosmosClient} cosmosClient
    * @param {string} databaseId
    * @param {string} containerId
    */
   constructor(cosmosClient, databaseId, containerId) {
     this.client = cosmosClient
     this.databaseId = databaseId
     this.collectionId = containerId

     this.database = null
     this.container = null
   }

   async init() {
     debug('Setting up the database...')
     const dbResponse = await this.client.databases.createIfNotExists({
       id: this.databaseId
     })
     this.database = dbResponse.database
     debug('Setting up the database...done!')
     debug('Setting up the container...')
     const coResponse = await this.database.containers.createIfNotExists({
       id: this.collectionId
     })
     this.container = coResponse.container
     debug('Setting up the container...done!')
   }

   async find(querySpec) {
     debug('Querying for items from the database')
     if (!this.container) {
       throw new Error('Collection is not initialized.')
     }
     const { resources } = await this.container.items.query(querySpec).fetchAll()
     return resources
   }

   async addItem(item) {
     debug('Adding an item to the database')
     item.date = Date.now()
     item.completed = false
     const { resource: doc } = await this.container.items.create(item)
     return doc
   }

   async updateItem(itemId) {
     debug('Update an item in the database')
     const doc = await this.getItem(itemId)
     doc.completed = true

     const { resource: replaced } = await this.container
       .item(itemId, partitionKey)
       .replace(doc)
     return replaced
   }

   async getItem(itemId) {
     debug('Getting an item from the database')
     const { resource } = await this.container.item(itemId, partitionKey).read()
     return resource
   }
 }

 module.exports = TaskDao
コントローラーの作成
- プロジェクトの routes フォルダ内に、tasklist.js という名前の新しいファイルを作成します。
- 次のコードを tasklist.js に追加します。 このコードによって、tasklist.js で使用される CosmosClient および async モジュールが読み込まれます。 また、TaskList クラスが定義されます。先ほど定義した TaskDao オブジェクトのインスタンスとして、このクラスが渡されます。
tasklist.js
const TaskDao = require("../models/TaskDao");

 class TaskList {
   /**
    * Handles the various APIs for displaying and managing tasks
    * @param {TaskDao} taskDao
    */
   constructor(taskDao) {
     this.taskDao = taskDao;
   }
   async showTasks(req, res) {
     const querySpec = {
       query: "SELECT * FROM root r WHERE r.completed=@completed",
       parameters: [
         {
           name: "@completed",
           value: false
         }
       ]
     };

     const items = await this.taskDao.find(querySpec);
     res.render("index", {
       title: "My BBS ",
       tasks: items
     });
   }

   async addTask(req, res) {
     const item = req.body;

     await this.taskDao.addItem(item);
     res.redirect("/");
   }

   async completeTask(req, res) {
     const completedTasks = Object.keys(req.body);
     const tasks = [];

     completedTasks.forEach(task => {
       tasks.push(this.taskDao.updateItem(task));
     });

     await Promise.all(tasks);

     res.redirect("/");
   }
 }

 module.exports = TaskList;
config.js の追加
- ワークフォルダのルート(直下)に、config.js という名前の新しいファイルを作成します。
- 次のコードを config.js ファイルに追加します。 このコードにより、アプリケーションに必要な値と構成設定が定義されます。
config.js 内の下記内容を先ほど、”Azure Cosmos DB の接続情報 のメモ” でメモした Cosmon DB の情報に書き換えます。
"[the endpoint URI of your Azure Cosmos DB account]";
"[the PRIMARY KEY value of your Azure Cosmos DB account]";
config.js
const config = {};

config.host = process.env.HOST || "[the endpoint URI of your Azure Cosmos DB account]";
config.authKey =
  process.env.AUTH_KEY || "[the PRIMARY KEY value of your Azure Cosmos DB account]";
config.databaseId = "BBS";
config.containerId = "Items";

if (config.host.includes("https://localhost:")) {
  console.log("Local environment detected");
  console.log("WARNING: Disabled checking of self-signed certs. Do not have this code in production.");
  process.env.NODE_TLS_REJECT_UNAUTHORIZED = "0";
  console.log(`Go to http://localhost:${process.env.PORT || '3000'} to try the sample.`);
}

module.exports = config;
app.js の変更
-
ワークフォルダ内の app.js ファイルを開きます。 これは、先ほどの Express Web アプリケーション作成時に作成されたファイルです。
-
次のコードを app.js ファイルに追加します。 このコードにより、使用される構成ファイルが定義され、以降のセクションで使用するいくつかの変数に値が読み込まれます。
app.js
const CosmosClient = require('@azure/cosmos').CosmosClient
 const config = require('./config')
 const TaskList = require('./routes/tasklist')
 const TaskDao = require('./models/taskDao')

 const express = require('express')
 const path = require('path')
 const logger = require('morgan')
 const cookieParser = require('cookie-parser')
 const bodyParser = require('body-parser')

 const app = express()

 // view engine setup
 app.set('views', path.join(__dirname, 'views'))
 app.set('view engine', 'jade')

 // uncomment after placing your favicon in /public
 //app.use(favicon(path.join(__dirname, 'public', 'favicon.ico')));
 app.use(logger('dev'))
 app.use(bodyParser.json())
 app.use(bodyParser.urlencoded({ extended: false }))
 app.use(cookieParser())
 app.use(express.static(path.join(__dirname, 'public')))

 //Todo App:
 const cosmosClient = new CosmosClient({
   endpoint: config.host,
   key: config.authKey
 })
 const taskDao = new TaskDao(cosmosClient, config.databaseId, config.containerId)
 const taskList = new TaskList(taskDao)
 taskDao
   .init(err => {
     console.error(err)
   })
   .catch(err => {
     console.error(err)
     console.error(
       'Shutting down because there was an error settinig up the database.'
     )
     process.exit(1)
   })

 app.get('/', (req, res, next) => taskList.showTasks(req, res).catch(next))
 app.post('/addtask', (req, res, next) => taskList.addTask(req, res).catch(next))
 app.post('/completetask', (req, res, next) =>
   taskList.completeTask(req, res).catch(next)
 )
 app.set('view engine', 'jade')

 // catch 404 and forward to error handler
 app.use(function(req, res, next) {
   const err = new Error('Not Found')
   err.status = 404
   next(err)
 })

 // error handler
 app.use(function(err, req, res, next) {
   // set locals, only providing error in development
   res.locals.message = err.message
   res.locals.error = req.app.get('env') === 'development' ? err : {}

   // render the error page
   res.status(err.status || 500)
   res.render('error')
 })

 module.exports = app
ユーザー インターフェイスを構築する
-
views フォルダ内の layout.jade ファイルは、他の .jade ファイルのグローバル テンプレートとして使われます。 この手順では、Web サイトのデザインに使用されるツールキットである Twitter Bootstrap を使用するために、これを変更します。
-
views フォルダーにある layout.jade ファイルを開き、その内容を次のコードで置き換えます。
layout.jade
doctype html
html
  head
    title= title
    link(rel='stylesheet', href='//ajax.aspnetcdn.com/ajax/bootstrap/3.3.2/css/bootstrap.min.css')
    link(rel='stylesheet', href='/stylesheets/style.css')
  body
    nav.navbar.navbar-inverse.navbar-fixed-top
      div.navbar-header
        a.navbar-brand(href='#') My BBS
    block content
    script(src='//ajax.aspnetcdn.com/ajax/jQuery/jquery-1.11.2.min.js')
    script(src='//ajax.aspnetcdn.com/ajax/bootstrap/3.3.2/bootstrap.min.js')
- views フォルダーにある index.jade ファイルを開き、その内容を次のコードで置き換えます。
index.jade
extends layout
block content
     h1 #{title}
     br

     form(action="/completetask", method="post")
      table.table.table-striped.table-bordered
         tr
           td なまえ
           td コメント
           td 日付
           td 削除
         if (typeof tasks === "undefined")
           tr
             td
         else
           each task in tasks
             tr
               td #{task.name}
               td #{task.category}
               - var date  = new Date(task.date);
               - var day   = date.getDate();
               - var month = date.getMonth() + 1;
               - var year  = date.getFullYear();
               td #{month + "/" + day + "/" + year}
               td
                if(task.completed)
                 input(type="checkbox", name="#{task.id}", value="#{!task.completed}", checked=task.completed)
                else
                 input(type="checkbox", name="#{task.id}", value="#{!task.completed}", checked=task.completed)
       button.btn.btn-primary(type="submit") 更新
     hr
     form.well(action="/addtask", method="post")
       label なまえ:
       input(name="name", type="textbox")
       label コメント:
       input(name="category", type="textbox")
       br
       button.btn(type="submit") 書き込む
ローカルで実行する
ワークフォルダ(今回の場合D:\poc_BBS)に移動して、下記コマンドを実行して http://localhost:3000/ へアクセスする
cd D:\poc_BBS
npm start
ここでもし失敗した場合は、下記を実行してリトライします。
*管理者権限でワークフォルダで実施
##node_modules を削除します。
rm  node_modules
## 依存関係のあるパッケージのインストール
npm install
npm install @azure/cosmos
## 再度実行する
npm start
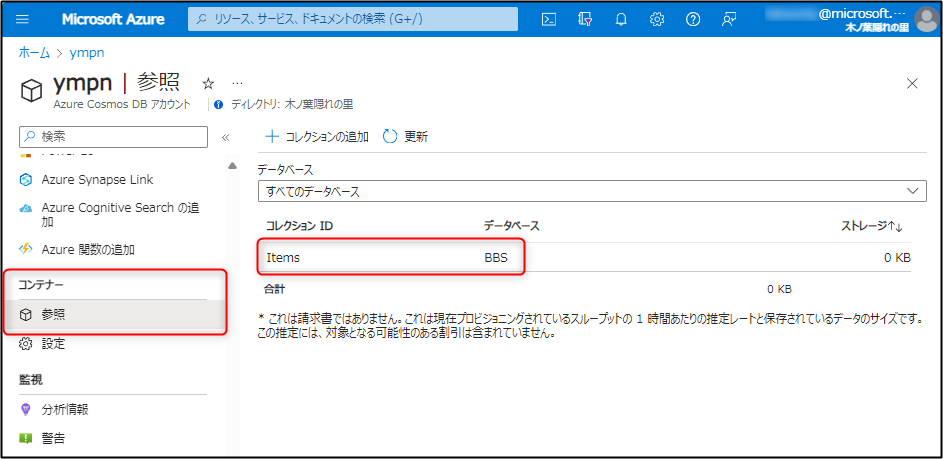
Azure Cosmos DB 側のコンテナーを確認する
- Azure Cosmos DB → コンテナー の ”参照” をみる
config.js で設定した内容 が反映されていることが分かる
config.databaseId = "BBS";
config.containerId = "Items";
Azure App Service へデプロイする
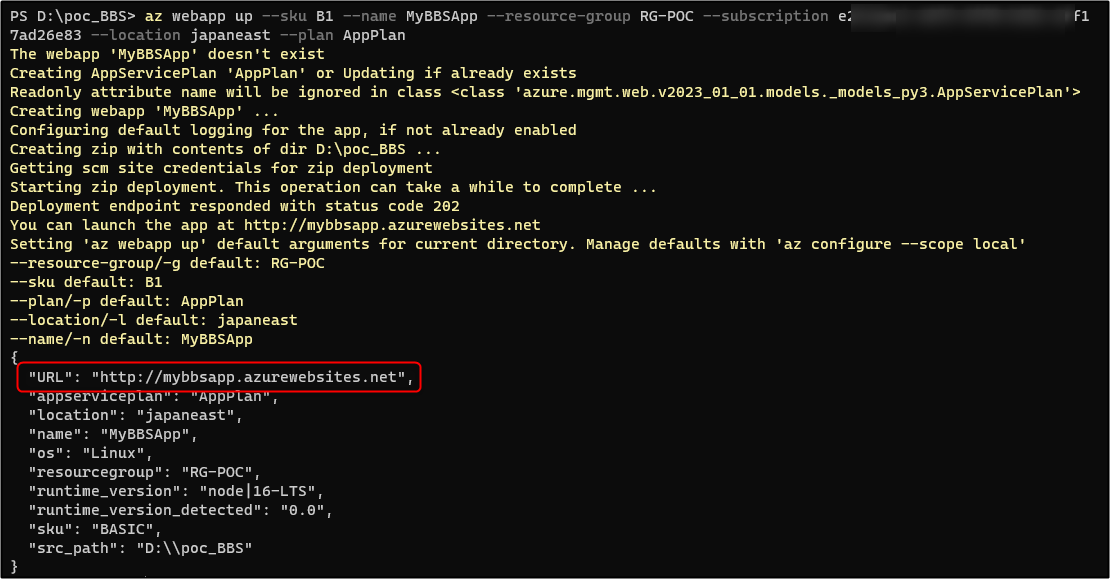
ワークフォルダに移動して、az webapp コマンドを用いてデプロイします。
az webapp up --sku F1(またはB1) --name <app-name> --resource-group RG-POC--subscription <Subscription ID> --location japaneast --plan AppPlan
- 今回 "<app-name>" は MyBBSApp、<Subscription ID> はご自身のSubscription IDを指定します。
- <app-name> はグローバルで一意なので適当に設定してください。URLの一部になりますありがちな文字列だと重複してデプロイが失敗する可能性があります。
- F1(Azure App Service のフリープラン)の上限に達している場合は B1 にします。
- --location は今回 japaneast を指定(東日本リージョンを指定)
- --resource-group は Azure Cosmos DB を作ったリソースグループを指定します。(存在しない場合は作成されます)
- --plan はAzure App Service プランを指定します。(存在しない場合は作成されます)
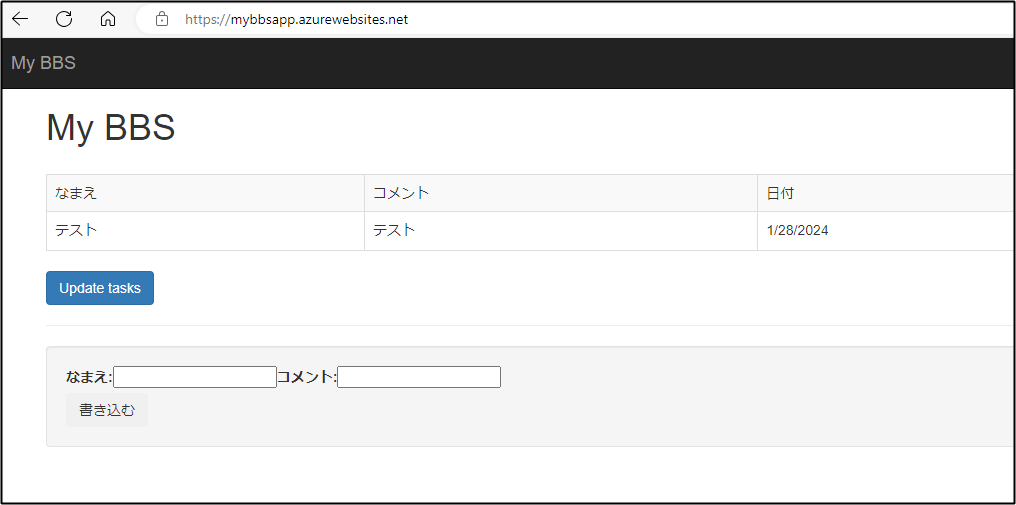
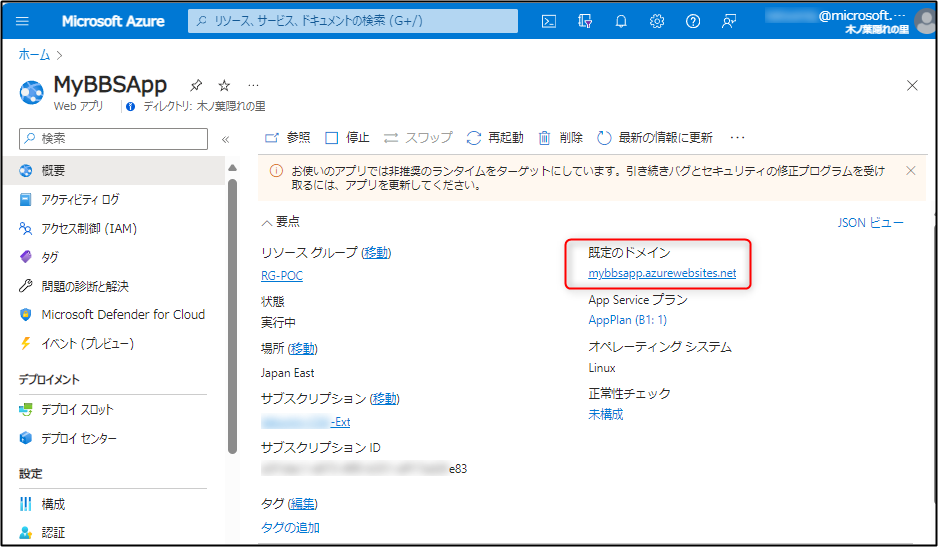
表示される URL にアクセスする。
無事デプロイできたことが確認できた。
- az webapp up に関するドキュメント
作成された Azure App Service リソースを確認する
最初に作った Azure Cosmos DB 以外に、今デプロイした App Service と App Service プラン が作成されていることが確認できます

SQL インジェクションの確認する
上記のようにパブリックなインターネットに公開して数日おいておきます。
運がいいと?悪いと?実際のSQLインジェクション攻撃を確認することができます。
SQL インジェクション攻撃
数日おいていたところ下記のような書き込みが多数きて無料の Azure App Service が止まっていました⚡⚡⚡
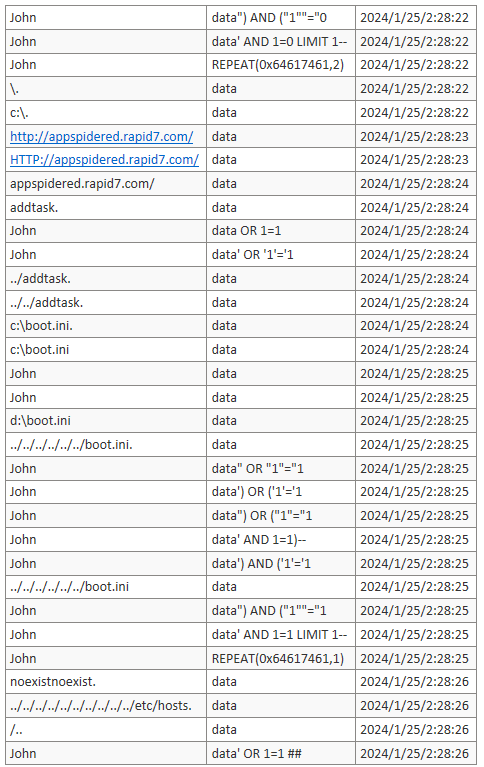
いつ来るかわかりませんが、放置してるとそのうち SQL インジェクション攻撃がくるかと思います。
SQL インジェクション攻撃を防ぐには?
この状態を改善するには大きく下記のようなアプローチが考えられます。
-
WAF (Web Application Firewall) を導入する
L7 レベルの FireWall を経由して Azure App Service へアクセスする。
Azure であれば、Azure Application Gateway や Azure Front Door があります。
パブリックなインターネットに公開するなら WAFは必須になるのではないかと思います。 -
パブリックなインターネットからのアクセスを防ぐ
Azure App Service は既定ではパブリックなインターネットからのアクセスが有効になっています。
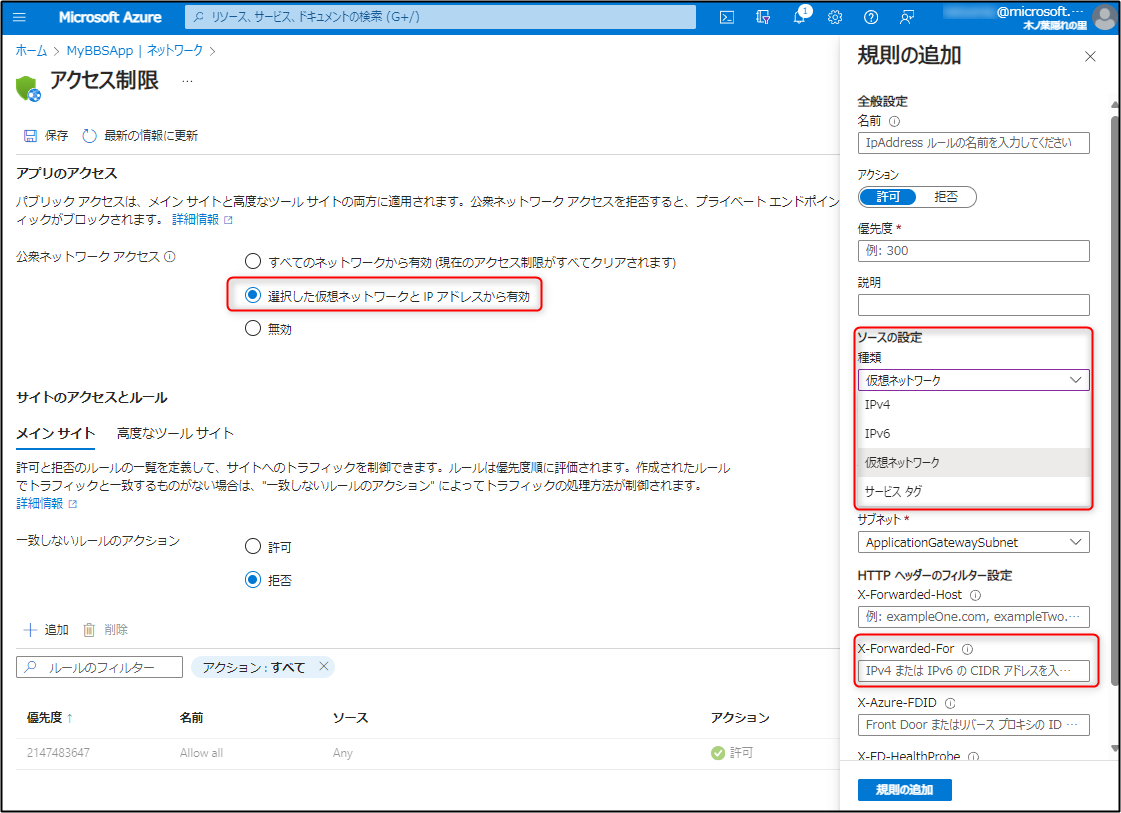
Azure App Service → ネットワーク → 受信トラフィックの構成 から設定を変更することでアクセス元を設定することができます。
特定の仮想 VNet からのアクセスに限定することや、特定のIPアドレスレンジ、XFF の指定などによってアクセス元を制限できます。(内部に悪意を持った人がいる場合には・・・・)
- 認証機能を追加する
アプリ側に認証を組み込んでもいいですが、Azure App Service には認証機能を簡単に組み込める機能があります。
次回は今回作った掲示板アプリに認証機能をつけてみたいと思います❣
→ Azure App Service に認証機能をつける話は下記記事をご覧ください。
参考
今回のハンズオンはこちらを参考にしました
Azure App Service に しばらく置いてアクセスすると遅い件


